Welcome to RennTech.org Community, Guest
There are many great features available to you once you register at RennTech.org
You are free to view posts here, but you must log in to reply to existing posts, or to start your own new topic. Like most online communities, there are costs involved to maintain a site like this - so we encourage our members to donate. All donations go to the costs operating and maintaining this site. We prefer that guests take part in our community and we offer a lot in return to those willing to join our corner of the Porsche world. This site is 99 percent member supported (less than 1 percent comes from advertising) - so please consider an annual donation to keep this site running.
Here are some of the features available - once you register at RennTech.org
- View Classified Ads
- DIY Tutorials
- Porsche TSB Listings (limited)
- VIN Decoder
- Special Offers
-
OBD II P-Codes - Paint Codes
- Registry
- Videos System
- View Reviews
- and get rid of this welcome message
It takes just a few minutes to register, and it's FREE
Contributing Members also get these additional benefits:
(you become a Contributing Member by donating money to the operation of this site)
- No ads - advertisements are removed
- Access the Contributors Only Forum
- Contributing Members Only Downloads
- Send attachments with PMs
- All image/file storage limits are substantially increased for all Contributing Members
- Option Codes Lookup
- VIN Option Lookups (limited)

X-UFO
-
Posts
42 -
Joined
-
Last visited
X-UFO's Achievements
Member (1/1)
1
Reputation
-
Mods to rear lid wiring loom to avoid spoiler alarm?
X-UFO replied to DaveCarrera4S's topic in 996 TT, 996 TT S, 996 GT2
Yes, that's how it works how you describe. If you want a down spoiler all the time (with no dash errors) you short out both microswitch pairs of wires (qty4 wires). If you want an always up spoiler (with no dash errors) you short out the top two microswitch wires together and leave the bottom wires either not connected to each other OR if the microsoft switch is still present leave them connected. The normal state of the unclicked microswitch is OPEN circuit. It took me a while to work it out. It's quite a simple thing. I was getting the dash error when going over 75mph and then dropping speed and it was annoyingly :eek: distracting and stayed on until the ignition was turned off. I'm not sure if 01 / 02 were different. -
Mods to rear lid wiring loom to avoid spoiler alarm?
X-UFO replied to DaveCarrera4S's topic in 996 TT, 996 TT S, 996 GT2
I did this (below) which I think I found somewhere on this site on my 2002 turbo when I fitted a larger wing and the fixed variable height rams (bought from the USA off ebay). I removed the pump. It worked perfectly for me and has worked for a long time since ........ It is the upper microswitch with the grey wire and black wire connected together. "This fix stopped my spoiler failure warning light from coming on. I have a 2002 turbo. I installed a fixed height stock spoiler kit after my right ram failed. This basically entails removing the hydraulic pump, pulling out the microswitches, gutting the rams and shimming the stock spoiler up with lengths of tubing placed inside the rams. It maintains the stock spoiler appearance at the raised height. I did not remove the spoiler dash switch. The spoiler warning dash light always activated above 75 mph and stayed lit until the car was turned off. This was getting tiresome. I used a quick splice connector to splice the black wire to the light grey wire going into one of the two microswiches that was attached to the right side ram. (IIRC this is the upper limit microswitch, as the wires to it off the harness is shorter. The other microswitch has a blue wire going to it. Problem solved. One could also close that switch or cut the two wires and splice them to achieve the same result. No more warning light now after numerous runs above 75mph. " -
Question about engine compartment cooling fan
X-UFO replied to up4speed's topic in 996 TT, 996 TT S, 996 GT2
The 996TT fan works all of the time as soon as the engine starts whether hot or cold. I have a 996TT after 5yrs of 996C2 ownership which was different. The engine compartment fan on other models only comes in when the engine compartment reaches a certain temperature. So, it's normal for it to be on all of the time on a 996TT. -
Daytime running lights for your 996
X-UFO replied to lex_gs's topic in DIY Articles - Carrera (996) - Mods
Looks great! As someone has already asked, did you end up running the wire under the dash, or did you find a 12V source in the trunk? I have a spare pair of the exact same lights the original poster used which are still in the box which are surplus to requirements. I'm in the UK, if anyone is interested then I'll take £25 incl postage (to the UK only). They are normally £29.95 + £3 p&p on ebay. PM Me for photos of them in the box etc or if you have any questions. Best wishes, Ian -
Thanks lex_gs I have double checked that today with the multimeter after reading your reply. PERFECT It's very easy to get to those connectors just behind the battery for an ignition switched 12V. As you say, after searching, it does seem that there are no other ignition switched 12V sources in the front. Cheers :thankyou:
-
Thanks CD for the reply, much appreciated. I was looking for a switched on with the ignition 12V, that thread is about an unswitched permanent 12V but the diagram is useful. Thanks
-
Has anyone had need to find an ignition switched 12V (low current draw) in the front luggage compartment area somewhere? If so, it would save me a lot of hassle if someone could tell me the best place to take 12V from. Thanks. 996C2 MY2001 manual coupe
-
Position of rear 911 badge
X-UFO replied to X-UFO's topic in 996 Series (Carrera, Carrera 4, Carrera 4S, Targa)
Thanks Loren. I forgot it was on the 40th anniversary model when searching. ;) -
I've done a search a few times and can't find anything. I seem to remember (a long time ago) seeing a diagram with measurements on where to place the 911 badge on the rear of a 996. My brother has bought a 99 996 C2 with a GT3 kit on and a GT3 badge on the rear. He's taken the GT3 badge off and has a black italic 911 to go in its place. Does anyone know of this diagram of the spacing etc etc? Thanks in advance.
-
Depending on how deep the marks are and if they've been created by the heat of the drill: You can do no harm by using some wet and dry 1500 fine or 2500 which is very fine. Something like SCRATCH-X (or T-CUT or PLASPOL) will help at the same time. Use the wet and dry with warm water to dip it in with a little Fairy Liquid in the water. Just try it on a small area a few inches square to let you see the results and to give you an idea of how long you need to rub in circular motions and how it is working. You will probably need to go at it for a while because those wet and dry grades are fine. Take the headlight out (two mins) and do it indoors. and away from the paintwork around it. I've used the above materials and method on cd's that have been very very badly scratched. NEVER use any machine always by hand. You can't just buy the plastic covers, they are glued to the rest of the headlight. You have to get the complete headlight.
-
116,500 miles and it happened.
X-UFO replied to Joel Pirela's topic in 996 Series (Carrera, Carrera 4, Carrera 4S, Targa)
Beautiful :D :D :D :D :D :D :D :D :D :D :D :D :D Interior tastefully done. -
Fun with Microfiber
X-UFO replied to Dwiggy's topic in 996 Series (Carrera, Carrera 4, Carrera 4S, Targa)
Very carefully... ;) It is a press fit. I had to a small mechanic's screw driver and spent about 15 minutes working it out around the edges as to not damage it. If you damage this part you are in trouble. D. Thanks D. I'll give it a try next weekend. -
Fun with Microfiber
X-UFO replied to Dwiggy's topic in 996 Series (Carrera, Carrera 4, Carrera 4S, Targa)
im diggin it! How did you get the curved piece off the shifter that's now covered in suede? I know the very top part with the gear numbers on is stuck on with glue but the rest of it going down the shifter? does that just pull off? -
Missing part on Rear Deck Lid?
X-UFO replied to ultramens's topic in 996 Series (Carrera, Carrera 4, Carrera 4S, Targa)
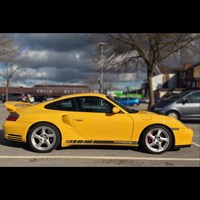
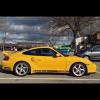
Speed Yellow THE best colour :D Ahhh, just realised after looking at my bootlid and thinking 'oops mine hasn't got that part anymore either' when I realised it looks different with the spoiler part raised or lowered using the switch in the drivers footwell. Spoiler raised: and with the spoiler lowered I think yours is a fixed spoiler. So yours will be like mine in the lower photo. In the lowered position so there is nothing in the way of the the air inlet apart from the fins in the spoiler lid itself. -
Missing part on Rear Deck Lid?
X-UFO replied to ultramens's topic in 996 Series (Carrera, Carrera 4, Carrera 4S, Targa)
Here's a photo of my 01 Carrera2 with the electric rear spoiler so you can see it for reference.
