Welcome to RennTech.org Community, Guest
There are many great features available to you once you register at RennTech.org
You are free to view posts here, but you must log in to reply to existing posts, or to start your own new topic. Like most online communities, there are costs involved to maintain a site like this - so we encourage our members to donate. All donations go to the costs operating and maintaining this site. We prefer that guests take part in our community and we offer a lot in return to those willing to join our corner of the Porsche world. This site is 99 percent member supported (less than 1 percent comes from advertising) - so please consider an annual donation to keep this site running.
Here are some of the features available - once you register at RennTech.org
- View Classified Ads
- DIY Tutorials
- Porsche TSB Listings (limited)
- VIN Decoder
- Special Offers
-
OBD II P-Codes - Paint Codes
- Registry
- Videos System
- View Reviews
- and get rid of this welcome message
It takes just a few minutes to register, and it's FREE
Contributing Members also get these additional benefits:
(you become a Contributing Member by donating money to the operation of this site)
- No ads - advertisements are removed
- Access the Contributors Only Forum
- Contributing Members Only Downloads
- Send attachments with PMs
- All image/file storage limits are substantially increased for all Contributing Members
- Option Codes Lookup
- VIN Option Lookups (limited)


frisbee91
-
Posts
47 -
Joined
-
Last visited
About frisbee91

frisbee91's Achievements
Member (1/1)
8
Reputation
-
Update: Factory-looking replica displays are available from 914Rubber.com This is the same type of kit as above, but the display looks just like the factory display (with "Manuell") I replaced my Audi-type display with the replica from 914Rubber. If you want the original factory look. I'd highly recommend this... http://shop.914rubber.com/LCD-Products_c23.htm;jsessionid=1B770B793724893919AD408A881738A8.m1plqscsfapp06
-
I did my switch today. Got the part from Pelican, and it was a direct exact replacement. I did NOT take off the side vent, just removed vent connector duct (part "A" in the DIY), and used a very short flat head driver bit to remove the set screws.(see pic) I'm small and flexible, so it wasn't too hard. Maybe 20 minutes total. The small flat head driver made it possible. I was able to unscrew the setscrews using only the driver held between my thumb and finger.
-
Water Pump Replacement
frisbee91 replied to Loren's topic in DIY Articles - Carrera (996) - Common Fixes and Repairs
I'm getting ready to change the water pump on my '99 996 C2, and the coolant hose that connects to the pump is looking pretty old (now that the car is 13+ years old). Are there any other coolant hoses I should be changing while I have the coolant drained? The Porsche parts catalog is pretty confusing when referencing the coolant hoses in the car. If you have any part numbers to suggest, that would be great as well. Thanks. -
This is just a guess, but perhaps the rack-and-pinion system is not fully actuating for some reason. As the motor actuates, the rear latch disengages in the first inch of stroke or so. It's probably worth inspecting either way when you get a chance. It's never good to get stuck with your top down.
-
I have a good understanding of how this system works, but I'm not clear on your issue. Is the entire clamshell moving, or does it remain locked in position? There are three latches that hod down the clamshell when it is fully closed. The one in the center rear (under the center brake light) is operated by an independant cable connected to the rack-and-pinon gearbox & motor that operates the clamshell. The left and right are more complicated. The left and right latches are operated by a pushrod connected to the slider-actuators that actually move the clamshell. The slider-actuators are in turn operated by cables from the gearbox & motor for the clamshell. There are more possiblities for problems with these. If you have an more details or pictures, I'll try to help. Might even have parts leftover from when I repaired mine earlier this year.
-
Post a pic of what it looks like without the faceplate. Then, we can determine what model it is. What year is your car? Alternatively, you can slide out the radio (you need two removal "keys" that cost about $2) and get the radio model number. I have an extra faceplate (for a CR-220) that has partially non-working display, but at least the radio will work. You could also contact BeckerAutoSound. The sell entire radios, and perhaps a faceplate. Probably not cheap. They might have the CD changer cartridge too. Finally, you could just buy an aftermarket radio.
-
I've posted this before, but this is my favorite shot.

-
Do you have photos of the stitching? I'm a bit afraid to go that route without seeing how it might look. The original window did not have stitching, so you can't just match the stitching holes. I used a piece of masking tape with marks every 3/16", and located the stitch line 1/4" from the edge of the plastic window. I don't have any current pictures of the window, but I could take another one later this week. There is a close up photo of the stitching in the pdf.
-
I believe the last microswitch in the closing sequence is the one on the top of the Lid Drive Motor. This is shown on the last page of the PDF. You should be able to visually verify that the switch is being depressed by the latch sliding mechanism when the top is up and the lid is closed. (must remove the rear carpet first). The potentiometer is mounted to the back side of this motor. You can get a ohm value from it by pulling the cable from the cabrio control unit, and measuring the pot. with a meter. When I had issues with the lid mechanism, I found that the cable that drives the lid up and down was binding, preventing the lid from fully latching, and preventing the microswitch activation. I had to replace the lid drive mechanism.
-
2001 cab convertible top issue
frisbee91 replied to Murph44's topic in 996 Series (Carrera, Carrera 4, Carrera 4S, Targa)
I wouldn't weld that piece on. I believe it is meant to be a separate piece. It slides up and down while the rack and pinion system moves. Post some pictures, so I can be sure we are talking about the same thing. Here's some troubleshooting advice: Remove the rear lid by removing 4 bolts on the underside of the lid (using a 10mm socket) and unclipping the rear brakelight wire. Set the lid aside. Then, with the gearbox motor apart, you can actuate the hinge and hook on each side by pushing/pulling the cable that attaches to the rack gear. By doing this, you can check for binding in the right and left side cable and hinge mechanism. For me, the left side was binding, causing damage to the cable and hinge. I ended up buying a whole new assembly. Depending on what's wrong with yours, I might have parts you can use. -
996 Cabriolet roof
frisbee91 replied to gazzer1's topic in 996 Series (Carrera, Carrera 4, Carrera 4S, Targa)
I'd suspect that recalibration is needed. When I took mine apart recently (same issue - damaged cable), I was always very careful to re-install the drive motor with the top and clamshell in the EXACT SAME position every time, so that nothing would get out of sync. -
I painted mine with at $20 kit from pep boys. It was a "Duplicolor" red caliper paint kit that included the caliper cleaner and enough paint to do several coats on all four calipers. The kit comes with a crappy brush, but I bought a new brush that made the job easier. http://forums.rennlist.com/rennforums/996-forum/254971-weekend-mod-red-calipers-pics.html I got the Porsche lettering decals on ebay, and added some clearcoat over them for protection.
-
2001 cab convertible top issue
frisbee91 replied to Murph44's topic in 996 Series (Carrera, Carrera 4, Carrera 4S, Targa)
I'm in the middle of dealing with an issue like this right now. For me, the reason the microswitch for the rear "hook" cable was not engaging was because the gear that drives it is shared with the left side clamshell cover hinge drive cable. The cable was binding, along with the drive mechanism slider for the left side hinge. I'm still not sure of the root cause, but ultimately, the left side cable is damaged internally, and the slider is out of alignment. Haven't fixed it yet, but I'm working on it. PM me if you want some more ideas to check. I have some pictures to share and write up once I finally fix it. Warning: the parts aren't cheap.- 5 replies
-
- 1
-

-
- convertible
- calibrate
- (and 2 more)
-
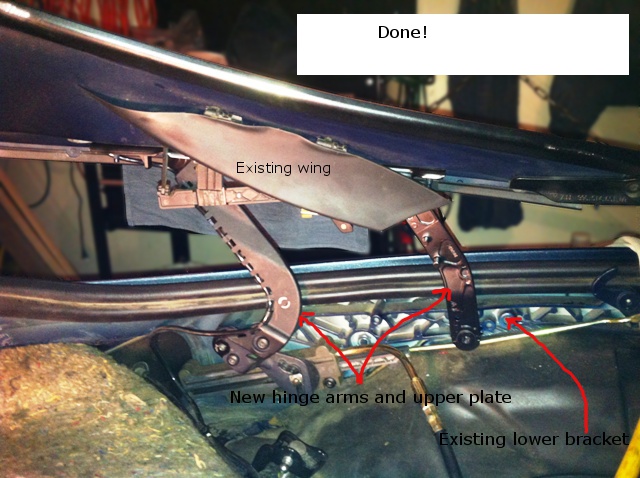
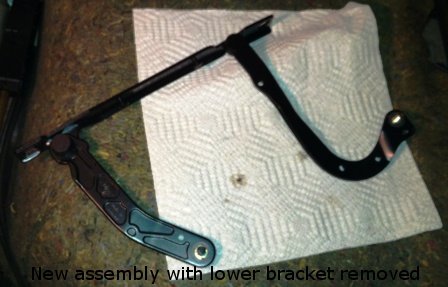
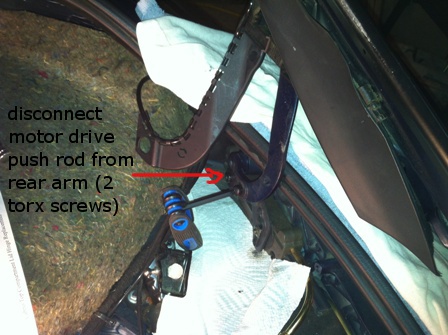
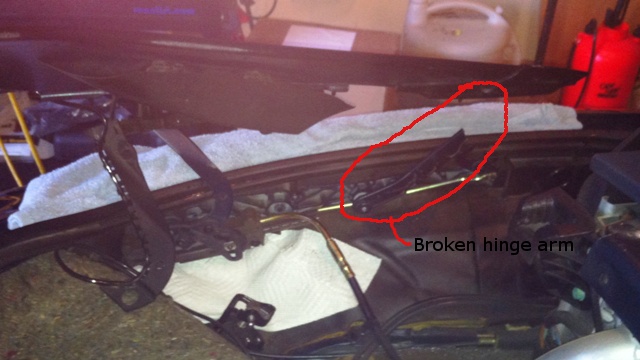
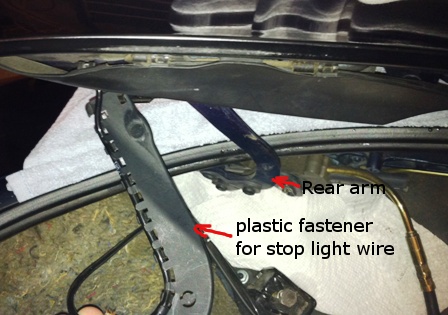
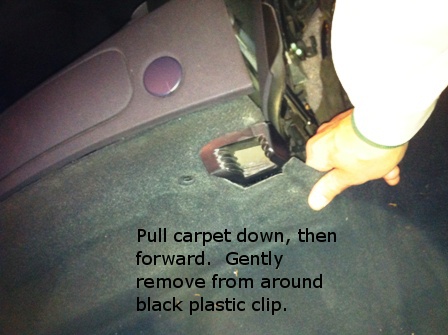
Just a follow up. I did end up buying the whole assembly Part# 996-561-907-02 for $169 from Sunset. However, to simplify installation, separated the assembly at the pivot points by removing the two hex bolts. I only installed the upper portion, leaving the lower bracket in place: Other than that, I followed the DIY, which helped. Here are a few pictures of the job. The hardest part for me was removing the plastic "wing" which was very tight and difficult to remove, but it eventually came off. See the pics below. Removing carpet: Broken hinge arm: Upper hinge assembly removal: Wing removal: Completed job (I used a bit of loctite on the pivot hex bolts, just to be sure they don't rotate out) After completing this, I found that the slider mechanism that moves the cabrio deck lid was also not functioning properly. I'm working on this one, and hope to post back if I have any luck with it. BTW, the deck lid is not driven by the hydraulic system. There is a separate motor and gear system which drive cables to move and lock deck lid via a pair of sliders.
-
I had a similar situation recently. I had an old CR220 radio with peeling buttons. I also had another CR220 with a bad LCD display. I dissassembled both, took the good parts, and built one good working faceplate. Interesting note: The bad LCD display in the CR220 was caused by the circuit board inside the faceplate housing. By swapping LCD's, zebra connectors, and circuit boards, I was able to deduce that only the circuit board was bad. (I cleaned all connections, so it wasn't from dirty connectors) Before: After: Note that I repaired my climate control display at the same time using this DIY.