Welcome to RennTech.org Community, Guest
There are many great features available to you once you register at RennTech.org
You are free to view posts here, but you must log in to reply to existing posts, or to start your own new topic. Like most online communities, there are costs involved to maintain a site like this - so we encourage our members to donate. All donations go to the costs operating and maintaining this site. We prefer that guests take part in our community and we offer a lot in return to those willing to join our corner of the Porsche world. This site is 99 percent member supported (less than 1 percent comes from advertising) - so please consider an annual donation to keep this site running.
Here are some of the features available - once you register at RennTech.org
- View Classified Ads
- DIY Tutorials
- Porsche TSB Listings (limited)
- VIN Decoder
- Special Offers
-
OBD II P-Codes - Paint Codes
- Registry
- Videos System
- View Reviews
- and get rid of this welcome message
It takes just a few minutes to register, and it's FREE
Contributing Members also get these additional benefits:
(you become a Contributing Member by donating money to the operation of this site)
- No ads - advertisements are removed
- Access the Contributors Only Forum
- Contributing Members Only Downloads
- Send attachments with PMs
- All image/file storage limits are substantially increased for all Contributing Members
- Option Codes Lookup
- VIN Option Lookups (limited)
Leaderboard


Popular Content
Showing content with the highest reputation on 10/05/2015 in all areas
-
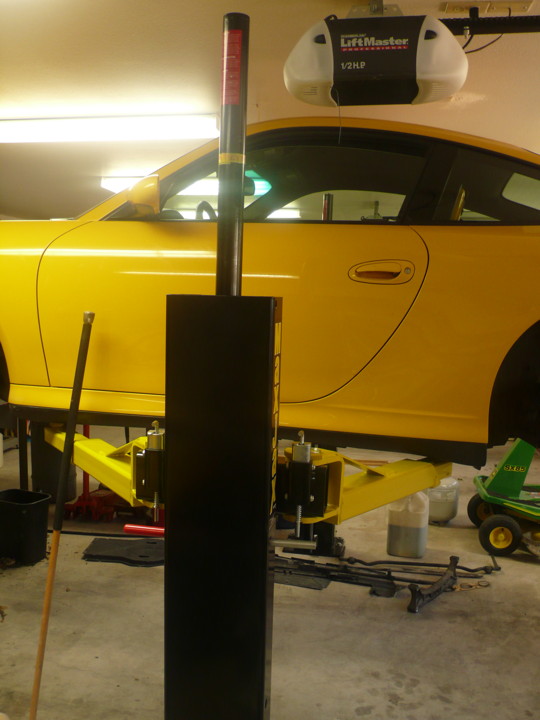
The MaxJax has 5 large bolts that screw into permanent anchors in the floor. As long as you have a 4" slab you're good to go. The feature is that you can remove the bolts and wheel the post out of the way when not in use. The post has wheels so it can be moved around without much effort. However I've never moved mine. I just park a little to the rear of the garage so the doors can swing full open without hitting the post. The install is pretty easy, you'll need a rotorhammer for drilling holes in the concrete. I've had my car up and down so many times I couldn't even count. It's great for cleaning wheels, oil changes, removing the belly pans, etc. I'll take more pixs and post. Also the MaxJax dealer was really helpful, I had the need to replace some parts and they sent it out without any questions. Nice people... If anyone ends up installing this lift I can give you some good advise on the install, I came up with some short cuts on the install. If you enjoy working on your car $2,000 for a $30,000 plus car isn't a deal breaker. I wouldn't leave home without it... I'm not a paid employee, but just a happy customer... :-)1 point
-
I finally bit the bullet and bought a MaxJax 2 post lift that fits under my 8' garage ceiling. I sit on a BoneTail rolling chair and scoot around under the car. The MaxJax lift is good for 6,000 lbs so I feel safe and I don't have to worry about getting a jack under the car and having to rely on jack stands. I appreciate the cost of the lift is signficant, but your life is too. I bought my MaxJax lift from Costco on sale, $1,900, free delivery. You might ralionalize the cost by saving a couple hundred dollars an oil change at the dealer, plus have a lot more fun working on your car.
 1 point
 -
Finally got around to doing the front wheel bearings on my 1999 Boxster. I bought the SIR Tools B-90 P2 kit. $259.00 Bearing seperator from China Freight $29.99 (ON Sale) Craftsman 32mm large socket. $11.99 4 foot bar extension or pipe. (Home Depot $10) Bearings from, I can't remember but a while back. $30ea Jack Stands Jack Important Anti Seize Compound $8.99 (NAPA) Large wrench set. Sears $59.99 (I kinda went overboard on the wrenches. They had them on sale and even thought Craftsman is a lot more than China freight they treat their employees well, i think they are made in the USA and we need to support American companies, my .o2) Various other tools sockets, punch, spring compressor etc...You will see as i go along. So first off is to open the front trunk and get out two tools. The wheel lock key and the wheel post. Start off with taking the center cap off the wheel while it is still on the ground. Take the 32 mm socket and loosen the big center bolt. You will need to use a large ratchet, small extension and stick the home depot bar on the end. Be careful to use a quality ratchet or it might break and you will be doing some paint work later. I had taken the steel bar and pounded it into an oval shape so it would fit overtop of the ratchet. This bolt is tight so make sure you have the parking brake on. Next loosen the wheel bolts and jack the car up. Take out one bolt then put the alloy peg in one of the holes. This helps line everything up and keep the wheel from falling onto your nice painted caliper. You should have the wheel off and put somewhere out of the way...You won't be needing that anymore...At least for a while. On the front of the rotor there are two phillops screws. I like to remove them now as the brake pads are holding the rotor from spinning. You may need a special tool to get these out if they are stuck. Just be careful not to strip them.1 point