Welcome to RennTech.org Community, Guest
There are many great features available to you once you register at RennTech.org
You are free to view posts here, but you must log in to reply to existing posts, or to start your own new topic. Like most online communities, there are costs involved to maintain a site like this - so we encourage our members to donate. All donations go to the costs operating and maintaining this site. We prefer that guests take part in our community and we offer a lot in return to those willing to join our corner of the Porsche world. This site is 99 percent member supported (less than 1 percent comes from advertising) - so please consider an annual donation to keep this site running.
Here are some of the features available - once you register at RennTech.org
- View Classified Ads
- DIY Tutorials
- Porsche TSB Listings (limited)
- VIN Decoder
- Special Offers
-
OBD II P-Codes - Paint Codes
- Registry
- Videos System
- View Reviews
- and get rid of this welcome message
It takes just a few minutes to register, and it's FREE
Contributing Members also get these additional benefits:
(you become a Contributing Member by donating money to the operation of this site)
- No ads - advertisements are removed
- Access the Contributors Only Forum
- Contributing Members Only Downloads
- Send attachments with PMs
- All image/file storage limits are substantially increased for all Contributing Members
- Option Codes Lookup
- VIN Option Lookups (limited)
Leaderboard
-0001-0001.thumb.png.17f5bb25bf8ec261a17c21e6321c8492.png)

Popular Content
Showing content with the highest reputation on 03/25/2017 in all areas
-
So after an extended conversation with the indy and data mining in his system, call to a dealership head mechanic who, in turn had a conversation with another mechanic we have concluded that the next course of action is to replace the replaced HP pump. Seems to be a regulator type problem and the reg is integral to the pump. Luckily the pump I have has a 1 year warranty and it's only been 9 months or so. Hopefully in a week or so I should have everything to get the next step done. Maybe the last step?1 point
-
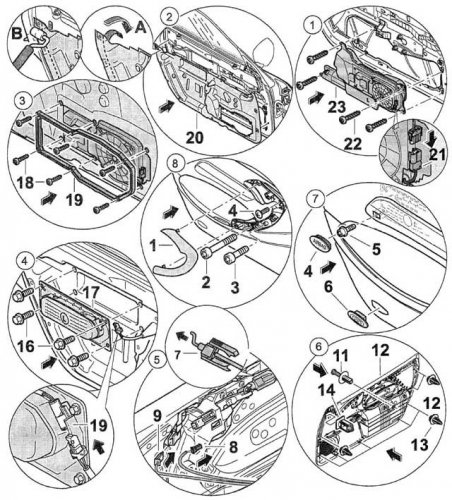 Note: Part numbers sometimes change without notice. Always double check with your supplier that you have the latest part numbers. Tools you will need: 10 mm socket or wrench Small narrow regular screwdriver Phillips screwdriver 4 mm hex allen socket or 4 mm allen wrench Door Panel Removal Note: If you are just going after the speaker enclosures you may not need to do all the items here (i.e. door handle mechanism). Just remove the minimum and carefully lean the door panel to the side. Warning: Airbag could inflate. Danger of injury or damage during removal/install! 1. Remove ignition key. 2. Disconnect and cover the negative terminal of the battery. 3. After the battery is disconnected, assembly work or work on the vehicle may be started after a waiting period of 1 minute. Caution: Damage may occur if the bowden cable is bent at the hook. The hook of the bowden cable is pressed into the end piece of the cover for protection during transport and assembly. Pull the hook out of the end piece only after installation in the inner door release (see below). Remove (1) cover - Use a plastic spatula to release the clipped connection out of the door handle on all sides. Remove fastening screws 2, 3, 4. Remove (2) plastic cover (airbag) - Press the cover out with a narrow screwdriver 5. Remove the fastening screw 6 seated below it. Press light 7 out of the door trim panel using a plastic spatula 10. Disconnect (pull off) electrical plug connection. Disconnect (3) the bowden cable (arrow B ) and electrical plug connection - Disconnect electrical plug connection from the microswitch for the door handle 9 and orientation lighting 10. Press lugs of the plastic clip (arrow A) and pull out towards the rear. Carefully push the bowden cable 8 back into the end piece of the sleeve (arrow B ). Remove (4) door trim panel - Take expanding nut out of the door trim panel. Unclip door trim panel out of the door on all sides and lift up and off. Clips 13 and 14 must be replaced for assembly (according to the manual). Remove (5) airbag - Disconnect electrical plug connection 15. Remove the fastening screws 16 out of the side airbag and remove. Removing (6) frame - Remove fastening screws 18 from the frame 19. Remove (7) door film (only if needed)- Pull off carefully on all sides. Removing (8) sound enclosure (if present) - Disconnect electrical plug connection from the sound enclosure 21. Remove the fastening screws 22 on the sound enclosure 23. ------------------------------------------------------------------------------------------------------------------------------ Door Panel Install Caution: Water may enter at the door film! Door films which have been completely removed or torn must always be replaced. In the case of door films which have become partly detached at the top and side, the detached films must be reattached using a butyl sealing cord. Install (1) sound enclosure - Position sound enclosure 23 in the door. Screw on the sound enclosure with the fastening screws 22. Connect electrical connection 21. Install (2) the door film (if needed) - Peel off the protective film -A- on the door film and position on the door. Using a roller 8, press on the door film on all sides 20. Install (3) frame - Position the frame 19 on the sound enclosure. Make sure that the door film cut-out is positioned correctly on the sound enclosure. Screw in the fastening screws 18 and tighten. Install (4) side airbag - Position side airbag 17 on the door and tighten fastening screws 16 (7.5 ft-lb). The fastening screws 16 must be replaced each time they are removed (according to the manual). Engage (5) the bowden cable B. Connect electrical plug connection - Engage bowden cable B 7 in the door handle. Pull the hook out of the end piece of the sleeve only after installation in the door handle. Clip plastic clip into the door handle. Connect electrical plug connections 8, 9. Install (6) door trim panel - The clips 13, 14 must be replaced every time the door trim panel is removed (according to the manual). Position the door trim panel on the door and clip it in. (7) Position fastening screws 5 in the door trim panel and tighten (4.5 ft-lb). Press in plastic cover. Make sure the logo reads correctly. Install (8) the cover - Screw in the fastening screws 2, 3, 4 and tighten. Clip in the cover 1 on the door handle.1 point