Welcome to RennTech.org Community, Guest
There are many great features available to you once you register at RennTech.org
You are free to view posts here, but you must log in to reply to existing posts, or to start your own new topic. Like most online communities, there are costs involved to maintain a site like this - so we encourage our members to donate. All donations go to the costs operating and maintaining this site. We prefer that guests take part in our community and we offer a lot in return to those willing to join our corner of the Porsche world. This site is 99 percent member supported (less than 1 percent comes from advertising) - so please consider an annual donation to keep this site running.
Here are some of the features available - once you register at RennTech.org
- View Classified Ads
- DIY Tutorials
- Porsche TSB Listings (limited)
- VIN Decoder
- Special Offers
-
OBD II P-Codes - Paint Codes
- Registry
- Videos System
- View Reviews
- and get rid of this welcome message
It takes just a few minutes to register, and it's FREE
Contributing Members also get these additional benefits:
(you become a Contributing Member by donating money to the operation of this site)
- No ads - advertisements are removed
- Access the Contributors Only Forum
- Contributing Members Only Downloads
- Send attachments with PMs
- All image/file storage limits are substantially increased for all Contributing Members
- Option Codes Lookup
- VIN Option Lookups (limited)
Leaderboard

-0001-0001.thumb.png.17f5bb25bf8ec261a17c21e6321c8492.png)


Popular Content
Showing content with the highest reputation on 01/30/2019 in all areas
-
Gibbs DT40, and full synthetic 5W-40 oil that still has a very high ZDDP level and excellent film strength. Your "emissions system" can be replaced in the driveway with hand tools, cylinder liners not so much...……...1 point
-
A recall is for an issue with the potential to cause injury or death to the driver, passengers or surrounding people. Manufacturers look at recalls as a black eye. If they get serious ones like the Chevy ignition switch, you know there will be people lining up with personal injury attorneys waiting for their chance to sue Porsche for real, or imagined injuries. A recall is a last resource for a manufacturer. Some manufacturers - when faced with a potential recall will setup a "service campaign" where they fix the problem when a vehicle arrives in their shop. That's generally done at their expense (usually billing back part or all of the cost to the OE manufacturer who supplied them with the failing component, if they didn't build it themselves.) Toyota/Lexus love to do this - it's why my wife's Lexus gets dealer oil changes - there is almost always some issue that is addressed for free while the car is there getting the oil changed. NHTSA is where "recalls" in the USA come from. They have a website. There are forms on the website for reporting issues that have caused injury/death, or you feel have the potential to cause injury or death. If enough people make identical complaints about an issue - the issue will usually percolate up to the actual human employees of NHTSA who are in charge of investigating the reports. An example of this process working would be the "Camshaft-Controller-Recall" (Porsche's name for it.. I'd call it a Variocam recall..) In threads discussing this problem on several forums, instructions were given on how the reporting process works - and how to most effectively report an issue (several things have to be identical in order to build up the "mass" of reports that will trigger an investigation.) People did report the issue to NHTSA (not just complain on the forum) - and there were some very credible reports of close calls for serious injury since the failure could result in a vehicle with no brakes, power steering barreling down a freeway. The mass of reports was enough to catch the eye of a defect investigator, who then reached out to a few people asking for additional information. The information supplied to them was copies of recalls that Porsche had issued in other countries for the identical problem. At that point Porsche was notified of the investigation, and apparently felt it might be best to be pro-active in it - and they voluntarily issued a recall. Whew... so that's what has to be done if you expect a recall to happen. Some manufacturers avoid recalls by offering buyers an extended warranty on the part in question (BMW loves this - they've given out 100k engine guarantees on multiple engines any number of times - to avoid a recall.) The highest number I've seen on these extended warranties is typically 100k miles. BMW-Motorad (motorcycle side) has an extended warranty in place for 12 years, unlimited miles for a fuel gauge sender that regularly fails - and people run out of fuel on their motorcycle in risky conditions. That was done in response to a similar campaign that was coordinated on a BMW motorcycle club forum I'm a moderator/member of. NHTSA expressed interest in it (other manufacturers, both bike and car - have had recalls for similar failures.) BMW extended the warranty. So far - I've had about 10-11 of the fuel senders fail and replaced at no cost to me. I'd be much happier if they'd simply solve the problem though. So one other thing - a recall is only really a solution IF the manufacturer has devised a way to solve the problem. In the case of the transfer case - it's not clear that they have. This went on a bit longer than I thought it might when I started it. If it gives anyone ideas - I'd be happy to discuss the NHTSA process off-line with you. DISCLAIMER: I have nothing to do with NHTSA. The above ramblings may well be the spurious thoughts of a madman - or not. Use at your own risk. YMMV. LSMFT. I did stay in a Holiday Inn Express this past week though.1 point
-
Eureka! I suppose during the time you guys were typing, I was arriving at the same conclusion. I pulled the latch mechanism out and examined it up-close. The tension spring was out of a pocket on the latch and not providing any push when the latch was released. Hence, the hood could be pulled up out of 'battery' but would not pop up on its own. I disassembled the mechanism, lubed it, and re-inserted the spring into the latch. Put it back together and now all is well. Very simple to do. This is how I did it and you may find it useful. Do so at your own risk, yada yada yada. 1st, open the hood and peel back the carpet cover just inside of the latch. Next, using a flat-head screwdriver, remove the four plastic 'screws' holding the trim plate between the bumper and the hood flange. They merely turn 90 degrees (so that they are perpendicular to the car's direction of travel) and pop out. Then remove the trim piece and place to the side. Next, using a ten millimeter socket, remove the two bolts securing the latch to the car. They are located just inside the trunk under the carpet you just peeled back. Once they are removed, the latch is now only held in place by two metal cables and the alarm pin switch wires. Carefully unplug the alarm wires. Push in on a small 'latch' on the lower half of the plug and pull out the lower half. Then carefully rotate the upper half about 45 degrees (it should be fairly easy to move, don't force it) and the plug will pop out of the metal holder. Then use a small screwdriver to gently push a release clip on the plastic mounting point. This will allow the small plastic mount to separate from the wiring plug. Now you need to gently remove the cables from their sockets. Take the tension off of the upper cable and gently pull the cable up out of its socket. Then remove the lower cable in the same way. The only thing holding the latch in the car now is the alarm wiring harness. Push the rubber grommet through the body toward the bumper. You can then pull the wiring through and the entire latch will come out of the car. Be sure to set the stainless steel shroud to the side. It was not attached on my car but may be on yours. Now that you have the latch out of the car, you can see the large diameter steel spring that is wound around the large post to the passenger side of the latch. That is the culprit. The small plastic shroud over it pulled straight out and off of my latch. This is the microswitch that tells the alarm that the trunk is open or closed. Set it to the side. You should now see the latch mechanism and the hole that the spring needs to be in to function properly. I used two screwdrivers to push the other end of the spring (the end on the release / catch mechanism ) over the catch. This allowed me to push the end into the latch more easily. I then popped the spring back over the catch. Now there should be tension on both the latch and the catch. Lubricate with white lithium grease, or some other semi-solid lubricant and work the mechanism to ensure that it is functioning properly. Once you have confirmed proper function, reassemble in reverse order (i.e. put the alarm switch back on - it should snap right back in place ), pop the cable back on, thread the wiring through and secure the grommet in place, place the stainless shroud on, insert the bolts and loosely tighten things. Once the bolts are in, line up the hood and the latch mechanism and tighten down the latch. Replace the plastic bumper/body trim piece but don't insert the 'screws' until you've tested the hood a couple times. Once it is clear that the hood is functioning properly, secure the trim, replace the carpet and smile at a job well done, for free. If I can figure out how to transfer my pictures out of my camera phone I'll add some illustration to this. Hope this helps. I was frustrated as *)*^*( until y'all help me realize what the problem was. Pictures ...1 point
-
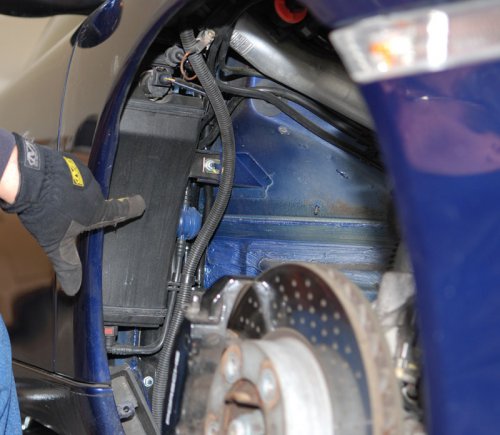 Note: Part numbers sometimes change without notice. Always double check with your supplier that you have the latest part numbers. (Special thanks to Chuck Jones for being the guinea pig and for taking the photos.) Parts you will need: 997.624.113.00 Actuator Tools you will need: Very short Torx T20 driver and right angle ratchet or tool to use the short T20 in a very confined space Regular screwdriver, phillips screw driver, and 10 mm wrench to remove th wheel well liner 1. Jack the car so that right front wheel is off the ground and secure it with a jack stand. Remove the right front wheel. 2. Remove the wheel well liner by removing the the plastics rivets (pry them out with a regular screwdriver). As well remove the 10 mm nuts on each side of the axle. Now remove the phillips screws that fasten the wheel well liner under the front bumper and remove the wheel well liner (and set aside). 3. Locate the EVAP canister and remove the electrical connection at the top of the canister. Now remove the 10 mm nut that holds the canister in place. Remove gas the vapor lines - one at the top and one at the bottom (again by squeezing the connectors). Remove the EVAP canister by pulling gently back and forth until it releases from the rubber gromments 4. Look back up under the fender (now that the canister is out of the way) and locate the broken actuator. Now using the stubby Torx T-20 loose (but do not remove) the two T-20 screws. The actuator itself is a bit tough to get to and you will need a really short T-20 Torx head to loosen the two screws. I say loosen because that is all you need to do to remove the part - it sits in two "U" shaped slots. Remove the electrical connector (by squeezing the tab). Here is a pic of the new part - as you see the Torx screws are already in place so that is all you have to do to replace it. 5. Put the new part in place making sure you feed the emergency pull line through the fender to its location in the door jam. There is room to slide it through the side so you don't need to try and thread it through the hole. Fasten the two Torx screws and reconnect the electrical connector. Chuck's car had the guide rose guide piece missing (so he needed to order one) Here is a pic of his car (without guide rose) and my car (with guide rose). Ref. P/N 997.624.505.00 We also noticed that on his car the plastic catch for the lock was missing (so he needed to order that too). Here is a pic of his car (without cap) and my car (with cap). Ref. P/N 996.201.243.00 6. Reinstall the EVAP canister by pushing it into place on the rubber gromments. Then reattach the vapor lines (they should snap back into place) and the electrical connection. Finally put the 10 mm nut back in place and tighten down. 7. Reinstall the wheel well liner (reverse of removal). 8. Mount the tire, lower the car and re-torque the wheel bolts. Done.1 point