Welcome to RennTech.org Community, Guest
There are many great features available to you once you register at RennTech.org
You are free to view posts here, but you must log in to reply to existing posts, or to start your own new topic. Like most online communities, there are costs involved to maintain a site like this - so we encourage our members to donate. All donations go to the costs operating and maintaining this site. We prefer that guests take part in our community and we offer a lot in return to those willing to join our corner of the Porsche world. This site is 99 percent member supported (less than 1 percent comes from advertising) - so please consider an annual donation to keep this site running.
Here are some of the features available - once you register at RennTech.org
- View Classified Ads
- DIY Tutorials
- Porsche TSB Listings (limited)
- VIN Decoder
- Special Offers
-
OBD II P-Codes - Paint Codes
- Registry
- Videos System
- View Reviews
- and get rid of this welcome message
It takes just a few minutes to register, and it's FREE
Contributing Members also get these additional benefits:
(you become a Contributing Member by donating money to the operation of this site)
- No ads - advertisements are removed
- Access the Contributors Only Forum
- Contributing Members Only Downloads
- Send attachments with PMs
- All image/file storage limits are substantially increased for all Contributing Members
- Option Codes Lookup
- VIN Option Lookups (limited)


Morissey
-
Posts
30 -
Joined
-
Last visited
Morissey's Achievements
Member (1/1)
0
Reputation
-
Rough idle, loss of power on accelleration, IMS?
Morissey replied to BrianH's topic in 986 Series (Boxster, Boxster S)
Ah got you. Yes, I thoroughly sprayed the walls and the cavity at the crown with cleaner and rinsed out. -
Rough idle, loss of power on accelleration, IMS?
Morissey replied to BrianH's topic in 986 Series (Boxster, Boxster S)
I have rebuilt the heads, so no chance of that :) Thanks! -
Rough idle, loss of power on accelleration, IMS?
Morissey replied to BrianH's topic in 986 Series (Boxster, Boxster S)
You were absolutely correct. The cat is the where the debris came from. Shook the header and some more pieces came out. Turns out the rock I rolled over last year had put a good gash on the unit and it had been waiting to get into the head. Searching for a good used cat to replace.... Thanks! -
Cranks but no start -Misfire
Morissey replied to Schnell Gelb's topic in 986 Series (Boxster, Boxster S)
Ahsai - What exactly is the TDC whistle test? -
Rough idle, loss of power on accelleration, IMS?
Morissey replied to BrianH's topic in 986 Series (Boxster, Boxster S)
Hmmm... I did mark the timing location of the bolts on exhaust cams prior to disassembly. So I put everything back on including the original tensioners and the marks did not line up on either bank while allocating the cams using the timing tool. I have to move the crank off TDC for the marks to line up, thus misaligning the cam notches relative to the cam cover. The misalignment is identical on both banks, and I am sure the chain did not skip and both sprockets were held in original position on the chain the entire time. I did replace the chain guides on both cams and wonder if that has caused the discrepancy. What are your thoughts on this? Should I button the engine back up aligned to original marked position? -
Rough idle, loss of power on accelleration, IMS?
Morissey replied to BrianH's topic in 986 Series (Boxster, Boxster S)
Thanks for the response and confirmation that item B is not essential. In addition, I am replacing all tensioners with new ones so pumping them with oil should do the job well enough. -
Rough idle, loss of power on accelleration, IMS?
Morissey replied to BrianH's topic in 986 Series (Boxster, Boxster S)
Excellent point. I will do that. Thanks -
Rough idle, loss of power on accelleration, IMS?
Morissey replied to BrianH's topic in 986 Series (Boxster, Boxster S)
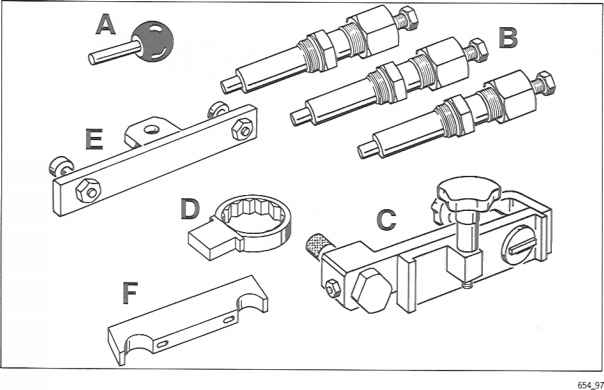
Hi, I am back. Heads and cams reassembly is complete and ready to time the engine. I have the timing tool, but do I need the Porsche tensioning tools as well? I have read mixed conflicting views on the topic. The shop manual clearly requires them in the procedure. 1. Do I absolutely need these to get the timing right? Item B in image below 2. Is there a hack or trick to avoid this tool? I have read pumping the stock tensioners in oil would set the correct pressure...not sure about that 3. Does anyone have a set they care to rent? I have searched and realized they are not readily available for purchase or rent. Any insight/help would be much appreciated.
-
Rough idle, loss of power on accelleration, IMS?
Morissey replied to BrianH's topic in 986 Series (Boxster, Boxster S)
Oh, does not seem to be magnetic. Although it was tough to tell as it is a small thin piece and the magnet kept gravitating toward the valve head. -
Rough idle, loss of power on accelleration, IMS?
Morissey replied to BrianH's topic in 986 Series (Boxster, Boxster S)
I am the only one who works on this engine. The last time i did anything engine related was check the air filter and put it back. 4K miles prior to that was an oil change. Perhaps something went in through the intake? -
Rough idle, loss of power on accelleration, IMS?
Morissey replied to BrianH's topic in 986 Series (Boxster, Boxster S)
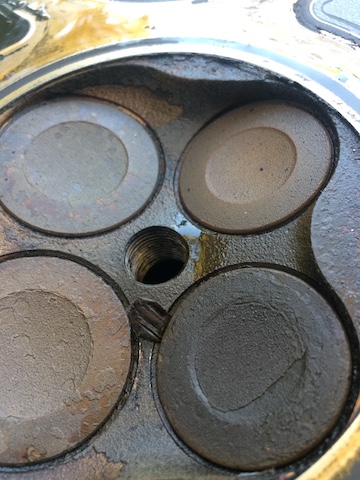
Coming back with some updates. My hunch was correct. An exhaust valve on cylinder 6 is not seating. My theory was a burnt guide or broken spring. Turns out neither! See attached pic. The object is a thin seemingly grooved piece of metal. I have yet to understand where it came from. I have checked IMS (in great shape, but will replace with LN for good measure) oil filter, oil, spark plugs, and of course the cams, covers and heads. I find nothing to be out of ordinary Both heads are off and with the machine shop for complete crack/leak test and valve jobs. I left everything in tact so they perhaps can try and determine the source of metal debris. While the machine shop does their assessment, your perspectives are welcome. Also, while I'm at this I have determined following additional projects to be worth the time and $. Any feedback on what I may be missing or overdoing is welcome. Care details: 2001 Boxster s with 50Kmiles 1. Water pump & thermostat (they are the originals) 2. IMS 3. RMS seal 4. Clutch (has ~ 40% left) 5. Oil separator 6. Cam chain rails
-
Rough idle, loss of power on accelleration, IMS?
Morissey replied to BrianH's topic in 986 Series (Boxster, Boxster S)
Yes, I will test all 3 on that bank. Thanks. -
Rough idle, loss of power on accelleration, IMS?
Morissey replied to BrianH's topic in 986 Series (Boxster, Boxster S)
I was afraid you would say that. I am pretty sure the leak is well over 20%. I do need to be for certain, so I will acquire a tester and report back. -
Rough idle, loss of power on accelleration, IMS?
Morissey replied to BrianH's topic in 986 Series (Boxster, Boxster S)
I don't know the leakdown value. I could not get my hands on a tester so I put air directly into the cylinder and looked/listened for the source of leak. On compression test it maxes at 40 psi. -
Rough idle, loss of power on accelleration, IMS?
Morissey replied to BrianH's topic in 986 Series (Boxster, Boxster S)
Update: I am afraid you are correct. I have a leak into the exhaust at TCD on cylinder #6. What should be my next diag move to determine extent of damage? or is this pretty much a head removal and valve job? Thanks!