Welcome to RennTech.org Community, Guest
There are many great features available to you once you register at RennTech.org
You are free to view posts here, but you must log in to reply to existing posts, or to start your own new topic. Like most online communities, there are costs involved to maintain a site like this - so we encourage our members to donate. All donations go to the costs operating and maintaining this site. We prefer that guests take part in our community and we offer a lot in return to those willing to join our corner of the Porsche world. This site is 99 percent member supported (less than 1 percent comes from advertising) - so please consider an annual donation to keep this site running.
Here are some of the features available - once you register at RennTech.org
- View Classified Ads
- DIY Tutorials
- Porsche TSB Listings (limited)
- VIN Decoder
- Special Offers
-
OBD II P-Codes - Paint Codes
- Registry
- Videos System
- View Reviews
- and get rid of this welcome message
It takes just a few minutes to register, and it's FREE
Contributing Members also get these additional benefits:
(you become a Contributing Member by donating money to the operation of this site)
- No ads - advertisements are removed
- Access the Contributors Only Forum
- Contributing Members Only Downloads
- Send attachments with PMs
- All image/file storage limits are substantially increased for all Contributing Members
- Option Codes Lookup
- VIN Option Lookups (limited)
Search the Community
Showing results for tags 'cayenne'.
-
 Cayenne 3.6 V6 Intake Manifold Removal DIY This DIY tutorial covers how to remove the intake manifold on the 3.6L V6 Cayenne. Removing the intake manifold gives you access to several parts of the engine that you may need to service. Disclaimer: Perform at your own risk. This is for reference only, I am not responsible for any damage/injuries that may occur from this procedure. Please do not attempt if you are not comfortable with doing work on your car or working around the fuel system. Work in a well ventilated area as you w Author shonuff Category Cayenne (9PA, 9PA1) - Common Fixes and Repairs Submitted 03/09/2018 08:31 AM Updated 03/09/2018 10:00 AM
 -
 Hi I have a problem finding the boost pressure sensor in my 2017 cayenne diesel S 92A with the 4,2liter V8. Is here some one who knows where it is 😅
 -
The common coolant pipe issue seems to only affect the V8 Cayenne's. I'm wondering if my coolant leak is a common problem too. I've been losing coolant on my 3.6 V6 Cayenne at a fairly slow rate compared to the other more common issue. I'm having to top it off about once every month or two. Last weekend I was changing the oil and started investigating the leak. It looks to be coming from a black plastic coolant hose fitting on the back of the engine, passenger side. Has anyone seen this problem before? I'm wondering if there is just a bad o-ring behind that fitting or if the whole part needs to be replaced. And if anyone knows the part number for this I would greatly appreciate that too! Thanks

-
 Hey everyone: I have a 2014 Cayenne. The latch to release the lid for the center console broke. Now, I can't open the compartment. I did not find any info on YouTube. I searched this forum but did not find anything relevant. I found a vendor that is selling the replacement part, but they said it does not come with instructions so that won't help if I can't open the console. So, I need to know: 1. How do I open the compartment? 2. How do I disassemble the lid to replace the broken latch? I appreciate any help you all can offer. Thank you, Neil
 -
 Hi there, my Cayenne is telling me my driver's side door is open when it is not. This is causing the dome light to stay on. Not sure what the issue is and if can be fixed easily. Any info given is greatly appreciated, thanks!
 -
 Any idea if I need a new motor or to take the mirror apart and clean something?
 -
 I have a 2009 957 3.6l v6 Cayenne. The battery was dead a few days ago so I replaced it. It now starts up just as it should but when run a diagnostic it says the alternator voltage is high reading 14.72. I’m assuming I need to replace the alternator to remedy this. I can’t find any information about replacing the alternator. Has anyone attempted this? It looks like it might be straightforward but my concern is whether or not the intake manifold has to be removed in order to get clear access. If anyone has any insight on this I would greatly appreciate it.
 -
 Does anyone have a wiring diagram for the seat on a 2008/957 Cayenne which they can let me have? I’m trying to chase a fault where the passenger seat will motor up and down and the backrest will adjust forward and aft, but there is no response from the controls to move the seat unit forwards and backwards, or the four-way lumber support control. Thanks in anticipation...
 -
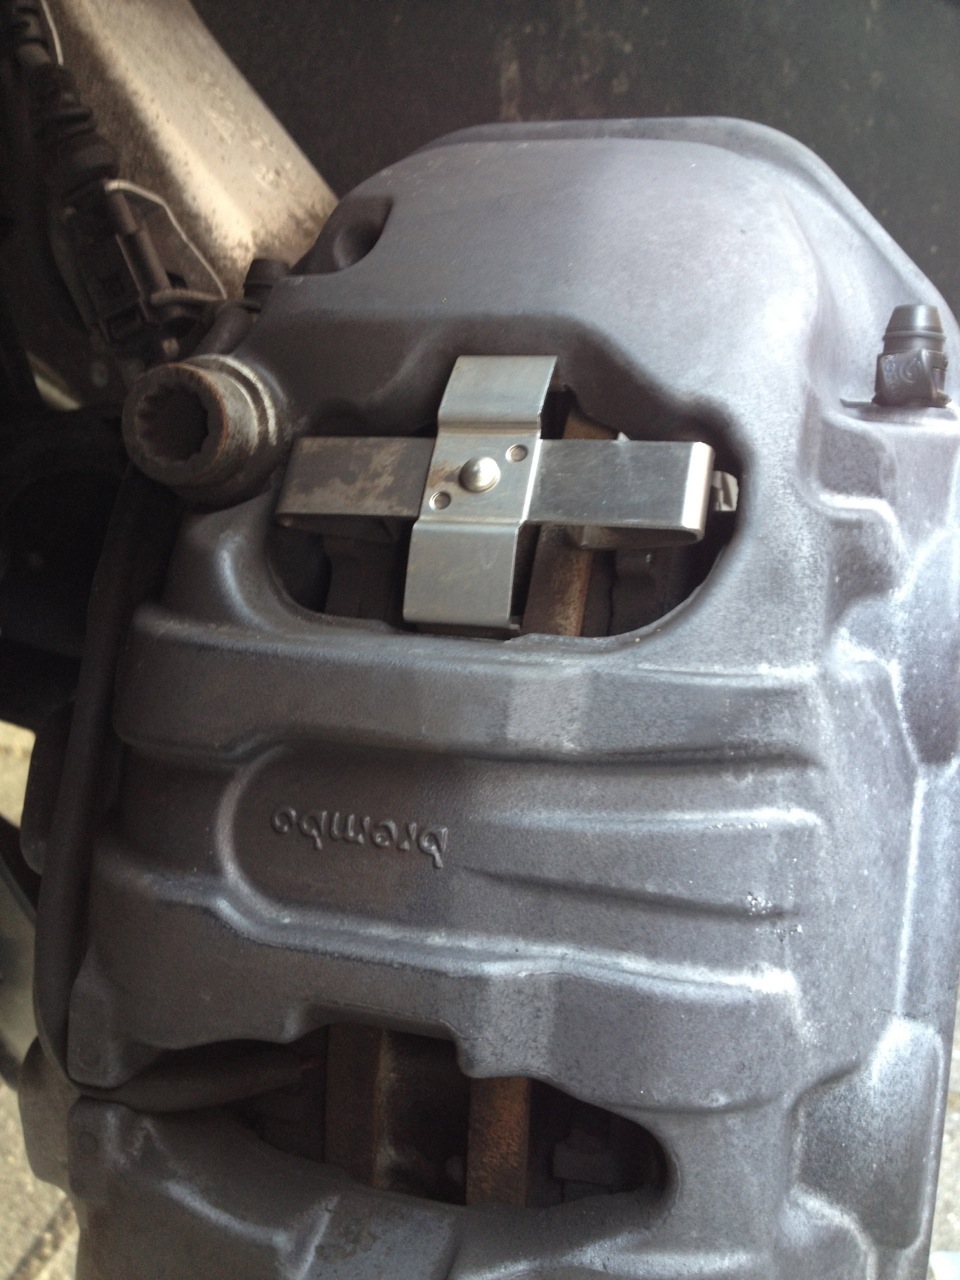
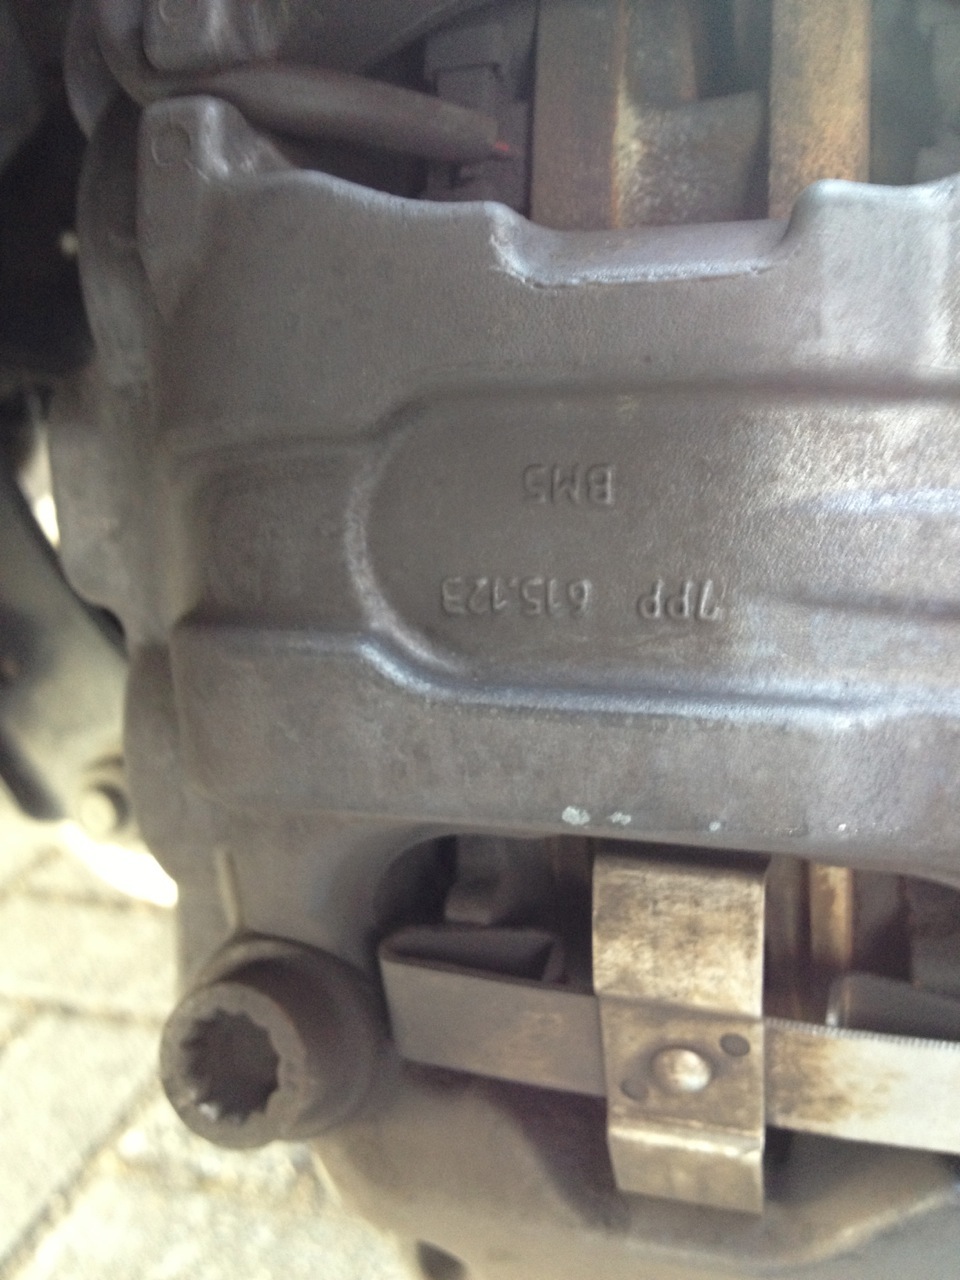
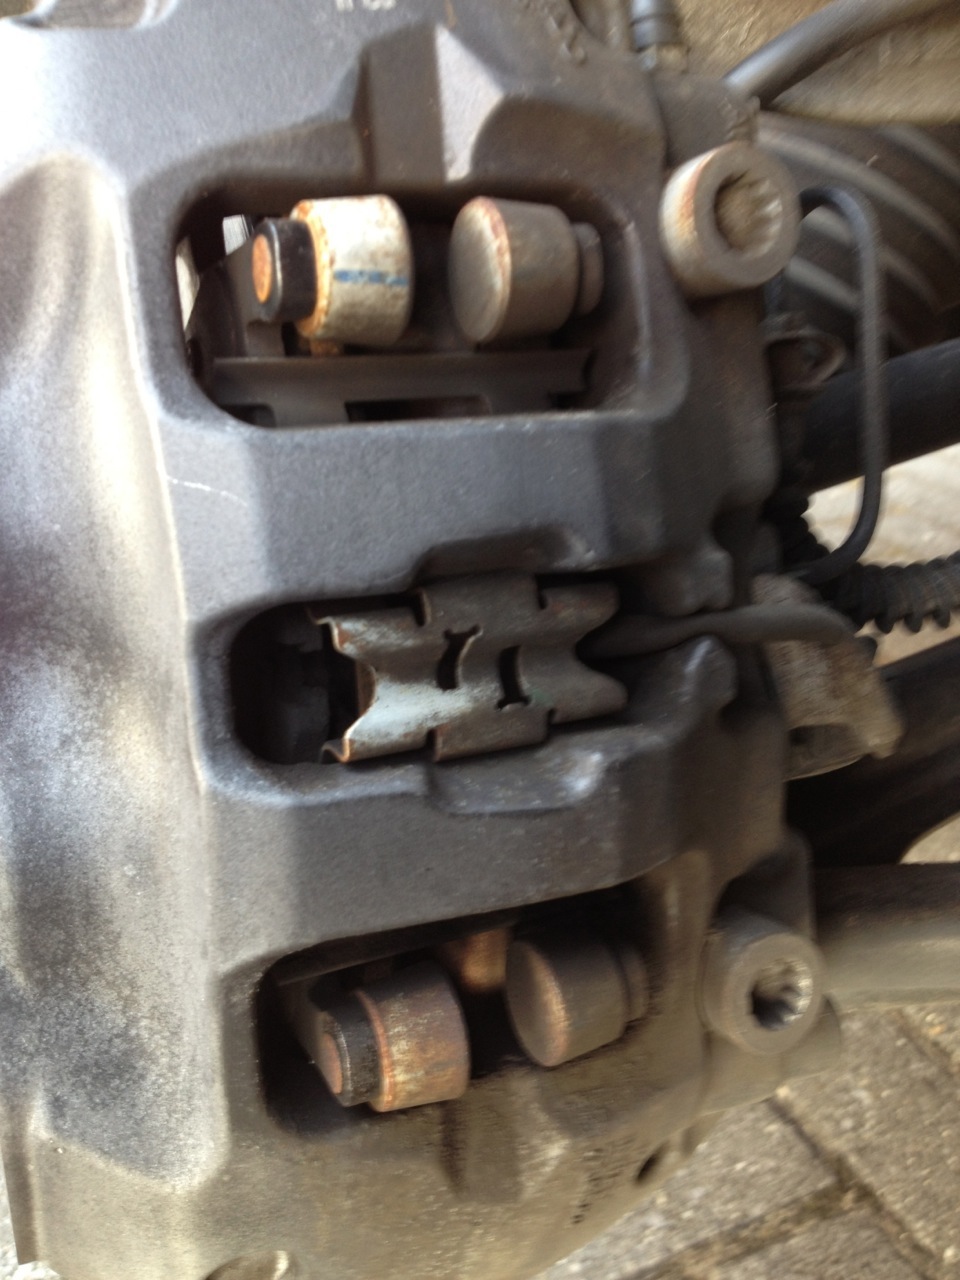
 hello , i want to replace the brake pads on front and rear of my Cayenne 958 diesel 6/2012 Whit the black calipers , i have already order the parts , but i have some questions , The front calipers bolted whit to big bolts part number WHT 004 571 they told me to renew them to , but how tight do a have to fastened these bolts in newton . also the rear main caliper bolts needs to be replaced part number N 911 837 01 how tight must these ? but i cant find out how to chance those rear pads , the car have also electronic parking brakes but someone tels me that the car needs on the diagnose computer to chanche the rear pads (aka VW ) , but i find this strange , i tested wit a piece of paper between pad and disc and activate the parking brake result the paper was not holding tight between pad and disc and feld down. because of this i think there are internal brake shoes inside the disc is this correct ? any technical help whil be helpful thanks in advance . or any exploded view .pdf part numbers : front pads 958 351 939 , warn contact 958 612 356 00 , caliper clips 970 351 959 00 Bolt front caliper WHT 004 571 , Rear Pads 958 352 939 00 , bolt N 911 837 01 , caliper clips 7PP 615 269 , warn contact 958 612 365 50 see pictures
-
 I recently had my 2004 CTT in the dealer to track down an oil leak from the front left corner of the cayenne, the dealer indicated the oil leak conditions could stemmed from either the left turbo or a faulty oil seperator (located in the valve cover). I've already replace my oil seperator 2 1/2 years ago and no smoke has been observed when the turbo's kick in. Therefore, it looks like my left turbo is leaking and needs to be replaced. My plan is to remove the left turbo and have it rebuild for under $500 vs. a new OEM turbo for $1900. My question to forum is, can the turbocharger be replace without removing the engine from vehicle? Is it a DIY project or should I take it to a shop for the remove and replace?
 -
 My front wheel was making a rattling noise for about the last week, and this morning as I drove out of my driveway and turned the wheel, I could hear a loud popping noise coming from my wheel whenever I turned. My best guess is that I drove over a pothole and the control arm / bushing moved out of place. Would this be covered under the OE warranty? Or should I take it to a mechanic?
 -
 Hi all, I just joined the group and am having some problems with my 2005 Porsche Cayenne. When I drive a few miles it stalls and I see a message saying Reduction on and reduction off. I your help please, and thank you in advance for your assistance.
 -
 Hello everyone, Does anyone have or know where I may have the bolt torque specs for a 2008 Cayenne Turbo? I need pretty much the specifications for all the bolts and nuts that would be included in a block replacement. I'm getting the back rebuilt by 928 Motorsports and reinstalling with an experienced friend. However, it's nearly impossible to find the specs for these motors. Additionally, if there's a place where I could find a complete 957 workshop manual, could someone please advise? Thank you.
 -
Just wanted to say thanks to the community helped answer some questions about the scoring on my 2008 CTT 957. My next question is, does anyone know where I may purchase a complete engine seals and gasket kit for a 2008 Cayenne Turbo? Or if these are unavailable as a whole unit, had anyone rebuilt their engine from the cylinder scoring or something similar and have a parts list of required seals and gaskets which need changed? Additionally, are there any other suggestions on parts that I should change some I'll have the motor apart? Anything would help at this point. Thanks
-
 I have a 2004 Cayenne S. I just got it recently, interior lights have never worked. I checked the fuse and it was blown. It calls for a 20 amp fuse but the blown one in it was a 25 amp. I had the key in the ignition if I remember correctly and put the new 20 amp fuse in and everything came on. Side note, I noticed a weird glitch with the light above the rear passenger side door and the switch on the main map reading light. The interior lights had gone off and I turned the back on and the backlight above to passenger side door was very dim. I slid the switch on the overhead console for the main map light and the rear light came back to full strength. I found that odd. Everything then worked fine. I took the key out. Next time I put the key in, immediately heard the fuse blow. Any ideas on where to start?
 -
 Hi Guys. I am new to the forum and proud new owner of a beautiful 06 Cayenne S. I love my new Porsche, but am slowly working on fixing a few minor issues... First of all, my driver door latch is defective or at least the switch in there is. The vehicle never knows when the driver door is open, no dome lights or door ajar switch or chime. I have already purchased a brand new replacement latch assembly. Any instructions or tutorials on the fastest and easiest way to replace this? Any help is greatly appreciated, thanks!
-
 Hello all Planning to replace the gauge cluster in a 2010 GTS with a Turbo gauge cluster and have a few questions. In researching this swap, I found some references in the archives to swaps done as far back as 2006 or so, but no answers to the questions below. I did a test fitment this past weekend and planning to do a permanent swap in the coming weeks when mileage on both clusters is the same (or within 10 miles or so!) In the settings on the Turbo cluster, COMFORT is in all caps and subsequent menus overlap in all caps. It appears setting can be set. Does this quirk affect usage at all? Is it possible/simple to swap the clock set button + trip mileage reset button? On the Turbo cluster the clock is half worn off, but on my GTS cluster it is perfect. I would like to keep the better looking clock set button if possible/simple. Any possibility of swapping in voltmeter on Turbo cluster? I know the gauge front is one big piece and may be tough to get right, but more wondering if the electronics are there and would be plug-and-play behind since the wiring sends the battery/electrical volt data to the cluster. (clearly I am not an electrical engineer!) If question 3 is an absolute NO, then how do you Turbo owners know how many volts your battery/electrical system is putting out (without the use of a radar detector that can tell you)? Thanks for reading this far, and thanks in advance for any useful responses to my queries above. el greggo
 -
 I have a 2008 Porsche Cayenne S with door alarm issues. The door(s) do not recognize whether they are open or closed. This image on the instrument panel shows a passenger front door ajar icon and the beeping alarm is enough to made a sane man or woman drive off a bridge. On the driver side over the past year I have noticed the door open or key in ignition alarm come on or not, the red door lamp not light, and the interior lights not come on when opening the door. On the passenger side i have experienced the alarm icon and alarm on continuously while driving, the interior lamps staying on after the doors are closed, the signal not sounding when locking the vehicle with the remote, or the security alarm suddenly going off a short time after locking, and probably a few other annoying items. I have applied the quick fix canned air and WD-40 to the passenger door a few times and it got me through the winter, but not any longer. So I was about to tear the passenger door apart and try and repair the latch when I started thinking it might be the driver door, which obviously has experienced a zillion more opening and closing than the passenger door. My question is, is there a separate door ajar alarm icon showing on the dash for each door, or only one showing the passenger door ajar for all door open errors? I l have only seen the Passenger door icon warning. When I leave the key in and open the drier door there is no longer an alarm, and the red door safety light in not lit. When I manually move the door catch one notch up, the alarm sounds and the light comes on. When I move it up another notch to full lock the alarm quits and the light goes out. I apologize in advance the length of this post but it seems to be a common issue. Regards, Yukonriver Roy
 -
 Hey yall! I'm new here, long time lurker but now that I've come to a bunch of problems I cannot get resolve with the DIY or tutorial I was able to find on here or youtube I decided to open a post with my issues and see what you guys think! I have some (prolly) simple ones and some really weird ones. A little bit of context: I just bought my cayenne turbo (2004) 2 months ago from its 1st owner that neglected it for the last 3-5 years of ownership. I have done a lot of mechanical work on the car ( I can list everything if needed). These issues are mainly cosmetic and quality of life ones. 1st: The side view mirror shells. Are they suppose to be this flimsy ? the half shell does a plastic rattling noise when I close the door (mainly on the driver side) https://streamable.com/kg8zt 2nd: Steering column adjustment. Now this one I read a lot about resetting the seat control by tilting it and stuff, done it, did not work. It did clear my memory settings for the seats but not reset the motor for the steering wheel. As you can see, it can go in and out, not up and down.... https://streamable.com/aciky 3rd: The PoS that is called the PCM Radio. I think the previous owner finger f*ck the hell out of the radio system because, well... It's not working great. Main issue it that the time keeps resetting and does not fallow the real clock, it just gets stuck and the date is now missing but used to be stuck in year 2000 (for a 2004 model) It's asking me to insert the GPS disk to get it to update I think now... https://streamable.com/qjyax https://streamable.com/pr748 4th: The worst. Hopefully the video explains it....well, it's completely lost at where to throw the air... https://streamable.com/2vxfq I have another major one when I drive that it kick between gears (only some gears, only some times) mechanic told me it's the transfercase/module, interweb tells me it's the transmission valve body..., i'll make a video about that one later. Thank for the help in advance !
 -
 having some issues with locking my cs using the key fob , i can unlock the car fine with the fob but i have to be next to drivers glass to lock the car . i have changed the battery in the fob no luck the led on the fob goes off when i press the lock button , i have also tried resync the key . has anybody had this similar fault
 -
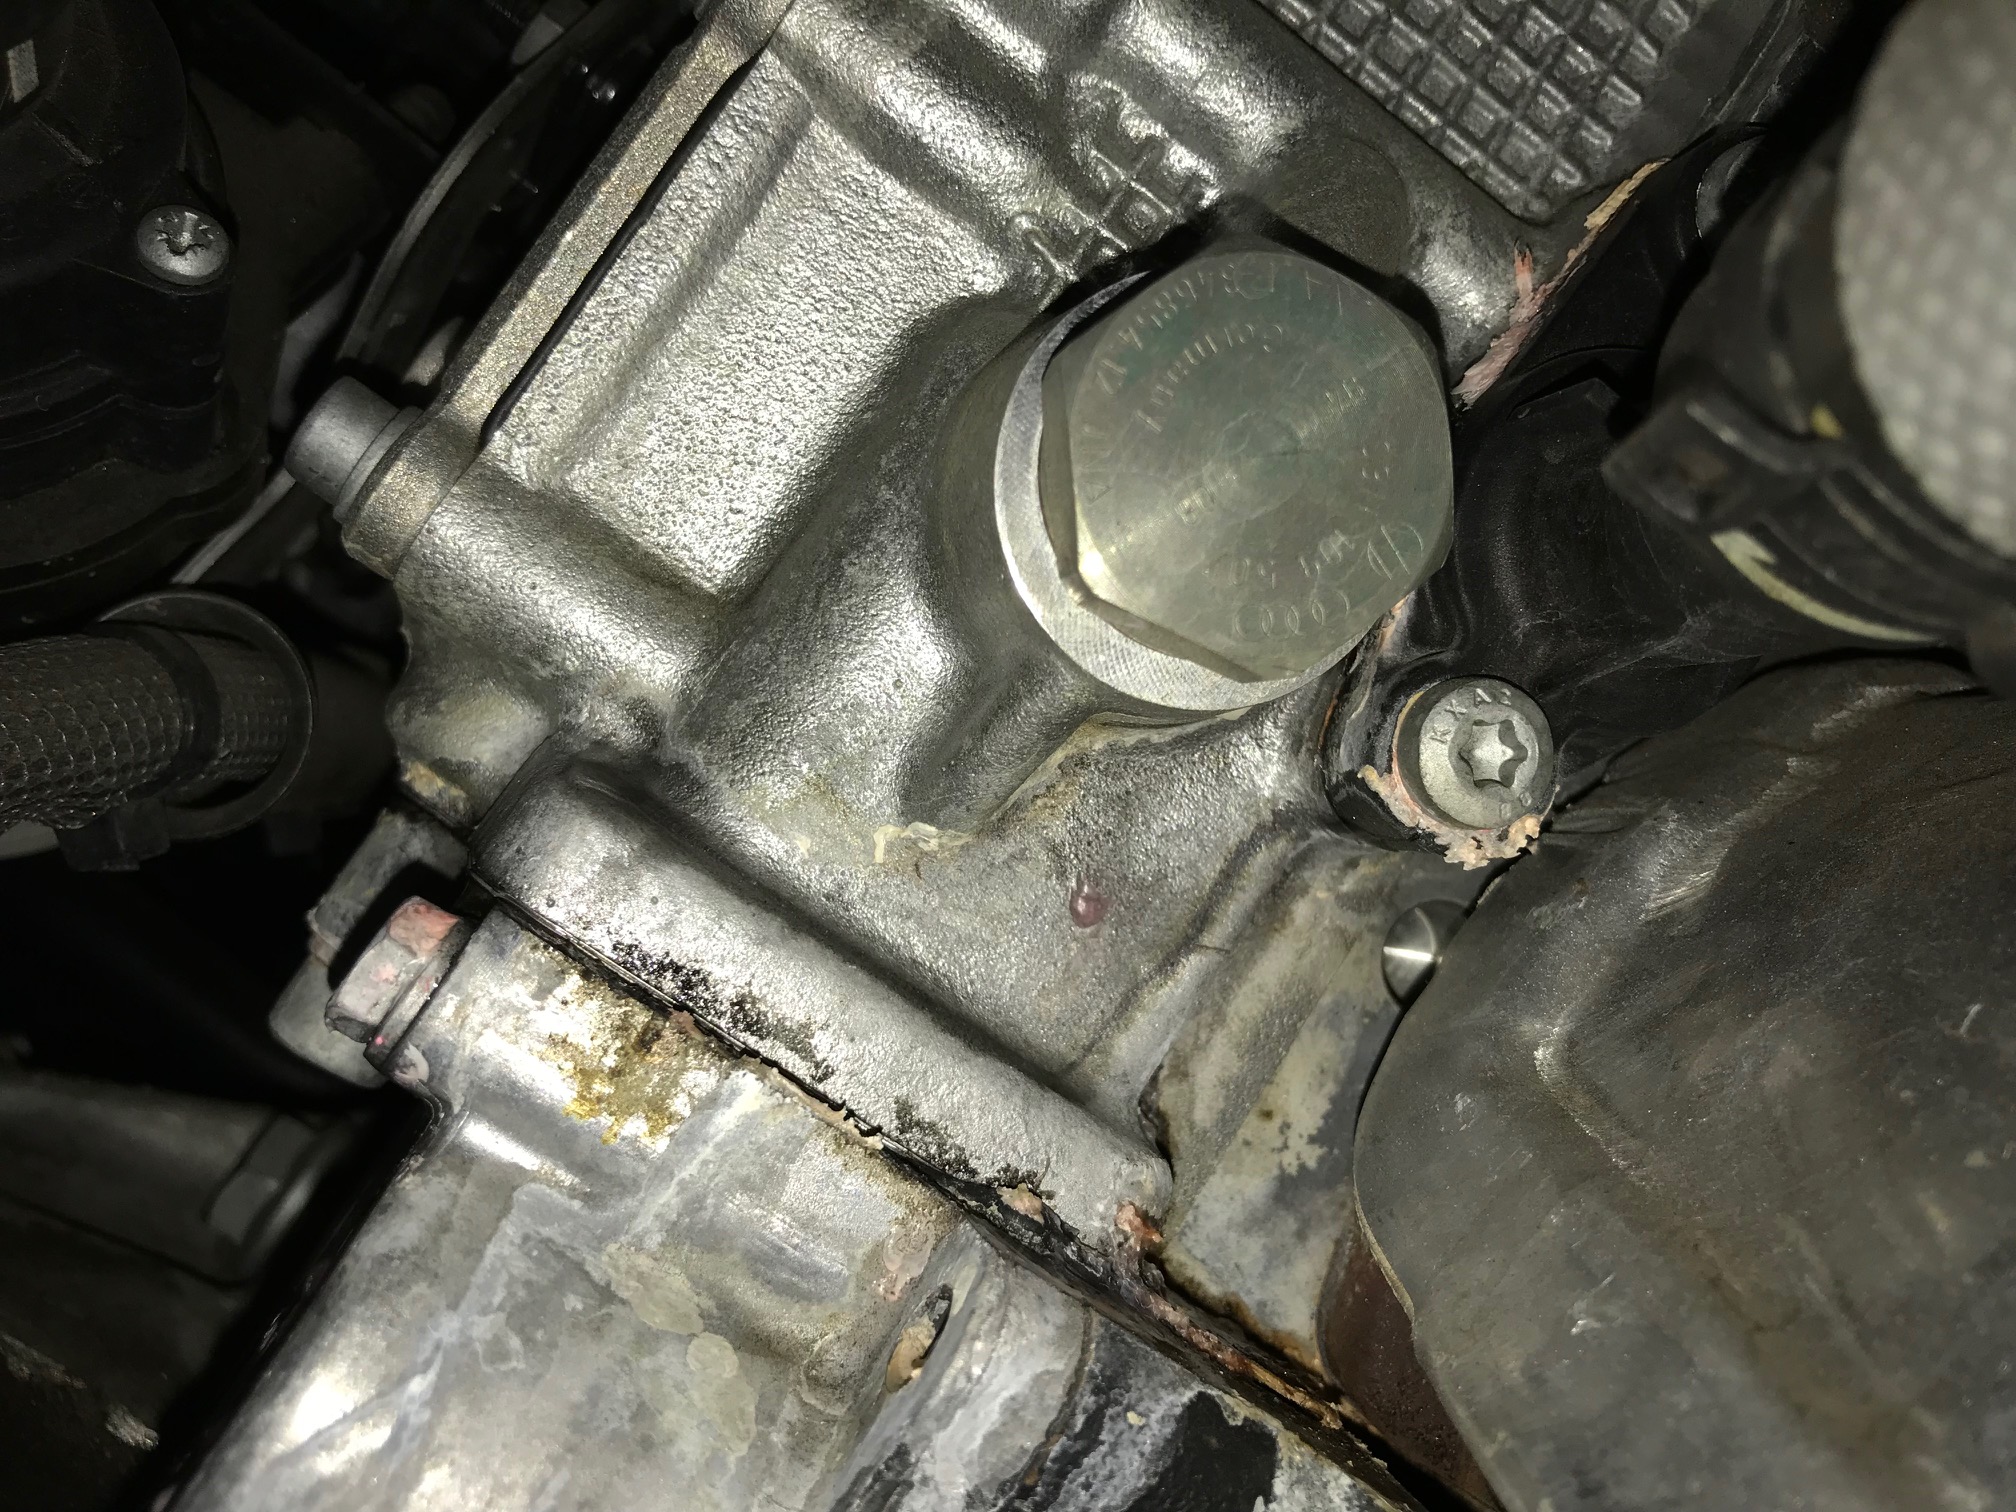
This DIY tutorial covers how to remove the intake manifold on the 3.6L V6 Cayenne. Removing the intake manifold gives you access to several parts of the engine that you may need to service. Disclaimer: Perform at your own risk. This is for reference only, I am not responsible for any damage/injuries that may occur from this procedure. Please do not attempt if you are not comfortable with doing work on your car or working around the fuel system. Work in a well ventilated area as you will be releasing a small amount of gas and fumes. Difficulty: 5/10 Estimated Time: ~2 hours If you’re getting a Durametric error code P0674, you likely have a bad PCV valve that needs to be replaced. An easy way to test a bad PCV valve is to unscrew the oil fill cap on the engine while it is idling. If you feel suction on the cap and/or the idle fluctuates once the cap is removed then your PCV valve is bad. The PCV valve is built into the valve cover so your options are to buy a whole new valve cover assembly (95510513500- ~$347) or buy just the PCV membrane (aftermarket $20-25) and replace it in your existing valve cover. To get access to the valve cover, you will need to follow this DIY article to remove the intake manifold first. Other reasons to remove the intake manifold are to service your fuel injectors or to make it much easier to replace the thermostat. The thermostat can be changed without removing the intake manifold (I did it twice), however you basically need to be a contortionist to reach the bolts to remove housing and you will scrape some knuckles along the way. Tools Needed: -Flathead screwdriver -Assortment of torx bits (T20, T25, T30, 6” long T30) -Pliers -Torque Wrench -3/8” ratchet set with various extensions and a universal joint -1 1/16” Deep socket -10mm Triple Square Spline Bit -Crescent Wrench -9/16” Open End Wrench -Dental pick Parts Needed: -Brake Booster Vacuum Hose- 95535557941 (your existing hose is probably brittle and will likely crack from removing it, I recommend getting a new one) -Lower Fuel Injector Seal Kit (3X) - 95511091000 (existing seals may be brittle and once you have removed the intake manifold, they may not seal properly upon reinstallation, I recommend getting new ones, need 3 sets) Procedure: First start by removing the plastic covers surrounding the engine. Using a flathead screwdriver, remove the quarter turn plastic trim fasteners. Rotate them in either direction by 90 degrees and pop them out. Be ready to catch them as sometimes they like to jump out. Next you will need to remove the 2 torx screws on either side of the engine cover with a T25 bit and the screw under the windshield washer reservoir cap with a T20 bit. Remove the oil fill cap and front engine cover by pulling straight up. They are held on by friction rings around a stud so pulling straight up will release it. Now that you have the covers removed, it’s time to remove the intake filter box and intake piping. Using your T25 torx bit, rotate the 2 screws until the dot on the screwhead lines up with the lower indication on the filter cover. Now gently use your pliers to pull them straight out. With your flathead screwdriver, pop up the two clips to release the filter housing. Pivot the filter house towards the passenger side of the car and remove it. Remove the engine air filter as well. Next, remove the wiring harness from the MAF sensor located in the middle of the intake piping. Loosen the clamp around the intake piping on the throttle body and gently work the intake piping back and forth until it releases from the throttle body. Remove the top bolt on the engine lift bracket and loosen the lower bolt with your M10 triple square bit. Then pivot the bracket towards the front of the car. Remove the bolt next to the throttle body with your M10 triple square bit. Then unplug the wire harness from the throttle body. Remove the top bolt from the bracket on the passenger side of the engine with your M10 triple square bit. Remove the vacuum lines from the intake manifold on the passenger side of the engine. One hose requires pliers to open the hose clamp, the other can be removed by hand if you squeeze the lock ring around the hose to release it. Next, from the passenger side, reach your hand around to the back side of the engine. There is a vacuum line that goes from the bottom surface of the intake manifold to the brake booster. You will need to pull the vacuum line fitting straight down to pop it out of the intake manifold. I don't have a good picture of it so here is a diagram of it. Pull down on the elbow fitting, not the hose. Also on the back side of the engine just behind the vacuum line you removed there is a bolt that needs to be removed using your M10 triple square bit. You are working blindly so locate the bolt first by feel and guide your bit to the bolt. Remove the 3 screws holding the actuator with a T25 torx bit. Slowly pull it straight out towards the front of the car. There is an actuator arm that attaches to a shaft on the passenger side of the part. Once you have enough clearance to reach your finger in there, you need to slide the arm off the shaft as you pull the entire actuator off. Then disconnect the vacuum hose from the actuator. Now pull the coolant hoses out of their holder in the intake manifold and push it towards the driver side of the car. There is a T25 torx screw that attaches this water hose bracket near the back of the intake manifold. The screw is facing up, so you need to use your T25 torx bit and get creative with removing that screw. I used a crescent wrench to turn the torx bit while holding the torx bit in place with my other hand. With the water hose bracket free, slide the water hose bracket towards the front of the car to release it from the intake manifold. This bracket has a keyhole slot that will release once it's slid forward. Remove the oil dipstick tube bracket with a T25 torx bit. Just push it out of the way once you remove the screw. With your long T30 torx bit, remove the bolt on the intake manifold that was under the actuator. Next, there are 3 blind holes on the driver side of the intake manifold. You need to use your long T30 torx bit to loosen the screws inside those holes. Those 3 screws are captive screws so they will not come out. There are 3 bolts below the intake runners. They need to be removed with your M10 triple square bit. This is where your universal joint will come in handy. The bolt near the rear of the engine required me to use my u-joint with various entensions to acess. At this point, you will hear gas leaking out. Since you have released the pressure from the lower fuel rail to the lower fuel injectors, the pressurized gas in the rail will leak out. Make sure you are working in a well ventilated area. From the driver side of the car, reach behind the engine to remove the wire harness from the fuel pressure sensor. Using your 1 1/16” deep socket, unscrew and remove the fuel pressure sensor. Using your 9/16” open wrench, unscrew the nut that connects the metal fuel line running from the lower fuel rail. The slimmer your wrench the better. My crescent wrench did not fit here. Now that the intake manifold is completely unbolted, you can start to wiggle it free. You will need to lift the manifold up from the passenger side and pivot it up towards the driver side. You will need to wiggle the lower fuel rail loose to release the metal fuel line you just unscrewed the nut from. It is a flare fitting that pushes into the upper fuel rail assembly. Be gentle here as you don’t want to bend the fuel rail. Once the metal fuel line is free from the upper assembly, you can remove the intake manifold as described above by lifting up from the passenger side first to pivot it off. At this point, you have access to the fuel injectors if you need to service them, the thermostat housing and the valve cover. Unbolting the valve cover is straight forward from here if you need to replace the PCV valve, etc. The fuel injector seal kit comes with a rubber o-ring, Teflon o-ring, Teflon sleeve and metal clip. At the bare minimum you should replace the rubber o-ring and Teflon o-ring. Use a dental pick to remove the old o-rings. These 2 parts are the wear surface when you remove/reinstall the intake manifold and are prone to fail if you re-use them. Trust me, I learned the hard way. To install the intake manifold, reverse the steps above. Take care in sliding the lower fuel rail back onto the lower fuel injectors and lining up the metal fuel line back into the flare fitting. I found it was easier to pull the lower fuel line out of the manifold to line the flare fitting up first, then pushing it into place in the intake manifold. You want to apply even pressure on the surface as you tighten all 7 of the bolts down on the driver side. Torque the 3 triple square bolts evenly to 6 ft lbs, torque angle 90 degrees, then a final torque of 22 ft lbs. The bolts holding the engine lift bracket are 17 ft lbs, the other triple square bolts holding the manifold on the head are 15 ft lbs. Once you get it all back together, turn the key to the ON then START position without your foot on the brake. This will run the fuel pumps to build pressure back up in the fuel rail. I removed the key and repeated 2-3 times to get the fuel pressure up. The first time you restart, it may take a couple seconds to fire up due to the fuel pressure needing to build back up. If you replaced your PCV valve, it may idle rough as the ECU needs to remap since it adapted to a leaking PCV valve over time. If you did not replace the fuel injector seals and smell gas/hear it leaking after shutting off the engine, then your seals failed and you need to repeat the procedure and replace those seals.
-
 Hi - on my 06 CTTS, over the last few months I noticed occasionally awful smell inside the cabin while driving. My research so far indicates that it is emitted from vents when AC system is on. Believe it smells like sth. burned, and is not present when I switch AC system completely off. Did anybody experience this before on a 955 Cayenne, Turbo or Turbo S ? Thanks in advance. PS.: side note. It may be coincidence or completely unrelated, but as far as electrical problems I am noticing for about comparable amount of time that the horn is dead (silence when pressing the steering wheel center...).
 -
 Greetings and thank you for the informative site. I am a new owner of a 2009 Cayenne base model with dead Horn. I’ve read on the forum of typical failures, including steering wheel wire and two horn units. So far I’ve confirmed the fuse is ok. Before removing wheel arch covers to test the horns, I wanted to check the relay. Is the horn relay in the under hood fuse box? If so, which position? thank you, Ben
 -
Hello, Does anyone know how to find the radio security code other than removing the actual multimedia console? I found this website here but not sure if it really works. My concern is when I change the battery (which is dying) how to gain access to the multimedia center again should it require a security code. I am the third owner and have found nothing written in any of the vehicle documents. Any advice would be appreciated.
-
 Hi All, So today, after putting gas (Shell, premium) in my 2014 Cayenne base, I got on the freeway and shortly after, the check engine light came on and Cayenne started shaking abnormally. I was able to turn around and get back home but I noticed 1. When I stop, the CEL flashes and the Cayenne shakes a lot more 2. When I press on the gas, it takes a long time to pick up speed (really struggling). I connected the Durametric when I got home and I see the following misfire fault codes on it. Anyone have any suggestions? Cayenne has around 62k miles on it. P030000 Random/Multiple Cylinder Misfire Detected Factory Fault Code 10203 Warning Indicator Off Test Not Completed This Monitoring Cycle Test Failed Since Last Clear Test Completed Since Last Clear Pending DTC Test Not Failed This Operation Cycle Fault Active P030100 Cyl.1 Misfire Detected Factory Fault Code 10591 Warning Indicator Off Test Not Completed This Monitoring Cycle Test Failed Since Last Clear Test Completed Since Last Clear Pending DTC Test Not Failed This Operation Cycle Fault Active P030300 Cyl.3 Misfire Detected Factory Fault Code 10593 Warning Indicator Off Test Not Completed This Monitoring Cycle Test Failed Since Last Clear Test Completed Since Last Clear Pending DTC Test Not Failed This Operation Cycle Fault Active P030600 Cyl.6 Misfire Detected Factory Fault Code 10596 Warning Indicator Off Test Not Completed This Monitoring Cycle Test Failed Since Last Clear Test Completed Since Last Clear Pending DTC Test Not Failed This Operation Cycle Fault Active P030200 Cyl.2 Misfire Detected Factory Fault Code 10592 Warning Indicator Off Test Not Completed This Monitoring Cycle Test Failed Since Last Clear Test Completed Since Last Clear Pending DTC Test Not Failed This Operation Cyclea Fault Active P130A00 Hide cylinder Factory Fault Code 10205 Warning Indicator Off Test Completed This Monitoring Cycle Test Failed Since Last Clear Test Completed Since Last Clear Pending DTC Test Not Failed This Operation Cycle Fault Passive

.jpg.82cb3003a2dcdf94c5d3c2a30489cbb0.jpg)