Welcome to RennTech.org Community, Guest
There are many great features available to you once you register at RennTech.org
You are free to view posts here, but you must log in to reply to existing posts, or to start your own new topic. Like most online communities, there are costs involved to maintain a site like this - so we encourage our members to donate. All donations go to the costs operating and maintaining this site. We prefer that guests take part in our community and we offer a lot in return to those willing to join our corner of the Porsche world. This site is 99 percent member supported (less than 1 percent comes from advertising) - so please consider an annual donation to keep this site running.
Here are some of the features available - once you register at RennTech.org
- View Classified Ads
- DIY Tutorials
- Porsche TSB Listings (limited)
- VIN Decoder
- Special Offers
-
OBD II P-Codes - Paint Codes
- Registry
- Videos System
- View Reviews
- and get rid of this welcome message
It takes just a few minutes to register, and it's FREE
Contributing Members also get these additional benefits:
(you become a Contributing Member by donating money to the operation of this site)
- No ads - advertisements are removed
- Access the Contributors Only Forum
- Contributing Members Only Downloads
- Send attachments with PMs
- All image/file storage limits are substantially increased for all Contributing Members
- Option Codes Lookup
- VIN Option Lookups (limited)
Search the Community
Showing results for tags 'radiator'.
Found 16 results
-
 The radiator grills on the 986 sit very low and thus tend to collect quite a bit of debris and garbage faster than other cars. The design of the radiators and front air intakes is such a way that any debris which enters the grill get jammed between the radiator and the inside of the front bumper body panel. Cleaning out your radiators and the garbage stuck behind the front bumper should be done periodically as leaving anything in there can cause inefficiencies to your cooling (A/C and engine) and also rust your radiators once the debris gets wet. By adding mesh to the standard grill, using gutter guards for rain gutters, you can reduce the amount of debris which can enter your grill. This is a simple process and adds not only functional value, but I think it looks pretty great too. For me it took roughly 4 hours to access, clean the radiators and air intakes, and add the mesh to my front grills(not including painting the grills). Parts you'll need: • Gutter Guard (this is the same stuff you use for rain gutters on a house to keep leaves and junk from building up in the gutter) - Buy two sheets of this. • High gloss, black spray paint • Tiny black zip ties - nothing too thick, but don't go too wimpy either. You'll need about 4 zip ties. Tools you'll need: • Torx set • Vacuum • Aluminum shears • Wet rag and soap to wipe down the air intake duct which is likely dirty. I won't cover how to remove the front bumper, as that's available widely across Youtube, Renntech, and other DIY sites. Here's the Youtube video I used (https://www.youtube.com/watch?time_continue=280&v=X2q54XtupVo). So we'll get started with this tutorial once you have the front bumper cover removed. 1. The first step is to remove the grills which are held in place with 4 plastic tabs and pull out from the inside of the front bumper cover. This is fairly straight forward – just be sure to follow the general rule of not trying to force anything! Use the images below to help. From this image, you can see 4 plastic tabs are used to secure the grill in place, while 3 tabs on top are flat and just used to align the grill. 2. With the grills out, it’s time to trace them on paper so you can cut your mesh correctly. I used a big sheet of painters drop paper, which I’ll later use when painting the grills, to trace around the whole perimeter of the grill piece. It’s important to trace around the whole piece rather than just the vent portion, because the grill is rounded and so the mesh will need to bend in order to make this a tight fit. If your mesh is too small debris will be able to make it past your grill. 3. Now it’s time to cut your gutter guard. Using the metal shears, cut the mesh to match the outline you traced in step 2. I found it easy to use a box knife to score and transfer the tracing from the paper to the gutter guard (since the gutter is painted, you just use the box knife to score the paint). Your cuts don’t need to be perfect. Mine aren’t rounded, but you’ll see that they still create a great seal for stopping junk. 4. This next step is optional, though it makes a big difference in terms of looks! I painted by grills. There’s nothing fancy you need to do when painting them. I applied three coats of paint just to ensure it was solid. Let them dry for at least a day or two or else the paint will easily chip. 5. The next step is to cut a whole out for the outside temp sensor which is sticks through the left grill (when looking at the car head on). Before cutting the hole for the sensor, be sure to test out your mesh by holding it against and fitting it (bending it to form) with the respective grill it’s for. This doesn’t need to be an exact science, and in this case it’s always better to cut less and test it rather than cut too much. I determined where the hole needed to be cut by holding the fitted mesh against the grill and scoring the part of the mesh which aligned with the hole on the grill. I cut a small rectangle that is about a half inch, or in my case three snips of the mesh. I probably couldn’t gone a bit smaller, but you can’t really notice. 6. Next step is to adhere the mesh to the grill. I did this a bit differently than others have since I didn’t’ want the mesh to be permanently attached to the grill. I used small black zip ties which aren’t visible when viewing the car but hold the mesh securely in place and allow it to be replaced if they become damaged or a future owner doesn’t want them. In the picture below you can see I used 4 zip ties for each grill. Two on the very bottom which help support the mesh from sliding down, and two at the very top which help the mesh from being pushed back into the intake duct. 7. The most difficult part of reassembly is aligning the outside temp sensor with the hole you made. Prior to having mesh installed this was simple because you could just put your fingers in the grill and guide it. There’s no trick to this, just take your time aligning it as you put the bumper panel back on. It doesn’t need to be aligned perfectly since you can use needle nose pliers to adjust it after the bumper panel is in place.
 -
View this tutorial Radiator Grill Mesh and Painting The radiator grills on the 986 sit very low and thus tend to collect quite a bit of debris and garbage faster than other cars. The design of the radiators and front air intakes is such a way that any debris which enters the grill get jammed between the radiator and the inside of the front bumper body panel. Cleaning out your radiators and the garbage stuck behind the front bumper should be done periodically as leaving anything in there can cause inefficiencies to your cooling (A/C and engin Author mrplow911 Category Boxster (986) - Mods Submitted 03/23/2019 06:59 AM Updated 03/23/2019 07:46 AM
-
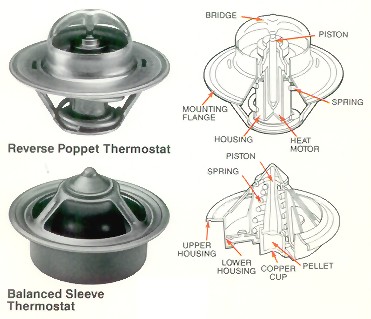
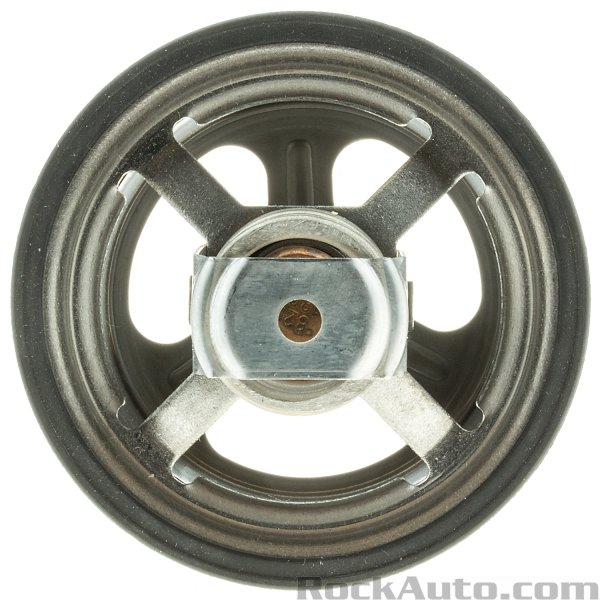
 Turbo/Turbo S (maybe even GTS) thermostats are not the typical looking reverse poppet design I've come to know an love (hate?) over the years. The "standard" design is pretty obvious - a hole opens up in the middle against the flow of water. On the Turbo/Turbo S it seems to be a balanced sleeve (am I correct?), which allows pressurized coolant to circulate around all of its moving parts. Sounds great, but I don't understand how it restricts the flow. Upon 1st impression it would seem to me coolant can pass right through it unrestricted, regardless of the position of the internals. I do realize the water pump sits in front of the thermostat and that the inlet(s) coming from the engine and the outlet tubes exit out just over the water pump both are both behind the thermostat. This must have something to do with it but in my mind, having both inlet and the outlet on the other side of the thermostat means the water pump isn't doing anything but churning coolant. See diagram on page 89 of this parts diagram: https://www.porsche.com/all/media/pdf/originalparts/en/E_9PA1_KATALOG.pdf Does somebody know how this all works? Your knowledge is appreciated!
-
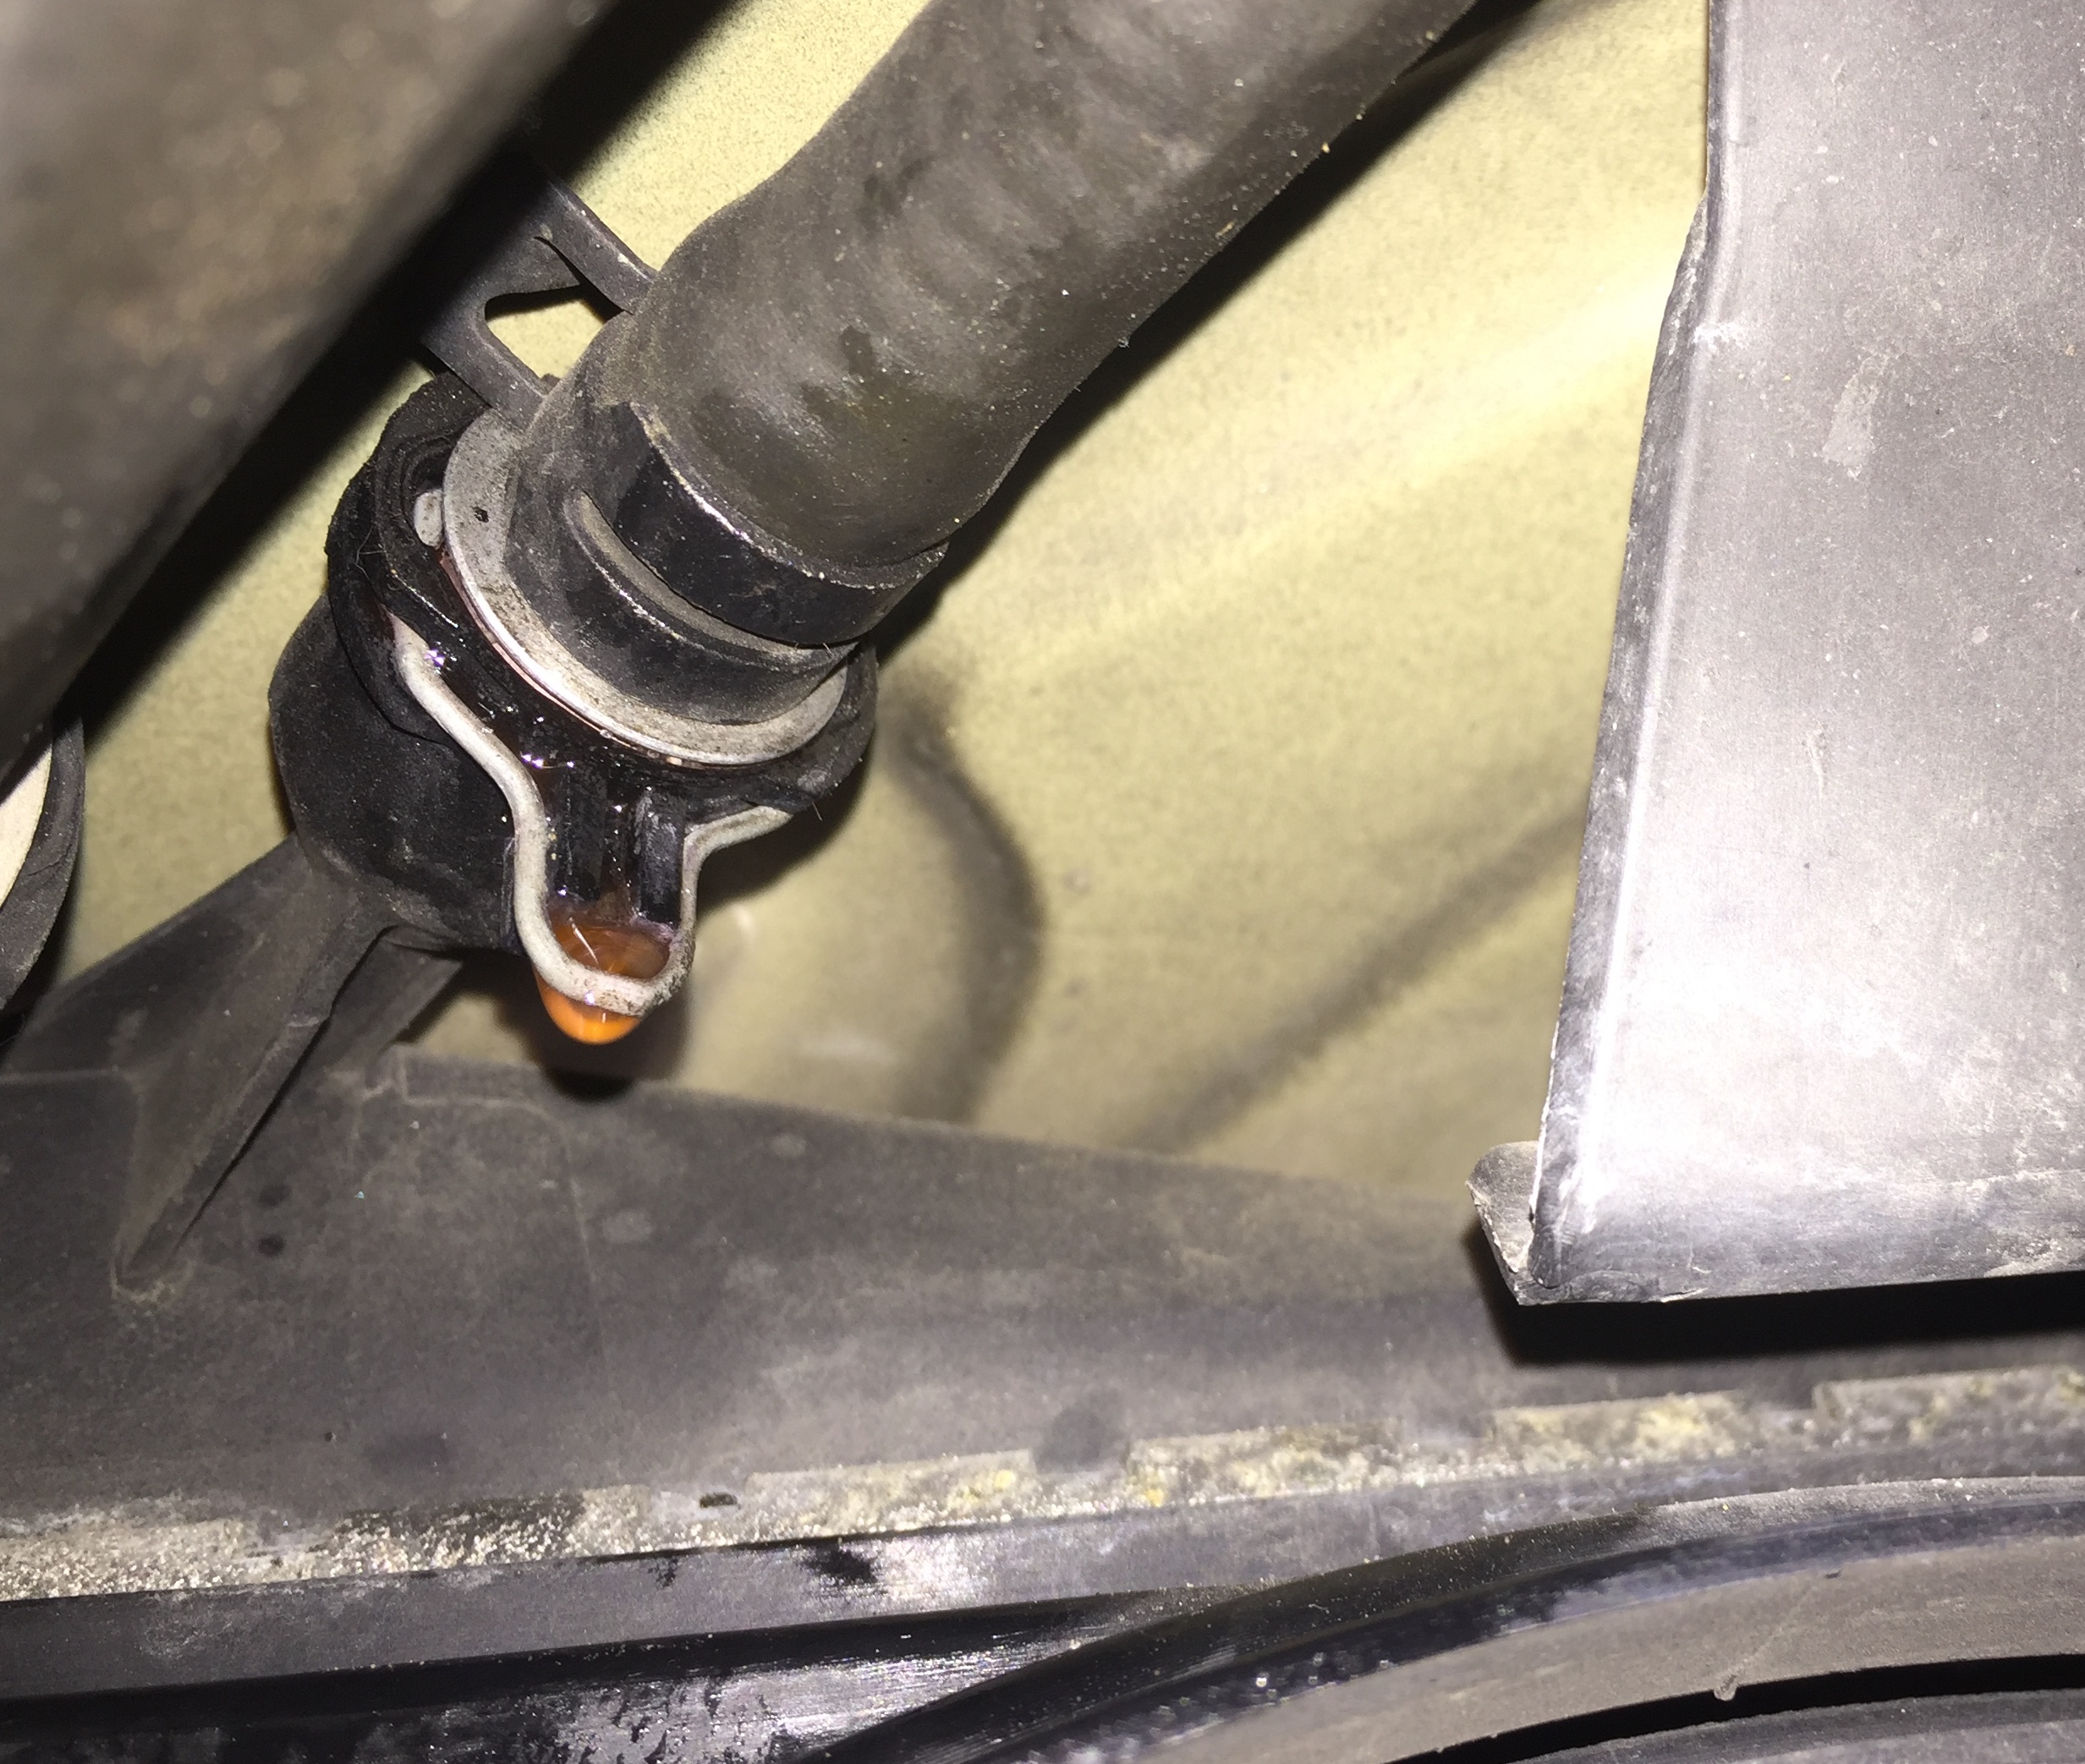
 When I went out to the garage this morning I saw a puddle in front of the left front wheel. I thought I had a bad radiator but when I got in and took a look it appears that the leak is coming at the connection between the breather tube and the radiator, check out the picture. So, my question is this; is this a bad radiator or a bad breather hose? Thanks!
-
 Hi guys i removed radiators to clean and found both have oil stains on the one side (outer side) is this normal for a 116k and 14 years old vehicle ? Is there way to pressure test these radiator on the bench ?
 -
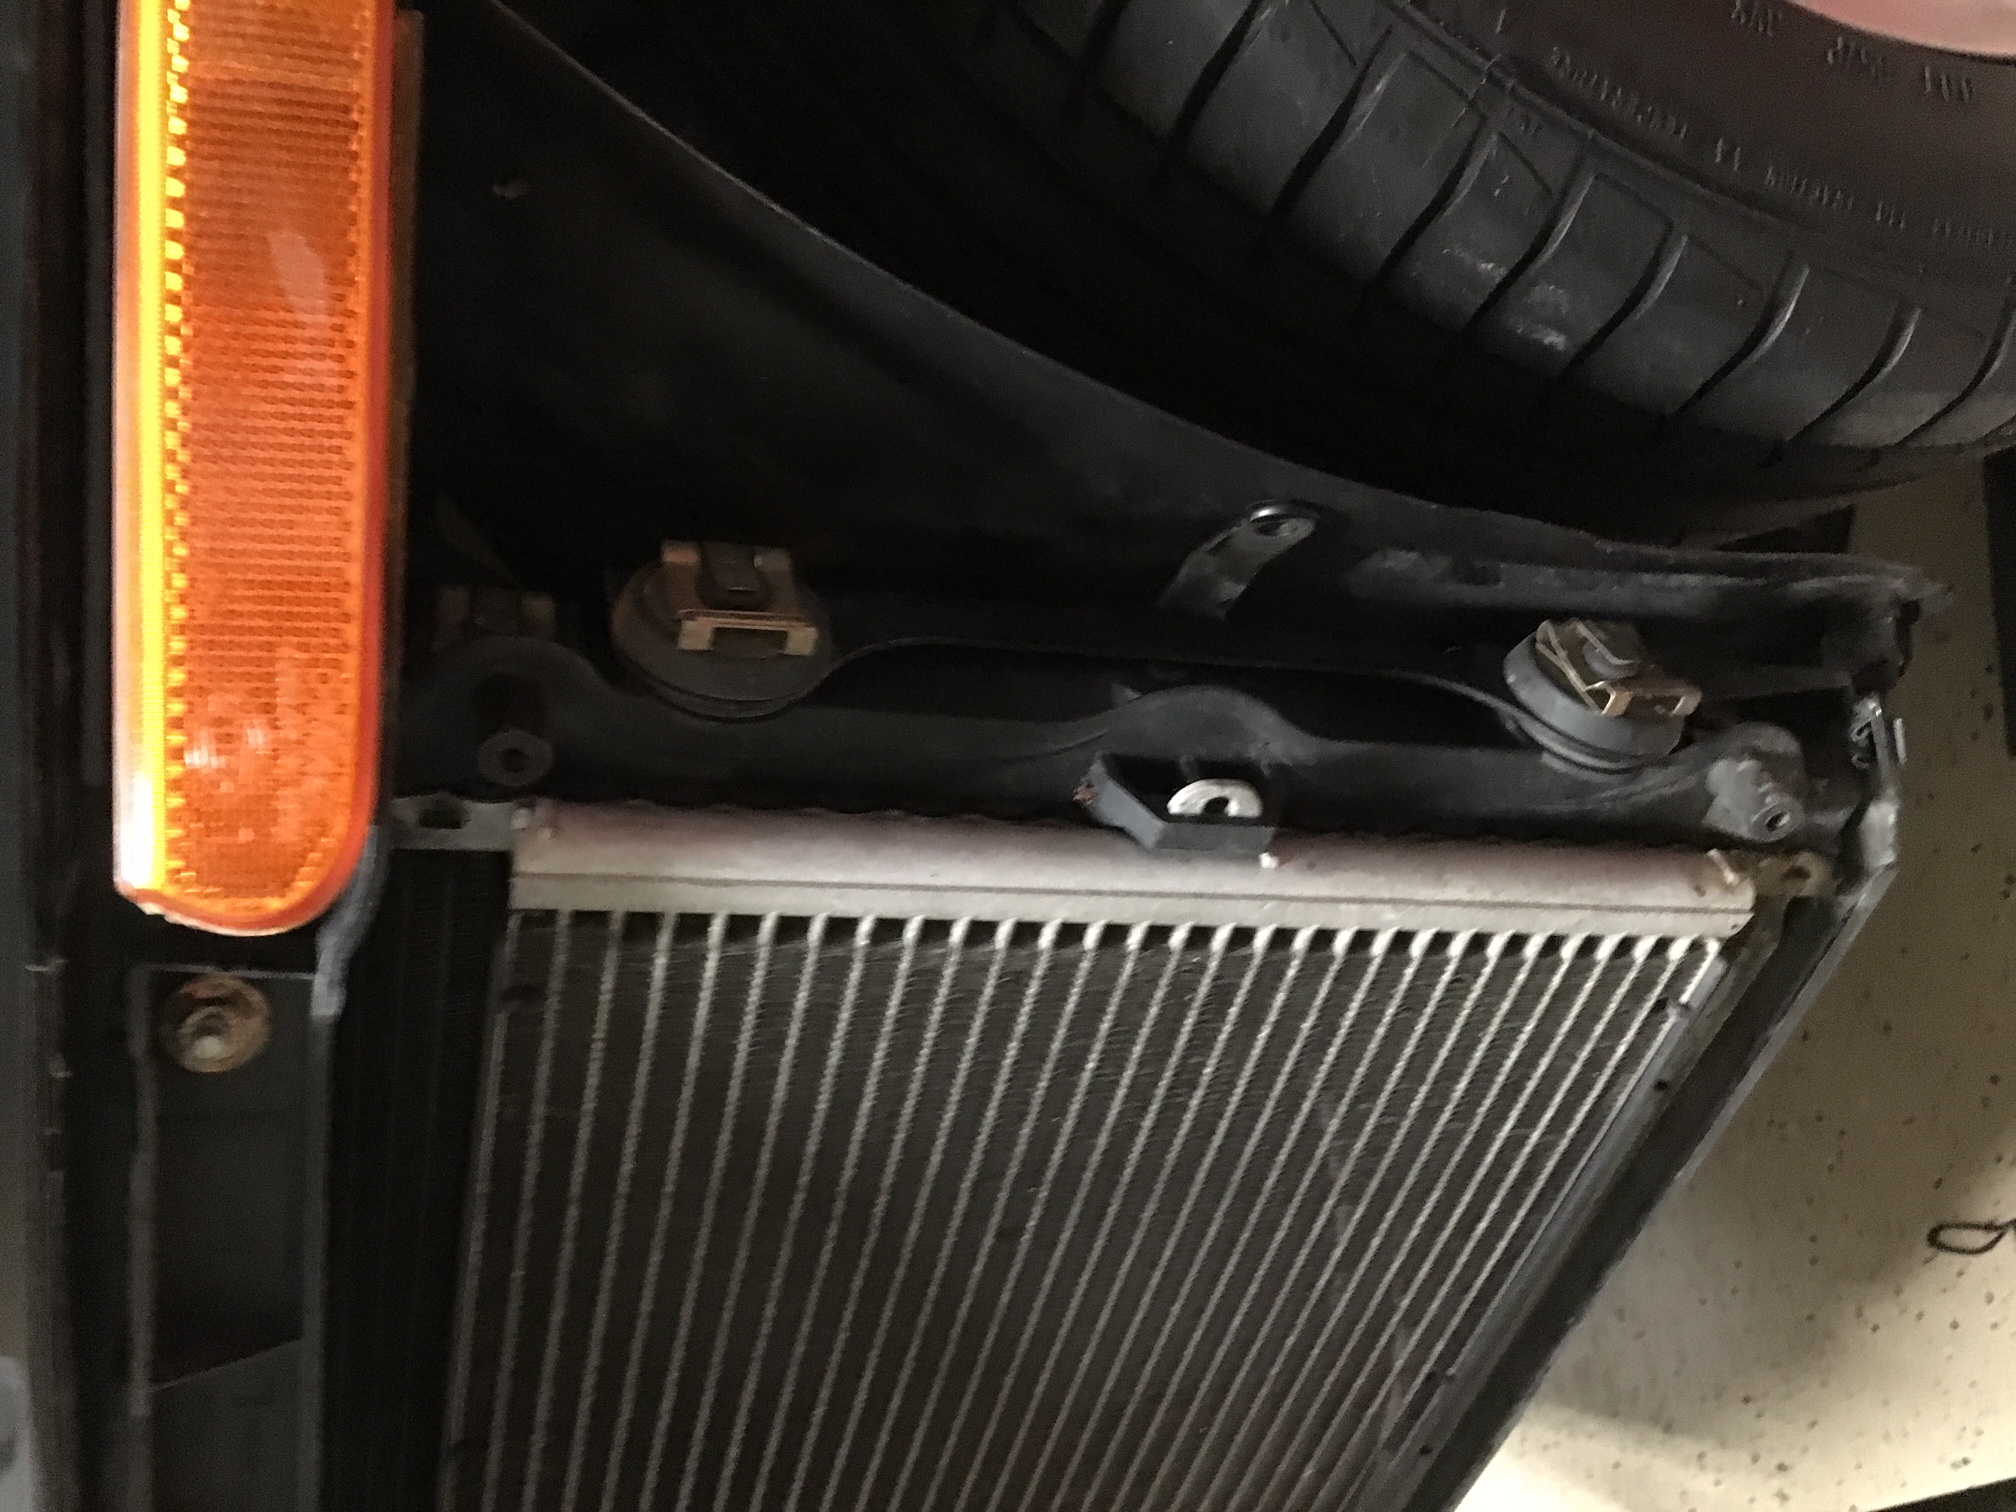
Hi Guys I suspect a pinhole on the driver side radiator, so I wanted to dismount the radiator and inspect it. My problem is I don't know how to remove the two clips (see the picture) without breaking them. Any ideas ? - Driver Side Radiator - IS this called left side radiator or right side radiator ? Does any one has a part number for this ? - I found a radiator on rockauto for under 200 bucks
-
 I'd like to turn on the radiator fans at about a temperature that's 10 degrees cooler than what they currently turn on at. Is there a way to do that? Different temp switch? Reprogramming one of the computers? If reprogramming, can the Durametric Enthusiast do the job or is the Pro needed? Or some other available tool?
 -
 Durametric says I have a problem with the passenger side radiator fan. Using the Actions controls to turn on the radiator fans, the passenger side fan does not turn on in either low or high setting. Previously while replacing brake pads I removed the wheel well liner and inspected the radiator unit. The fan turns freely when manually pushed but does not turn under computer control. So the fan motor appears to have failed. Driver's side fan works fine. The fan is mounted to the radiator as a unit and it appears impossible to remove just the fan without removing the whole unit, and given the tight space it appears necessary to disconnect the unit from the cooling hoses to do so. I was hoping to avoid this and replace just the fan. I have searched and there are numerous sources for replacing the whole unit but none (that I've found) that discuss whether the fan can somehow be removed and replaced by itself. Does anybody know if this can be done? 2005 Boxster, manual, no mods.
 -
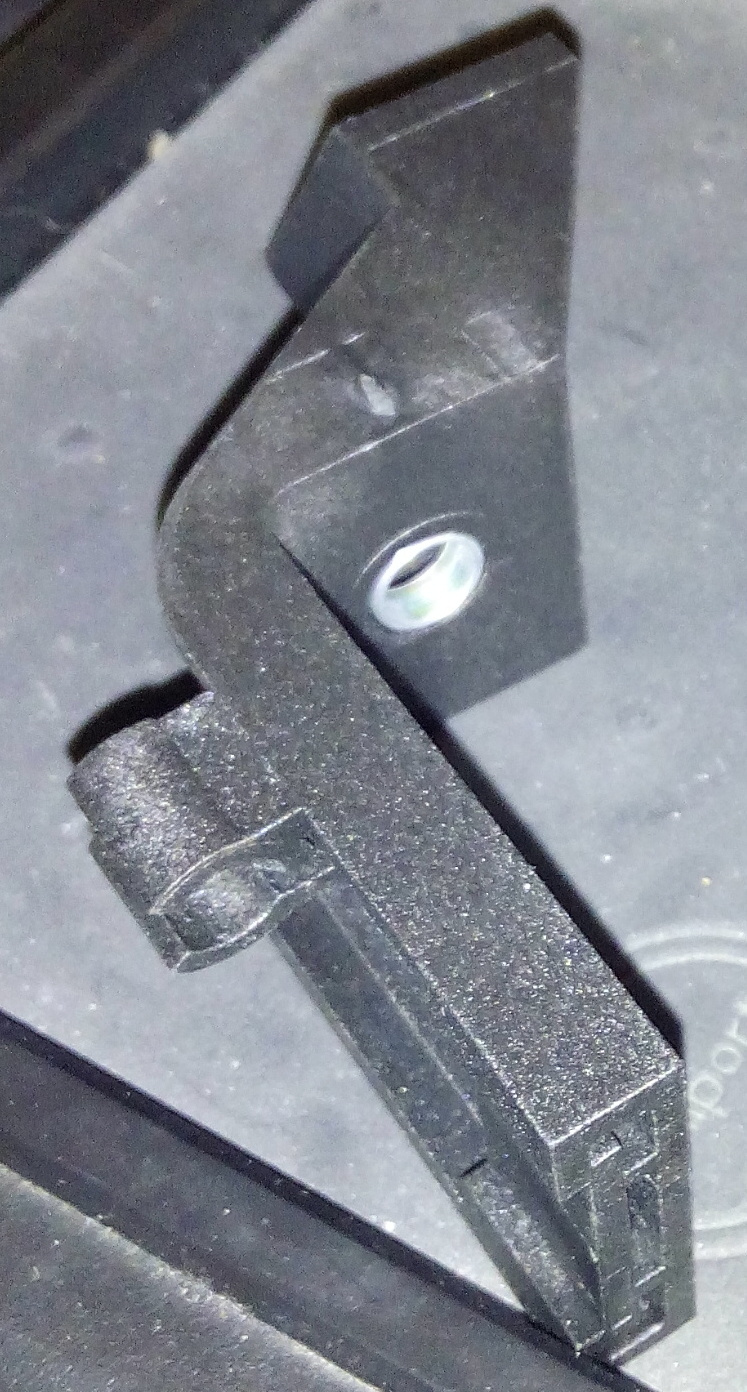
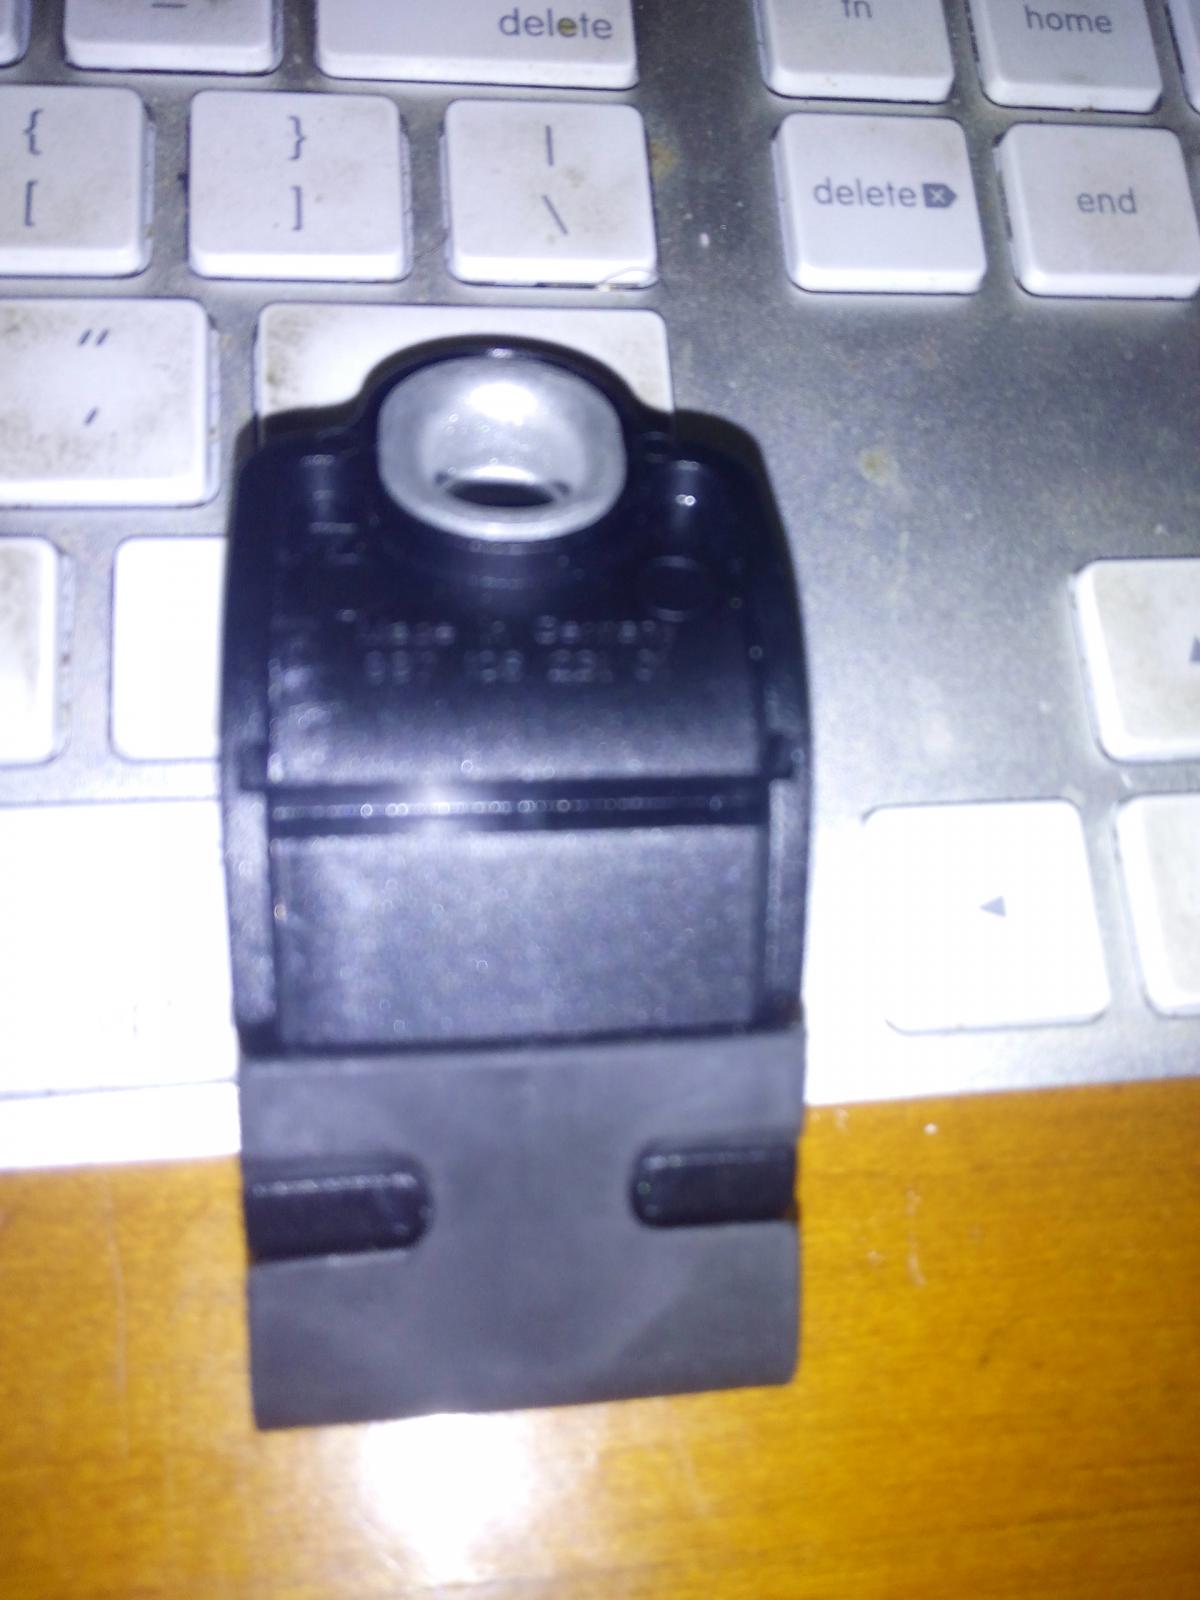
 Hi. I am putting together a project car (2006 C2S 3.8L) and have the radiators fitted except for a small item. My Pet diagram doesn't show how this part goes onto the radiator. Like most of PET it shows the parts exploded but out of context. It is a 997.106.453.00 it is some kind of hose holder. The second picture is this part 997.106.231.01. I don't know where it goes either. I was at the dealer in Long Beach this morning and they said that they didn't know how the item would go onto the car as they didn't have a 2206 997.1 to look at. Scary I know!. This tells me most of these guys are flying by the seat of there pants and the computer. Any pics of this part on the car would be quite helpful. Or a good diagram. Thanks
-
 Does anyone have a solution for debris easily getting into the radiator area? Leaves, needles, trash, etc. Under the license plate isn't protected at all, and the openings to each side allow tons of stuff through. I'm thinking something like the GT3 has -- mesh that fits right and looks right. Going in with a shop vac every second or third wash seems the only "solution."
 -
I recently purchased some used radiator air ducts for my 2006 C2S. The airducts looked great and no broken clips in the photo and when I spoke to the seller. However when the air ducts arrived some of the clips where you slide the air ducts onto the radiator were broken. I did see where the seller tried to tape them up to protect them so I can't blame the seller. The post office I can blame. Well has anyone ever repaired their air ducts clips? If so how did you do it? Bodyshop maybe? plastics fabricator? I hate to have to buy two more of these. ocmacman
-
 Well, when it pours it's raining.........got me a puddle o coolant under the car just as I pull in to send wife and child on a roadtrip. My X5 4.8i is at my mechanic's for oil valve seals. DANG. Now what? Probably just have it towed over to him rather than crawl under and start investigating.....no need. At least hoses are cheap, depending on which one went, if there's a common one that goes. Alu pipe conversion was done at 76k mi. i'll be perusing the coolant system diagram if anyone needs me. Borrowed an A6 Avant for them to enjoy. The back seat sure fit that baby seat better than my CTT!
 -

Clean Radiator Results, '00 Tip, 95k mi
crwarren11 posted a topic in 986 Series (Boxster, Boxster S)
Just wanted to post some results from recently cleaning my radiators. After owning the car for 14 years, I finally got to this! I didn't realize until recently how much this affects the cooling of the car. But after going through an imploded ATF cooler which caused an intermix problem in the cooling system and caused the transmission to die, I thought I had done everything to refresh the system back to normal. I flushed and cleaned all the coolant lines and put in a new water pump and low-temp thermostat, yet I was still getting regular readings higher than I'd like to see, in the ~205F range. So you have some reference, this is the front of the left radiator when I got to it: This is what dropped to the floor when I got the cover off (and what was still in the cover): Of course, I forgot to take pictures of what was between the front radiator and the a/c radiator, but it was at least as bad. All-in-all I figure I got about 6lbs of crapola out of there. So, here's what's really cool. Before doing the cleaning my temperature was regularly running into the right side of the "0", even when the outside temp was reasonable: That was typical, even after only ~12 minutes of my daily commute to/from work. As you can see, only 68F that day outside and it was still running hot. (Pay no attention to the time, I broke my clock adjustor several years back). Now onto today...it's been blistering out here in Southern California and this is my temperature after driving stop and go through the city for about 20 minutes, with 102F outside: Steady at 180F, even with pushing it pretty hard. I am seriously amazed at what a difference this has made! I've only been tinkering with cars for a few years now, so I never knew about the radiators getting clogged up and causing such a big difference in cooling efficiency. I've tackled some pretty big projects on this Boxster and my two BMW's, but just goes to show you that if you are ignorant about something so simple then you really have no clue how to address it. This was maybe an hour of work and a 1 out of 10 in difficulty. I'm sure this is an obvious thing to nearly all of you, and this is why boards like this are fantastic. I would have never known about cleaning the radiators (and many other things I've learned here) had it not been for all the contributions of time and effort to help guys like me who are just in our infancy of tinkering. Anyway, just wanted to share my results and say a big thanks to everyone who contributes here! -
 The lowest point on my '99 996 Tip is the radiator hose to the hose. I found this out the hard way. If you bottom out your Porsche, the hose gets scuffed and can cause a leak. After a good person warned me I was spewing something bad, I pulled over and saw the problem. Here's is what to do: If there is an auto parts store really nearby, race to it. Otherwise shut it down. Hopefully, your are in the city and can get the the auto parts store. If not, tow it. Buy a section of 1 inch radiator hose, straight, and two 1 1/2 inch hose clamps. Cut the hose about an inch longer than the tear. Slit open the hose. Wrap the new hose around the tear and secure using the two clamps. My tear was next to the engine inlet, so I had to remove the old clamp. If so, make sure you place the new clamp around the inlet. Note: if the leak stops spewing before you can fix it, you lost about three gallons of coolant. Allow the engine to cool. Then fill with coolant, 50/50 pre-mix. There will be trapped air. Note: even though the temp gage says its cool, the coolant may still boil over. If so, wait more. Check for leaks in the patch. Now drive the car a short way, keep an eye on the temp gage, aim towards a car wash. If the temperature climbs towards overheating, stop and allow to cool. Check for leaks. At the car wash, was car of all coolant and cool down the engine. The fill with coolant. There may still be air trapped, but you shouldn't have to wait for the engine to cool before filling the coolant tank. Now drive car cautiously. Look for the coolant level warning light. It is next to the over heat light on the temp gage. If it goes off, stop and fill with coolant. The patch should hold until you get a new hose. I am going to leave the patch on the new hose in order to protect it.
 -
 Hi, I hope you can help. I have a 2004 (986) standard 2.7L Boxster. The last couple of days There is a loud noise when the air conditioning is running. Seems way more loud than usual - especially at idle (probably because of less engine/road noise). I think the issue is that the fan behind the front bumber is coming on when I turn the air con on. The fan seems to be on anytime the a/c is on. Is this normal. It just seems very loud and I dont think it was there a few days ago. I looked at the radiator through the vents in the bumper and there seems to be a slight layer of dust on the radiator - though not too much. Could this be the issue? The problem can be heard even when I strat the car from cold. I have read that there are two fan speeds. When the A/C is turned on - what speed should they run at - how can I tell? How do I clean the dust from the radiator (preferably without having to remove the bumper)? Thanks TS
 -
 Hi folks, Learning a lot reading through these forums and thanks to all of the contributors. My Cayenne S 2005 had been behaving itself pretty well up till recently and then decided to play silly buggers. Radiator had been coming on intermittently following cold start and last week it a dropped cylinder followed by an emission light warning as the Cat screamed in protest. In the absence of a compression test, I suspect the misfire is either plugs or coils or both so I've ordered a set of each but am open to any suggestions?