Welcome to RennTech.org Community, Guest
There are many great features available to you once you register at RennTech.org
You are free to view posts here, but you must log in to reply to existing posts, or to start your own new topic. Like most online communities, there are costs involved to maintain a site like this - so we encourage our members to donate. All donations go to the costs operating and maintaining this site. We prefer that guests take part in our community and we offer a lot in return to those willing to join our corner of the Porsche world. This site is 99 percent member supported (less than 1 percent comes from advertising) - so please consider an annual donation to keep this site running.
Here are some of the features available - once you register at RennTech.org
- View Classified Ads
- DIY Tutorials
- Porsche TSB Listings (limited)
- VIN Decoder
- Special Offers
-
OBD II P-Codes - Paint Codes
- Registry
- Videos System
- View Reviews
- and get rid of this welcome message
It takes just a few minutes to register, and it's FREE
Contributing Members also get these additional benefits:
(you become a Contributing Member by donating money to the operation of this site)
- No ads - advertisements are removed
- Access the Contributors Only Forum
- Contributing Members Only Downloads
- Send attachments with PMs
- All image/file storage limits are substantially increased for all Contributing Members
- Option Codes Lookup
- VIN Option Lookups (limited)


Youri Ko
-
Posts
51 -
Joined
-
Last visited
Content Type
Profiles
Events
Forums
External Paint Colors
Downloads
Tutorials
Links Directory
Collections
Store
Posts posted by Youri Ko
-
-
Thanks JFP, always informative.
you should also note that correctly reallocating the cams requires some special tooling to accomplishIndeed, I,ve read through forums and here is what I gathered as alternative to using those tools.
Crank at TDC, Lock exhaust camshaft with camlock tool. Prime tensionner with heavy oil and thread it in tight to tension the chain. Loosen four sprocket bolts. Rotate crank out of tdc by few degrees and back to tdc. Tigthen four sprockets bolts.
How does that sound?
-
So while I'm doing my VarioCam pads with the engine on the ground, I came with few more questions.
If some of you remember, I had some deviation reading, steady -6.2 and -3 but on cold engine, so not a solid reading, but still, I take it as reference.
After reading through Porsche Manual, I studied their procedure of "retiming" the camshaft sprocket. My initial idea was to simply put the sprocket back exactly where it was, but would it be a good idea to actually play with it, to get a better camshaft position?
What I'm trying to understand, is what exactly is camshaft deviation value? Crank to Exhaust cam ? - I reckon it can be adjusted via the sprocket.
Or Crank to Intake Cam - thus, the whole varioCam rig comes into play, ramps, chain, teeth etc.I worked on few engines in my life, mostly belt driven, and never seen anything that allows so much "adjustement" via the sprocket. Looks ingenous to me, no matter how stretched the chain gets, just rotate the sprocket back to align cam notch vertically, with crank at TDC and bingo?!
-
-
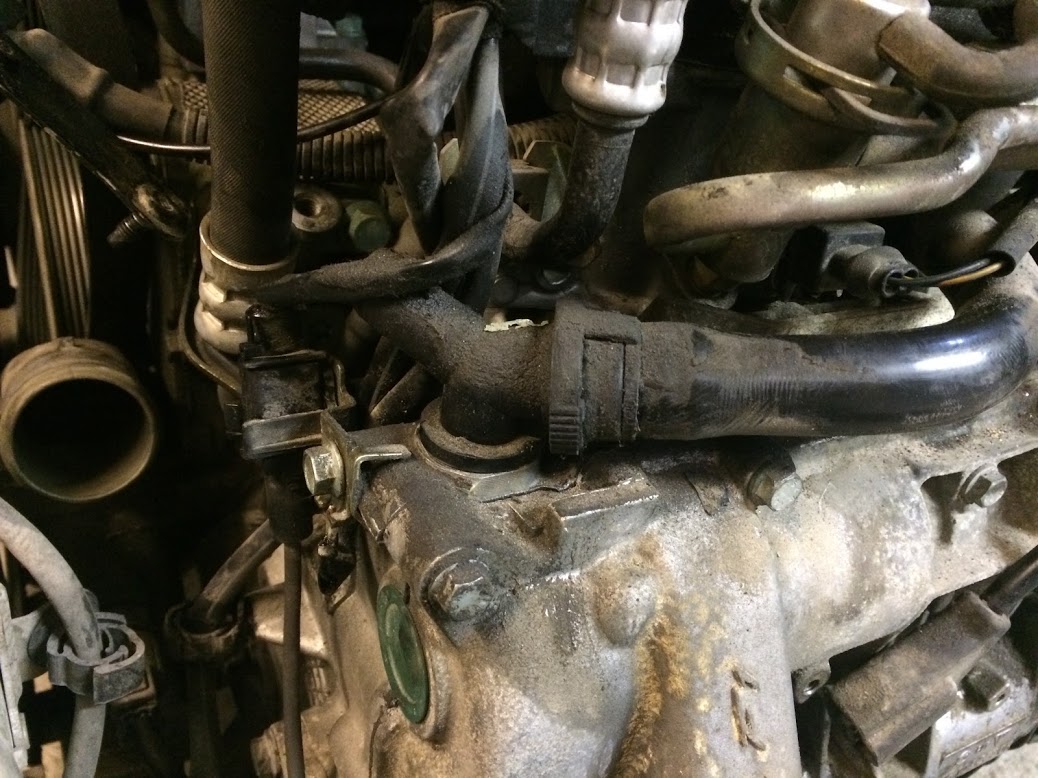
Got this obivous leak. What needs to be changed exactly to fix it properly?
Thanks
I don't see a leak, just a lot of accumulated dirt. What are you referring to?
Sorry, my bad, forgot to specify, engine was washed two times before the pic was taken.
Leak was surounding that plastic Y shaped thingy, some sort of a breather, with 3 ends. Plain middle of the picture.
-
Got this obivous leak. What needs to be changed exactly to fix it properly?
Thanks

-
Thanks.
Thinking to go with Pelican $$ if mine is single. Any inputs?
-
It can be done with the engine in, but it is a bear; almost like building ship in a bottle. With the engine out and on a stand, it is much easier.
Just how are you planning to "check the IMS"?
JFP - exactly the guy I was hoping to get a reply from!!
Just how are you planning to "check the IMS"?I don't know - you tell me :D
-
I have same issue as the OP and in my case, problem was IN the mirror. It was replaced by previous owner for some reason, but with a cheaper, non seat memory version, as they are much more widely available from wreckers I suppose.
To find out, remove the mirror and counts pins. Has to be 10 or 11
-
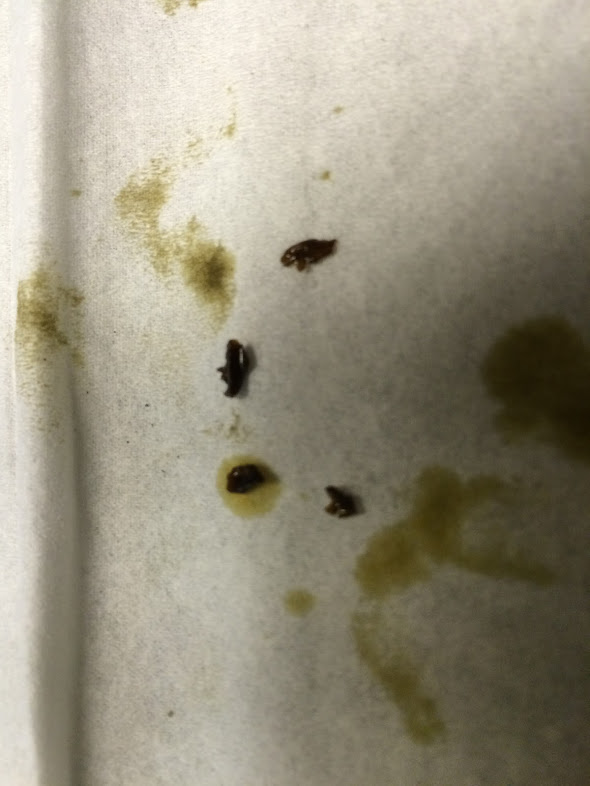
Good monday morning!
Pulled my sump yestarday, found 4 littles bits 1/16x1/8" of brownish plastic. 2001 C2 90K
I have some deviation on bank one of -6.2 so from my limited knoledge, variovam pads need to be replaced.
Anyone done it with the engine in? Any inputs?
I'm leaning more towards pulling the engine/tranny out, and doing them "confortably". And while in there. check the IMS, water pump and stuff.
All info will be appreciated.
-
EPS has a repair sleeve to fix the regulator cable problem that plagues these cars regularly. Also there is a good instruction on thier site showing the problem and the repair. The sleeve is $59 OR you can use a bicycle cable adjuster to fix it on the cheap.
Wow, I'm not crazy then!! :)
-
Question - I only have ONE key fob that car starts with, but the fob does not wor,, lights blink but nothing happens on the car's side.
Plan was to go the dealer for new fob + plus programming (around 450CDN)
I'm tempted to try the fix but would like to know, in case I mess up the circtuit board, what are my chances to be stuck with a non starting car and have it towed to the dealership?
Thanks
-
 1
1
-
-
Keep in mind that my "fix" is for a brand new regulator off eBay too. Window was not dropping enough.
Did you "train" the window after the regulator replacement?
Of course I did
For me, taking any slack out of brand new regulator, was what fixed the problem. I still belivem, OEM regulator would do better, I purchased an aftermarket one, which looks simillar but lacks in precision I believe.
-
Take the car for a good run, and then recheck the values
Good to hear, but that will be in spring only.
Meanwhile, while we're on the topic, what exactly needs to be replaced - twe two "C shaped" wear pads that go between two cam sprockets?
And in my case, that would be Bank 1 I reckon? which is on Left / Drivers side of the car, right?
Thanks
-
Test was done on a barely warm car with no test drive.
So from what JFP says, nothing to be alarmed so far?
I will dissect the oil filter soon and will probably drop the pan later on for a piece of mind.
-
Hello all,
some background, I got 2001 C2 with about 85K on it. No history except that the car was tracked as some point.
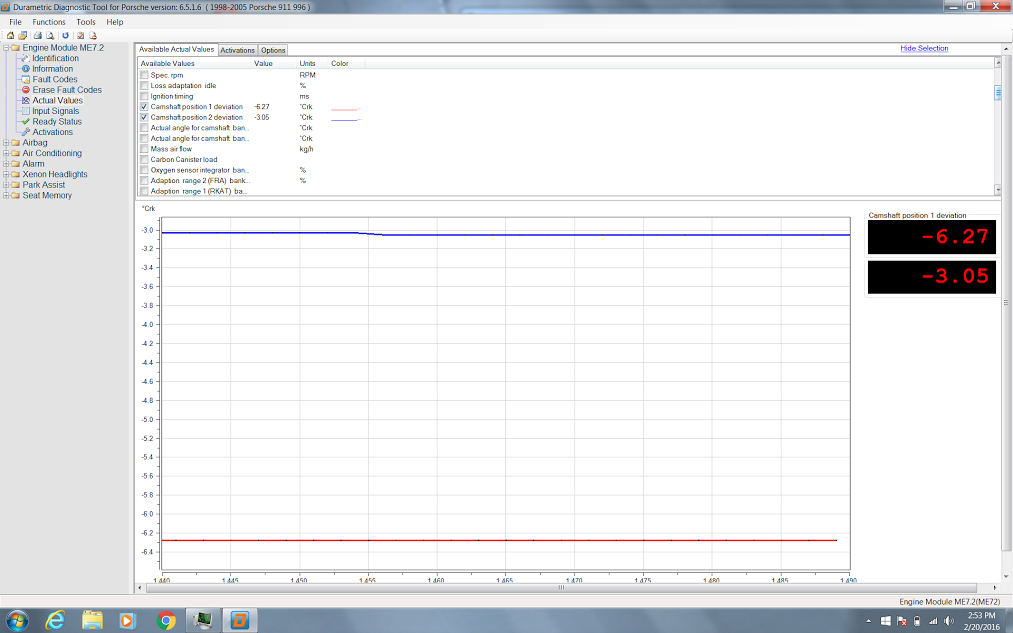
I was playing with the idea of doing the IMS PM but first, learnt about the cam shaft deviation check procedure.
So I got Duramtric and here is what I have :
Camshaft 1 : - 6.27
Camshaft 2 : - 3.05
not sure for how long I'm going to keep the car, but don't mind to work on it for bit while winter is still here. What would you do as next step? I have dirty injectors/ fuel rail to take care of, so I was about to do that, but the Camshaft thingy got me alarmed .
Open to comments and suggestions....
thanks
-
Keep in mind that my "fix" is for a brand new regulator off eBay too. Window was not dropping enough.
-
Keep in mind the picture was taken of the passenger side regulator. Connection you see is more towards the front of the car. The idea is to tighten the cable as much as possible to eliminate any wiggle it may have while operating. Just get in there and operate the window switch, you'll see the cable jumping in place. I figured that this "slack" was causing the window not to drop fully as some movement was lost in that slack.
FIY, use Pelican parts free online guide to get in there if you never took a door panel off before - you don't want to damage anything trying to get in there.
-
1
-
-
Besides checking all the switches (requires a voltmeter and some basic electronics knoledge), if your window "drops" but by a very small ammount - problem is mechanical, Here is what I did on a brand new window regulator that was not giving me the full drop .
http://rennlist.com/forums/996-forum/899393-lazy-window-drop-fixed.html
-
1
-
-
I have two taillights for sale which have solid housings but cracked lenses.
-
eBay the hell out of it!
-
I may chime in as I just did mine :
They had this terrible "clear coat" applied over them which baked in the sun and made the polishing process harder as I had to sand that one off before actually sanding the lens.
All work was done using Griot's DA polisher and wet sanding disks. Lowest I went was 600 and if it was not for that clear coat, I would not go lower than 1000 personally.
Never heard of that solvent people mention, wander if that would remove the clear coat I had on them and make job easier.
-
Quick answer would be NO - been there, done that, C4s are 11" yours are 10" in the back, but that is not the main problem, problem is offset on those 11s. They will stick out by almost 2inches pas the fenders, and look stupid. Rolling fenders, huge negative cambers is what would be needed to make em tuck in. I had to return mines and ask for a refund, lesson learned.
-
Thanks for sharing
I have not called the dealer yet though
-
Hello there,
I took my headlights off for repolishing, noticed one of my seal - rubber trim that surrounds the headlight is cooked.
i've looked throught parts list on porsche.com and did not see the part being sold separately, anybody can confirm on that?
Thanks
About to do my chain pads - engine in or out?
in 996 Series (Carrera, Carrera 4, Carrera 4S, Targa)
Posted
Thanks Ashai, nice looking kit there.
In my case, only VarioCam pads get replaced. All the other components remain the same. So putting the sprocket back to where it was can not make things worse, IMO. The engine ran fine with the sprocket at that given location. New vario pads should only tighten things a little bit.
I still may try out the procedure I outlined in my previous post, will see how it goes.