Welcome to RennTech.org Community, Guest
There are many great features available to you once you register at RennTech.org
You are free to view posts here, but you must log in to reply to existing posts, or to start your own new topic. Like most online communities, there are costs involved to maintain a site like this - so we encourage our members to donate. All donations go to the costs operating and maintaining this site. We prefer that guests take part in our community and we offer a lot in return to those willing to join our corner of the Porsche world. This site is 99 percent member supported (less than 1 percent comes from advertising) - so please consider an annual donation to keep this site running.
Here are some of the features available - once you register at RennTech.org
- View Classified Ads
- DIY Tutorials
- Porsche TSB Listings (limited)
- VIN Decoder
- Special Offers
-
OBD II P-Codes - Paint Codes
- Registry
- Videos System
- View Reviews
- and get rid of this welcome message
It takes just a few minutes to register, and it's FREE
Contributing Members also get these additional benefits:
(you become a Contributing Member by donating money to the operation of this site)
- No ads - advertisements are removed
- Access the Contributors Only Forum
- Contributing Members Only Downloads
- Send attachments with PMs
- All image/file storage limits are substantially increased for all Contributing Members
- Option Codes Lookup
- VIN Option Lookups (limited)


scanner-1
-
Posts
62 -
Joined
-
Last visited
-
Days Won
2
Content Type
Profiles
Events
Forums
External Paint Colors
Downloads
Tutorials
Links Directory
Collections
Store
Posts posted by scanner-1
-
-
Diagrams are from my Bentley manual covering 1997-2004 Boxsters.
Note: these diagrams are for 2001, but there are no later years in this manual (maybe 2001-2004 are all the same?)

-
Update for anybody still wondering:
I swapped my new Shrader equipped wheels on to my wife's 2013 Cayenne Diesel and had the exact same issue (front wheels not identified).
I went to TPMSdirect and bought 4 HUF IntelliSens for $33 a piece. They arrived in BHsens IntelliSens boxes with a sticker saying they were programmed for a 2011 Cayenne Turbo. Same indy installed and 5 minutes later they were working fine.
I'm pretty sure that HUF is the OE for Porsche and BHsens is their joint venture with a Chinese company. The sensors look, smell, taste and act like the genuine part.
Bottom line: DO NOT buy Shrader 29138 for your 958 Cayenne.
-
So it's a few years later, a new set of wheels, tires, TPMS, and unfortunately an update on what TPMS does NOT work on my 2011 CTT:
My old UVS2000 HUF Intellisens (installed 2017) were still working fine when I had my indy install a new set of Porsche wheels and Pirelli tires (went from 20" to 21"). I was unable to find the same sensors (discontinued) and my search led me to some very reasonably priced Shrader 29138 (Pre-programmed for Porsche) sensors. After install, the Porsche relearn procedure would only pick up the two rear sensors. After multiple tries and a call to Shrader tech support, I swapped front wheels to rear and rear to front. Again only the rear two sensors were picked up by the TPMS system. My current theory is that the Shrader TPMS outputs at a slightly lower signal strength and is unable to reach the TPMS antenna located on the rear axle.
Any other thoughts or experience with these particular sensors is appreciated.
-
Just to be clear, there are two "resets" available under the Reset PCM menu:
1.Factory Settings
2.Vehicle Handover
Vehicle Handover is the one you want.
-
-
Many thanks Loren. That diagram was exactly what I needed. The valve in question is hiding in plain sight on the front of the engine, well obscured by the serpentine belt and a host of pulleys and not easily accessible due to radiator, etc.. For unknown reasons, the wiring was severed about four inches from the valve. The wiring harness gave me just enough play to back it out and do a soldering job in the left front wheel well. Reconnected and the code is now clear.
My next question is, what is your source for the diagram? Do you have a repair manual recommendation? Locating that particular diagram would have saved me hours of fruitless internet research--Thanks again!
-
2013 Cayenne Diesel
Problem:
P164E00 Oil pressure control valve: electrical fault
(No check engine light)
Does anybody have any idea where this valve is located on the 3.0L diesel? I think I have found EVERY sensor/control BUT this one--is it underneath the intake manifold?
-
Yes-ish, it works in slow and go traffic. It works pretty well if you never come to a complete stop--if you do, you will have to hit resume to get the car to continue.
Overall, I'm not a big fan of the system (although this could be because I'm not a big fan of the push towards automation of street vehicles--especially ones that are so good to drive). My biggest complaint is that in traffic it is not aggressive enough when re-accelerating (car ahead moves out of the way or picks up speed quickly), which invariably leaves enough gap for another vehicle to cut in front and actually push you to the rear of the pack! For me, it's best use is on the long single file construction lane that you can't pass or be passed on, it will keep perfect trailing distance and keep you from rear-ending the vehicle ahead as you fall asleep.
-
I think you’re looking for Adaptive Cruise Control (ACC). Don’t know when it first came out, but it’s on my 2011 Turbo. If it brakes the vehicle to a complete stop, it requires you to hit the resume switch in order to accelerate again, other than that it works like you’d expect.
-
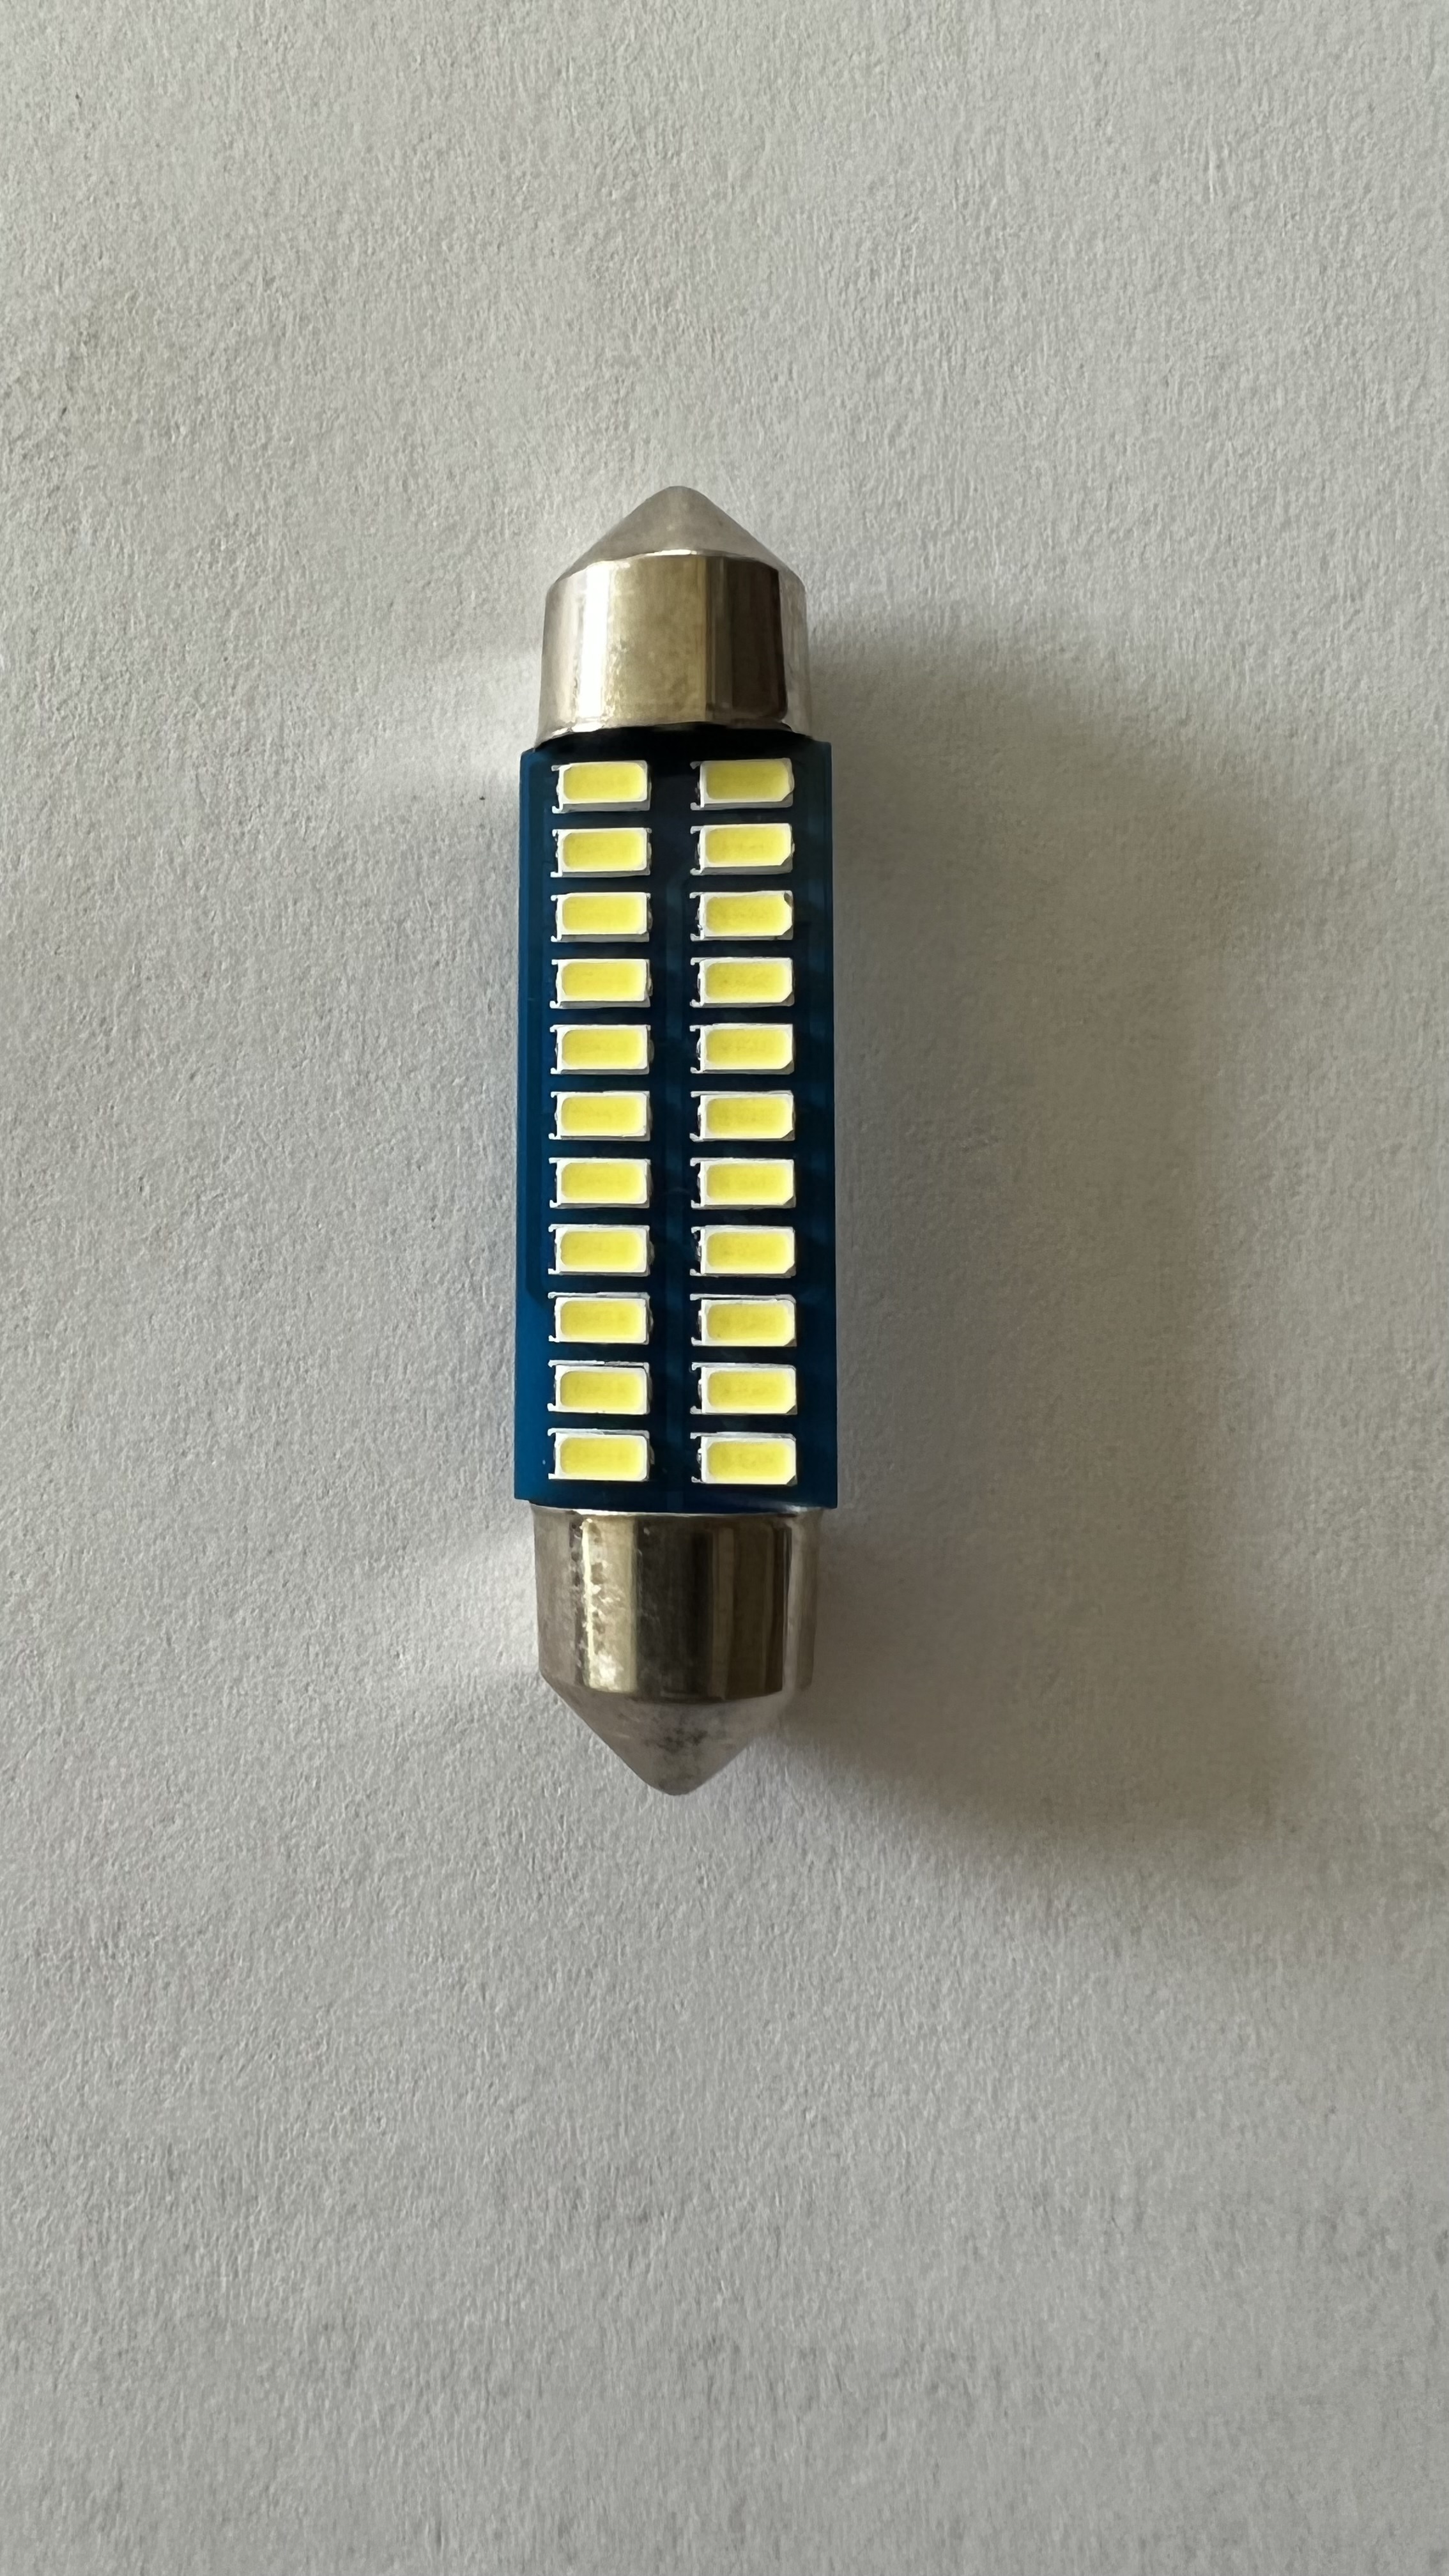
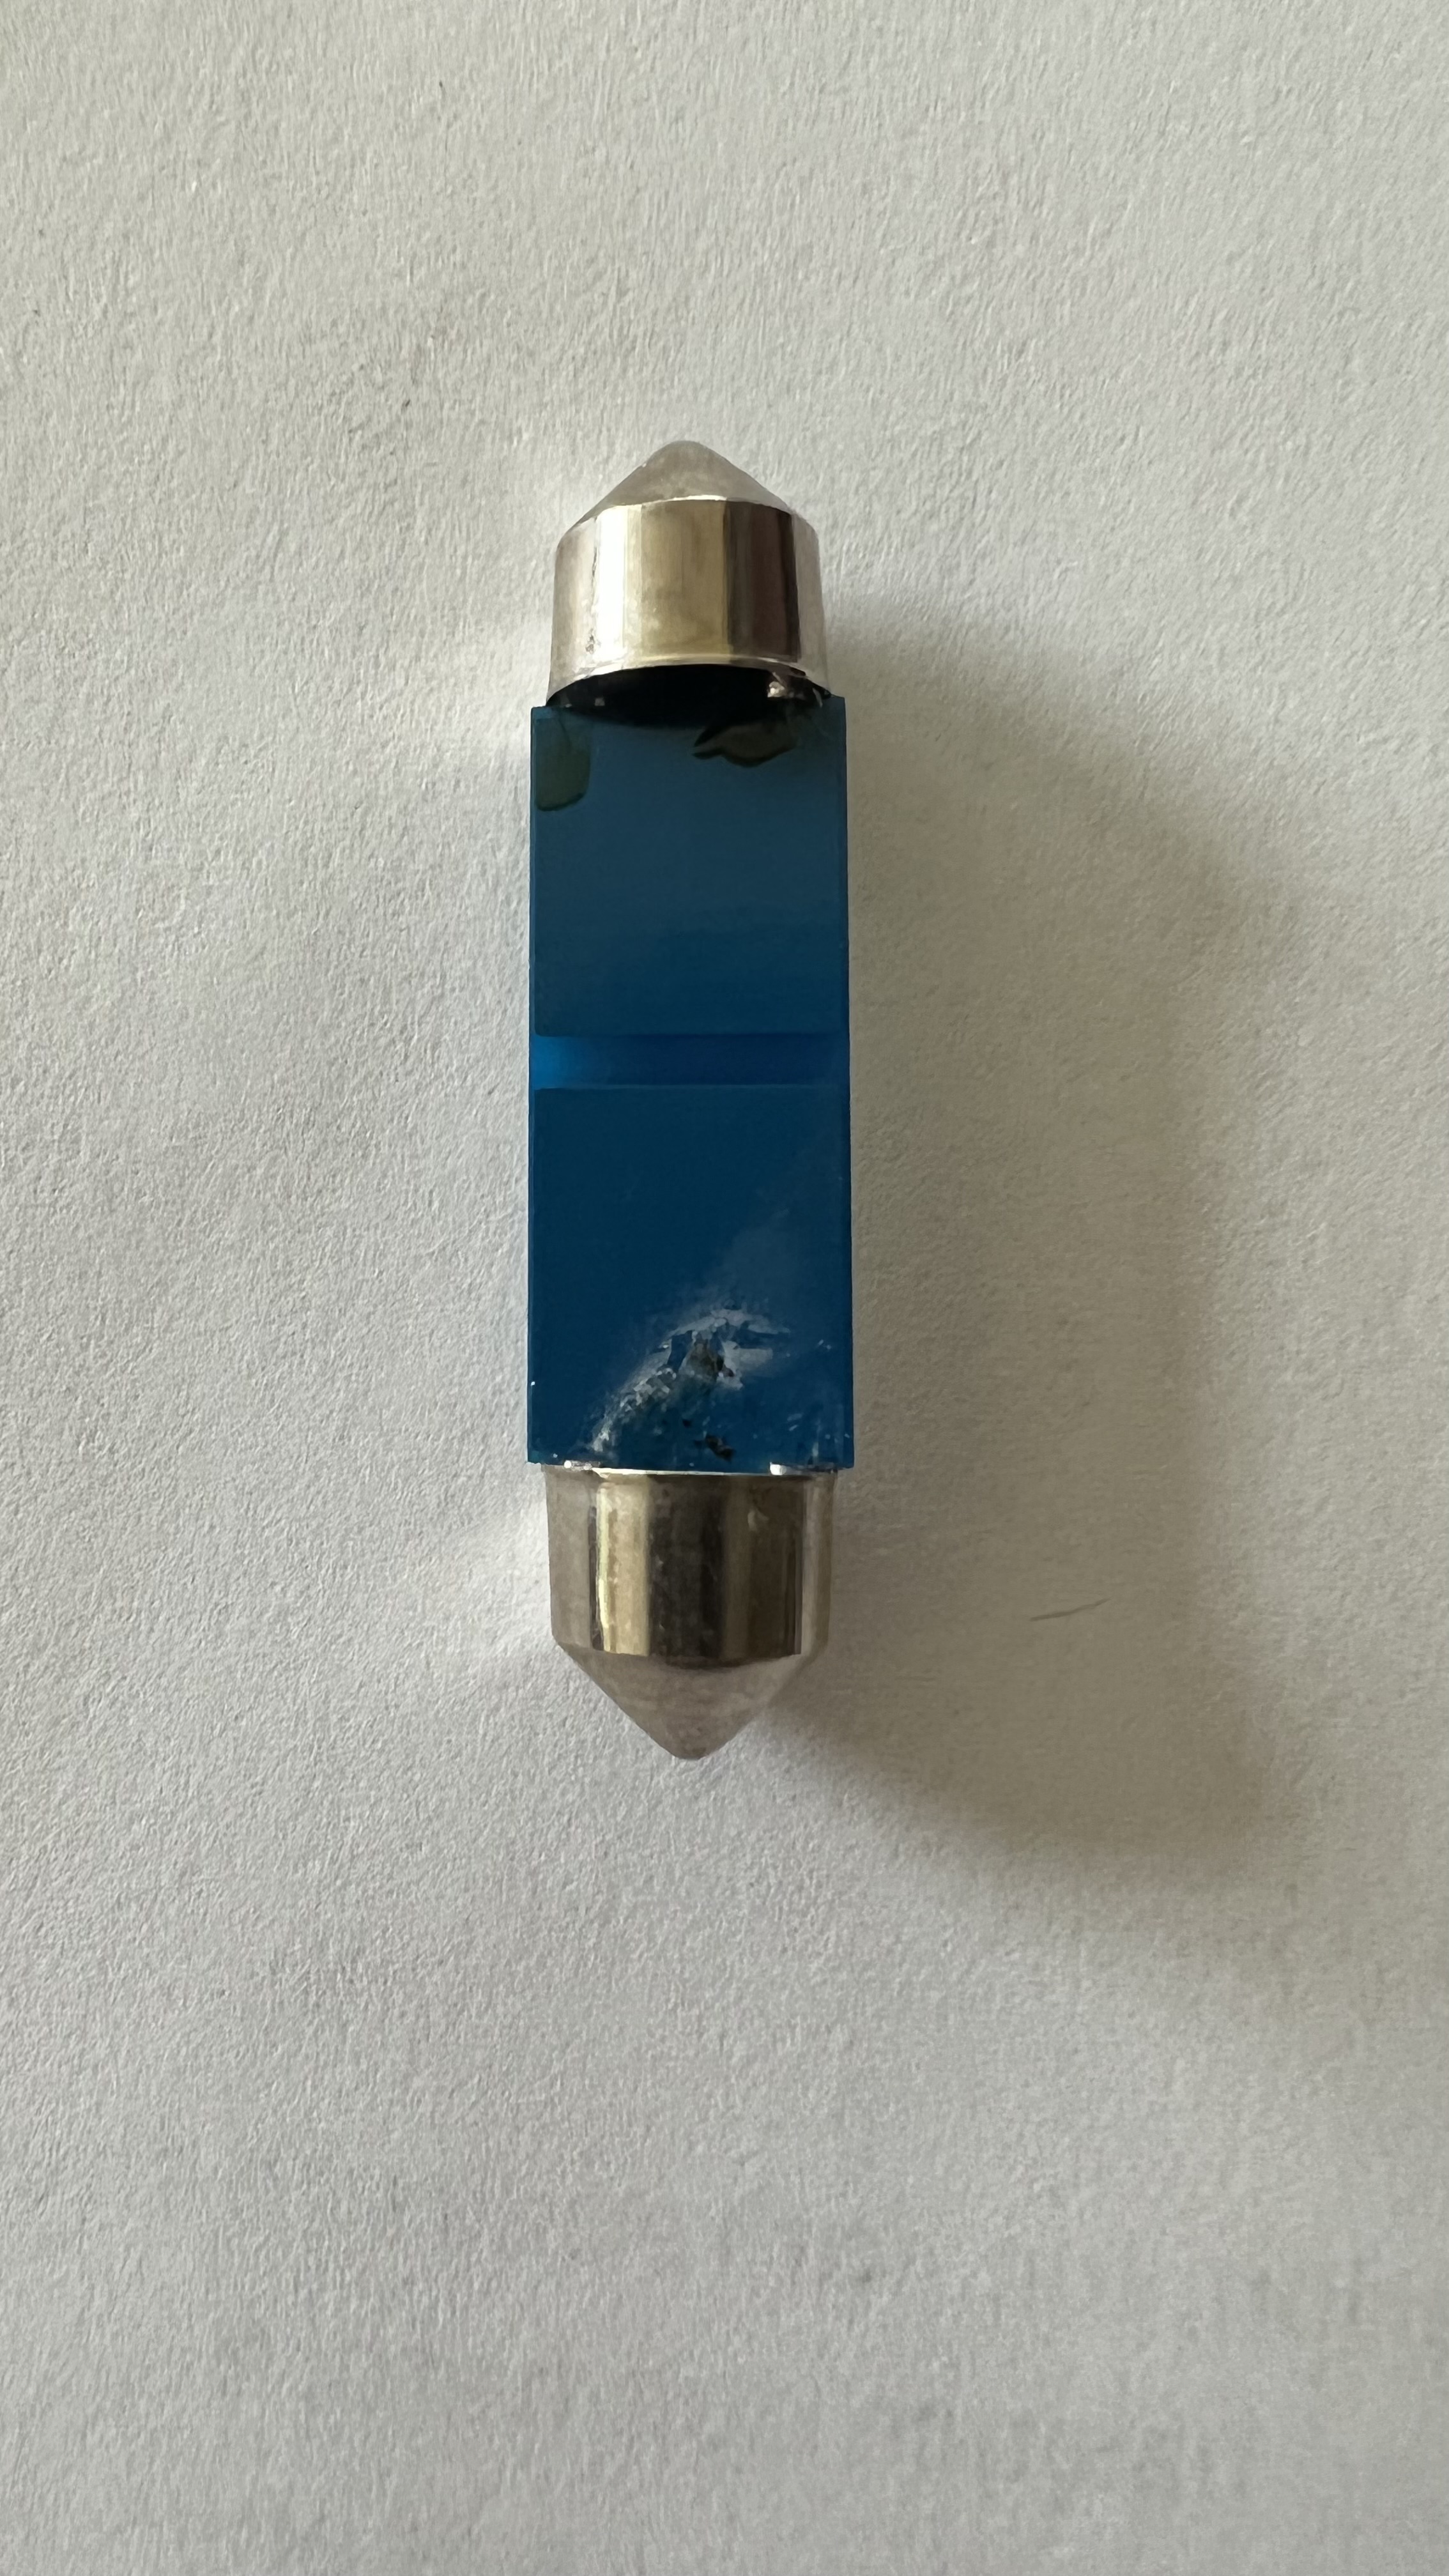
I replaced the frunk and trunk lights on my 2003 with LEDs and they work great, no codes. Problem is sorting through the vast number of replacement bulb options out there. I probably got mine from ebay. I don't have a brand name, but here's a picture:

-
I think I now understand the difference in quantities.
According to the manual, part of the procedure includes draining the ATF lines at the bottom of the transmission AND draining the front ATF lines.
To drain the front ATF lines, you must remove and install the ATF thermostat--to do that, you must remove the front apron (bumper cover). Seems like a lot of work for maybe only a small amount of fluid to replace.
So just a few last questions from the guy who doesn't want to remove the bumper:
How much fluid did the initial fill require?
How much fluid required to top off after the warmup?
-
Kenny,
I have found a kit from Blauparts that comes with 9L of fluid, the manual I have says filling capacity is 10L, you said 10L gave you two changes--can you shed some insight?
Did you drain the lines to the radiator?
My manual also specifies 2 special tools (adapters) for filling, did you use these or were you able to fill and check levels without them?
Thanks!
-
Did you have a bad wire or connector?
I recently tried a cheap door lock actuator on my 2011 Cayenne Turbo. It worked intermittently and gave implausible signal codes so the alarm would not set.
It was from a place called excellent-autopart on eBay. They were responsive until I asked for a refund then went comm out. This cheap Chinese part and this vendor is a non-recommend from me.
The URO part from Rock Auto that is in there now has been working great--twice the price of the knockoff, but 30-50% less than the Porsche part.
-
I was hoping you would get some traction on this question as I have a 2013 CD with 160k and a 2011 CTT with 80k and I am contemplating doing the trans fluid on both.
What did you end up doing with yours?
Note: I have replaced the transfer case fluid in the CTT 15k ago with Ravenol TF-0870 and it is working well.
-
So I just replaced THREE (yes 3) rear door lock actuators.
To recap:
Left rear door exterior handle would not open the door after unlocking with keyfob or by proximity.
Right rear door would not lock (and no confirmation beep).
Since it was a bigger security issue, I replaced the RR first and decided to experiment by buying the $37 actuator from Hong Kong as found on eBay. The door lock would now physically lock, but the alarm would not set. Occasionally, the exterior handle would not work either. I was unable to clear DTC 000843 Central locking closing unit, implausible signal.
Due to my experience with the $37 part, I decided to splurge for the $91 URO Parts actuator for the left side. This part worked perfectly and solved the problem.
I then went back to Rock Auto and bought the URO Parts right side actuator (why this one costs $17 more than the left side remains one of those mysteries). The RR door is now working perfectly, all codes reset and alarm confirmation chirps occur when locking.
Lessons learned:
The screws that clamp the window regulator to the window glass are reverse threaded (at least as viewed from inside the car, the E-Torx end, size E-6). Pay attention to the torque specs here (4.5 ft-lb). If you shear this end off, you will kick yourself and likely spend the next week trying to figure out how to loosen that screw--ask me how I know.
Reassembling: in order to reinsert the automatic shade rod, you will have to lift the door panel to the exact level that automatically disengages the upper tweeter connector--a mere 1 inch more of tweeter wire would have made this job almost too easy. I suggest you test the stereo before putting all the trim back on, my diagnostic tool speaker test warned me (an embarrassing number of times) that I had accidentally disengaged that connector!
And yes, you will break at least one of these: 955 555 243 00.
-
 1
1
-
-
There are two (one for each bank of cylinders). You probably only need one, your diagnostic tool will point you to which bank's VVT solenoid has failed--hard to believe both have failed simultaneously.
-
 1
1
-
-
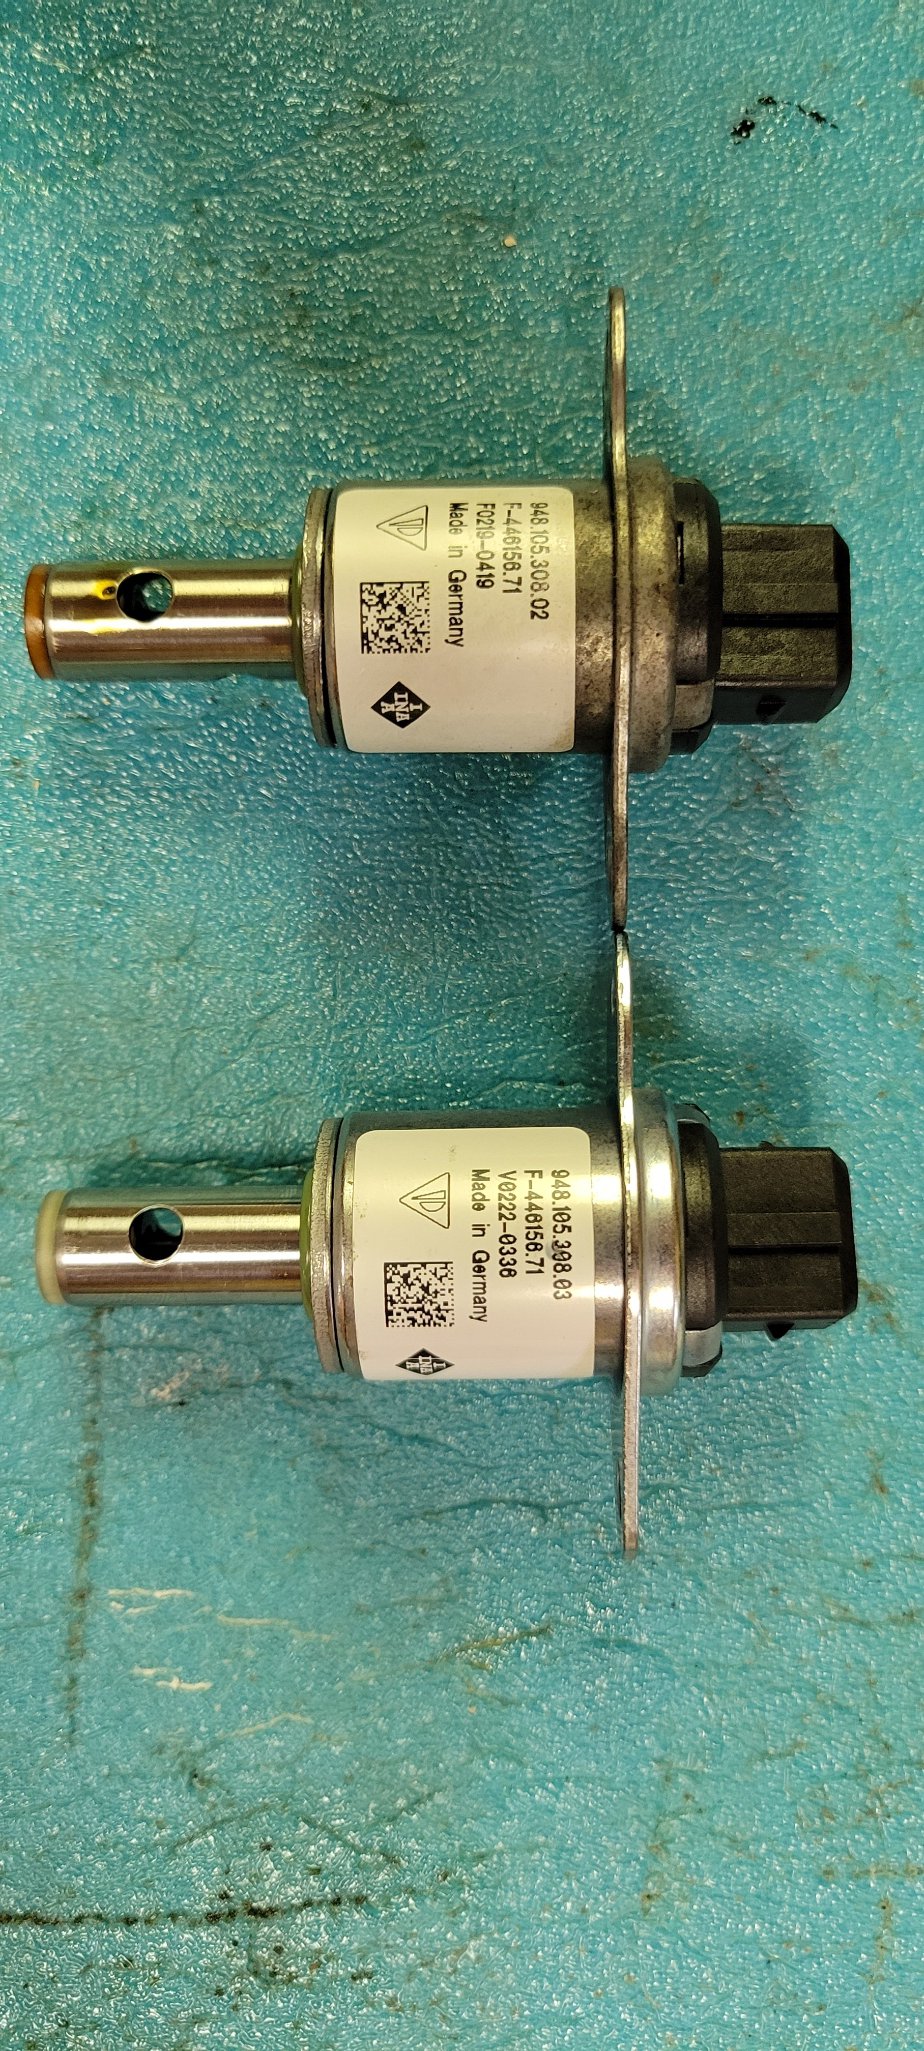
A new VVT fixed mine too. I am cheap, so I bought the following from Pelican:
Variable Timing Solenoid(2011 Porsche Cayenne Turbo Sport Utility)(m)
Part #: 948-105-308-03-M40$45.25
See if you can tell the difference between cheap and expensive:
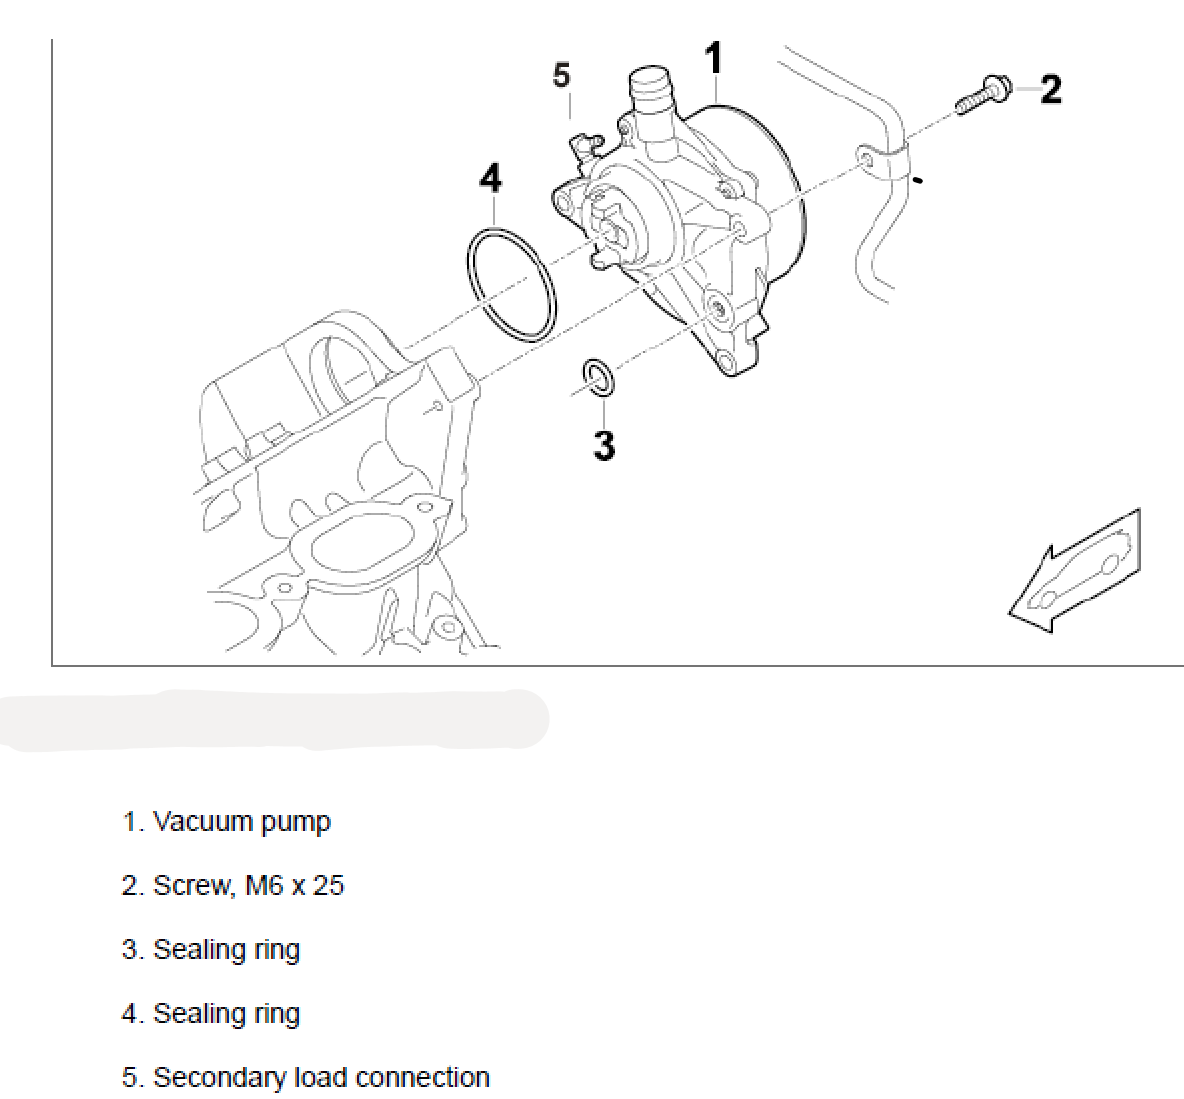
My arms were not long enough to access from the bottom. I did not remove the wipers and fascia as the manual suggested to access the vacuum pump. My main access was from the top combined with through the right wheel well (removed the wheel, fender liner and slightly bent a heat shield). Tip: only loosen, do not remove the top left screw on the vacuum pump, remove the remaining vacuum pump mounting screws and the pump will back out/twist enough to allow removal/replacement of the VVT. Be prepared for some oil to leak out and ensure the vacuum pump o-rings remain in place . Small tools and a willingness to work by feel/limited visibility are recommended if going this route. Knowing what I know now, this is less than a 2 hour job.
-
2011 Cayenne Turbo, 85K miles, 3/4 tank fuel
Car started normally 4 times/ran flawlessly for about 45 minutes driving during a 2 hour period. After the last 30 minute rest, the car would crank but not start, then intermittently start after a long crank and subsequently stall. An engine reduced power warning would display and continuous check engine light. Eventually engine would not start or not run for longer than a few seconds.
I read/reset codes with the following results:
P0192 Fuel Rail Pressure Sensor Circuit Low Input
reset and did not returnP1031 Fuel high pressure sensor stuck at start
unable to resetP1024 Fuel high pressure too high after engine off
reset and did not returnCar still unable to start/maintain idle.
After about 1 hour, I returned to the car, reset codes (this time all cleared)--the car started and ran flawlessly!
Anybody else have something like this happen? Should I replace the High Pressure Sensor or order and keep one around--are these prone to failure? I'm having a hard time finding a diagram with the HP Sensor for the Turbo engines, is it located under the intake manifold like the non-turbos? If so, is intake manifold removal on the turbo very difficult? Any other things I should be considering?
-
On 11/4/2018 at 6:17 PM, Quickster2 said:
Replaced the valve lift solenoid. All is good now.
MY2011 CTT, 83K miles, intermittently rough idle with the following codes:
P1372 Valve lift control, bank 1
P1361 Valve lift control, cylinder 2
P1363 Valve lift control, cylinder 3
P1362 Valve lift control, cylinder 4
I suspect the valve lift solenoid. It looks like an easy enough job (which means I have obviously missed something).
Quickster2, did you do this yourself? If so, any tips or tricks to pass on?
Additional info (or does anybody else see a different diagnosis or suggest other data to pull?):
I have no frame of reference for the camshaft deviation numbers, do these differences from between bank 1 and 2 seem odd, normal, or appropriate for this problem?
N010_Nominal intake camshaft angle 130.88 degree CRK
N020_Actual intake camshaft angle, bank 1 130.88 degree CRK
N040_Actual intake camshaft angle, bank 2 130.88 degree CRK
N030_Camshaft deviation, bank 1 3.75 degree CRK
N050_Camshaft deviation, bank 2 -0.38 degree CRK
N080_Camshaft adjustment valve activation, bank 1 8.99 %
N090_Camshaft adjustment valve activation, bank 2 8.99 %
M005_Engine roughness reference value 65498 us
M010_Engine roughness cylinder 1 1024001856 us
M020_Engine roughness cylinder 2 1024001856 us
M030_Engine roughness cylinder 3 1024001856 us
M040_Engine roughness cylinder 4 1024001856 us
M050_Engine roughness cylinder 5 9.27 us
M060_Engine roughness cylinder 6 19.28 us
M070_Engine roughness cylinder 7 14.75 us
M080_Engine roughness cylinder 8 14.27 us
-
I was hoping to avoid pulling the door panels off--thought I read somewhere that it might be tricky with the powered window shades?
Av8sky, did you replace the actuators yourself and do you have the powered shades?
BTW, when mine does this, the scan tool typically reports:
000843 Central locking unit, implausible signal
-
I have had the same issue randomly occurring with my 2011 Turbo. Another related issue was the other rear door would not lock and my alarm confirmation tone would not chirp.
It seems to be more frequent in cold weather, so I suspect it may be a lubrication issue.
Not sure if it was luck or not, but I tried spraying WD40 Dry Lube PTFE into every nook and cranny I could find near a handle or lock, then put a charger on the battery and actuated the locks and door handles multiple (many, many) times.
Both issues have improved, but they're not 100%, so if anybody has a suggestion for an easily accessible spot on these locks to shoot some lubricant into, please chime in. Also taking suggestions on what lube!
-
**Bonus repair**
After accomplishing "Vehicle Handover", 2 longstanding issues with my PCM were cured also!
1. When playing music via Bluetooth there would be a dropout on a semi regular interval.
and
2. When manually advancing a music track on the USB input, the display would not immediately cycle to the next song--sometimes not until the next song automatically sequenced would the display catch up to the actual song playing.
All in all, this turned one problem into three repairs.
My recommendation for ANY PCM problem is accomplish the Vehicle Handover.
-
My 2011 CTT with PCM v2.4.7 had the same issue recently. I messed with it for a couple days, charged battery, checked fuzes, checked/cleared scan codes, removed phone data, removed phones, tried Factory Reset, tried some percussive maintenance, then finally tried the only thing that worked--Vehicle Handover.
One day later, up pops your post!
I can confirm this works. It is a minor pain to reinput all your settings, but sure beats the continual 2 minute reboot merry go round.
Thanks Mattski
-
From the subject title, I thought that your car was randomly starting itself-haha!
I would check the condition of the battery as well. I have the exact same vehicle and have found that the world turns wonky when the battery is in anything other than excellent condition.
.jpg.6c386dc0279749f08f2c5691846cc244.jpg)
.jpg.6b290067d5d586076a3473b7e36f0db3.jpg)
.jpg.411164593a979625f893d7127a567733.jpg)
.jpg.e40dcd9f33d96bb7692db9afca809d61.jpg)
2012 Cayenne S running rough, almost jerky or bumpy feeling at low speeds and gears
in 92A (Cayenne, Cayenne Diesel, Cayenne S, Cayenne Turbo, Cayenne S Hybrid)
Posted · Edited by scanner-1
That definitely sounds like symptoms of a MAP (or MAF) sensor issue.
My 2011 CTT will on occasion behave like you describe and it is easily remedied by removing the sensor and spraying it with MAF sensor cleaner.
I'm guessing this happens about every 20,000 miles or so on mine with 100k+ miles. I bought a new sensor just in case, but it just rides along in the glove compartment waiting for the day when the cleaner stops working.
If I let mine go long enough, it will eventually throw a "P1637 Pressure sensor ahead of throttle valve" code.
Pretty sure your engine has at least one, check this part #: 94860618000,