Welcome to RennTech.org Community, Guest
There are many great features available to you once you register at RennTech.org
You are free to view posts here, but you must log in to reply to existing posts, or to start your own new topic. Like most online communities, there are costs involved to maintain a site like this - so we encourage our members to donate. All donations go to the costs operating and maintaining this site. We prefer that guests take part in our community and we offer a lot in return to those willing to join our corner of the Porsche world. This site is 99 percent member supported (less than 1 percent comes from advertising) - so please consider an annual donation to keep this site running.
Here are some of the features available - once you register at RennTech.org
- View Classified Ads
- DIY Tutorials
- Porsche TSB Listings (limited)
- VIN Decoder
- Special Offers
-
OBD II P-Codes - Paint Codes
- Registry
- Videos System
- View Reviews
- and get rid of this welcome message
It takes just a few minutes to register, and it's FREE
Contributing Members also get these additional benefits:
(you become a Contributing Member by donating money to the operation of this site)
- No ads - advertisements are removed
- Access the Contributors Only Forum
- Contributing Members Only Downloads
- Send attachments with PMs
- All image/file storage limits are substantially increased for all Contributing Members
- Option Codes Lookup
- VIN Option Lookups (limited)


liifesfun
-
Posts
61 -
Joined
-
Last visited
Content Type
Profiles
Events
Forums
External Paint Colors
Downloads
Tutorials
Links Directory
Collections
Store
Everything posted by liifesfun
-
Thanks Philip, its the same seller I have ben looking at too (except glass version) Where did you find the reviews? Bruce
-
Hi All I am looking to replace the soft top on 97/8 986. The plastic has cracked and is no longer translucent. It makes sense to me to replace with a glass insert as well. I am looking for recommendations on where to purchase and what brand to replace it with. Also what I need to watch out for eg what material brand, sound proofing and especially proper fit. Whilst looking for a good deal , I am not looking for the cheapest as I would hate to have wind/water/noise issues. Also are any better than others to install. So far I have had a look on ebay http://www.ebay.com/itm/310573975855?_trksid=p2060353.m1438.l2649&ssPageName=STRK%3AMEBIDX%3AIT and Pelican parts. Will need to ship Australia. Regards Bruce
-
Where is the brake light switch on the brake pedal
liifesfun replied to liifesfun's topic in 986 Series (Boxster, Boxster S)
Dear friends, I just noticed that its nearly 2 years since the brake switch / cruise control cut out problem. UPDATE - its still all OK, the $0 fix is still working. Without trawling back through the threads, my cruise control kept dropping out and I finally worked out it was the brake switch causing the problem. I pulled out the switch, dismantled it ( yes you can pull them apart) and the contacts were burnt, so I filed them with a nail file. I commented on this forum that if I got 12 months service I'd be thrilled, well its now 2 years. Bruce -
Check as other said the "gutters" under the roof, beside blockages make sure they are not split as mine were Bruce
-
What is the safest way to Jack/Lift my Boxster?
liifesfun replied to gandrade1's topic in 986 Series (Boxster, Boxster S)
Theres an obvious answer usually under your nose if you dont have anything, and thats a wheel, I often slid a wheel under the car even as a back up to floor stands -
Hi If you follow this topic there are instructions for the ICV (non egas) which would be worth doing as its linked to the TCB, a pdf and lots of photos of ICV and TCB If you the ICV out http://www.renntech.org/forums/index.php?s...c=13120&hl= Bruce That was a good question, I was cleaning my throttle body a couple of weeks ago and was wondering the same thing. If you haven't cleaned your throttle body, it's a good idea to do so. Keeps the idle constant and the engine operating efficently. Tom, can you post a pics or a quick set of DIY steps for doing the throttle body cleaning on the 986 correctly? Thanks. Andy
-
YEAH the power converter, great idea, I got sick of all those 12v cigarette lighter charges when all devices have a 120v/240v charger, now I can charge my laptop, camera, phone etc - highly recommended bruce
-
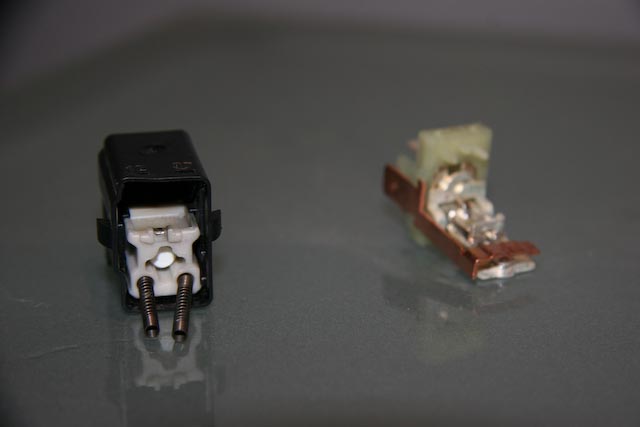
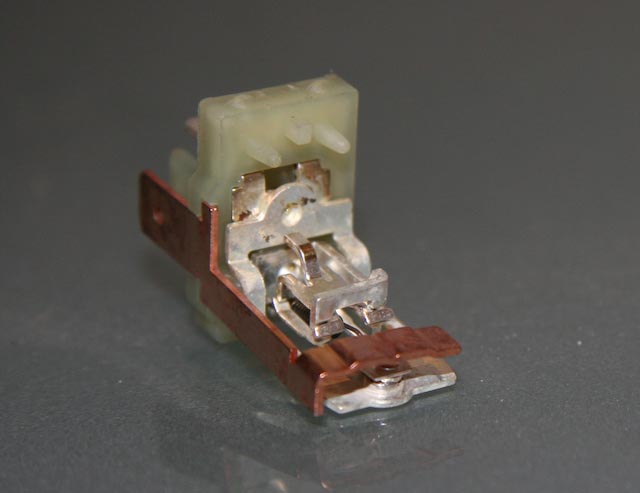
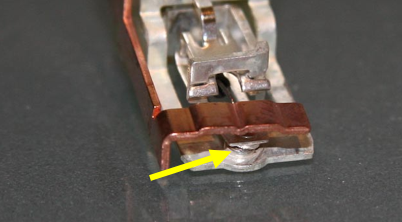
Cruise control not working - try your brake switch Note this switch controls other functions as well (such as tiptronic start inhibitor, RFM reminded me of this) http://www.renntech.org/forums/index.php?showtopic=18271 Photos of the switch pulled apart the contacts are at the bottom centre the top contact is the copper piece across the top, the silver contact at the bottom you see is pitted (from electrical arcing)

-
Where is the brake light switch on the brake pedal
liifesfun replied to liifesfun's topic in 986 Series (Boxster, Boxster S)
UPDATE - $0 fix Porsche centre (OPC) supplied part number 99661311302, they have indictaed that this is the updated/ sueprceded part. It is physically a little different, the new one it has 4 terminals as opposed to 3 but fits the connector OK (this probably doesnt matter electrically, I couldnt test at the time) BUT its about 5-10 mm longer, I couldnt get it to lock in and wonder if this is why, any one experience this? 97/98 2.5l tip. Good news - I pulled apart the old switch and can answer my question previously. For those techos - The switch is electrically a changeover switch with 3 contacts (as opposed to terminals) in the normal position (meaning without the brake pedal pressed) the switch is closed for the cruise control circuit, which validates my previuos logic that for safety if the switch or circuit fails is most likely to go open circuit thus swiching of the cruise control. When the pedal is depressed the switch changes over and operates the brake lights. For reference, the switch is mounted in front not behind the brake pedal, so the switch releases when you press the pedal, the significance is if you test the switch whilst not mounted but plugged into the quick connect socket, the brake lights will come on when the switch is released (normal mode) and go off when you push the plunger. As I had the switch apart I took a metal finger nail file and gently filed the contacts as they were pitted and sprayed with contact cleaner plus the connector, went back together perfectly. Drove the car $100km today the cruise works without fault! I'll post a photo sometime Bruce -
send me an email reminder if you dont have a response and i will photograph mine for you Bruce
-
Is your accelerator (gas pedal) all the way to the floor, I mentioned before is that my experience is that they wont shift in this condition but if you lift off a bit it will then shift? Bruce
-
Where is the brake light switch on the brake pedal
liifesfun replied to liifesfun's topic in 986 Series (Boxster, Boxster S)
Dont you love this site, 24 minutes for a response, I reckon you could get an answer and do the repair quicker than an "auto club" could get out and jump start a flat battery! -
Hi all My cruise cuts out intermittently and it (the fault) appears to be linked to the brake switch, as it works again if I hit the brake pedal and then pull back on the pedal with my toe hooked behind it, suggesting the contact in the brake switch is faulty. I stuck my head in and expected to easily see the switch but it wasnt apparent, I did a search on this site and couldnt find anything. Out of curiosity does anyone know if the switch has a single or dual contact and if it is make or break (sorry thats techo speak), logic would say its a break contact as a fault condition is likely to be open circuit and for safety it is best that the cruise is off rather than the it failing to switch off when you hit the brake pedal. I was expecting this as 5 minute job and hope it is, if I have missed something obvious, I will graciously accept referrals to a good optometrist. Bruce
-
Just a query on the description below in a Tiptronic in D (auto), the default is to start in 2nd gear, 1 st gear requires to be placed in manual. thanks for the electro mechanical description ( I learnt some more about my car)
-
Is this a fault? I cant say for sure but having had a 911 tip and now a boxster tip, it sounds familar, I assume you are holding it the trottle to the floor, what happens if you lift of a bit? Is the engine running smoothly? I have a feeling I have experienced this, in the 911 or the boxster and I put it down to a design feature, cant be sure though. Sorry but living in Australia, I cant simulate this easily, the men with flashing lights (and a lack of sense of humour) might decide that they need my license more than me :-) Very interested in the outcome on this one? Bruce
-
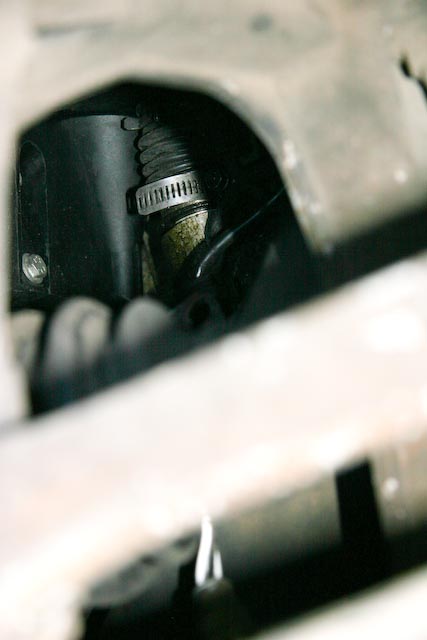
Hung, Stefan The bellow tube you can see in the attached photo (note the hose clamp on the bottom of the tube) Bruce boxster_aos_bellows_location.htm
-
Hung, Stefan Sorry to hear your grief. My experience is the same as Stefans , the two bolts can be reached from the top, from memory I used a mini socket set with a universal joint on a mini tool bar and manged to then screw them out with my fingers. Not sure if Americans use the same term , "universal joint", its a knuckle like joint you can get for socket sets. The bellows on the Australian (USA model ??) model can be seen from underneath but its very narrow view and you need to look underneath from about the the corner of the rear bumper (rear of the car not level with the axle) and you can shine a torch through a narrow gap but you need to know what your looking at (you can see the bottom of the belows), I only discovered once I had fitted it, thus verifying how difficult it is too see. (I think you'll find its closer to the front of the car than you expect If Stefans photos dont arrive let me know. If you have skype you can try me, send me a private email ,I'll give you my contact details, happy to talk on the phone. Happy Xmas and New Year to you both Bruce
-
Hung RE part open, yes thats right, it doesnt close all the way, from memory if it closes all the way there is no air at all getting into the motor as I believe the throttle body is closed at Idle and the ICV acts as a bypass around the throttle body , I believe in later models the throttle body modulates to perform the idle control, meaning the ICV is not there in latter models, Guys correct me if I am wrong on this latter point. Re AOS - see my comment to Stefan also on idle. Happy to answer any questions on AOS as its still reasonably fresh in my mind. (I did post it a few weeks ago) Bruce
-
Stefan In case your idle is not quite there. Not sure of where you are at with your AOS in the last 12 months I have done ICV, MAF, Throttle body and got an improvement in idle all the way through the process but had a few periods where it would wonder up and down, 3 weeks ago I did the AOS and now its perfect, rock solid the tacho hardly moves from about 780 rpm. Sorry didnt document the process any near like I did with the ICV , (your right I should have stated its a sideways push , not a downwards push on the valve) The AOS was a messy job and very hot, so the camera stayed inside. Bruce
-
It isn't easy! good job Bruce. So what was the longest waiting time? LOL Juniinc All I am prepared to say is that the smoke was enough that I discovered, you cant fit much camping gear into a Boxster ....... LOL Bruce
-
There seems to many references to AOS replacement and varying opinion on the degree of difficulty. One thing I think can be said, its not an easy job, even with instructions and should be regarded as difficult but do-able and I can see its a 2-5 hour job (suspect a hoist makes it much easier) A lot of threads lead to BF instructions which are rather simplistic but thats understandable given its hard to get pictures of all the parts and where they live and hence its a messy and awkward job. I think a key is to study the new AOS noting all the connections and size so that you have a picture in your mind as to where relatively you will find the clamps and bolts as you will work from the top and bottom of the car and at first not know where all the related parts are. One thing I found differing from the instructions, was that the middle tube doesnt have to be disconnected prior to removing the AOS its easier to pull the AOS partly out and then remove this hose as there is some slack and its, of in a second (not sure if being a TIP and Australian delivered makes any difference, extra plumbing?, but I must have played for 1/2 hour trying to get it out insitu.) I agree on cutting the bellows, the new AOS has them on it, in fact you may not need to cut the bellows, give it a good tug and see if it rips (ie its rotten) and then take the clamp off from the top after the AOS is removed. I did the worm drive clamp replacement BUT would like to know if anyone has a good trick to refitting the belows, I found there is little room and as you are working blind with one hand virtually hidden from site its a matter of feeling your way around and pulling it over the joining pipe, even with the clamp sitting loosely over the bellows its was unbelievable, I ended undoing the clamp so it came out of the worm dive after removing it. Once I had the bellows (like pulling on a boot) on it, I "'threaded" the clamp around the belows and back into the worm drive (which isnt that easy either) . I have thought about it since and wondered if your blue tacked the clamp to the top of the belows against the AOS, maybe is the trick whilst you fit the rubber bellows tube. You could then slide the clamp down into position. One benefit of the worm clamp is that its easy to spot and hence locate the bellows to check that have seated right afterwards, you can see with a torch from underneath without jacking the car. That all said, REALLY pleased its done, Car idles perfectly, doesnt smoke, whiffy smell is gone, discovered that was the oil leak source (bellows had a slight split I think) and starts like new. PS Loren, from 6 months ago, thats was the final part of the idle issue (post MAF replacement, ICV clean, throttle body clean), once again THANKS to this site, the car is running beautifully and I know a lot more about it which makes for more enjoyable driving So now I have a car I proud to drive again, dont have to wait to everyone has gone to start it, LOL, saved a bundle of money (minus the physio bill and skun knuckles medical treatment), sorry dont have pictures that I wanted to take as my hands were that filthy it was 33c and too hot for gloves. Hope this helps someone and interested if others have the tips for the clamp and belows fitting. Here endeth my therapy. Bruce
-
Why dont you try driving it??? sorry couldnt help that :D
-
When did this start happening, did it occur after some mod, are you running a standard air intake?
-
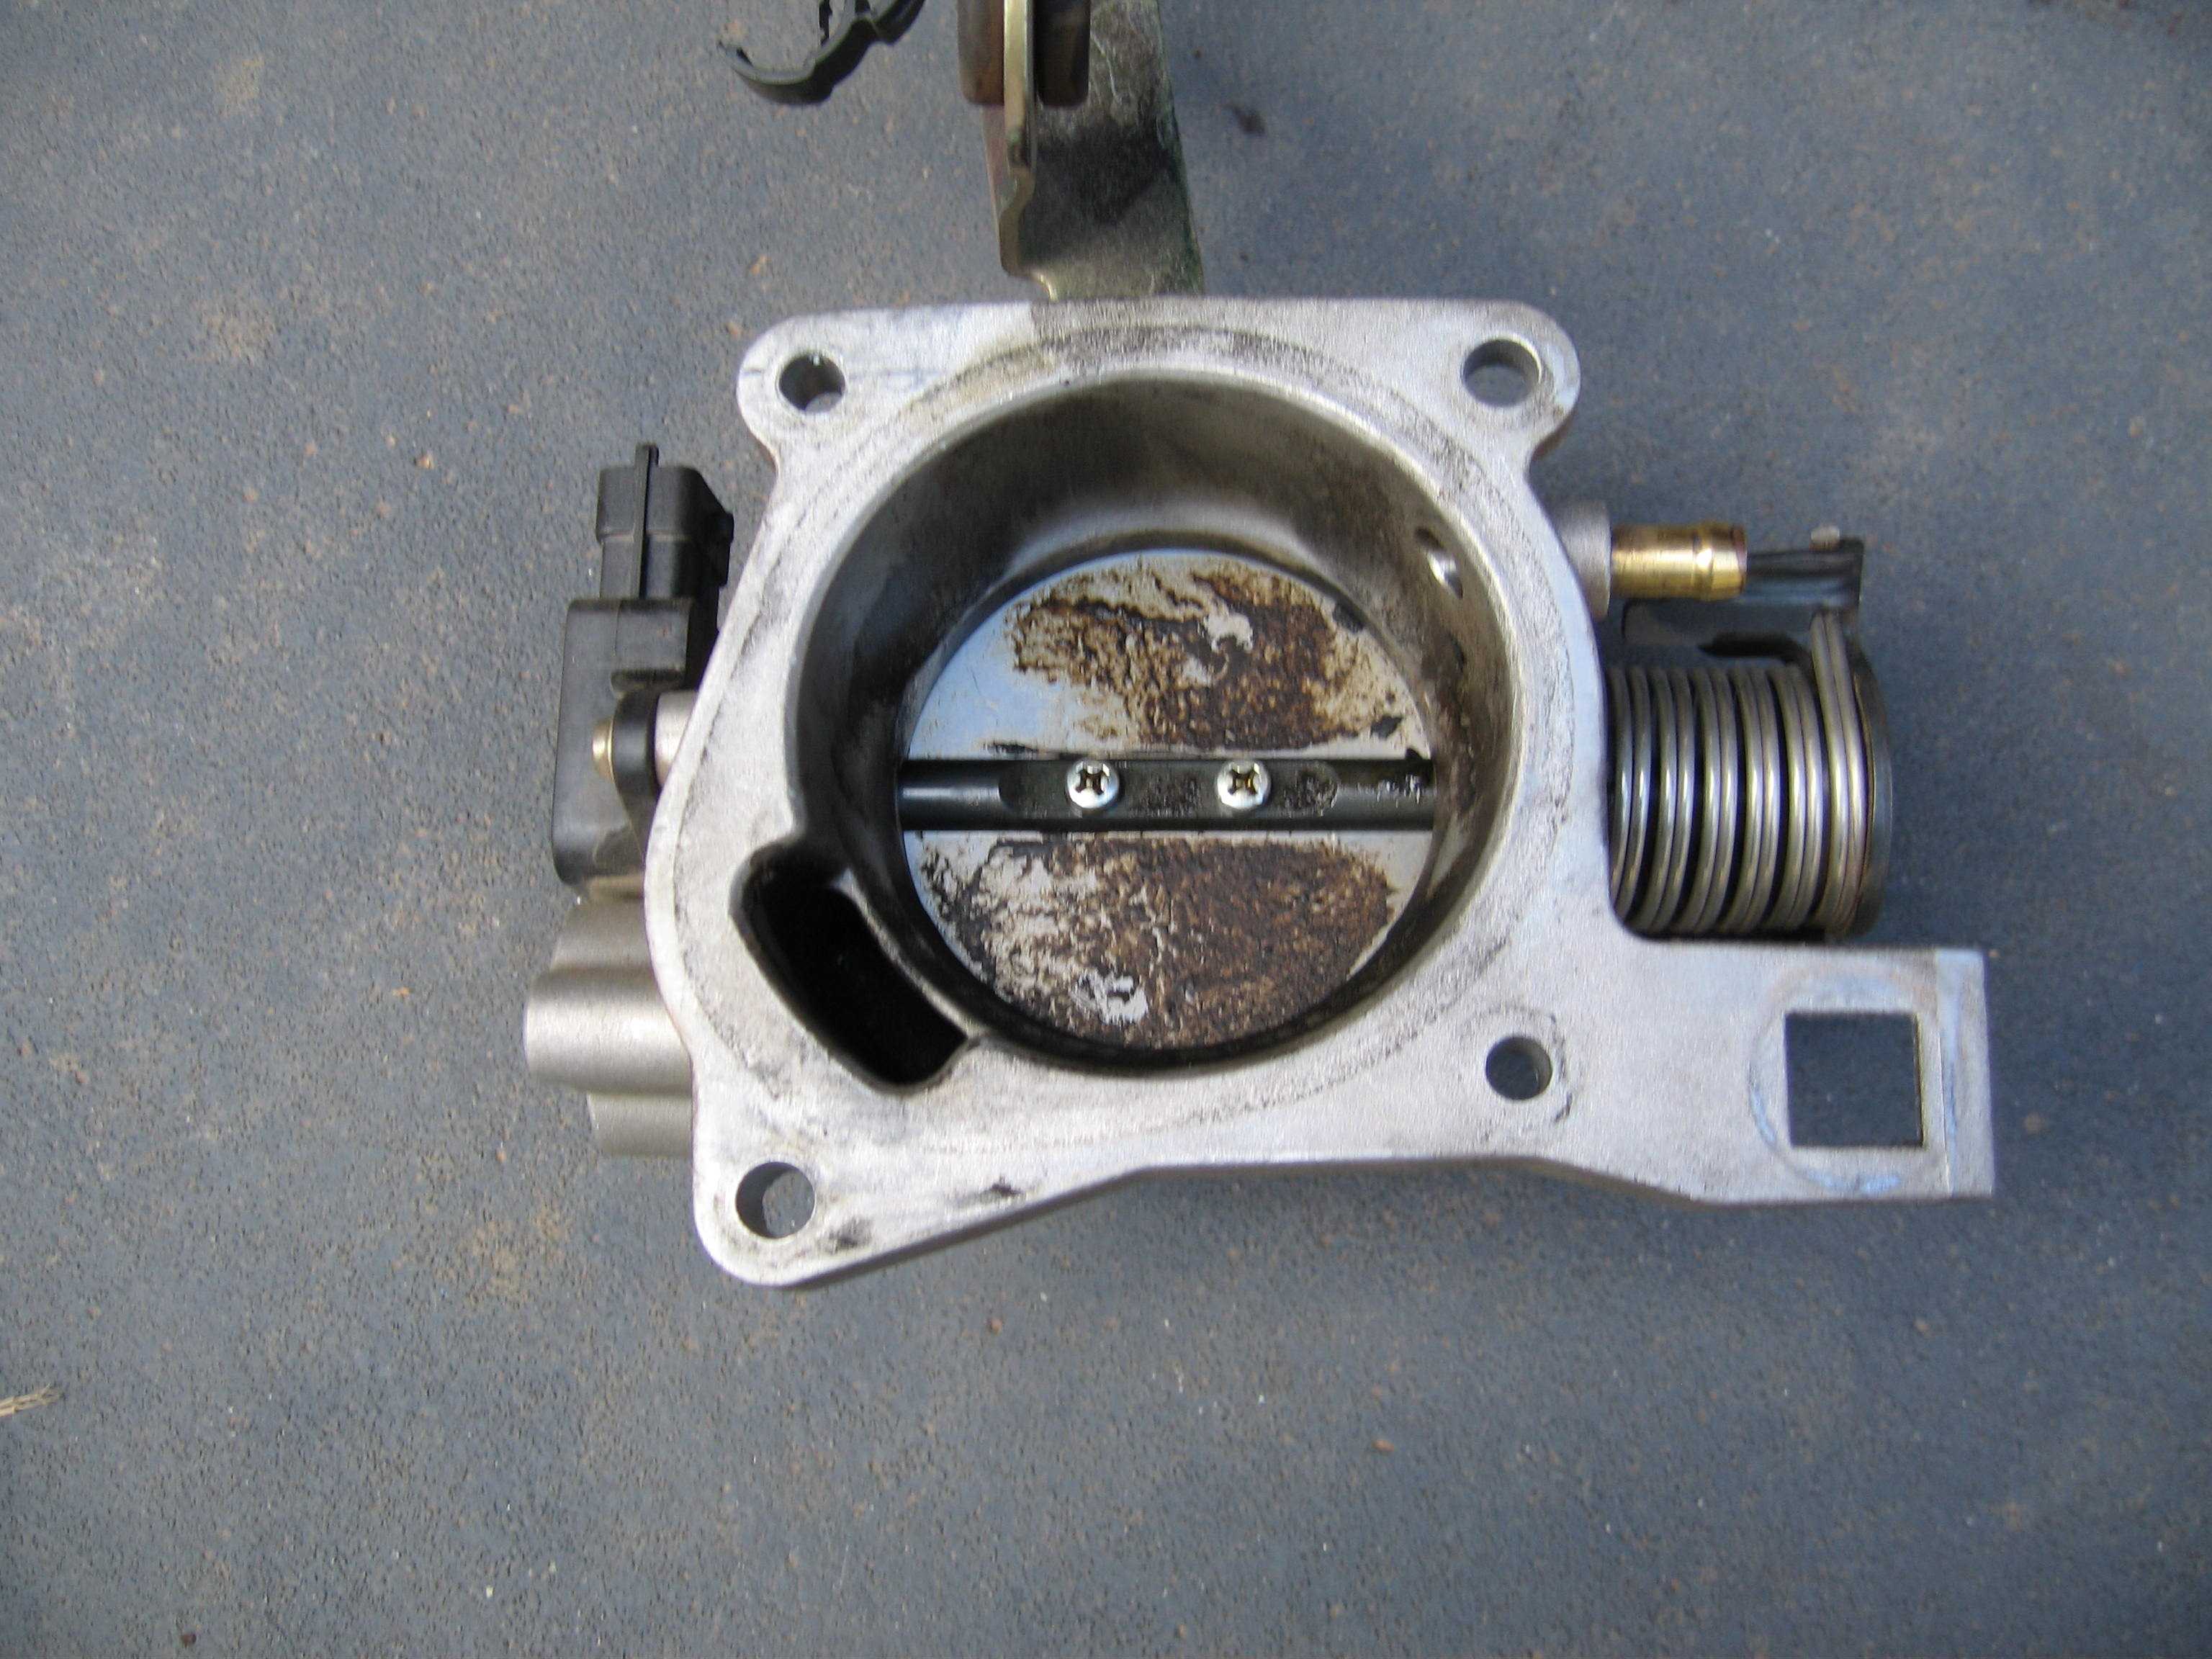
Worth doing, Finally got round to cleaning the throttle body, seems to improved the idle at start up and general running, thanks Loren for encouraging me to do this. Heres the before photo (after photo looks brand new)
-
Worth doing, Finally got round to cleaning the throttle body, seems to improved the idle at start up and general running, thanks Loren for encouraging me to do this. Heres the before photo (after photo looks brand new)