Welcome to RennTech.org Community, Guest
There are many great features available to you once you register at RennTech.org
You are free to view posts here, but you must log in to reply to existing posts, or to start your own new topic. Like most online communities, there are costs involved to maintain a site like this - so we encourage our members to donate. All donations go to the costs operating and maintaining this site. We prefer that guests take part in our community and we offer a lot in return to those willing to join our corner of the Porsche world. This site is 99 percent member supported (less than 1 percent comes from advertising) - so please consider an annual donation to keep this site running.
Here are some of the features available - once you register at RennTech.org
- View Classified Ads
- DIY Tutorials
- Porsche TSB Listings (limited)
- VIN Decoder
- Special Offers
-
OBD II P-Codes - Paint Codes
- Registry
- Videos System
- View Reviews
- and get rid of this welcome message
It takes just a few minutes to register, and it's FREE
Contributing Members also get these additional benefits:
(you become a Contributing Member by donating money to the operation of this site)
- No ads - advertisements are removed
- Access the Contributors Only Forum
- Contributing Members Only Downloads
- Send attachments with PMs
- All image/file storage limits are substantially increased for all Contributing Members
- Option Codes Lookup
- VIN Option Lookups (limited)


SteveTTT
-
Posts
14 -
Joined
-
Last visited
Content Type
Profiles
Events
Forums
External Paint Colors
Downloads
Tutorials
Links Directory
Collections
Store
Everything posted by SteveTTT
-
Thanks for this Scouser, very helpful. Mine’s a facelift version but I’m sure the template will be ok to work from. Cheers, Steve
-
4S side skirt question
SteveTTT replied to SteveTTT's topic in 996 Series (Carrera, Carrera 4, Carrera 4S, Targa)
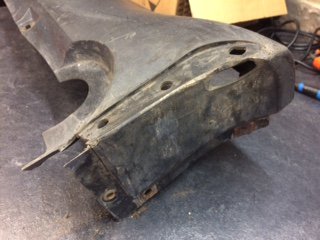
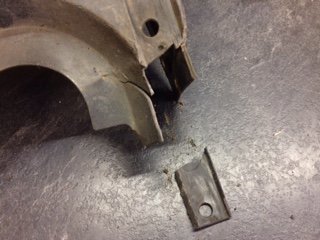
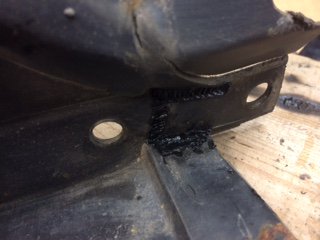
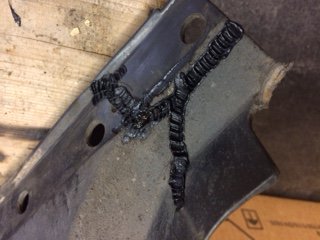
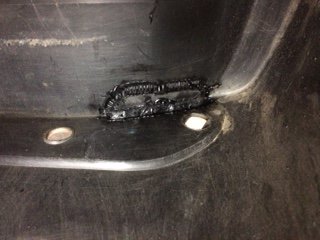
UPDATE, 27 Jan. So I’ve now sorted the problem, reasonably successfully, with a bit of YouTube help, and I thought it might be of interest to show how I made the fix. I forgot to photograph the right hand side repair, so the pictures below are of the left sill cover which had smaller holes inside the wheelarch but a section completely broken off (only held on by the rubber lip). Using a 40w soldering iron, and working gently on the inside face of the p.u. moulding I found it quite easy to stitch the splits together. I successfully reattached the broken piece, firstly welding on unstressed areas (as in the photo below) before using a small g-cramp to align the split sections. Using offcuts of an old undertray I then welded a patch on the inside of the hole. I then fitted filler pieces on the outside face to create the necessary curves, and filled the gaps using black cable ties as filler rods. The shaft of the soldering iron was hot enough to use as a smoothing iron to blend the external faces of the patch repairs. I also stitched and blended in the outside face of the splits, once everything was whole again. The actual repairs took took me about 40 minutes per side, working quite slowly and avoiding breathing in any vapour from the polyurethane (which can contain cyanide apparently). To understand how the side skirts were fixed I had removed both wheels and wheelarch liners on the right hand side. Reinstalling these took more time than all the other repair work - there must be a knack that I don’t possess. I did the left side just by removing the rear wheel, there was sufficient access to loosen the fixings without removing the liners. The results won’t win any beauty contests, but are not really visible, and since the car is no concours queen I can live with the aesthetics. I’ve got a strong serviceable fix that has cost me literally nothing. I did buy new speed nuts, clips and torx head screws for the wheelarch and chassis fixings, but the old parts could have been reused. Job done!
-
4S side skirt question
SteveTTT replied to SteveTTT's topic in 996 Series (Carrera, Carrera 4, Carrera 4S, Targa)
Thanks Lorem I’m with you on that. b3freak found the correct item. -
4S side skirt question
SteveTTT replied to SteveTTT's topic in 996 Series (Carrera, Carrera 4, Carrera 4S, Targa)
Hey thanks so much. The pictures also confirm what the unbroken mouldings look like. Even with shipping to the UK that comes out at only $200 or thereabouts, so it’s a realistic solution if I can’t fix mine or find a salvage part in the UK. You’ve been a real help, cheers! -
4S side skirt question
SteveTTT replied to SteveTTT's topic in 996 Series (Carrera, Carrera 4, Carrera 4S, Targa)
Thanks for the confirmation, you're dead right about the cost of replacement. Here in the UK its about £1300 for the two skirts (a different price for l/h and r/h!), somewhat cheaper for grp aftermarket kit, but I think that will have to be a last resort. I haven't looked for any secondhand items yet but I'm going to get the broken ones off the car and try plastic welding them from the rear, using a soldering iron (there's some useful stuff on YouTube) then use plastic bumper filler to tidy the outside. I know there are professional 3M patching kits available if that proves necessary. Might post some pics if the welding works! Thanks for your help. -
4S side skirt question
SteveTTT replied to SteveTTT's topic in 996 Series (Carrera, Carrera 4, Carrera 4S, Targa)
Thanks for the response. I’ve removed the rubber lip (it practically fell off) so I know about those holes. The hole in question is above the lip, inside the wheel arch but below where the liner stops on the 4S. I’ll try to get a better picture. I’m pretty sure it’s impact damage that’s created the hole, as it’s quite badly split underneath the rear end of the skirt as well - maybe it was kerb damage. -
4S side skirt question
SteveTTT posted a topic in 996 Series (Carrera, Carrera 4, Carrera 4S, Targa)
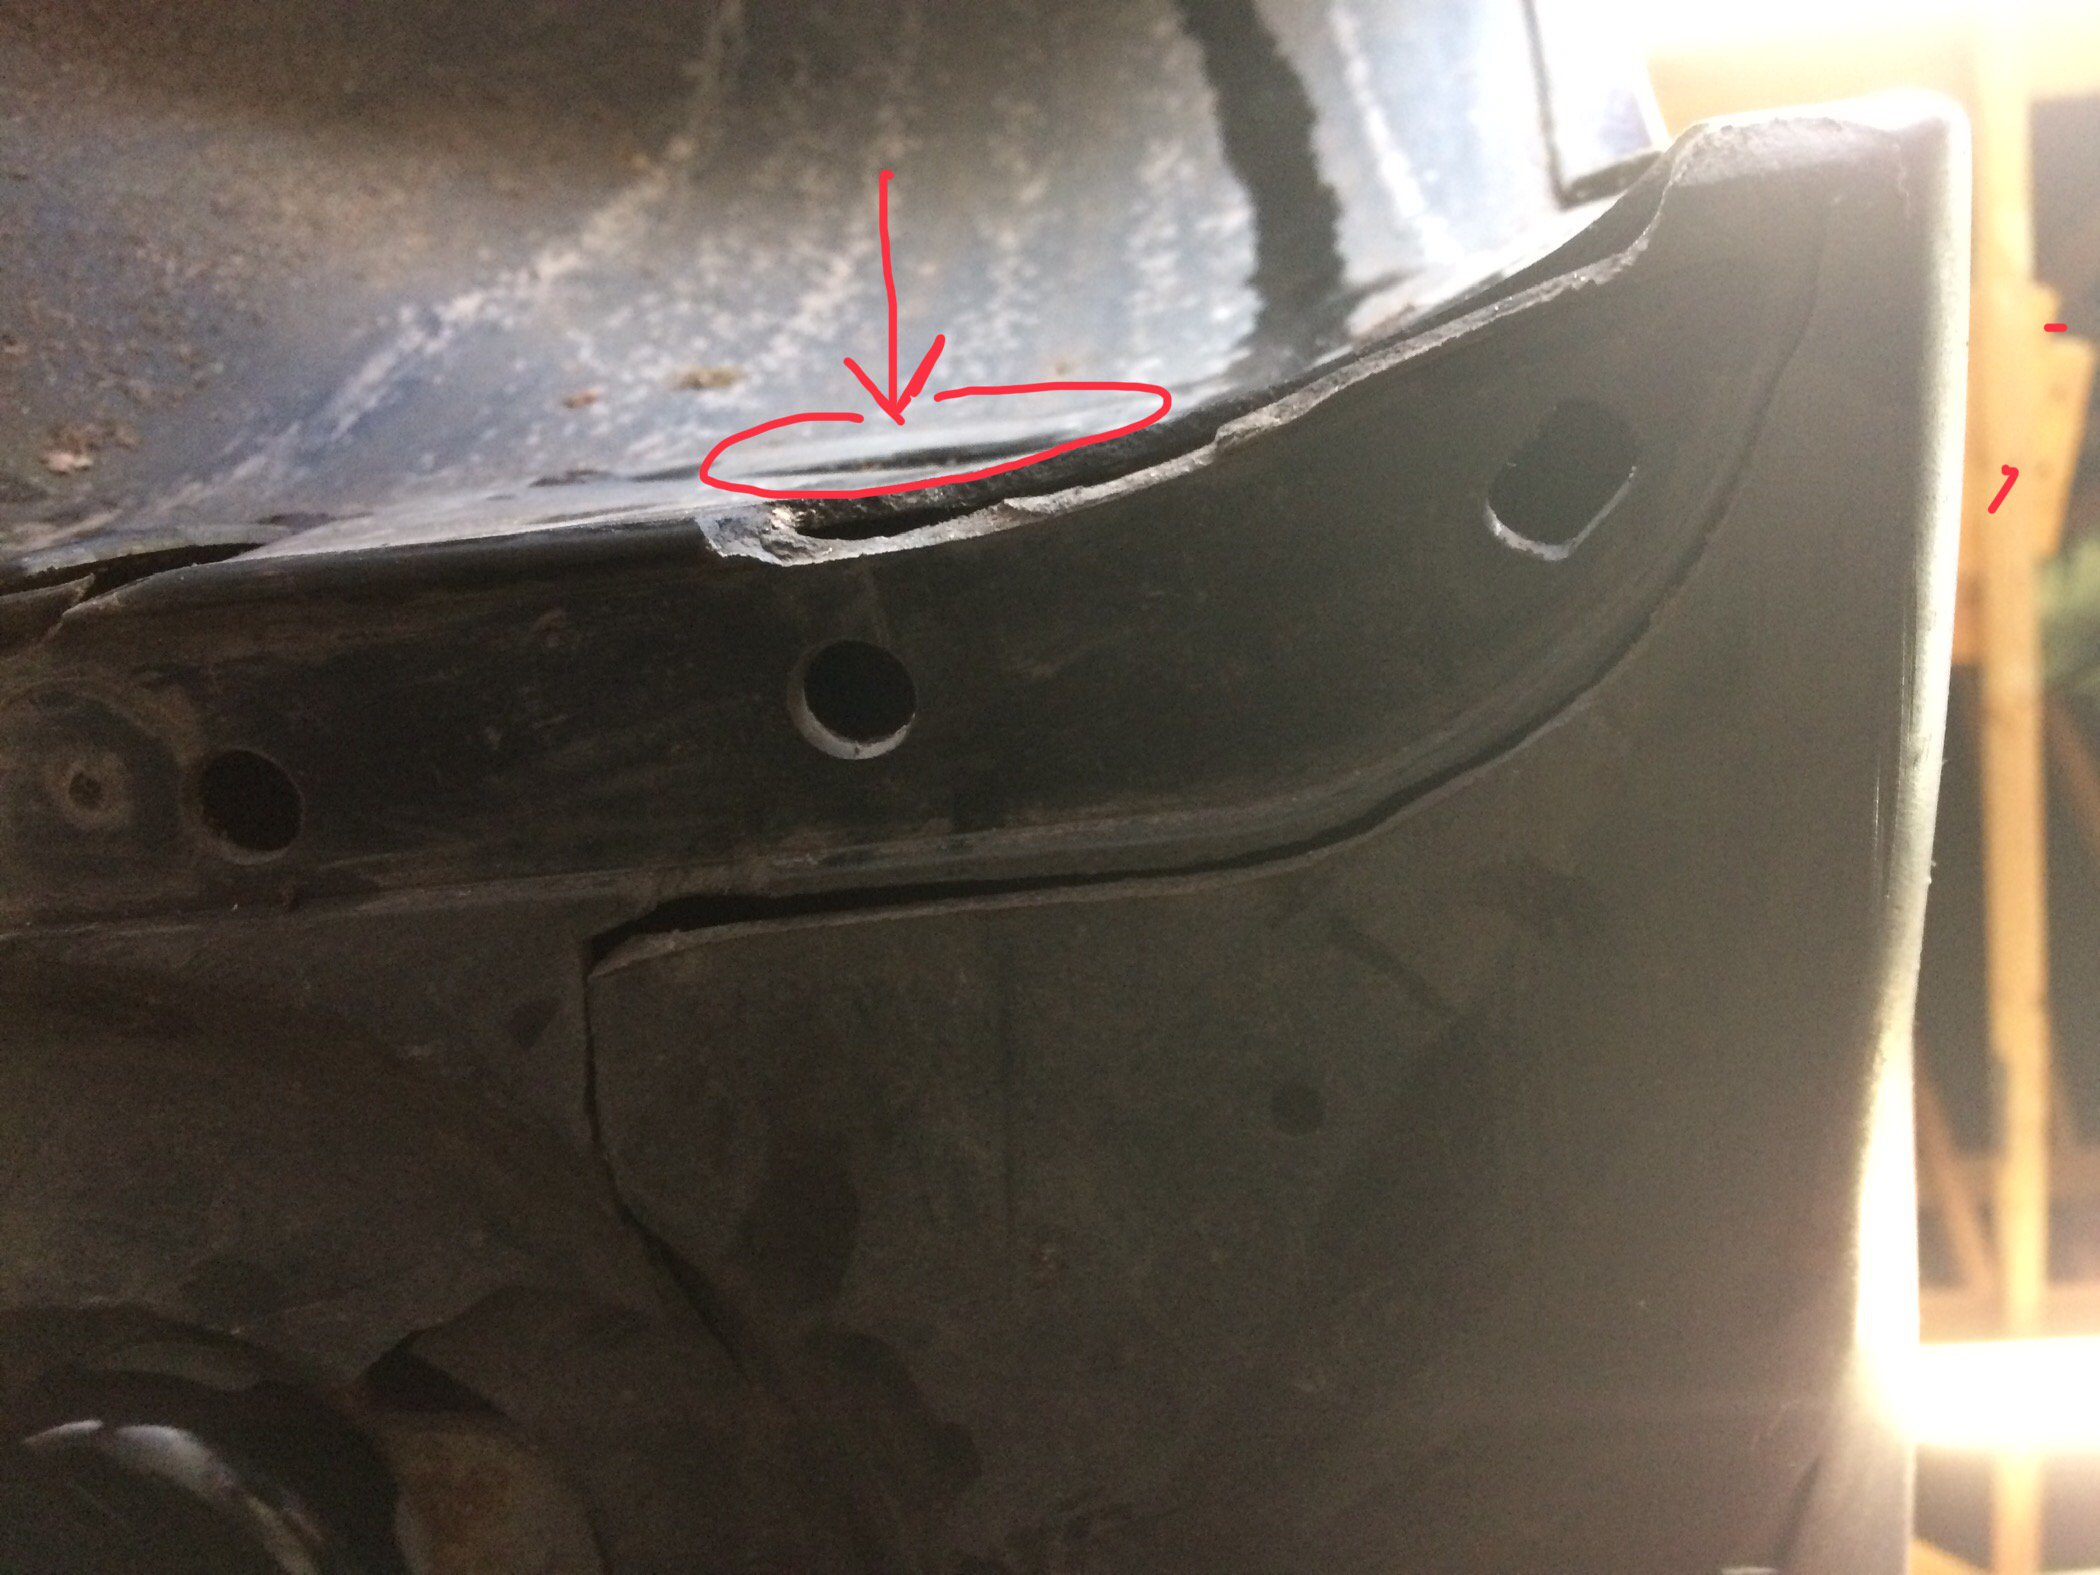
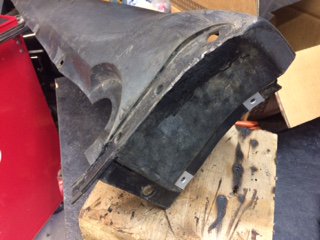
My 2002 4S has quite bad cracking at the rear ends of both side skirts, presumably from careless use of a trolley jack in the past - I must have had my eyes shut when I bought it! I’m planning to remove the skirts and try pu welding from the rear using a soldering iron, and then appropriate filler to tidy the outside. Here’s my question. Should the end cap - ie the vertical face, above the rubber lip and below the wheel arch liner - be completely closed off, or should there be some sort of drainage hole? Both skirts have irregularly-shaped holes in similar places, almost as if someone went in there with a screwdriver! Apologies the picture doesn’t show this very well, I’ve ringed the area where the hole in question is, above the very obvious breaks revealed when I removed the rubber lip. If any 996 4S or Turbo owners could have a quick look at their side skirts I’d really appreciate it!
-
Mine had no cooling whatsoever JJT. I’m no a/c expert but I think if there was a leak the system would get depleted very quickly. Is there some kind of pressure relief valve in the system that might be malfunctioning? (Just a stab in the dark!). As creekman said earlier on, maybe a pressure test and recharge is a relatively low cost way of eliminating potential issues? Hope you get it sorted.
-
That’s correct JTT. I haven’t identified exactly how the noise was being created, but low (or no) pressure in the system was the cause. I mentioned earlier in the thread that a Mercedes specialist friend of mine had experienced something similar on Mercs.
-
It’s sorted! One condenser was replaced and the system re-gassed; no more problems. And well done to Porsche independent Brookspeed in Hampshire UK for sorting this out without quibble on a customer’s car sold on brokerage. They also sourced a new remote key f.o.c. Great customer service.
-
Spot on creekman, that’s just the kind of stethoscope I was thinking of. Simply listening to the various engine noises doesn’t raise any concerns, but it’s all a bit loud back there! However, I just spoke to a friend at my local country pub, he’s a Mercedes specialist for his sins, who says the “evaporator” can make weird noises when the a/c system pressure is too low. I think his evaporator might equate to dessicator/receiver-dryer in Porsche-speak and my original view that the noise came from the firewall area might tie in with the location of that bit of kit. So your original suggestion of doing the re-gas first is what I think I’ll now do. I’ll feedback when I’ve done that. Cheers, Steve
-
I think I’ve now ruled out the blower fan. With the engine off the blower is as smooth and quiet as you like, at all fan speeds. With engine running and a/c off it’s fine too, but switch on the a/c and after a few seconds a new slightly harsher sound becomes apparent. (All this is with the car stationary). I’ve checked out the cooling fans and they seem fine, so I’m now thinking it could be noise transmitted from elsewhere, maybe the a/c compressor - that would account for the varying pitch of the whine when I’m on the move. Have run out of time today, but I think the next step is to look in the engine bay before I have the a/c re-charge is done.
-
Thanks creekman, can’t do any harm can it.
-
Can anyone offer advice on this please. The car is a recent purchase, 2002 4S Coupe with 92k miles. Drove fine for the first month, but now a whining noise sounds as if it’s is coming from somewhere behind the dash/firewall/front axle area. The whine varies with engine speed/gear selection, so it presumably can’t be from the tiptronic transmission or front axle otherwise it would vary with road speed. However, the noise completely disappears when the a/c blower is turned off. I’m not great on electrics but was wondering if the blower fan might be failing and needing more alternator output at higher revs? I haven’t noticed anything untoward on the voltmeter. The a/c needs a re-gas, but I can’t think that can have any relevance? Any thoughts much appreciated.