Welcome to RennTech.org Community, Guest
There are many great features available to you once you register at RennTech.org
You are free to view posts here, but you must log in to reply to existing posts, or to start your own new topic. Like most online communities, there are costs involved to maintain a site like this - so we encourage our members to donate. All donations go to the costs operating and maintaining this site. We prefer that guests take part in our community and we offer a lot in return to those willing to join our corner of the Porsche world. This site is 99 percent member supported (less than 1 percent comes from advertising) - so please consider an annual donation to keep this site running.
Here are some of the features available - once you register at RennTech.org
- View Classified Ads
- DIY Tutorials
- Porsche TSB Listings (limited)
- VIN Decoder
- Special Offers
-
OBD II P-Codes - Paint Codes
- Registry
- Videos System
- View Reviews
- and get rid of this welcome message
It takes just a few minutes to register, and it's FREE
Contributing Members also get these additional benefits:
(you become a Contributing Member by donating money to the operation of this site)
- No ads - advertisements are removed
- Access the Contributors Only Forum
- Contributing Members Only Downloads
- Send attachments with PMs
- All image/file storage limits are substantially increased for all Contributing Members
- Option Codes Lookup
- VIN Option Lookups (limited)


k996c4s
-
Posts
26 -
Joined
-
Last visited
Content Type
Profiles
Events
Forums
External Paint Colors
Downloads
Tutorials
Links Directory
Collections
Store
Posts posted by k996c4s
-
-
I had a set of HR Sport springs installed in my 2014 Panamera S yesterday. The ride home was interesting. Going over bumps in the road (dips, sewer covers, etc.) it sounded like the bottom of the car was falling out with a very loud bang. I put in a call to the dealer to confirm the correct springs were installed, but if so, perhaps it's a bumpstop issue? Any thoughts on the cause?
Thanks!
-
Do wheels typically come with instructions on how to remove the current wheel? I hate to start just pulling and jerking...
I didn't get any with my new wheel, but it's a simple process. Disconnect your battery. In this forum John suggested waiting 30 minutes for the airbag's capacitor to discharge. Good idea. Two screws on the back of the wheel hold the airbag. Lift it gently off and unplug the two or three wires, taking note where each one goes. Take off the center nut, and the wheel will pull off very easy.
Here's a link that will help: http://www.whiteson.org/boxster/mods/obc/obc.stalk.pdf
Note: The pictures in the link go past simply taking the wheel off, so stop after the wheel is off, and if you're replacing the wheel, marking it for re-installation shouldn't be necessary.
-
Assuming I remove/reassemble the Airbag, after disconnecting the Battery and waiting 30 mins for the capacitor to discharge, then will the Airbag warning light still come on? If so, how can I avoid this happening?
Thanks.
I've replaced the wheel twice on my '02 C4S. I disconnected the battery, removed the airbag, then the wheel. I didn't wait the thirty minutes that you mentioned, and have never had a problem with a warning light. One note: be sure to have your radio code handy. You'll need it after re-connecting the battery.
Good luck, but you won't need it. This is an easy DIY project.
Ken
-
The amp. is located behind the right rear trim above the CD reader.
Thanks, but I assume you are speaking about the external CD changer, which I don't have. I only have the in-dash unit. Can you be more specific about the amp location?
-
I have a strange issue with the speakers in my '06 Cayenne S. I have the Bose system. When I drive the car with the sound system off, I occasionally get a very (I mean very!) loud "pop" out of the speakers. I haven't heard it with the system on. The system seems to work fine otherwise. It occurred only once over a big bump, but not the other times. Loose connection at the amp? I read in other posts that the amp is located in the cargo area, but where?
Any ideas about the "pop" and what may be causing it?
Thanks.
-
I use 76 - they have 100 octane and 91 octane here in California.
I mix ~ 4 Gal of 100 octane with the remainder of 91 octane.
Shell or Chevron myself, but in a pinch I use a cheap place to fill up. But normally not more than once a month.
Gary:
The car looks great. Who did the turbochargers?
-
Not sure about TX, but in S FL Shell is selling a mix with ethanol - not interested. I use Chevron or Sunoco.
-
I lowered my car with HR springs. It's the second time I've done it on a 996. The first was a 2000 996, the second a 2002 C4S. The results are similar. In both cases I did not change the stock shocks. The car is an inch or slightly lower, and the ride is only very slightly firmer. Still a great ride but a definite improvement.
How big of a DIY job was that, k996c4s? Did you have to have a special spring compression tool? I'm not sure Ive seen any pics on this DIY and wonder if this is something I could do myself with normal tools...
It wasn't. I've always shied away from suspension issues, and surely can't do the necessary alignment after the spring install. I think I paid about $300 for the springs, and about $1,000 for the install and alignment from a local shop. I've found the local shop does the alignment best, and takes the time to ensure the adjustments on each side are not only within spec, but very close to each other. As I mentioned earlier, the ride is not harsh, but the car definitely handles better.
-
I lowered my car with HR springs. It's the second time I've done it on a 996. The first was a 2000 996, the second a 2002 C4S. The results are similar. In both cases I did not change the stock shocks. The car is an inch or slightly lower, and the ride is only very slightly firmer. Still a great ride but a definite improvement.
-
Anyone have experience with having a supercharger installed on a 996? I have a 2002 C4S and I'm considering it. I'm especially interested in the resulting engine longevity, and how having it installed affects the car's resale value.
-
OK, I got my sports seat the other day and now I'm trying to install them but I ran into a problem. For some reason, the rails on the sports seats aren't lined up with each either, (left and right). Since that's the case, I'm not able to bolt down both rails. Does this happen with everyone? What do I do? I took a quick glance and it doesn't seem like I could change the rails. Can anybody help? I have a 99 C2 if that makes a difference.
Lined up as in front to back, or is it a parallel issue?
-
"Throw out arm" meaning the arm attached to the throw out bearing? I assume you are referring to decreased leverage now that it's bent? My dealer claims there's no issue with the tranny, so I'll probably start with the clutch and arm, though I'll have to wait a while until my recent exhaust purchase is forgotten by the wife.
Thanks for the reply.
-
Visited the dealer today. The pedal is somewhat heavy, but there's no slipping and no throw-out bearing noise. They stated that it's normal for the pedal to get heavy as the clutch ages and dirt (dirt?) builds up. The car has 38k miles on it. They think it might be the clutch failing to disengage fully when depressed. This sound plausible?
-
Your first post sounds like an alignment issue. Highways often develop indents where car and truck tires contact the road in the lane.... meaning there's a high spot at the lines, and low where the tires make contact, and also high between the tire tracks. An aggressively set or perhaps out of alignment condition can cause the pulling that you are experiencing. I had an RS America that liked to change lanes at high speed for that reason - very scary. However, after reading your second post, I'm not sure if that's it.
-
I have a 2002 C4S with a Porsche short-shift kit in it. Occasionally, I miss second gear, especially when RPM's are high. I also miss it, though rarely, at slower speeds and low RPM. Is it possible it's a shifter adjustment? I'm hoping it's not a syncro issue. I don't hear any strange whine or tranny noise, and it's never popped out of any gear. Any thoughts?
-
I just went throught the exact same issue with the exact symptoms on a 2002 C4S. I think you have a bad window regulator. I paid about $500 installed.
-
I have a 2002 C4S. The window should move down about one inch when the door-handle is pulled to clear the seal. Passenger side is good.... driver side only moves about 1/16 of an inch. When the handle is pulled, there's a sound in the door like something is loose. The window seems to operate normally other than that, although it once made a "snap" sound when it was lowered - no other problems since then. Any ideas what it is?
Any ideas would be greatly appreciated. :(
-
I just noticed that in your "switches" photo, it appears that the small black and blue plug may be the switch plug. Not the plug and wires you point to, but the one to the right of it. Mine has a third section that's white, but it is for the lumbar control. I can't tell from the picture, but if the black and blue plug has a total of six connections, then I'm pretty sure it's your switch plug. If you have a VOM you can confirm it by following the pin guide I gave and check continuity when pushing the switch. Regardless, per my previous post, these switches can't control the seat like the passenger side. You need to either replace the seat switches and wiring or add new switches.
-
I don't have my camera available right now, otherwise I'd take some new pictures of the wiring on the passenger side. So, I'll see how well I can explain this. The picture of the harness below is actually of the driver's seat main harness, but I altered the picture to reflect the passenger harness. The passenger harness has two extra, thicker wires--one red and one brown. I simply cut these red and brown wires so they are no longer connected to the harness. Then, I spliced them together with the red and brown wires in my car.
It's as simple as that, the seat functions now.

Thanks
There's a module under the front of the drivers seat that controls everything. You identified the motor wires in your photos, but not the switch wires. If yours is the same as mine, the switch wires are connected to a white/blue/black plug that has nine contacts. The bad news is that from what I can tell, the switches provide a contact to the PC board that with logic and relays controls the motor and its polarity. The switch wires on the passenger side carry voltage to the motor and are fairly heavy gauge. The switch wires on the drivers side are much thinner, and don't appear to be designed to pass the amperage required to run a motor.
To explain it further, I'll number the contacts: (This is the way they'll appear when you remove the switch plug)
1 2 3
4 5 6
7 8 9
I checked the contacts for continuity and found the following. (Just a few for example) These are the pins that are connected when the stated button is pressed:
Forward: 2/9
Back: 2/8
Seat back tilt back: 3/8
Seat back tilt forward: 3/9
I'll check it out further tomorrow and let you know if I find anything that can help.
After lots of effort, I can't figure a way to make it work with the existing switches. The same type of switch setup as the passenger side would work, and I once saw one available on ebay in the past. Maybe you could get the switch assembly from someone like LA Porsche Dismantler. I expect it would have to come from a seat that is otherwise not sellable.
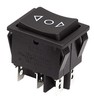
If you want to do the work without disassembling or installing the stock seat switches, you could install your own. Just an idea if you're interested, you could use the bracket under the front of the seat to install a small plate to hold switches. The plate (painted flat black) and the switches wouldn't be visible, but would be easily accessible. This would be very easy to wire. You already know where the motor wires are. The 12vdc and the motor wires can be connected to the switch with ease. If you want to try it, you'll need dual pole, dual throw switches, with center off. You want the momentary on-off-on type that returns to "off" when released. Set up the switch as a reversing type by reversing the polarity on one set of terminals. This will enable the motor to move in one direction when pushed on one side, and the other direction when pushed the other way. I attached a picture of a switch you might use.
I don't think this is a great solution, but not knowing what you want, I thought I'd throw it out there.
Good luck.
-
I don't have my camera available right now, otherwise I'd take some new pictures of the wiring on the passenger side. So, I'll see how well I can explain this. The picture of the harness below is actually of the driver's seat main harness, but I altered the picture to reflect the passenger harness. The passenger harness has two extra, thicker wires--one red and one brown. I simply cut these red and brown wires so they are no longer connected to the harness. Then, I spliced them together with the red and brown wires in my car.
It's as simple as that, the seat functions now.
Thanks
There's a module under the front of the drivers seat that controls everything. You identified the motor wires in your photos, but not the switch wires. If yours is the same as mine, the switch wires are connected to a white/blue/black plug that has nine contacts. The bad news is that from what I can tell, the switches provide a contact to the PC board that with logic and relays controls the motor and its polarity. The switch wires on the passenger side carry voltage to the motor and are fairly heavy gauge. The switch wires on the drivers side are much thinner, and don't appear to be designed to pass the amperage required to run a motor.
To explain it further, I'll number the contacts: (This is the way they'll appear when you remove the switch plug)
1 2 3
4 5 6
7 8 9
I checked the contacts for continuity and found the following. (Just a few for example) These are the pins that are connected when the stated button is pressed:
Forward: 2/9
Back: 2/8
Seat back tilt back: 3/8
Seat back tilt forward: 3/9
I'll check it out further tomorrow and let you know if I find anything that can help.
-
From what I've read and heard, it's the 99's that have had some problems, although rare, with catastrophic engine failure. I have owned a 2000 996 and a 2002 C4S, and both have been relatively trouble free. The C4S needed a RMS at about 30k miles, which was covered under warranty. I think it's common in that car. Other than that, I've done nothing but regular scheduled maintenance. The 996 is a solid car.
-
Yes, Original seats are full power with memory and new are sport seats with power back only. I would prefer not to cut wires so I can retrofit if needed. I am hoping I can work around that.
Mark
Mark:
My car is a 2002 C4S. The sport seats I installed are from a 2005 GT3. Your situation may be somewhat different.
The passenger side was super easy. Because the passenger side has no memory, it turns out the plugs were the same. If you don't have them already, you'll need a special socket (external Torx) to remove the seat bolts that you can get at Sears. They only sold a complete set in my local store for what I think was about $39. If you can find singles, you'll need a size 12. Take out four bolts and unplug the electrical connection and the seat is out. Be careful pulling the plug apart. I believe I pulled the sides outward first to release it, and then you can disconnect the two sides. The seat bolts have Loctite on them so you'll need a little muscle to get them out. You may want to put some back on when re-installing to ensure they stay tight. Also, you should lay something down on the doorsill to protect it when removing or installing the seats. FYI: My back is still killing me a week after installation - You should consider having someone help.
The driver's side was a little more complicated. There are a couple of modules attached to the underside of the seat where all the wires connect. The plugs are a little tricky. If I remember correctly, I had about three plugs to remove from the front underside of the seat. Two were released by snapping something away and up on the front of the plug, and one had a sliding hold-down that I put a small flat screwdriver under and pulled up to release the plug. None of the plugs simply pulled off. Make sure you figure out how to release them before muscling it and breaking something. Because my seats were full power (Incl. lumbar) with memory (memory buttons on the doorsill), there were lots of wires coming from the seat. The plug for the sport seat did not fit the original plug. If you pull the sides of the original plug, it will free things up to work with the wires. The seat belt plug (small square) is located within the big plug, and will match up with the plug on the sport seat. You can simply plug them together, but they won't lock. I used a cable tie to keep them together. Power is the issue for the remainder of the install. I cut the power-plug off of the sport seat . The power wires are brown and red. With the key on, check the harness from the module on the floor to find the +/-12vdc wires in the connector. They are the thick brown and red wires. I cut them as well. Be sure to cut them one at a time and don't let them touch each other. If you leave enough to work with when cutting, you could easily restore the connections to reinstall the old seats when needed. You should be able to buy a suitable connector at Radio Shack for the new connection. Simply connect the red to red, and brown to brown. To see if things work before finalizing everything, you can simply twist them together and try the seat-back to ensure you have the polarity correct. Having them reversed won't hurt anything - the seat-back will simply work in reverse of the direction you push the switch. Don't leave the wires twisted together, and I would not recommend using wire-nuts. Buy the connector and do it right.
I hope this didn't sound too ridiculous. The install is really quite easy and straightforward. Just take your time and be patient with the connectors.
Good luck!
-
Did you take pictures? I am making the same swap this spring.
Thanks, Mark
Which seats are you taking out? Are they full power - with memory?
-
OK, OK.... Maybe it was a ridiculous question!
Got the sport seats today. They are manual forward and back as well as height, with electric backs.
I did the most difficult driver side only tonight. The install was very straightforward and easy. There's a lot of wire and plugs under the stock seat due to the memory function. I left the seatbelt wires and plugs intact after pulling the large plug apart to gain access to the small seatbelt plug located within it. I plugged the wire and plug from the seat directly into it and put a wire tie around it to keep it together. The sport seats only require 12vdc to power the backs. I cut the wires from the seat and soldered plugs on. I located 12vdc on the original large plug that's connected to the module in the car - cut the wires and again soldered plugs on. I didn't cut wire too close to the connectors so I could restore the original configuration if need be. The 12vdc wires are brown(-) and red(+). After connecting the plugs I had the electric backs working. The seatbelt indicator on the dash worked fine as well. A few tie-wraps and four bolts later I was ready for the road. The memory function is gone, but the seats weigh less and feel amazing. Total time: 2 hours. The passenger side should be a breeze! :clapping:

HR Spring Installation
in 970 series (Panamera, 4, S, 4S, 4S Executive, S E-Hybrid, Turbo, Turbo S, Turbo Executive, GTS, 4 Sport Turismo, 4S Sport Turismo) (MY2010 - 2016)
Posted
Got the car back today. it was simply a spring not seated fully in the strut perch. Hats off to Champion Motorsport. They're not cheap, but they are excellent. The car is riding quite nicely on the new HR springs and looks great.