Welcome to RennTech.org Community, Guest
There are many great features available to you once you register at RennTech.org
You are free to view posts here, but you must log in to reply to existing posts, or to start your own new topic. Like most online communities, there are costs involved to maintain a site like this - so we encourage our members to donate. All donations go to the costs operating and maintaining this site. We prefer that guests take part in our community and we offer a lot in return to those willing to join our corner of the Porsche world. This site is 99 percent member supported (less than 1 percent comes from advertising) - so please consider an annual donation to keep this site running.
Here are some of the features available - once you register at RennTech.org
- View Classified Ads
- DIY Tutorials
- Porsche TSB Listings (limited)
- VIN Decoder
- Special Offers
-
OBD II P-Codes - Paint Codes
- Registry
- Videos System
- View Reviews
- and get rid of this welcome message
It takes just a few minutes to register, and it's FREE
Contributing Members also get these additional benefits:
(you become a Contributing Member by donating money to the operation of this site)
- No ads - advertisements are removed
- Access the Contributors Only Forum
- Contributing Members Only Downloads
- Send attachments with PMs
- All image/file storage limits are substantially increased for all Contributing Members
- Option Codes Lookup
- VIN Option Lookups (limited)


roastduck88
-
Posts
66 -
Joined
-
Last visited
Content Type
Profiles
Events
Forums
External Paint Colors
Downloads
Tutorials
Links Directory
Collections
Store
Posts posted by roastduck88
-
-
My car recently failed smog due to O2 Sensor and CAT was not detected by OBDII. The Smog tech recommended that I drive 200 miles or try replacing the battery. I confirmed my battery wasn't an issue after testing it and began my 200 mile drive. I figure I could probably pull it off in less miles if I varied my driving with city and street. After about 150 miles I plugged in my OBDII scanner and to my disappointment, the O2 and CAT was still not detected. I decided to do some research and read posts from people (non Porsche owners) driving several hundred miles with no luck. Three nights of research later, I stumbled across a solution that didn't sound too ridiculous and tried it the same night. Sure enough, my sensors were all detected after the first try! The next day I took my car to the Smog station and passed with no issues.
Here are the steps I took:
PREREQUISITES:
- The car must have been off for at least 8 hours to allow the car to fully cool down before staring this procedure
- You must have a strong battery, if you need to jump start your car or have a weak battery you could lose all the sensor data and have to redo this again
- I recommend you do this test in the middle of the night or whenever there is the least amount of traffic, you'll understand why later
- Always obey all traffic rules and use your best judgement on safety while performing these steps, this is not worth getting into an accident over!
STEP 1. WARM UP THE CAR: turn on your car, while in idle turn on your heater, headlights, and rear defroster for about 5 minutes. Do not press the gas pedal during this process. It is not necessary to leave your heater, rear defroster, and headlights on after this step but leaving it on should not impact the results.
STEP 2. CITY DRIVING: drive your car normally through the city streets for about 10 minutes while trying to maintain the speeds between 25-35 mph whenever possible but do not go over 35 mph. Do not accelerate hard or brake hard, just drive normally and conservatively, and do not exceed too much past 3,000 RPM. If you exceed 35 mph once it's no big deal but if you do this often this may not work and you will have to start this process over again. I exceeded 3,000 RPM to about 3,500 RPM once or twice but it didn't impact the results but I would not take a chance. I made slow full stops at all the stop signs and traffic lights and when I accelerated I slowly accelerated.
STEP 3. FREEWAY DRIVING: accelerate normally onto the freeway and maintain speeds between 55-65 MPH for about 6 miles, I drove about 10 miles just to be safe and stayed around 60 MPH. THE NEXT STEP IS VERY IMPORTANT AND MAY BE DIFFICULT TO FIND AN OFFRAMP TO DO THIS SAFELY. When you exit the freeway, DO NOT HIT THE BRAKES, the car must slow to a crawl by itself. I used the handbrake to stop the car fully when it was crawling. I did this test at 1am in the morning during the weekday and found a long offramp that people rarely take so it was not difficult for me to do this. After the car stopped I slowly accelerated to the next stop sign / stop light not going any faster than 35 mph or over 3,000 RPM.
STEP 4. MORE CITY DRIVING: I followed the exact same steps as step 2. After I was done, I pulled the car over and let the car idle for about 2 minutes before plugging in my OBDII scanner. All my sensors came up.
My biggest challenge was to figure out which roads / freeways I would take in order to pull this off but doing this in the middle of the night definitely helps out a lot. My second biggest challenge was to get over being embarrassed as drivers stare you down for going well below speed limit in a Porsche. =)
There are plenty of posts out there that suggest you should maintain 25-35 mph for a solid 3-5 minutes without stopping, I thought that was absolutely ridiculous. If that was the case, there would be a lot of people with sensors in the not ready state!
-
I just finished my spark 3rd spark plug job on this car. First try took me 6 hours, second try took me 4 hours, third try took me 2.5 hours so I wanted to share some tips on how to speed up the process (I did not have to remove the bumper or the exhaust)
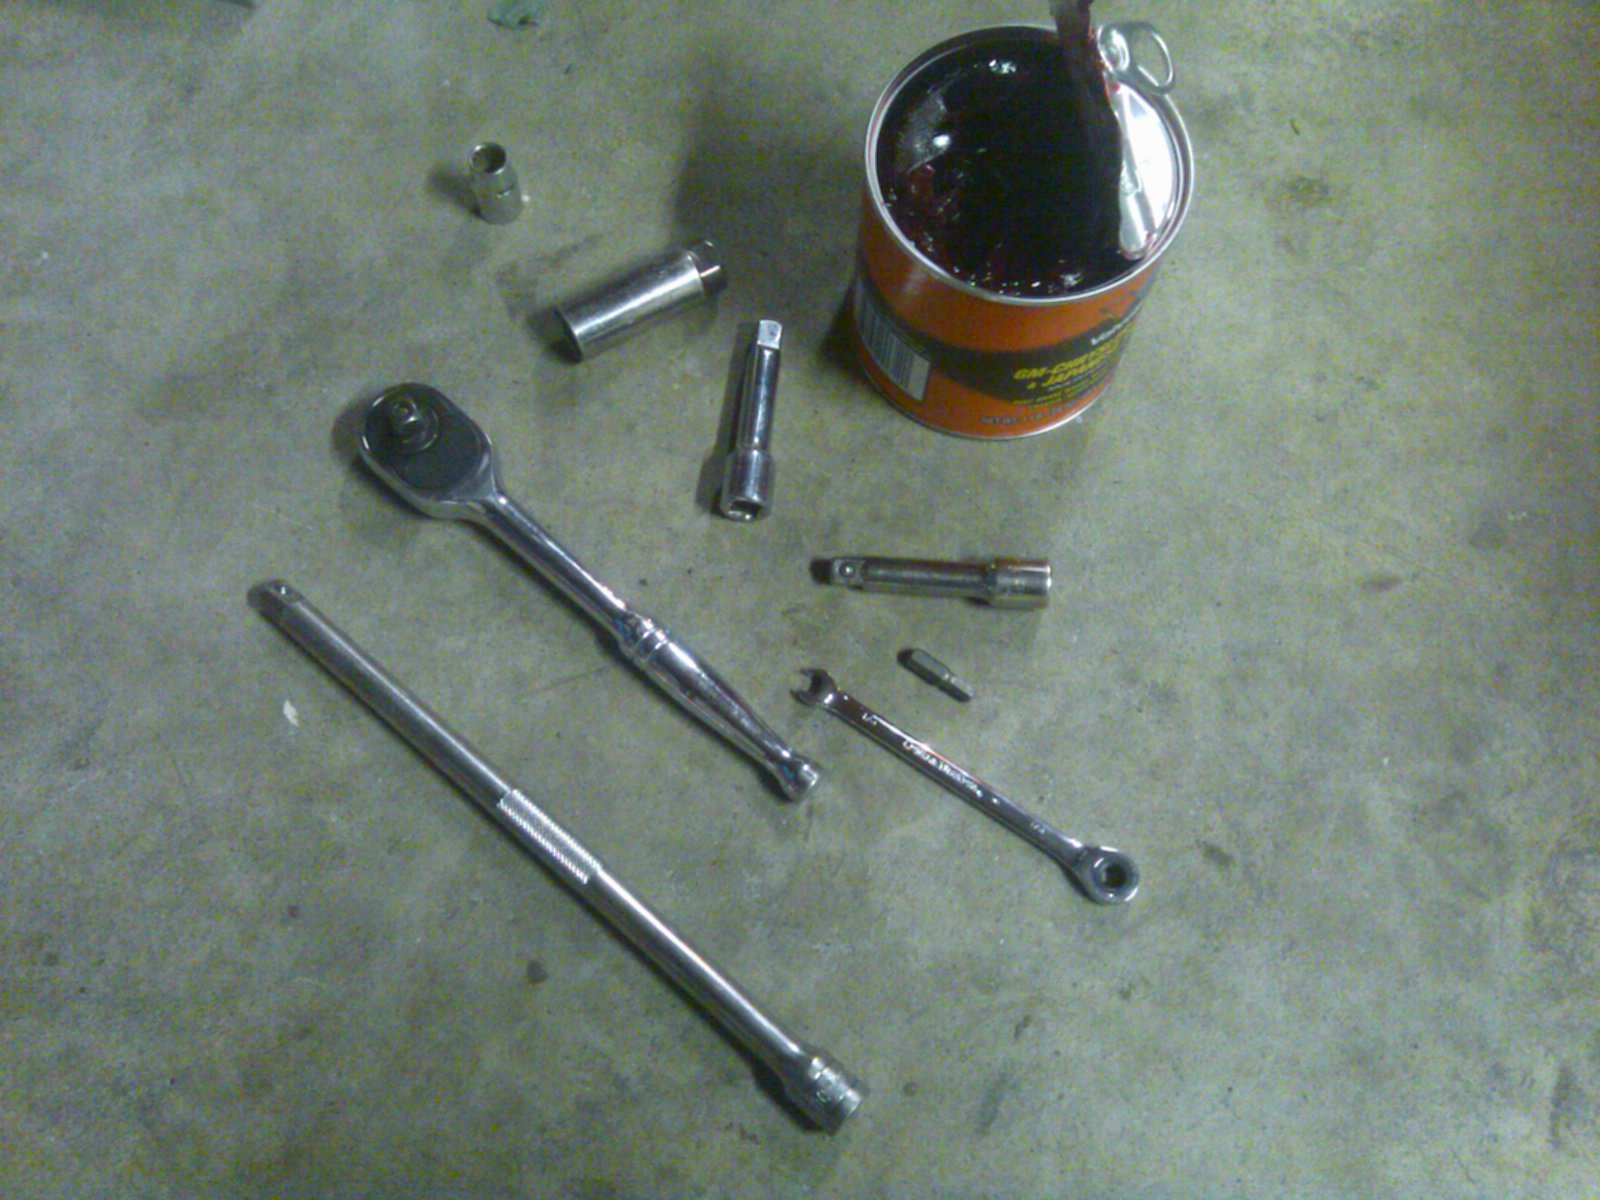
ATTACHED IS THE PHOT OF THE TOOLS I USED:
- the wrench is used with conjunction of the 5mm bit, the closed end turns so it works like a rachet (this combination allows you to get into the tight spaces)
- the grease is for lubing up the spark plug so it wouldn't get stuck in your spark plug when you're taking it out
- the long extension is for reaching the 2 plugs on the left and right side of the car closest to the wheel
- the 2 mini extensions is for you to get to the other 4 hard to reach plugs, put the spark plug socket and the extension in first and then attach the 2nd extension and finally the rachet
- the 10 mm socket was used to remove the heat shield
TIPS
- only the rear needs to be jacked up to access the spark plugs
- the spark plug closest to the rear end of the car on the DRIVER'S SIDE can be reached through the exhaust gap at the rear of the car
- if you can not get your hand at the proper angle to loosen the screws or gain leverage try positioning your body at a different angle underneath the car (ie instead of vertical, try horizontal in relation to the car)
- make sure you double check all wire connectors connecting to the coils to ensure the wire is secure and COMPLETELY on
- check to ensure all the spark plugs are the correct model before installing
PROBLEMS
- do not over lube your spark plug, just use enough lube so it doesn't get stuck to the spark plug socket
- ROTTEN EGG SMELL, MISFIRE, I ran into this issue after replacing the spark plugs and I ended up redoing the whole spark plug job to fix it, I probably did not connect a wire properly to the coil
- MORE VIBRATION THEN NORMAL, again check the spark plug wire to the coil to make sure it's secured
I hope these tips are imformative! Please feel free to email me or msg me on AIM if you have any questions. GOOD LUCK!!!

-
Sorry for the late response, you are absolutely correct that constant power means you would have to turn off the deck in order to stop the deck from drawing power from your battery. Your best bet is to find an acessory in the car that has a "delay off" and somehow wire it to that. Perhaps your dome light?
Thanks RoastDuck88 - I am actually looking to replicate the delay the headunit shut_down after the key is removed - this keeps music playing until you open the door. I believe constant in the wiring harness would require me to turn off the headunit to turn off the music and keep it from drawing on the battery. Please advise if you are aware of something to the contrary. Thanks again.I am almost finished with the installation of a Kenwood DNX-9140. I really liked the feature I had with the Becker head unit of music continuing to play after removing the key until I opened the door. I would have thought that this worked off of a switch triggered by the opening of a door - but I seem to have lost this feature with the new install. Have others experienced the same with an aftermarket head unit - any solutions? Thanks -J
If you are referring to the power, you can try wiring it up to "constant" meaning power is available even after the key is turned off. Decks are normally wired to the accessory on meaning if the key is on the "assesory on" position then there will be power supplied to the deck. I hope this helps.
-
I am almost finished with the installation of a Kenwood DNX-9140. I really liked the feature I had with the Becker head unit of music continuing to play after removing the key until I opened the door. I would have thought that this worked off of a switch triggered by the opening of a door - but I seem to have lost this feature with the new install. Have others experienced the same with an aftermarket head unit - any solutions? Thanks -
J
If you are referring to the power, you can try wiring it up to "constant" meaning power is available even after the key is turned off. Decks are normally wired to the accessory on meaning if the key is on the "assesory on" position then there will be power supplied to the deck. I hope this helps.
-
I think there is a link here if you do a search
Sorry, my brain has not been working properly. It never occured to me to do a search, haha.. Thanks, I found exactly what I needed via a search!
-
Diipka,
You got everything you need now :D
I know this is a little off topic but does anyone know how to remove the whole side mirror assembly from the car?
-
Hi,
I did something really stupid. I was pulling in my garage and I pulled a little too close to one side of the garage because I was trying to avoid an obstacle on the passenger side and I scratched my side mirror assembly. I tried to touch it up with touch up paint but it's still noticable so now I am cosidering just replacing the mirror assembly or repainting the mirror assembly. Is the mirror assembly easy to take off? Would you recommend just replacing the mirror assembly or doing a repaint at a local body shop?
Thanks,
Raymond
-
Any feedback?
Don't forget the spinners on your rims and also a 10" diameter exhaust pipe! J/k... I would not do it, like others have said, spend the money elsewhere.
-
Thanks again to everyone for the replies!
-
Wise choice.... just remember at the end of the day when all is said and done. A Corvette is still an American car, an M3 is still a BMW, while a 911 is still a 911... :D
-
maybe this would do the triick :D
hahha.... funny, (funny car to be accurate)
I'm not sure what the 10k kit includes, but in order to properly add force induction there are alot of other things you may need to get for example, upgraded fuel pump, additional oil / trans cooler, ECU mapping, intercooler, and much more. And of course if you are going to go fast, you also need to be able to stop fast which means upgraded brakes. There are usually issues associated with aftermarket parts, after the whole ordeal you will probably realize it is much better to just get a car that is already has force induction stock.
-
It sounds like the microswitch in the windshield header latch receiver is pushed a little bit up so that when the latch closes into the receiver it is not triggering the switch. This tells the the top controller that something is amiss and commands the latch to open back up.
3 solutions
1. Remove the latch receiver, and gently push the microswitch back down a bit so that the latch closes it when it seats
2. Stick a little piece of self-adhesive felt (like the felt feet circles that you can get at Home Depot) on the latch receiver cover. This is usually all it takes to push the switch closed.
3. Replace the latch receiver.
Solution #2 is the easiest and quickest to try. If that cures your problem, then consider disassembling the latch receiver to bend the switch down a bit.
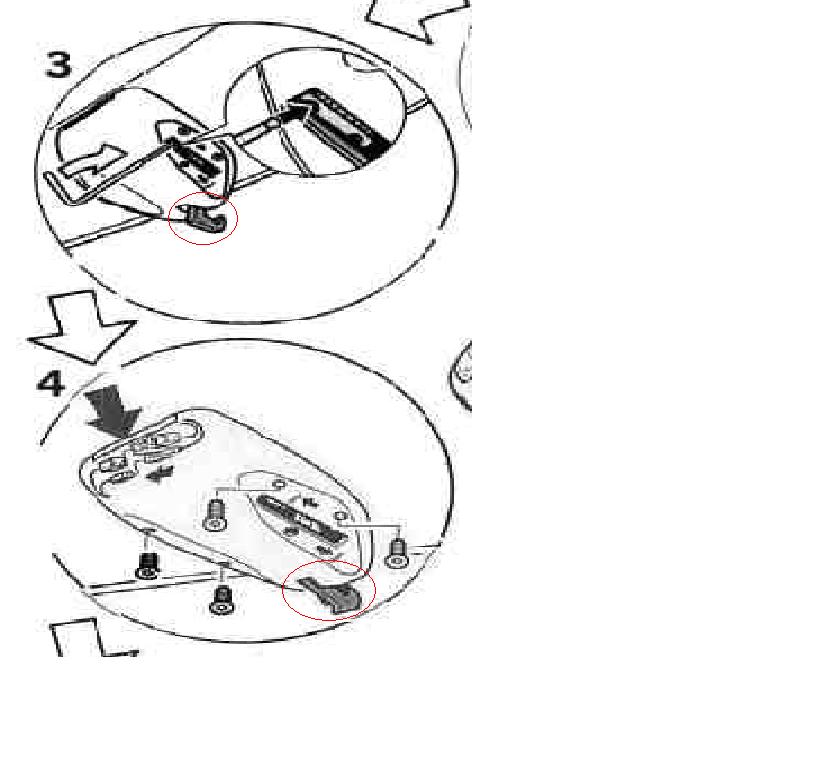
Thank you so much! I finally had time to take a look at the latch and I noticed that the latch cover is what is pushing down the microswitch. The latch cover was loose so when the latch was fully engaged it never pushes the microswitch on all the way. All I had to do was snap the latch cover back in place and that fixed the issue! I have circled the latch in the photo below. There is a plastic cover that goes on top of the latch.
-
Hi,
I have a 2003 996 C2 STOCK and am looking for some direction on getting more HP out of the car. A friend of mine has a M3 and is starting to annoy me when he can pull away from me on straights. I tend to get beat up on by guys with WRX Sti's and mildly tuned M3's...sometimes even stock M3's. I essentially want to lay the smack down with my Porsche hand. My goal is to get around 50-100 more HP. What is the best way to accomplish this.
I was going to do the fabspeed muffler bypass, chip remapping, intake(would like some recommendations if possible. I saw the K&N and doubt it really produces 23 HP+ come on). What else can I do to stay within a $3000 budget?? Do I really need to fork over $10K for a TPC supercharger? Seems pretty ridiculous that a guy with a corvette can pickup a supercharger for like $2K and a 996 one is over $10K. Any thoughts on maybe putting a new cam in and heads( even though this is going over my budget? There has to be some guys out there that have very fast Carrera 2's that can run with some of these mildly tuned M3's right?
Any help or suggestions would be appreciated,
Although I have not modded a Porsche, I have modded other cars and my experience has been that the gains seen on bolt ons are marginal at best unless your car has force induction already. If you want to see real HP gain, I am afraid you will need to go with force induction like a turbo or supercharger. If you are going to dump 10k for a supercharger, my advice to you is to just save up and just buy a 996 turbo and sell your existing car. There is a lot of work involved in turnning a non force induction car into a force induction car if you are going to do it the right way.
-
thanks docdyh.
I am in mountain view California. I came across this place http://www.heyerperformance.com/ - anyone know if they're good?
Sorry I know this is a bit late. But Marvin at The Renn Shop is very detailed and can tell you everything wrong with your Porsche to a point where you wish you did not know.. haha.. (he is very detailed and was able to fix issues the dealer was not able to isolate, it's very hard to find someone willing to spend that much time looking at your Porsche)
-
Thank you for the quick response and suggestions! Do you have any photos or instructions on how to disassemble the latch receiver?
Perhaps this will help...
Thanks!!!
-
It sounds like the microswitch in the windshield header latch receiver is pushed a little bit up so that when the latch closes into the receiver it is not triggering the switch. This tells the the top controller that something is amiss and commands the latch to open back up.
3 solutions
1. Remove the latch receiver, and gently push the microswitch back down a bit so that the latch closes it when it seats
2. Stick a little piece of self-adhesive felt (like the felt feet circles that you can get at Home Depot) on the latch receiver cover. This is usually all it takes to push the switch closed.
3. Replace the latch receiver.
Solution #2 is the easiest and quickest to try. If that cures your problem, then consider disassembling the latch receiver to bend the switch down a bit.
Thank you for the quick response and suggestions! Do you have any photos or instructions on how to disassemble the latch receiver?
-
Are the CD's original ones ? If not, do the check with originals to exclude potentially aftermarket (burned) CD errors.
yep tried both, thanks though
Sounds like a possible defective unit. I had similar issues but with the deck and not a CD changer. I ended up just replacing the deck with an aftermarket unit.
-
Hi,
I closed my convertible top yesterday and I noticed the convertible top latch is not locking by itself. The latch tries to engage and it looks like it completes but it suddenly disengages itself and restarts the process overr and over again. The only solution is to hold the lock with my finger after it is engaged and then the windows finally roll up by itself. I have also gotten the lock to lock by itself after several tries of opening the top slightly and closing the top again. Any suggestions would be appreicated. There does not appear to be any other issues with the convertible top.
Thanks,
Raymond
-
Problem appears to be fixed! Finally had a chance to take it to The Renn Shop and Marvin replaced the tie rods and the steering rack. He says the Tie rods are most likely the culprit but I had to replace the steering rack anyways since it was "loose". The tie rod replacement fixed the noise and the steering rack replacement improved my handling quite a bit. And to think when I took my car to the dealer not only did they NOT find an issue with my steering rack, but they also could not find the noise and claimed that it was most likely caused by the convertible top.
-
$800 will probably cover the cost of an aftermarket amp, a deck, and the cost of installation and running all the wires.
-
they look rusty. any thoughts.
B)
I would not recommend doing that if you are referring to your rotors.
-
Sorry, one dyno graph on a car that is not yours does very little to prove anything...you have no idea the conditions/ecu/other mods/environment....I'm with Loren on this...total BS
I use to mod alot, and I can tell you from experience that having an intake mod makes very little difference and the very little difference it makes (a matter of 5 hp or less) is only in the higher RPM's. I did not put an aftermarket intake on my porsche but I have put one on a Nissan and I noticed the lower RPMs was less responsible while the higher RPMs seem to be slightly faster. It is definitely not worth the money, unless you like the sound of an aftermarket intake. On top of that, if a simple intake mod would really produce an extra 23hp wouldn't you think Porsche, with a team of engineers, would have implemented that alraedy?
-
Hmmm that arm looks like it threads into the end of the steering rack. It looks like it could come off pretty easy. It might be worth taking it off and seeing if I can detect any damage to that joint. Anybody have that apart yet?
Doug Davis
I have the EXACT SAME PROBLEM to a T. I have replaced the front struts, ball joints and upper strut mounts. The only thing left to replace is the control arm and the steering rack. The mechanic recommended I replace the steering rack but I have not had the time to take the car in to get the steering rack replaced yet.
-
I saw these at Suncoast Porsche...
http://e-partssales.com/Merchant2/merchant...96brakeupgrades
Thanks!
SMOG FAILED: O2 Readiness / CAT Readiness (solved)
in 996 Series (Carrera, Carrera 4, Carrera 4S, Targa)
Posted
JFP, you are correct that I am referring to the I/M Readiness. I don't drive my car very often so at times I will have to recharge my battery in order to start the car. I did not get a CEL, the cause was due to a drained battery.
You are correct that the common solution to get the sensors to a ready state is to drive several hundred miles however my solution is for people that don't want to drive several hundred miles. This solution worked well for me without needing to drive several hundred miles, the end result was that I was able to pass Smog with flying colors.