Welcome to RennTech.org Community, Guest
There are many great features available to you once you register at RennTech.org
You are free to view posts here, but you must log in to reply to existing posts, or to start your own new topic. Like most online communities, there are costs involved to maintain a site like this - so we encourage our members to donate. All donations go to the costs operating and maintaining this site. We prefer that guests take part in our community and we offer a lot in return to those willing to join our corner of the Porsche world. This site is 99 percent member supported (less than 1 percent comes from advertising) - so please consider an annual donation to keep this site running.
Here are some of the features available - once you register at RennTech.org
- View Classified Ads
- DIY Tutorials
- Porsche TSB Listings (limited)
- VIN Decoder
- Special Offers
-
OBD II P-Codes - Paint Codes
- Registry
- Videos System
- View Reviews
- and get rid of this welcome message
It takes just a few minutes to register, and it's FREE
Contributing Members also get these additional benefits:
(you become a Contributing Member by donating money to the operation of this site)
- No ads - advertisements are removed
- Access the Contributors Only Forum
- Contributing Members Only Downloads
- Send attachments with PMs
- All image/file storage limits are substantially increased for all Contributing Members
- Option Codes Lookup
- VIN Option Lookups (limited)


kbrandsma
-
Posts
1,103 -
Joined
-
Last visited
-
Days Won
8
Content Type
Profiles
Events
Forums
External Paint Colors
Downloads
Tutorials
Links Directory
Collections
Store
Posts posted by kbrandsma
-
-
My passenger side cooling fan doesn't come on. It works with an external power supply. I've checked the fuse. Where's the relay? Is the temperature switch the same for both fans?
Wiggle the ignition key. Sometimes it is a faulty ignition switch.
-
Two blacks, a green and a red, could be a home made plug for the rear speakers. Pop your radio out and see if they attach to the brown plug in the back of the radio?
-
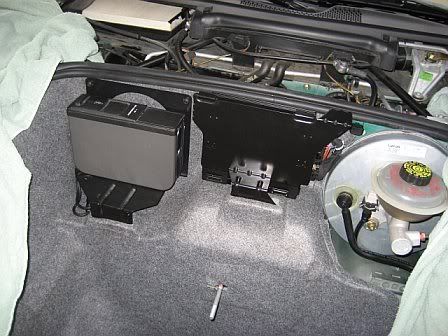
If it is the same as a 986 Boxster it should be in the center directly behind and and above the spare tire. The photo below shows the amp installed in a black frame and bewteen the CD changer and brake/clutch booster/reservoir. The spare tire is removed.

-
I ordered all parts from Sunset Porsche in Beaverton, Oregon. Here are the part numbers and the price I paid a little over a year ago.
1) 996-613-219-10
EWC 4 coulmn switch - $166.292) 999-650-513-40
Plug Socket (for wiring harness) - $2.863) 000-979-009
VW Wiring Set (5 of them) - $13.054) 993-552-573-01-01C
Steering Wheel Switch Cover (additional opening for 4th stalk on Left hand side) - $6.06 -
Thanks for the responses. My car has the OBC/cruise already so I won't get any extra from the replacement.
Found a guide with photos on the OBC hack:
http://www.whiteson.org/boxster/mods/obc/obc.stalk.pdf
Some prep questions:
Does anyone know the size of the socket for the steer wheel nut? Would a T27 torx work in place of T30?
Where is a good place to source the 4 stalk assembly?
Not sure of the size of the steering wheel nut, but I do know it is a standard metric size and has a spring washer too. The Torx T30 is the size of the two (2) fastening screws that hold on the airbag. They are accessible from from behind the wheel. A Torx T27 won't work. When you remove these screws re-insert them into the airbag and always store the airbag so that the cushioned side faces upward.
Here is a good thread with more info. PRESS HERE
-
[bOK[/b], Where do I post this topic?
Which is the best radar detector out there.
Not jammer, to get a good jammer it has to be self contained and not a feature of the detector.
So...just the detector.
Is it the Valentine One or the Escort 9500ix?
Or something else?
(I couldn't find a good heading under which to ask this question.)
Thanks!!
Check out Radar Roy @
-
It is on the windshield pillar. On a LHD it is on the right side. I think is is also on the right side on a RHD.
You need to remove the visor and the long black plastic trim that covers the pillar.
Great - Thank you, I will look tomorrow
Dave
Becareful removing the visor torx screws and putting them back. The screws are held in place by a jam nut that is very easy to strip.
-
Great, it seems you have a couple of options depending if you shorten (cut) your wire that came with your rear speaker kit. If you didn't you need to get the wire to within 12" of your new 6x40 AMP in order to use your extension. You can route the cable brown plug and all up to the AMP or cut of the brown plug, leaving enough room to re-solder it after running the wire to the AMP. I know you can get the brown plug through the bulkhead grommet but not sure about getting past the moat and into the trunk. The pins are hard to remove from the brown plug without a special pin extraction tool.
You could also contact Harvey Peck and order a longer extension for $30 or so. I may have an extra one, I'll take a look. Harvey is an excellent souce regarding your AMP. I have the following AMP:
996 COUPE M490
996.645.311.00
Other AMPs may work but I know this one does for sure. Perhaps others can chip in.
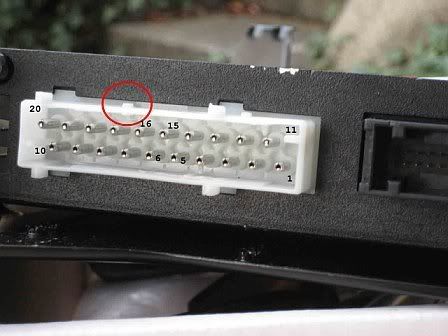
The PIN assignments for 996.645.311.00 are:
RL- 16
RL+ 6
RR- 15
RR+ 5
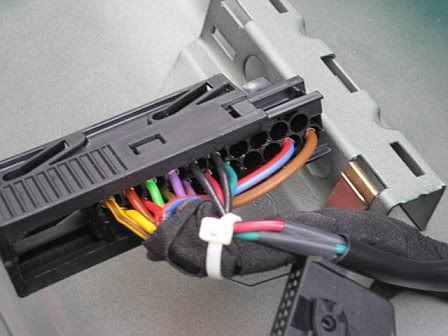
Here they are inserted into the harness
Also CLICK HERE for another thread on the same topic.
-
The filter just snaps into the housing and really is unprotected once you take off the cowling.
The wiring harness on the passenger side takes up most of the space in that grommet and I chose not to disturb the integrity thru the bulkhead there. The driver's side provides a simple routing of the cable to the back of the head unit. You will need the longer amp harness to connect to the brown plug behind the radio and make it up to your new amp.
Any idea what the part no. is for that? I'm going to check my parts catalog right now. Also, would i want a MY 2003 harness so it covers all 6 channels from HU or did they already come fully wired that way already in 2001?
Depends on what you have. Did you orginally have the M490 sound package with the 4x40 AMP and you are upgrading to a newer 6x40 AMP? Is the 6x40 AMP new or puchased used? Did your rear speaker kit come with your car as an option or did you purchase the PNA 986 KIT or the after market speakers from Harvey Peck at PNP. When I upgraded my AMP my rear speakers were already installed in the brown plug in the back of the radio. I purchase a long extension from Harvey for $30 or so. The brown plug snaps into to the extension and I routed as I indicated above. I have some short extensions if you want to make your own longer one out of it.
The pin assignments for the rears for your new 6x40 AMP are different as well. What is the Part no. for your new 6x40 AMP and I'll get the PIN assignments for you. You also have to cut off a male key on your new 6x40 AMP so your existing AMP harness will mate properly with it. See red circle in photo below.
-
The filter just snaps into the housing and really is unprotected once you take off the cowling.
The wiring harness on the passenger side takes up most of the space in that grommet and I chose not to disturb the integrity thru the bulkhead there. The driver's side provides a simple routing of the cable to the back of the head unit. You will need the longer amp harness to connect to the brown plug behind the radio and make it up to your new amp.
-
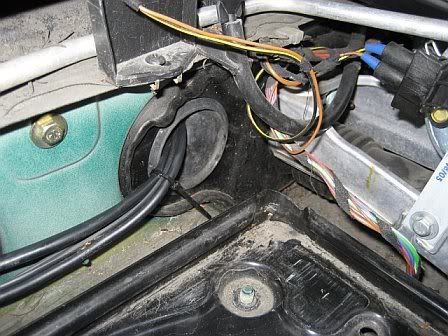
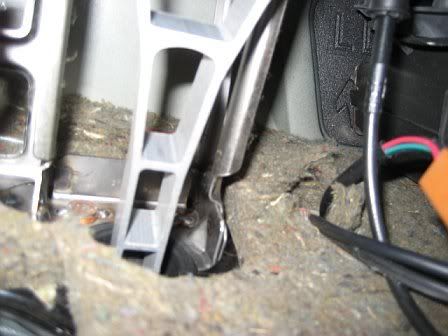
There is a large rubber plug on the fire wall behind the battery tray on the driver's side. On the interior it is just above the gas pedal. You can cut a small x in the plug and route your wires through. Be careful not to push the plug through.
Battery side
Above the gas pedal from inside the vehicle
I did the install a year or so ago and I have other photos. Let me know if you need assistance.
-
Also check Sunset Porsche in Oregon, found on link at the the top of the page "Porsche Parts at Dealer Costs"
-
I replaced mine with Mobil 1 synthetic when I had the tranny out to replace my RMS and clutch in March 08. Easy to tell where 11mm is when the tranny is out on the jack. In May 08 I replace my shifter to the eBay short throw and it shifts extremely smooth.
-
Check Mike Focke's website HERE
-
It is not necessary to remove transmission fluid.
-
Check your blue coolant resevoir cap in rear trunk. If it ends in 00 replace. I have a 98 with 64K and recently had to replaced mine with the latest version ending in 04.
Part number 996.106.447.04
-
Can you mix yellow Porsche coolant with the red Porsche coolant?
-
I recently started getting a similar noise at about 70 MPH. It sounds only with the top up. I have original top and window is in good shape.
-
I had the same thing and only new tires took care of the vibration.
-
Is that the hose to manually check the oil level from the trunk with the oil dipstick?
-
Just ordered some from Sunset Porsches in Portland, Or. Under $30.00 gallon.
-
crislau
I have an extra one. You have a PM
kbrandsma
Hi, would someone be able to provide me the part numbers to the complete windstop/wind deflector assembly? Here is what I've found thus far:- the clips that rivets to the upper side roll-bar: 987-561-901-02
- a single clip that rivets to the bottom of the roll-bar: ???
- the windstop plexiglass: 987-561-621-00
Anything else missing?
THanks!
-
A new resevoir includes a new bleeder valve. Sunset Porsche will beat most dealers by a $100 or more.
-
Your engine oil is cooled by a engine oil cooler heat exchanger. Are you calling the bleeder valve an expansion chamber? If you take off the cover to the bleeder valve you might be able to determine a leak. The best way however is with a pressure test. I just picked up a new coolant cap today. Part number - 996.106.447.04
Body Vibration at 75 MPH and up
in 986 Series (Boxster, Boxster S)
Posted
In the three years I have owned my Boxster I have experienced this twice. The first was an alignment and tire problem and the second was my undercarriage plastic panel that lost a couple of screws and at higher speeds vibrated the entire car.