Welcome to RennTech.org Community, Guest
There are many great features available to you once you register at RennTech.org
You are free to view posts here, but you must log in to reply to existing posts, or to start your own new topic. Like most online communities, there are costs involved to maintain a site like this - so we encourage our members to donate. All donations go to the costs operating and maintaining this site. We prefer that guests take part in our community and we offer a lot in return to those willing to join our corner of the Porsche world. This site is 99 percent member supported (less than 1 percent comes from advertising) - so please consider an annual donation to keep this site running.
Here are some of the features available - once you register at RennTech.org
- View Classified Ads
- DIY Tutorials
- Porsche TSB Listings (limited)
- VIN Decoder
- Special Offers
-
OBD II P-Codes - Paint Codes
- Registry
- Videos System
- View Reviews
- and get rid of this welcome message
It takes just a few minutes to register, and it's FREE
Contributing Members also get these additional benefits:
(you become a Contributing Member by donating money to the operation of this site)
- No ads - advertisements are removed
- Access the Contributors Only Forum
- Contributing Members Only Downloads
- Send attachments with PMs
- All image/file storage limits are substantially increased for all Contributing Members
- Option Codes Lookup
- VIN Option Lookups (limited)


kbrandsma
-
Posts
1,103 -
Joined
-
Last visited
-
Days Won
8
Content Type
Profiles
Events
Forums
External Paint Colors
Downloads
Tutorials
Links Directory
Collections
Store
Posts posted by kbrandsma
-
-
Okay, I started the engine and turned the lights on and the spoiler nor garage door did anything....until....I pushed the buttons; and as expected, they worked as they should! Don't get me wrong, I'm glad that the switches work, as they should, but I'm not glad that they don't light up with the rest of the interior lights???
So I'll have to take the switch plate back off and see if I can find anything (I'm old school.....must 'touch' everything to see if it isn't as it should be???) wrong with my wiring.
I'll let ya'll know if I find anything,
C'ya,
I did the exact same mods and placed in the exact same spot. I tapped into TC switch for the light and ran to my spoiler switch, which was in the middle opening. I then tapped into the spoiler switch lights and went to the garage door switch at the bottom. By the way I took some clear gloss and sprayed my spoiler switch which had the matt finish and matched the gloss to the other buttons. Looks great!
-
I don't follow this part.
"When I went to add the wiring harness there was already a plug (#2 above) with one wire that went to the white harness #22. Since I already had the new harness made I decided to leave the one I found in place and remove the wire from the white harness (#22) and replaced it with my new #22."
Other than you are supposed to put a wire in slot #22 of the white connector.
I thought that might be hard to understand. This was strange. Let me see if I can try again.
When I went to add my new harness with the five yellow VW wires, there was already a factory installed harness with only 1 wire in place. The the clip portion of the harness was not attached to anything (because there was no 4th stock to attach it to) and the one wire went to the white harness and was installed in slot #22. I knew it was factory installed because it was wrapped in the original factory black tape with all other wires . I probably should of snapped a photo. Go Figure!
-
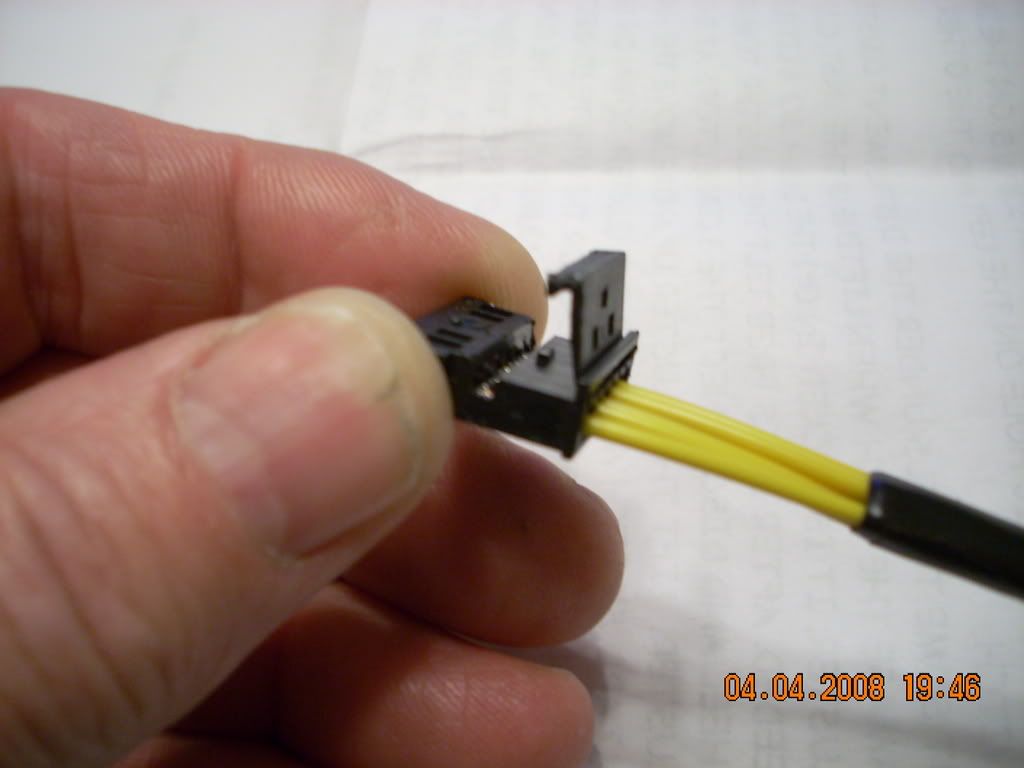
I finished adding the 4th stalk this evening. I ordered all parts from Sunset Porsche in Beaverton, Oregon. Jeff knew all the parts to include. Here are the part numbers and the price I paid.
1) 996-613-219-10 EWC 4 coulmn switch - $166.29
2) 999-650-513-40 Plug Socket (for wiring harness) - $2.86
3) 000-979-009 VW Wiring Set (5 of them) - $13.05
4) 993-552-573-01-01C Steering Wheel Switch Cover (additional opening for 4th stalk on Left hand side) - $6.06
Here are some photos of the wiring harness I made with #2 and #3 above.

When I went to add the wiring harness there was already a plug (#2 above) with one wire that went to the white harness #22. Since I already had the new harness made I decided to leave the one I found in place and remove the wire from the white harness (#22) and replaced it with my new #22.
Pointers I learned and would recommend.
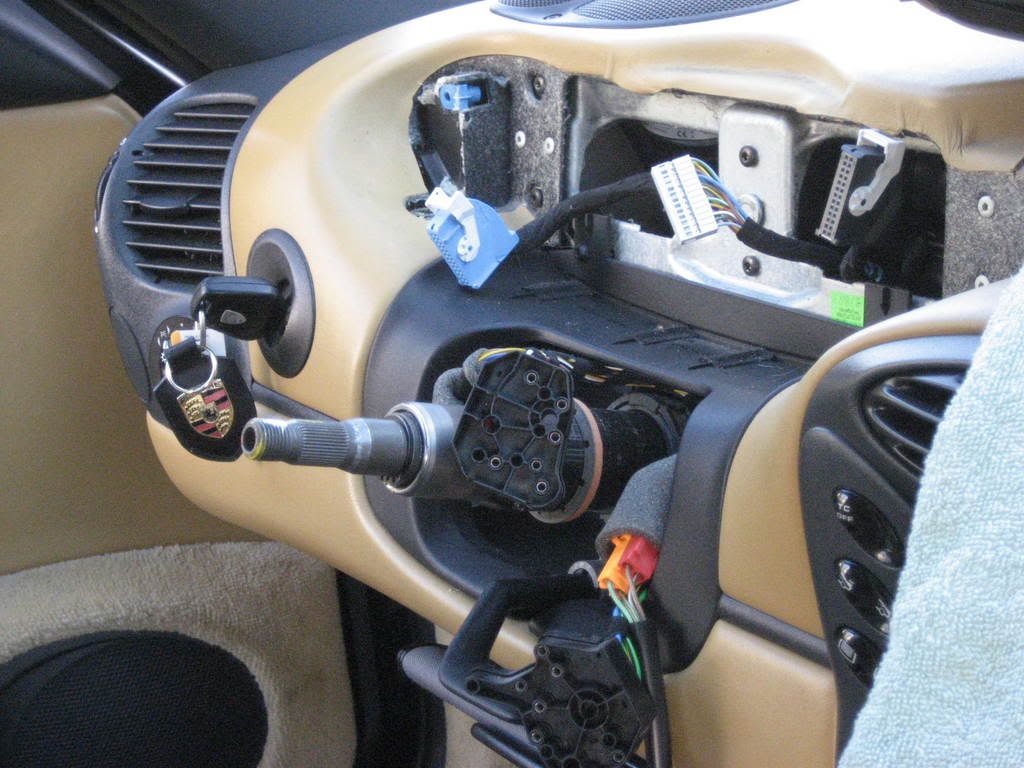
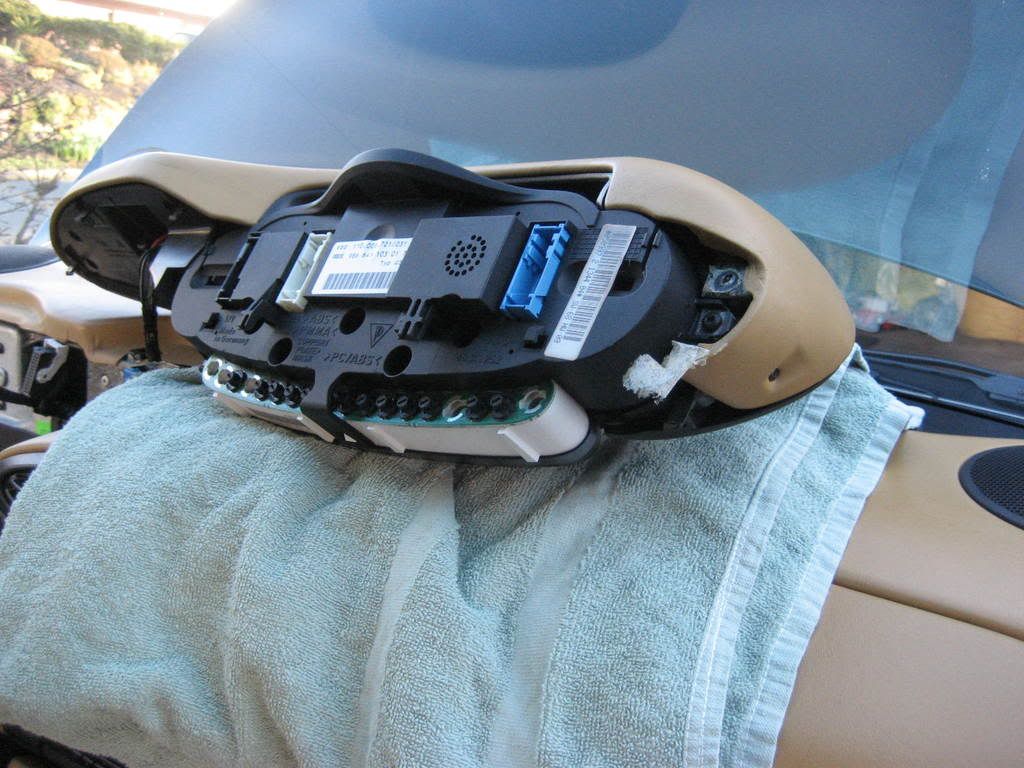
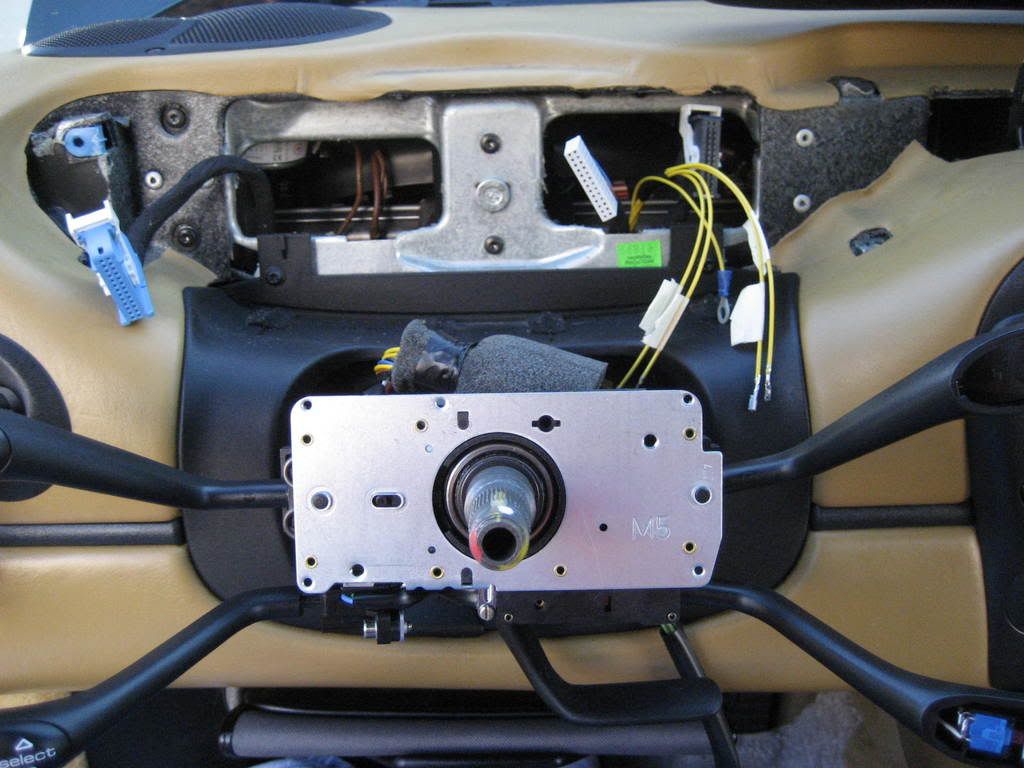
A) Remove the Instrument Cluster 1st. This will make room for removing the drivers airbag
B ) Protect your dash when placing the cluster upside down on it. Leather gets scratched easily
C) Invest in a long T30 screw driver for removing air bag screws
D) The airbag screws where really tight and I used a pair of vice grips to gain additional leverage
E) After removing airbag turn steering wheel and front tires dead center before removing the steering wheel for reference on re-install
F) Sunset sent all 009 wires (#3) and they where very tight in the white plug behind cluster. Most posts listed on this forum and others suggest having 010 wires for the white plug and butt them into the 009s from the 4th stalk. Although it was very tight I managed to use all 009s and everything worked. If I had to do it over I would use the 2 different sizes 009 and 010
On a scale of difficulty from 1 to 10 I would rate this mod a 3.
Other sites for reference:
More Photos of 4th Stock and OBC Hack
The White plug is in the middle
Cluster placed on dash
4th Stock is placed on steering column and beginning re-assembly, you can see wiring harness coming out of dash
-
There are lots of threads on this Board and others regarding this mod. Here are 2 good ones.
-
The support frame for the mount also is removed if I'm not mistaken. I believe it bolts into the tranny. I'll double check when I get home this evening.
-
I purchased the 4th stalk in November and I am just now starting the hack. The previous owner had used an Indy in the Bellevue, WA area. I called them up and asked about using the PST2 tool to turn on the OBC. I was surprised that they had never heard of this. The asked me to come in and show them how it's done at no charge. The good folks at Squires Autowerks enabled my OBC. If you are looking for an Indy in the Seattle area check out Squires in Bellevue, WA.
-
If the IMS is still exposed, replace it as well. Cost is about $75 from Sunset. Very easy to do. You will lose some oil in the process but you can catch it and reuse or change your oil if it makes since to do so.
-
Also remove the right rear tire and check the bellows from the AOS. Don't rule out the bellows when determining the cause of the oil leak. If you are going to drop the tranny you will need to also drop the muffler and catalytic converters.
-
Don't remove that nut you will damage the mount. I have a 5 speed and recently replaced my RMS and IMS. To remove the transmission supports you remove the other 2 bolts and nuts (2 bolts and nuts on each side). Good luck!
-
That's exactly what I did as well. Do you have any pictures?
-
l recently purchased the Durametric tool and software. I am located in Everett just north of Seattle.
-
Welcome, I purchased mine in July 07. The previous owner had only driven it 100 miles in the past 2 years. I noticed that at about 80 mph there is a slight shimmy. I think the tires will eventually need to be replaced. I'm going to try and have them re-balanced first and see if that helps. Good luck and welcome again!
-
I purchased the 4 stalk from Sunset in November and I am just now getting ready to do the hack. All parts were under $200 and the female connector or plug socket was $2.86 PN 999-650-513-40.
-
Hi Gus,
I recently did a short shift upgrade and used the eBay shifter.
-
Hi Joe,
Mike Focke has a great website. Under Repairs and Maintenance select Drains Diagram. The link is below:
-
I replaced all 4 of my O2 sensors this winter and got the same codes P1117 and P1121 with P1115 and P1119 pending. They were Bosch's 13806 as well with original fitment. The CEL comes and goes. I'm thinking of putting my old ones back to see if the codes will go away and stay away.
-
Sounds like a dirty throttle body or idle control. Check these links for more info:
http://www.renntech.org/forums/index.php?s...amp;#entry97080
http://www.renntech.org/forums/index.php?s...l=throttle+body
-
Their is an anti-theft wire in the radio pocket. If it grounds out the alarm horn will sound one time. Check this recent post. It has some excellent photos from Tool Pants.
-
I would be interested in camera install. Did you place it in the rear bumber?
-
trieullionaire
Outstanding DIY instructions and now Kit. Did you connect the camera up? Do you have a member forum price?
Thanks for your efforts!
-
ssflai what was the final damage$ ?
-
I have a 986 5 speed and I replaced my RMS, IMS, clutch and a few other things this past winter. Your estimated cost of $500 is right on. I purchased a few tools and a transmission jack to get the job done. If you get it down to the flywheel, 8 more bolts and your at the RMS and IMS. I would do it myself again if I had to do it over. If I can help let me know. Good luck and keep us posted.
-
Well, I definitely have a mesh sock. My manuals don't show a replacement however. Regardless it sounds like you need to replace your oil filler tubes. You should also determine if you need to replace your AOS which may have caused the collapse of your oil filler tubes.
K. Brandsma
'98 Boxster
-
Gus,
It is ok to use the alternate lifting point on a Boxster and put one side up on jack stands and then go to the other side and repeat. I'm assuming you have a manual transmission and u will be bleeding the clutch as well. Let us know how it goes.
K. Brandsma
'98 Boxster
PM Sent


AirBag Light
in 986 Series (Boxster, Boxster S)
Posted · Edited by kbrandsma
I odered and received a Durametric Tool last week and ran the codes. It indicated a passenger seat belt problem. Sprayed electrical cleaner into the seat belt receptacle on the passenger side and used canned air to dry and clean. Cleared the code and light has stayed out going on a week now. If it comes back I'll will replace the passenger buckle and electrical harness per TSB. The drivers side was done by previous owner in 2006.