Welcome to RennTech.org Community, Guest
There are many great features available to you once you register at RennTech.org
You are free to view posts here, but you must log in to reply to existing posts, or to start your own new topic. Like most online communities, there are costs involved to maintain a site like this - so we encourage our members to donate. All donations go to the costs operating and maintaining this site. We prefer that guests take part in our community and we offer a lot in return to those willing to join our corner of the Porsche world. This site is 99 percent member supported (less than 1 percent comes from advertising) - so please consider an annual donation to keep this site running.
Here are some of the features available - once you register at RennTech.org
- View Classified Ads
- DIY Tutorials
- Porsche TSB Listings (limited)
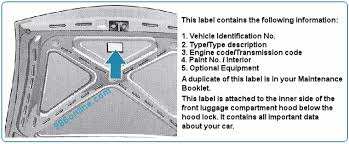
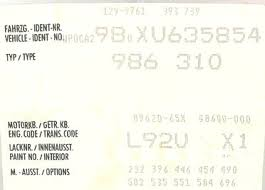
- VIN Decoder
- Special Offers
-
OBD II P-Codes - Paint Codes
- Registry
- Videos System
- View Reviews
- and get rid of this welcome message
It takes just a few minutes to register, and it's FREE
Contributing Members also get these additional benefits:
(you become a Contributing Member by donating money to the operation of this site)
- No ads - advertisements are removed
- Access the Contributors Only Forum
- Contributing Members Only Downloads
- Send attachments with PMs
- All image/file storage limits are substantially increased for all Contributing Members
- Option Codes Lookup
- VIN Option Lookups (limited)


kbrandsma
-
Posts
1,103 -
Joined
-
Last visited
-
Days Won
8
Content Type
Profiles
Events
Forums
External Paint Colors
Downloads
Tutorials
Links Directory
Collections
Store
Posts posted by kbrandsma
-
-
Those will certainly work and are very safe. However, you can't elevate the car and remove tires with the ramps. I would invest in a floor jack and a good set of jack stands.
Jack Stands here:
Floor Jack here (should be low clearance):
Sears:
http://www.sears.com/craftsman-3-ton-high-lift-jack-stands/p-00950159000P
-
The last couple of days in the Pacific NW it's been below 20 degrees with ice and snow. If you have your winter tires on their own rims, it makes them easy to swap them out.
Love those heated seats!

-
-
With winter tires the Boxster is outstanding in the snow. I put on my hard top and winter tires in early November and leave them on until mid-April.
I have a set of Bridgestone Blizzak's LM-25V and they are great in ice and snow. Also, get yourself a good set of winter floor matts and some seat upholstery chaps and if you bring a little weather into your car, nothing hurt.
With 11K on your car it's got to look pretty pristine inside and you'll want to keep it that way!
-
While you waiting to fix the bushings, tear of the cover from a match book and roll up and place in crack of steering wheel between airbag and wheel. It will keep it from honking. (Not a permanent fix however)
-
Not all, but most people reuse factory speaker runs. There is no inline capacitor that I know of.
-
Here is a good thread to try. Read all posts and always try re-training your window first.
-
No, socket "B" on a Porsche radio are for those from the factory that don't have the option for an AMP and they don't have door speakers. Socket "B" is usually a brown plug. The Pins 3-6 are for the dash speakers and Pins 1,2,7,&8 are for the rear speaker kit. This option doesn't use the yellow connector.
Door speakers are added from the factory when an AMP is installed and provide the low tones or bass for the system and the crossover is handled by the AMP. Usually the AMP is a four channel AMP, 2 channels for the dash speakers and 2 channels for the door speakers and those that add the rear speaker kit wire directly to the brown plug and let the radio power the doors. The yellow plug contains pre-amp signals and can't power speakers without an AMP. The common ground from the yellow plug is spliced into 4 separate grounds about a foot or so after leaving the radio. So coming out of the yellow plug at the radio are 5 thin wires that soon become 8 wires. The small 8 wires at the plug on the AMP are the yellow plug wires and the larger wires leaving the AMP are the wires that drive your speakers. There is also another wire coming into the AMP that provides switched power to the AMP.
You have dash speakers (front) that are wired directly to the amp and door speakers that are also wired to the amp. If you want to remove the AMP you will need to either run new wire to all the speakers from your new HU or run new wire from your new HU to the front trunk and connect to that wire directly to the existing wire to the speakers. Don't use the small wires from the yellow plug.
-
Sounds like you have 490 Option Code? The 2001 fitment will work.
Option Codes Location:
-
By your description, it sounds like you have a CD220 (cassette player) or CDR220 (CD player) Stock Radio and a 4 channel AMP in the trunk? What Option Codes do you have? M490?
The yellow plug contains line outs for front and door speakers and goes to the AMP in the trunk as shown by socket C, upper left hand corner of the diagram below.
Socket A (Black Plug 3rd plug down from the top) The plug contains both switched power - Orange wire, pin 7, from terminal 15, Constant power - thick red/black wire pin 4 that comes from fuse D8 and Ground, thick brown, from chassis, terminal 31.
My recommendation is not to cut the factory plugs but purchase pre-made adaptors that will mate perfectly with the OEM plugs. it becomes very difficult to soldier all the connections, crimp them or restore the radio/audio system back to stock.The photo below is courtesy of Pelican Parts. Shown are some adapter harnesses. For the complete Pelican Article PRESS HERE.Plug A Connects to the yellow "C" plug on the radio. The RCA plugs in this harnesses connect to your speaker outputs of your new radio and the blue wire connects power up the amplifier from your new HU.Plug B This plug is the main plug which supplies power to the radio. The ends of this harnesses (out of picture) connect to your new radio.Plug C This is the antenna adapter for the back of the new radio. (Plug D probably not needed is for iPod FM modulation.) -
What are your Option Codes? Do you have the M490 Stereo Option? Sounds like you have the AMP or possibly a CD changer in the trunk? Is your radio a CDR220 (CD player) or just a CR 220 (cassette tape)?
From what you described as wanting, IMHO I would do the following in the order below one at a time until your satisfied.
1. Replace speakers (immediate and remarkable improvement at least the dash and doors) The quality or lack of quality that you're experiencing are lack of quality speakers.
2. Swap out CD changer if you have one with a blue tooth adapter or simply add a blue tooth to existing HU as the CDR220 (CD220) have an AUX input.
3. Swap out CR220 with a CDR220 1st and if your not satisfied replace CDR220 with aftermarket HU Blaupunkt,, Sony, or Alpine Single DIN.
3. Swap out AMP.
Just my thoughts.
You have a PM
-
I also have a 98 Boxster and the setup is the same on years '97 thru 99. The light is controlled by the top double relay and what turns off the light is what is thought to be a combination of signals from the lever microswitch on top of the electric motor which is depressed by the clamshell when it closes down on it and the microswitch located on the B pillar. How those signals and the time lapses received by the double relay is what turns off the light. Put a 1/4 inch dense foam pad on the underside of the clamshell right above the electric motor lever and see if that does the trick.
I have to continue to press the dash switch longer than what feels normal until the light goes out and I wouldn't be afraid to keep pushing.
-
Very Nice!
Welcome to Renntech!
:welcome:
-
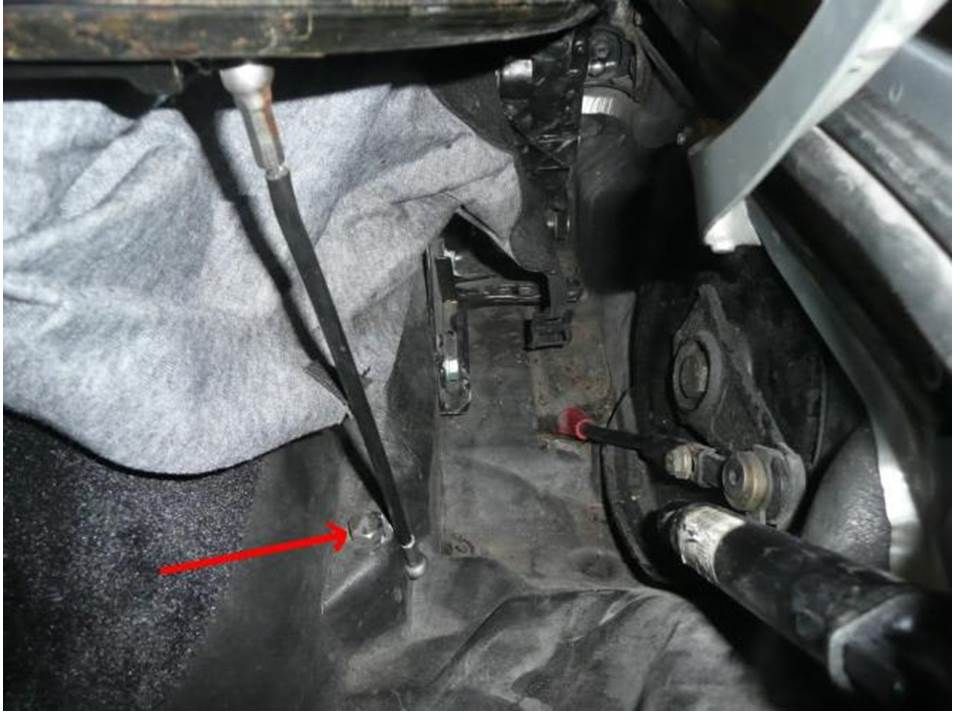
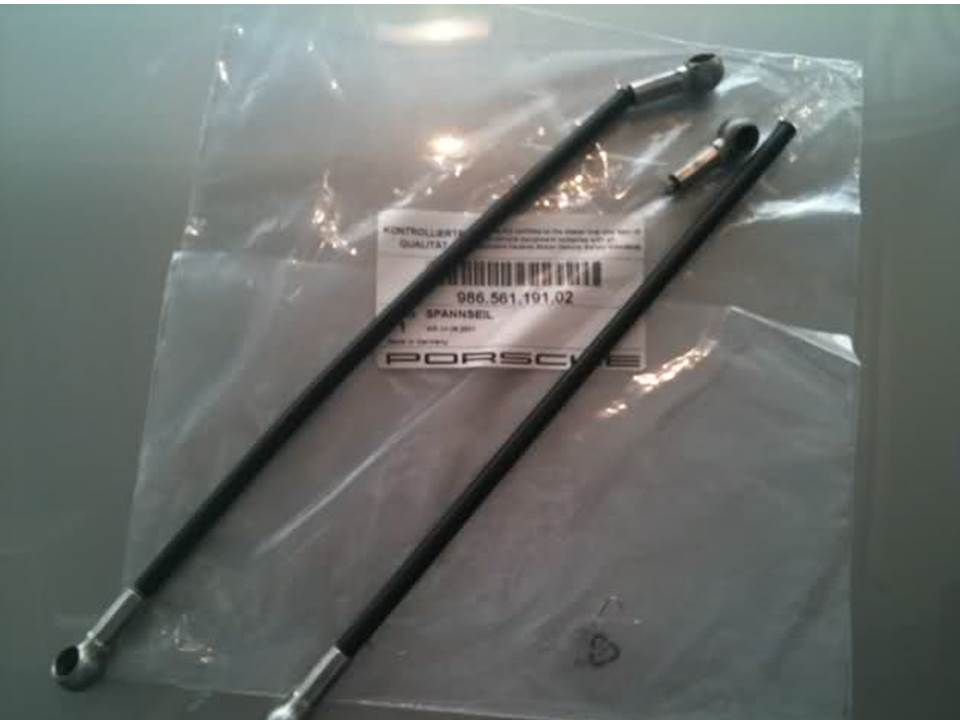
Check to see if that the tension cables are snapped in correctly?
-
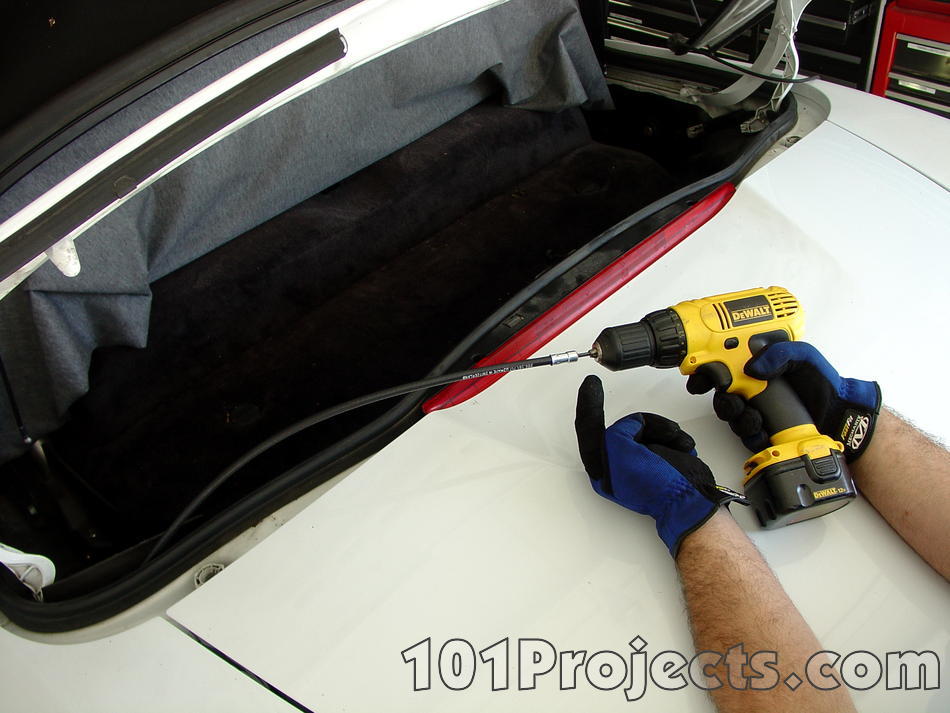
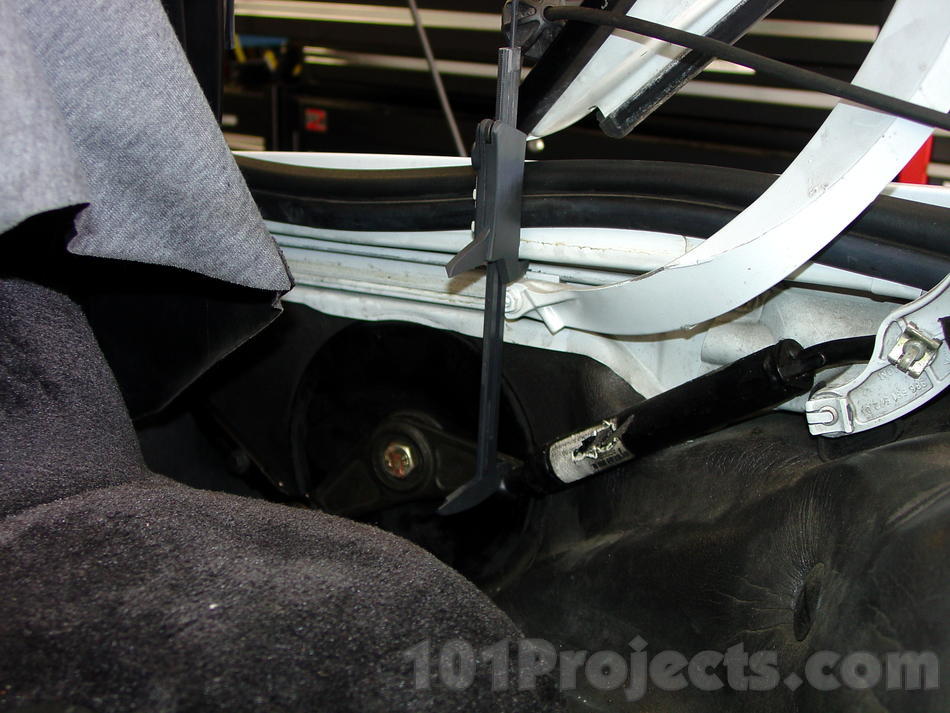
You can adjust your transmissions by removing one of the transmission cables and using a drill at slow speed to adjust the transmission either forward or backwards to equal the other one. Wayne's Book "101 Boxster Projects" has some good info and photos. I wouldn't recommend ever touching the rear trunk or even the rear quarter panels as they are easily dented even when padded.
You need to get both transmissions into the exact same place.
__________________ -
tcora,
It's against Renntech rules to bump your postings.
That said, perhaps your transmissions are slightly out of alignment. Or, the rocker arms that pull the clam shell down into final position are spring loaded and may have lost some of their tension. Or since the problem is more an issue when the top is down, is there something in the way of the top when it folds away?
Here is an excellent write-up on Mike Focke's website (by Maurice or 1schoir) on adjusting the Clamshell. PRESS HERE
-
Welcome to Renntech!
:welcome:
-
No need to remove radio or climate control.
EDIT: Number three is dead center and accessed from the top of the horse shoe. Between the horse shoe and the dash.
-
You can pull the horse shoe shaped housing (that holds the switch) out with you fingers or a plastic upholstery tool or screw driver wrapped with a rag. Just pry it out. You'll need a thin long screw driver to free the housing from the catch. (#3 below)
The switch just snaps back in from the back. Then snap the horse shoe housing back in.
Very easy to fix.
-
You can do a number of things.
- You can leave the hood open and manually latch the catch to trick the system in thinking the hood is closed. Place a rag or something in the latch opening to remind yourself to disengage the latch before trying to close the hood.
- Pull the fuse
- Disconnect the light
- They will automatically turn themselves off after about 30 minutes or so.
I usually do number 3.
-
List Price is just south of $45 US
996.543.615.03 Driver's Side
996.543.615.03 Passenger's Side
Good Price PRESS HERE
Part #2 Below
The seals are bonded to the rear windows. You pull them off to remove and then scrape off any glue residue, and then stick the new ones back on using a Super Glue like Loctite 480.
-
Check to see if that the tension cables are snapped in correctly?
-
There is a good write up for Spark Plugs DIY and Spark Plug Tubes on Pedro's Garage.
The link can be found by PRESSING HERE
-
Thanks everyone. We are 10% towards are goal. Kept it coming. About $3500 still needed!


Removing Stuck Hazard Switch...
in 996 Series (Carrera, Carrera 4, Carrera 4S, Targa)
Posted
No, not the trim. Just the flasher button.