Welcome to RennTech.org Community, Guest
There are many great features available to you once you register at RennTech.org
You are free to view posts here, but you must log in to reply to existing posts, or to start your own new topic. Like most online communities, there are costs involved to maintain a site like this - so we encourage our members to donate. All donations go to the costs operating and maintaining this site. We prefer that guests take part in our community and we offer a lot in return to those willing to join our corner of the Porsche world. This site is 99 percent member supported (less than 1 percent comes from advertising) - so please consider an annual donation to keep this site running.
Here are some of the features available - once you register at RennTech.org
- View Classified Ads
- DIY Tutorials
- Porsche TSB Listings (limited)
- VIN Decoder
- Special Offers
-
OBD II P-Codes - Paint Codes
- Registry
- Videos System
- View Reviews
- and get rid of this welcome message
It takes just a few minutes to register, and it's FREE
Contributing Members also get these additional benefits:
(you become a Contributing Member by donating money to the operation of this site)
- No ads - advertisements are removed
- Access the Contributors Only Forum
- Contributing Members Only Downloads
- Send attachments with PMs
- All image/file storage limits are substantially increased for all Contributing Members
- Option Codes Lookup
- VIN Option Lookups (limited)


kbrandsma
-
Posts
1,103 -
Joined
-
Last visited
-
Days Won
8
Content Type
Profiles
Events
Forums
External Paint Colors
Downloads
Tutorials
Links Directory
Collections
Store
Posts posted by kbrandsma
-
-
Try installing a ground loop insulator.
It sounds like you’re suffering from a classic ground loop problem. Ground loops occur whenever two components are grounded in different locations that have different ground potentials. The right way to fix the problem is to make sure that everything is grounded in the same place (or at least that every ground has the same potential). The easy way to fix the problem is to use an in-line noise filter.
The right way to fix the problem is to trace down your sound system wiring and attach the grounds from components like your head unit and amp directly to the chassis in the same place. Usually under the instrumental cluster.
Ground loop isolators basically consist of an input, an output, and a transformer. The audio signal enters the isolator through the input jack, passes through the transformer, and exits through the output plug. Since there is no direct electrical connection between the input and output, the ground loop (and any interference it generates) is effectively “isolated” from the signal.
Here is a ground loop isolator noise filter available on Amazon for $8.00 plus shipping or free next day if you have Amazon Prime.

-
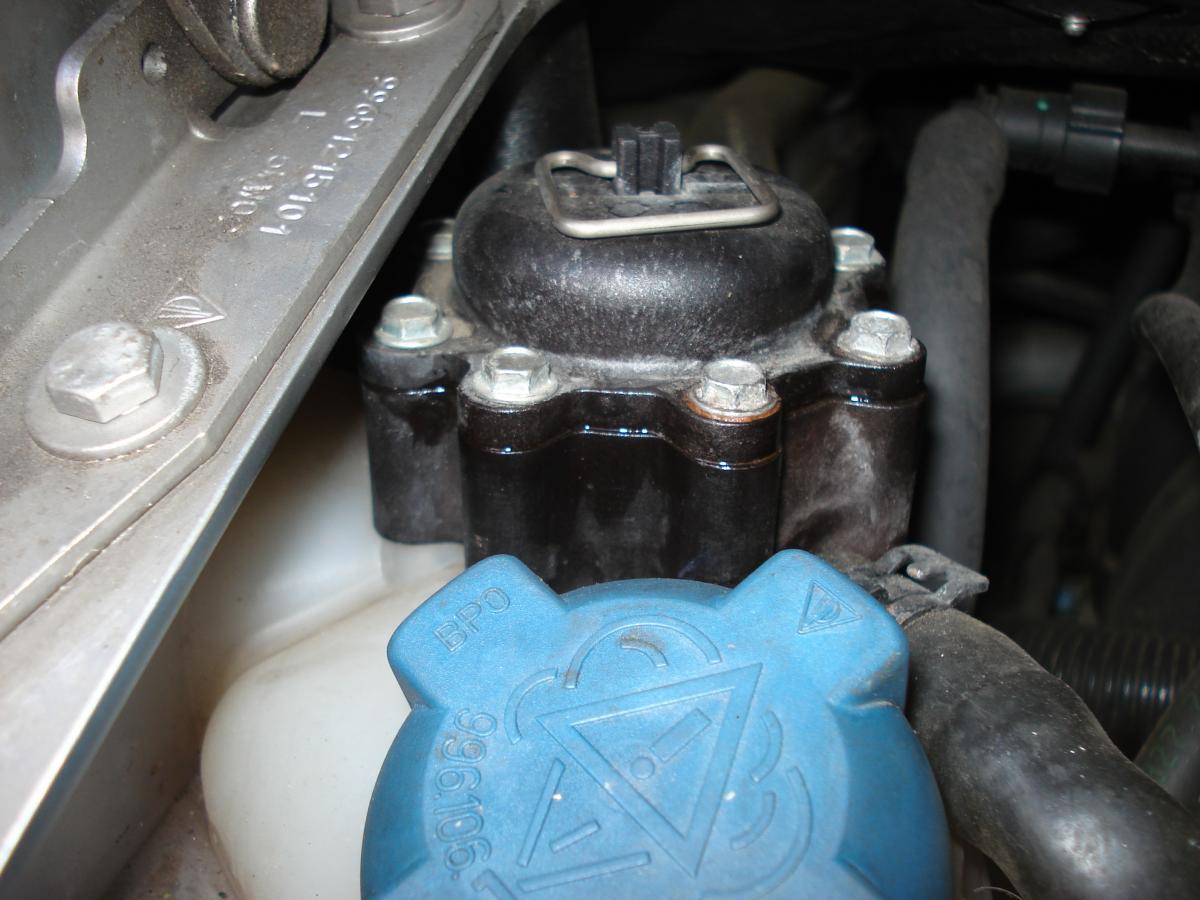
Is the bale on your bleeder valve up or down like the photo?
-
Sunset Porsche PRESS HERE or Einmalig Parts Press Here
-
When your lights are in the "ON" position, you can control the brightness of all of the dash lights (including radio) by turning the knob directly above the speedometer.
The user manual calls this knob "A".
-
Is it possible the cross threading of your coolant cap may have damaged the coolant cap or the threads of the tank?
If you have a UView AIrlift tool you can check the system to see if it holds a vacuum over a period of time.
-
Load test the battery to be sure. Just recently replaced an alternator with the same symptoms.
-
Actually Flitz is designed for plastics. The text below is from their website:
Color/Finish:
- Removes oxidation, tarnish, rust, water stains, heat discoloration, lead and powder residue, scuff marks and more
- Easy to use cream formula Our signature product. A concentrated cream that is unsurpassed in its ability to clean, polish, deoxidize and protect. Nothing works faster, easier or better. Use on: brass, copper, silverplate, sterling silver, chrome, stainless steel, nickel, bronze, solid gold, aluminum, anodized aluminum, beryllium, magnesium, platinum, pewter, factory hot gun bluing, painted surfaces, Formica , cultured marble, Corian , glass, Plexiglas , plastics, fiberglass, Eisenglass, and Armatel . Removes: tarnish, rust, water stains, chalking, lime deposits, heat discoloration, lead and powder residue, oxidation, bugs, tar, oil, fingerprints, tree sap, bird droppings, graffiti, dyes, black streaks and scuff marks. Not for: Electroplated Finishes.
-
I concur with JFP, placing a very small dab of anti-seize is good practice and always torque them back to spec. Small insurance to prevent problems when removing. If you have ever had issues with a galled plug on removal then you know what an issue that is. A coated plug has never caused a problem on removal for me.
-
Nice work!
But, I hope I never have to use this technique!
-
I have a MY98 Boxster and the valet key works exactly like the other key fobs except no radio/wireless access to doors and rear trunk.
The valet key is cheaper to replace. Anytime a new key is added to the vehicle the dealer will want all keys. They program them to the car and remove any keys that are missing. Most Porsches can have up to 6 keys. That way if you lose a key and add a new key to replace it the old lost key gets removed from the system and your car can't be stolen or taken for a joy ride. If the lost key gets replaced the dealer may need to have the 40 digit code to add the lost key back to the car.
-
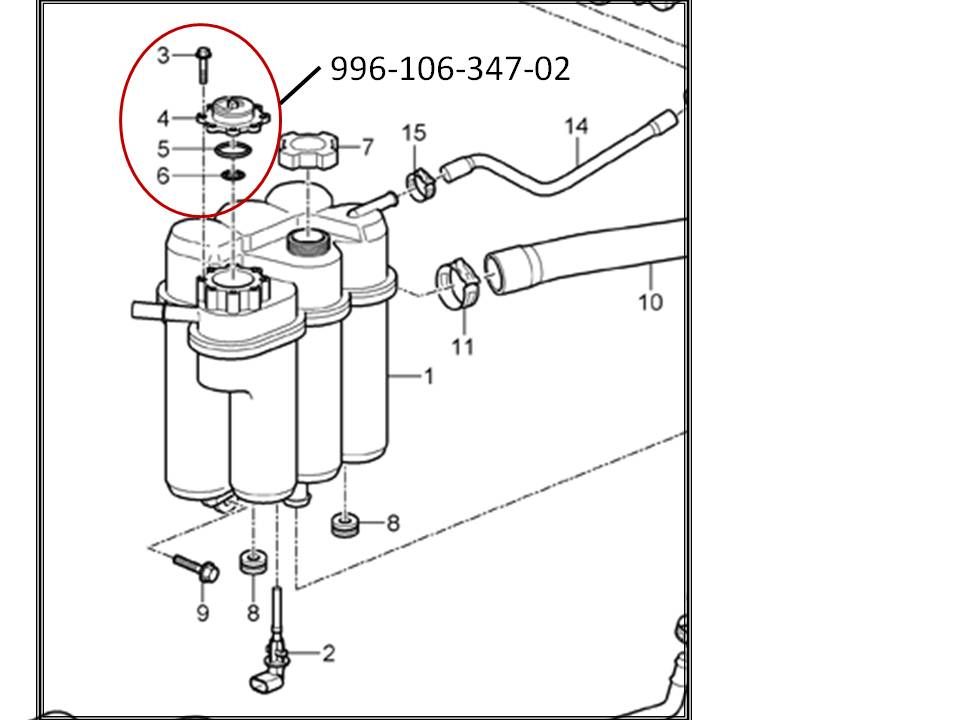
It is not uncommon to have a faulty bleeder valve. Part number 996.106.347.02. Fits 986, early Cayman and some Carrera's. Cayman photo shown. You would need the entire kit, comes with 8 hexagon-head bolts (part #3 in photo).
Word of caution these bolts strip easily so don't over tighten. The bolts don't strip the plastic they screw in to does. Priced recently at Sunset for about $75. Easy DIY.
-
A couple of drive cycles, 20-25 minutes with car getting up to temp. It won't hurt anything if you do it more. Some track their P-Car with the bleeder open. When cool, top off coolant as needed.
-
 1
1
-
-
The square shaped wire behind the fill hole. This position shown is currently open. Closed would be anything but straight up.
-
An AOS replacement shouldn't affect the cooling system. A Durametric tool can check the radiator fan speeds. I would check the ratio of antifreeze vs. distilled water in your coolant. I would also check the radiator cap for the most current version which I think is 05.
You may just have trapped air in the system. Check your water fluid level and top off if necessary. Flip your bleeder valve up and run a few drive cycles, then recheck coolant and close the bleeder valve. If you have no constant or flashing red light by the temp gauge on the console your OK and you may just have a faulty gauge.
-
You'll find Sunset Porsche in Beaverton, OR hard to beat on OEM parts on most everything. They can be found on the main menu on this site under "Special Offers" or PRESS HERE.
-
Rotating the input shaft and push. Here is a thread(link) on the 986 Forum with some discussion on the matter.
http://986forum.com/forums/performance-technical-chat/48316-transmission-installation.html
-
Yes, good idea! Redundancy is a safety must. Besides jack stands, I also use a floor jack on the rear center jacking point if possible and 2x6's under the rear tires.
-
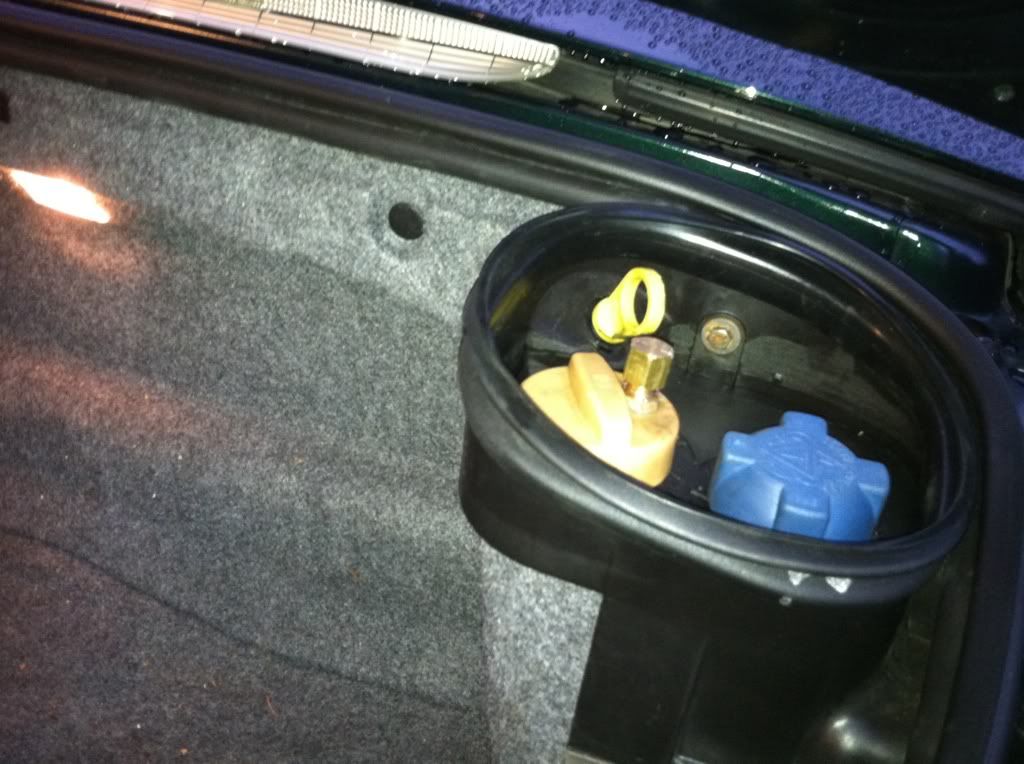
Yes it is a little more like orange than yellow.
If you are not throwing any codes, its doing its job.
-
Deleted - accidently posted on the wrong thread.
-
If the AOS is original to the car and has never been replaced, (14 years and 60K miles) its time to replace.
To test for a faulty AOS it can be as simple as starting the car and while at idle, try and remove the oil cap in the rear trunk. A faulty AOS creates a stronger than required vacuum and will make the oil cap very difficult to remove. With the engine off, you should also take the tube (J tube) off of the AOS that connects to the throttle body and see how much oil is in the tub. I would suspect some or a film (that's normal) but if it's filled with oil the AOS is definitely gone. Having the J tube off will also give you an idea how much oil went from the AOS through the J Tube and into the throttle body. Also, with a faulty AOS the middle oil fill tube collapses and expands and eventually may crack as it gets older and brittle, so always look at that as well.
A more sophisticated (but inexpensive) testing tool called a slack tube manometer can be used to test for a faulty AOS. How to build one can be found on a DIY post by logray here on the Renntech Board PRESS HERE
Photo of logray's setup.
Here is a link to Pedro's site regarding the AOS. It explains how to remove the J tube, clean the throttle body and ICV and maybe eventually replacing the AOS. PRESS HERE
Here is a link to a Pelican Technical Article on replacing the AOS PRESS HERE
If you do end up replacing the AOS, there are some shortcuts you can take during removal to make the job a little easier.
-
Its probably indicating a bad MAF. I would still do #4 and #5 on post #2 above. If you need info on a AOS test, let us know. I also wouldn't totally eliminate a faulty oil fill tube. What does your engine bay look like. When my AOS went it also created a cracked center oil filler tube.
Your car has three oil filler tubes that connect together from the rear trunk fill location to the 3rd tube at the top of the engine close to the fire wall . It is usually the middle tube. Each tube is about $30 US. Be careful if you replace the middle tube as the 3rd (last) tube as little ears that bolt to the top of the engine & hold it in place. The ears are easy to snap off by forcefully moving it while replacing the center tube. Breaking those ears will cause you to replace the third tube also.
I'm not sure if you are the original owner or if the previous owner had accurate service records. Depending on that and how many miles your MY2000 Boxster has, you may end up to doing everything.
-
Sounds like you have a bad connection between the HU and AMP or the AMP and the front right speaker. Possibly a bad AMP.
-
First see if you can clear the codes to see if them come back.
The codes mean:
P1128 Oxygen Sensing Adaptation, Idle Range, Bank 1 Above Limit
P1130 Oxygen Sensing Adaptation, Idle Range, Bank 2 Above Limit
Possible fault causes:
Incorrect signal from MAF sensor
Intake air system leaking
Fuel pressure too low
Volume supply of fuel pump too low
Fuel injectors fouled
Exhaust system leakingThis tells you that your O2 sensors are working and they are telling you something. I would always start with the most obvious and also least expensive.
Do 1-3 below and clear the codes again to see if they return.
If that doesn't work then clear the codes after 4, then 5, then 6. MAF is most expensive.
1. Clean your air filter and/or replace it.
2. Clean your MAF.
3. Vacuum Leak could be a bad oil cap (if you have a yellow one replace it).
4. Check your throttle body and "J" tube for excess oil and clean thoroughly.
5. If in there is a lot of oil and your car smokes more than usual at startup, I would suspect a bad AOS, test and replace.
6. Replace MAF
-
Not really, you have to take the seat out, remove all the wiring plugs, etc.
You got a PM.


Boxster Won't Start--Electrical Issue?
in 986 Series (Boxster, Boxster S)
Posted · Edited by kbrandsma
Hi Jetflyby,
Yes, all the lights come on when you turn your key prior to startup. That way you can tell if any bulbs have burnt out.
Check battery first, run a test across your terminals of your battery with a multimeter. It should read 11.8-12 volts before starting and 13.8 - 14 volts when started.
I would suspect a clutch safety interlock switch. You can always bypass the switch with a jumper to do a test. The switch is there for your safety, so Ieaving the jumper in place is not a long term fix. If not the clutch by-pass then most likely a faulty ignition switch.
For more information run a search on this site or click HERE
Good luck!