Welcome to RennTech.org Community, Guest
There are many great features available to you once you register at RennTech.org
You are free to view posts here, but you must log in to reply to existing posts, or to start your own new topic. Like most online communities, there are costs involved to maintain a site like this - so we encourage our members to donate. All donations go to the costs operating and maintaining this site. We prefer that guests take part in our community and we offer a lot in return to those willing to join our corner of the Porsche world. This site is 99 percent member supported (less than 1 percent comes from advertising) - so please consider an annual donation to keep this site running.
Here are some of the features available - once you register at RennTech.org
- View Classified Ads
- DIY Tutorials
- Porsche TSB Listings (limited)
- VIN Decoder
- Special Offers
-
OBD II P-Codes - Paint Codes
- Registry
- Videos System
- View Reviews
- and get rid of this welcome message
It takes just a few minutes to register, and it's FREE
Contributing Members also get these additional benefits:
(you become a Contributing Member by donating money to the operation of this site)
- No ads - advertisements are removed
- Access the Contributors Only Forum
- Contributing Members Only Downloads
- Send attachments with PMs
- All image/file storage limits are substantially increased for all Contributing Members
- Option Codes Lookup
- VIN Option Lookups (limited)


JuncoJones
-
Posts
49 -
Joined
-
Last visited
Content Type
Profiles
Events
Forums
External Paint Colors
Downloads
Tutorials
Links Directory
Collections
Store
Posts posted by JuncoJones
-
-
The SAI holes go pass-thru accross the block (top to bottom).
I've pressured-washed the entire area, which ended up working pretty well (a rather unorthodox approach, but I felt comfortable about it).
You need to remove both intake and exhaust manifolds, spark plugs, disconnect battery, etc., etc. etc.
Any excess water needs to be very carefully siphoned from all cylinders by using a vacuum pump (such as a brake bleeder).
here's the link:
Having the area cleaned up is a project, what also needs to be understood is the reason why those ports are getting clogged. In my case, it was oil-related.
Check the status of your Air-Oil separator (AOS), as a faulty one will feed oil back into the combustion. Also sticky lifter issues can allow for more oil into the combustion chambers. And excess oil will eventually re-clog your SAI pass-thru holes and the CEL will be triggered on, never fun.
-
Found what the problem was...an aged AOS. With the replacement part, works like a brand new car, same as before...
Jones
-
Thanks for your reply, JFP. I've already ordered a cooling system pressure tester, and will post the results once I get that done.
Also very interesting your comment about the head gaskets...I'll certainly keep that in mind.
Jones
-
Hi there folks,
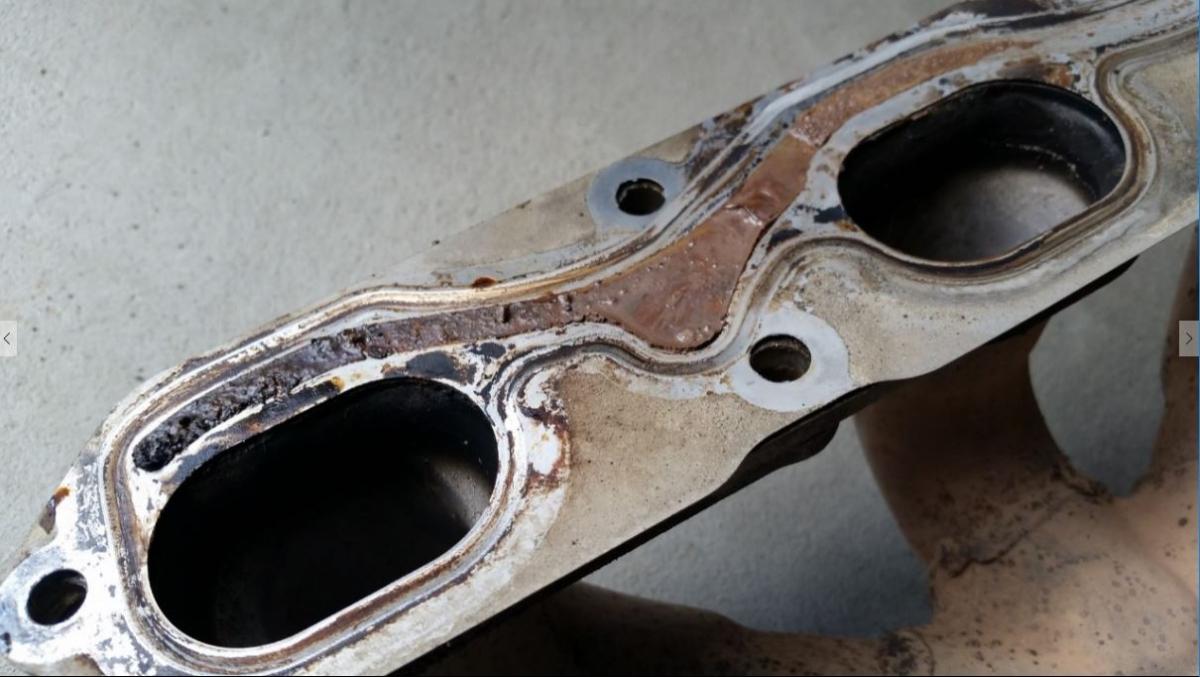
I’m having some random misfires in my ’03 Boxster. I’ve disassembled the intake manifold to get a better understanding of the problem, and as per the picture below, there is clearly something going on with cylinder-1.
- a week ago, CEL came on for random misfires in cylinder-1 (P0301)
- Engine runs well, has high millage (320km) and no noticeable degradation in performance
- Checked the coolant, and was below the minimum mark (which was flushed a couple of months ago)
- On the exhaust side, there are dripping marks, probably coolant leaking through the exhaust manifold gasket (!)
All this makes me think that it’s leaking coolant through the head gasket into cylinder-1. I already know this is not a four-hour repair to be completed during a weekend, and that one way or another, the engine will have to come down for surgery. . so I'll definitively appreciate any inputs!
Thanks,
Jones.

-
Your list looks good to me, SteelStroke.
I only replace the brake pad sensor cables if they were ‘chewed out’ by the rotors. Otherwise I’ll keep the new ones as spare parts, and clean and reuse the old ones.
You also have anti-vibration shims, which fit tight inside of the brake pistons, and sometimes are hard to come out, particularly with all the road salt if the car is driven during the winter time. The shims are different for the front and rear calipers.
Lastly, the small screws that hold the rotors in place, sometimes they also need to be replaced.
-
 1
1
-
-
All flags are in Ready state... very cool!
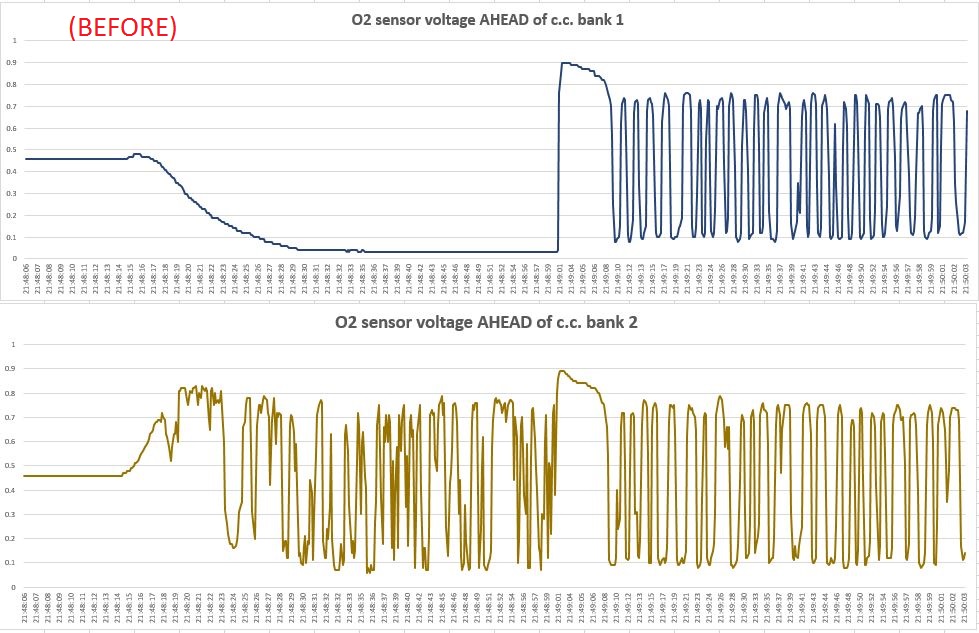
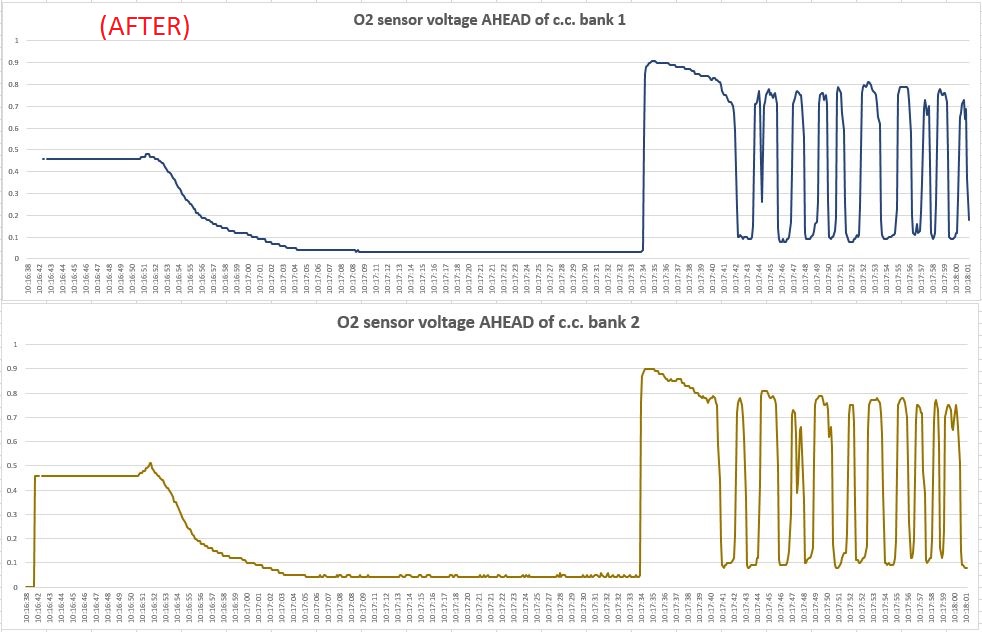
and here's the BEFORE and AFTER graphs of the 02 sensors, also posted in the DIY guide.
Cheers,
Jones.
-
Also BEFORE and AFTER graphs with the 02 sensors data analysis.
Cheers,
Jones
-
Hi everyone,
I've posted a quick tutorial on the P0492 error code issue. Here's the link.
Cheers,
Jones
-
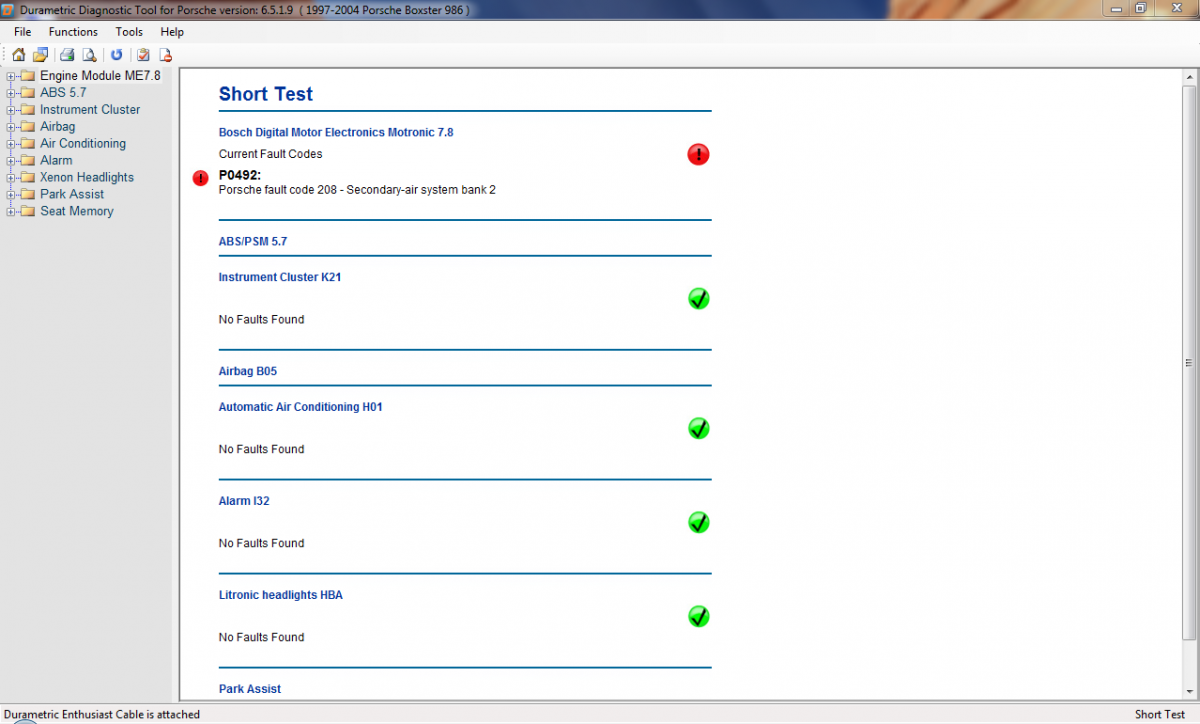
Here’s a quick tutorial on how to fix a P0492 error code on a Boxster 986 / 987 / Carrera 996 / 997.
Error: P0492 – Porsche fault code 208 – Secondary-air system bank 2
Symptoms: no visible symptoms, except for the CEL (check-engine light) being triggered, particularly during cold engine startups with the SAI (Secondary Air Injection) pump running for the first 90 seconds.
Diagnostics: when troubleshooting the P0492 error code, I initially focused my attention on all SAI components located on top of the engine, such as the SAI pump, hoses, solenoids, vacuum hoses and reservoir, etc.
I found it easier to remove all vacuum components and work on a workbench and running individual tests, with the invaluable help of a handheld vacuum tool. I did find the vacuum reservoir had a leak, and one vacuum line was damaged (mostly brittle due to heat / time). Also tested both solenoids with a 12-V DC power supply and then replaced the damaged components with new ones. The CEL was off for a few days, but it came back on, throwing the same error code.
With great help of Ahsai on troubleshooting the O2 sensors readings during a cold startup cycle (thread here), it looked like the problem was an obstruction in one of the paths used by the SAI pump to blow cold air form the engine compartments into the catalytic converters. And because I didn’t wanted to work on my car during the cold season, I parked the project for the winter and lived with the CEL on for many months, certainly one of my joys in life ;)
Solution: When the first nice spring days finally arrived, I used the opportunity to do this and other maintenance jobs in my car, like deep cleaning after the winter season (It’s my all-year-round daily driver), two axle rebuild job, etc.
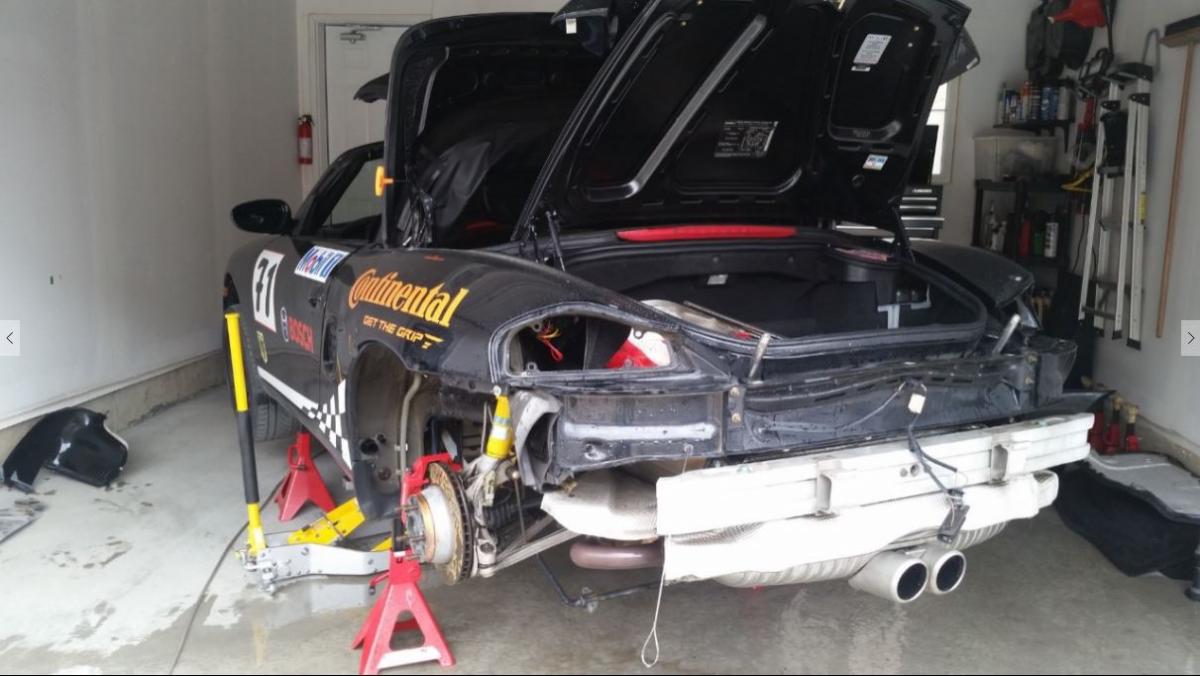
With regards to the exhaust manifolds removal procedure, where a broken bolt can quickly become a nightmare, I had already done some prep-work on all manifold bolts: driving the car until reaching running temperature, quickly jacking-up the car and loosen all exhaust bolts while still hot, thoroughly cleaned, anti-seize and remount. This method, while not everyone’s cup of tea, ended up being quite effective in my case.
And when I finally removed both exhaust manifolds, where I was originally expecting lots of carbon buildups, I instead found a soft clay-like product (oil?), which was quite easy to remove with a finger nail (through the gloves, of course ;).
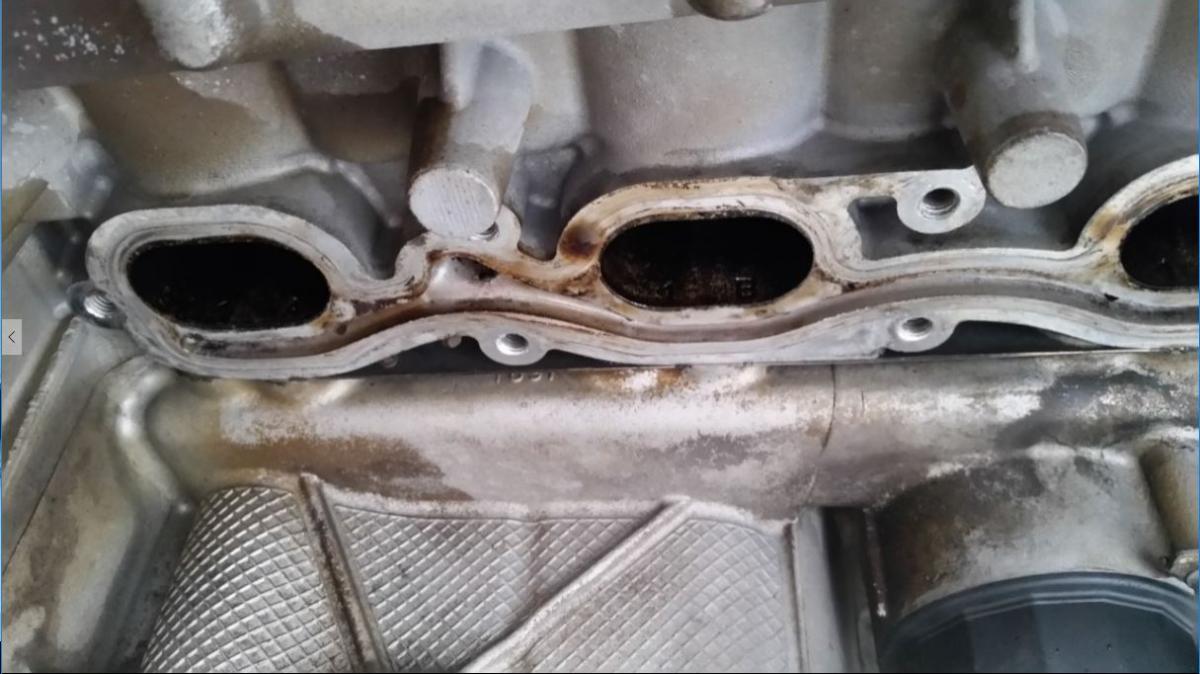
I thoroughly pressure-washed all components, carefully avoiding to send the water jet directly into the exhaust valves / catalytic converters and the use of any degreasers. A 2,000 psi electric pressure-washer with a 10 degree spread nozzle can be extremely effective, particularly at short distances. Attached is a picture of the engine block after the pressure-washing job.
Finally, a grey Scotch-brite, well lubricated in oil, for mirror-like surface finishes (well, in most cases). It honestly looked amazing… too bad I forgot to take a picture… my apologies.
Finishing-up with another thorough cleanup of all exhaust bolts, a new thin layer of anti-seize and a complete car reassembly, and my P0492 error code is finally gone, hopefully for good!
Cheers,
Jones
-
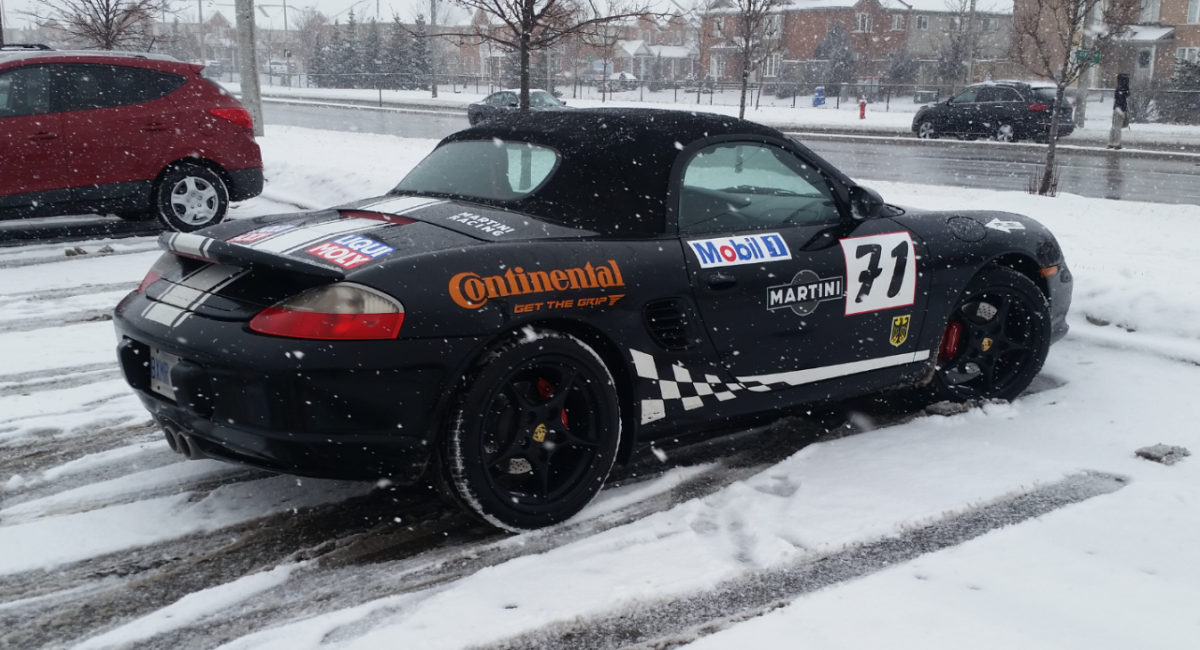
Cool picture ;) ...and that's exactly the way the car is supposed to be driven!
What kind of oil do you all use when the temperature drops? Same year round or does it pay to use a thinner oil during the colder months? Thanks for sharing every one!
I've been using Liqui Moly 5W40 for Ever...and with over 300k, my car still runs like new.
Here in Toronto it sometimes gets -30 Celsius in winter, and I had no problem at all with that viscosity.
Jones
-
I drive mine all-year around, every single day, and as much as I can. I use Continental DWS tires, which I think are great.
To avoid rust, whenever possible pressure-wash the car, particularly underneath the body frame.
-
Hey Guys,
New code today, P1090, and the idle is getting worse.
Would it be helpful to post a video of the symptom.
Reading this leads me to maybe three things, what do you think?
a) Throttle Body or Sensor not good
B) Lift solenoid problem
c) Sticking lifter
I have cleaned Throttle body, changed MAF so I am just not sure now.
Bjorn
Bjorn,
Posting a video always helps, it provides us with more information. So if you can, go ahead.
Now In my typical style, I’ll throw some unconventional techniques that I would try (and already have, of course) in my own car:
- Liqui Moly Engine flush – some people don’t like this product, I find it extremely efficient. It will thoroughly clean your engine from inside. These engines are highly dependent on effective oil pressure, and can potentially help eliminate oil-related issues, like sticky lifters and clogged solenoids. This will clean any gunk and build-ups, but of course, it won’t magically fix damaged or worn-out components. Add it to the oil, idle the car for 10 minutes and replace oil and filter.
- Liqui Moly Injector cleaner – this is a fantastic product. Add it to your fuel with a full tank of gas. The first time I used it on both my cars, I remember I felt a huge improvement after the first 10 minutes of driving. Once the injectors are clean, you won’t feel any noticeable difference.
Now, these won't necessary fix your P1090 code, but like I mentioned above, can help rule out other possible causes.
-
Argh help, found this on the side of one of the piston bores, 100% sure I didn't do it as I didn't go anywhere near the inside of the bores, I picked the dust boots out from the outside -
Running my finger over it I can't feel it at all but I can just feel it with my finger nail.
I know a scratch on the piston itself needs to be replaced as it can carry fluid past the pressure seal, but taking into account where this scratch is (above the pressure seal on the bore) & how the piston caliper works, is this ok or needs to be replaced? I don't even know if the sides of the piston that touch the bore even go that high...
I don't think that scratch will have any impact on your project, no1joey.
Your comment above is right, as both the seal AND the piston are the areas that need to be perfectly flat. There should be no fluid pressure built on that part of the caliper. I also suggest to make sure that scratch is perfectly flat, so you don't run the risk of scratching your piston while its moving up and down.
-
...Oil filler cap comes off easily. Had the inspection cover off and cant hear any vacuum leaks....
Timbo,
During normal running conditions, the car should idle around 680/700 RPM. If then you remove the oil filler cap, that should create a vacuum leak in the crankshaft, and the car should start running rough. The cap should always fit tight when in place.
I also don’t think you will be able to hear most vacuum leaks, sometimes they are very small, but enough for having low or no vacuum formed in the system. And you also have 2 systems to troubleshoot: the crankshaft and the intake manifold. This is also where a friend’s smoke machine comes very handy.
Cheers
-
1
-
-
With a Durametric you should be able to enable the OBC (which happens at the cluster) without a problem.
The activation for the Cruise Control, happens both at the cluster AND at the DME, where Durametric (Enthusiast) doesn't have that functionality, but the Pro version might.
Other tools like Autologic, if licensed for Porsche, can enable both as well. And regarding time, it takes roughly 10 minutes to get all done.
-
Without Durametric or Porsche scanner, you're under-equipped to deal with these codes. Misfires on a single bank could be lifters, variocam+, air leak, etc.
Agree with Ahsai, +1 for Durametric.
-
I am hearing a noise that I can best describe as wheel-bearingey like thrum, thrum, thrum, similar to the sound you get when one sector of the bearing is damaged, but the main difference being the frequency of the thrumming is much higher than wheel rotation (but is still related to vehicle speed).
It sounds like the thrum, thrum is around 3 times wheel rotation speed. Best heard at low speeds, say 10mph, and in gear or out makes little difference (heard best coasting). At higher speeds due to the frequency increase it just turns into a whine.
Any ideas?
If you can post a recording of the noise that will certainly help with the diagnosis..otherwise it's kind of shooting in the dark..
One time I got some sort of metal shavings inside the drilled disc holes, but that was easier to pinpoint as it was one noise per wheel rotation, not three.
Cheers
-
OK. But, if the battery is not in good shape, charging it won't solve the shortage of amperage required during the startup. The second startup will likely work better, as the engine has already spinned for a few seconds and is fully lubricated.
Both startups sound good to me, with the exception of #1 that it takes a few more cycles for the car to start. After the first ignition, the car should rev to 2k which happens on both cases.
if the car would be having some sort of oil pressure issues, I believe it would be noticeable. I'm more inclined in looking around the starter / battery area. Is this starter the original one? and what about the battery?
Boxtsers don't come with the oil pressure and volt-meter gauges, which would certainly help on these 2 different tests. I've upgraded my cluster with a 996 one, it was a nice project and really worth, it so I can have those 2 readings active at any given time.
-
What about the battery? When you're doing a cold start, the battery has been idling / discharging for hours.
After the initial startup, the alternator will (slightly) recharge the battery, AND with the engine being warmer, startup should required less power than during a cold start.
-
Welcome to Renntech and congratulations on your new purchase, skuyumcu.
...Cheers.
JuncoJones;
...I will try to change all the fuses as your suggestion.
Thank you again. Good luck...
You are welcome, skuyumcu. A few more comments:
- When you have a chance, have all the fluids replaced, including brake, transmission and engine coolant. Of course, you don’t have to do this as often as an oil change, but will help keeping your car in great shape along the way.
- It is good practice to keep a detailed log including dates, brands and mileage.
- Before clearing fault codes with your Durametric, save a dated copy in PDF format, THEN clear the codes
- It’s much simpler so understand live data in a graphical mode (2 dimensions). This will show changes throughout time, and it is much easier for anyone to help you with your engine analysis by looking at the variations over time.
Cheers
-
I have the iSIMPLE ISFM2351 TRANZIT BLU HF adaptor installed, and it works quite well. Because the MOST adaptors are very expensive, this is the next best thing.
Traditional FM transmitters have a lot of interference, which was solved quite well in this model as it disconnects the external antenna when in use. There is an app that you install on your phone for initial configuration. When you get in your car, it gets connected automatically, and the cool thing is also that you can use your phone as it has a microphone that you install somewhere in the dashboard.
Cheers.
ok. cool.
kindly advise, how does this adaptor connect?
It would be great if you would post up pictures if you have them.
I've thought about this issue quite a lot, and decided some time ago not to install an aftermarket gps/sound system and move the a/c panel down on the console. I actually like the little cubby hole, and use the push in/push out cd holders. I also occasionally use an iPod fm transmitter that plugs into the lighter socket, and I find that it works fairly well.
Your solution seems good. So, if you please, how about some more details.
Cheers....
The iSIMPLE ISFM2351 TRANZIT BLU HF can be either connected to an AUX port (but the CDR23 doesn’t have one) OR using the FM-bypass. The system is in essence simple, but very well-conceived from a design standpoint.
The kit includes:
- The adaptor itself, which includes the FM in-out cables
- One microphone with cable (so you can use your phone)
- One multi-function button (call handling, next song, etc.)
- One connection harness, which includes power and the aux-in cable
- Configuration app for your mobile phone, once you’ve connected using Bluetooth
You need to get a couple of keys to take the CDR23 out, you can get those easily on eBay.
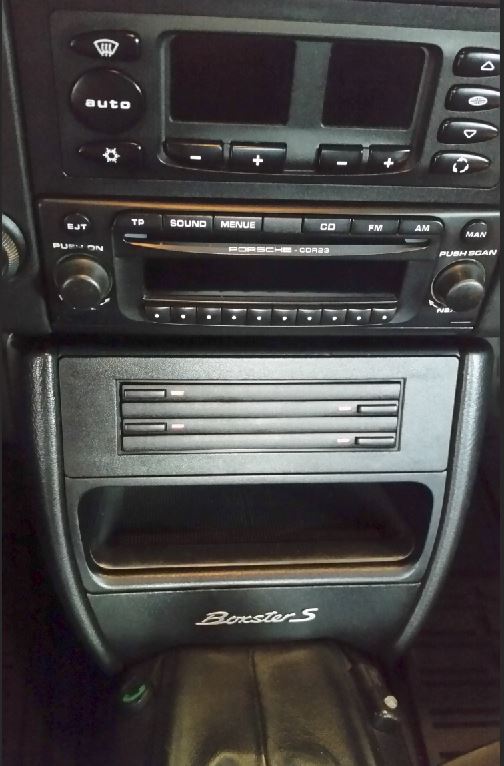
This is a picture of my layout. I also gave it a lot of thought when installing the system as I wanted to keep my car OEM looking, but adding some cool features of newer cars. you can see at the bottom on the left the multi-function button.
Cheers.
-
I have the iSIMPLE ISFM2351 TRANZIT BLU HF adaptor installed, and it works quite well. Because the MOST adaptors are very expensive, this is the next best thing.
Traditional FM transmitters have a lot of interference, which was solved quite well in this model as it disconnects the external antenna when in use. There is an app that you install on your phone for initial configuration. When you get in your car, it gets connected automatically, and the cool thing is also that you can use your phone as it has a microphone that you install somewhere in the dashboard.
Cheers.
-
Welcome to Renntech and congratulations on your new purchase, skuyumcu.
Changing the oil more frequently will likely reduce your chances of having IMS issues (by removing the contaminants), but this is just only one part of the equation. In my own case, using my Boxster as a [real] daily driver (300,000 km) has greatly helped me in keeping it in very good overall running conditions. It is not uncommon to hear of garage queens to have more problems than those of daily drivers.
As per your oil questions, my suggestion is that before starting to add all these different products, create a baseline by just replacing the oil, and at the same time get to know 'all the different sounds' of your new car.
I use Liqui Moly 5W40 oil, and it works great (from my perspective, of course, 300,000 km and it doesn’t smoke AT ALL). I also use Liqui Moly valve cleaner and Injector cleaner, both of which are awesome!.
As per the spoiler issue, at some point in time my car was acting quite erratic (i.e. spoiler error lights, etc.), and I solved this (and many other) problems by Removing and Replacing ALL the fuses, making sure that each one is matching the right specs that you can find on the small booklet in your fuse box.
As you already own the Durametric tool, my last suggestion Is for you to buy the book "101 Projects for Your Porsche 911, 996 and 997 1998-2008 (Motorbooks Workshop)" by Wayne Dempsey.
I believe it's one of the best ways to learn about your car in a fast, efficient and methodical way (by sections) - and it's also packed with great color pictures.
Cheers.
-
The document that Kevin shared is excellent. I did a lot of reading by the time of upgrading my cluster, and that document provided great insights on how to properly work with the EEPROMs while swapping units.
On both clusters, old and new, there are certain bytes what will enable/disable specific functionality (i.e. enable volt-meter or oil-pressure gauges). In general, I was able to find much more information on the OLD style of clusters in comparison to the NEW one.
One of the first tests that I did was to copy the entire EEPROM from the old cluster to the new one, which provided the same functionality as before (including my mileage, etc.), but now with a much better LCD screen.
At that time, my NEW cluster had a corrupt firmware, so I ended up manually typing the hex-code from the pdf document which enabled most of the functionality I required (except a few details, like the capacity of the fuel tank, as the second page is missing on the PDF ;) )
Now all this was possible between the same generations of clusters: when I tried to enable certain functionality on the NEW style of clusters using bytes from OLD one, it didn’t work.


PO492 error code on a Boxster 986 / 987 / Carrera 996 / 997
in 986 Boxster Convertible Top Issues and Solutions
Posted
Cameron,
When both the pump is ON and the solenoid is open, air from the engine bay is pumped directly into the catalytic converters. In the picture of the exhaust, you can see the bottom part of the pass-thru hole between both cylinder ports.