Welcome to RennTech.org Community, Guest
There are many great features available to you once you register at RennTech.org
You are free to view posts here, but you must log in to reply to existing posts, or to start your own new topic. Like most online communities, there are costs involved to maintain a site like this - so we encourage our members to donate. All donations go to the costs operating and maintaining this site. We prefer that guests take part in our community and we offer a lot in return to those willing to join our corner of the Porsche world. This site is 99 percent member supported (less than 1 percent comes from advertising) - so please consider an annual donation to keep this site running.
Here are some of the features available - once you register at RennTech.org
- View Classified Ads
- DIY Tutorials
- Porsche TSB Listings (limited)
- VIN Decoder
- Special Offers
-
OBD II P-Codes - Paint Codes
- Registry
- Videos System
- View Reviews
- and get rid of this welcome message
It takes just a few minutes to register, and it's FREE
Contributing Members also get these additional benefits:
(you become a Contributing Member by donating money to the operation of this site)
- No ads - advertisements are removed
- Access the Contributors Only Forum
- Contributing Members Only Downloads
- Send attachments with PMs
- All image/file storage limits are substantially increased for all Contributing Members
- Option Codes Lookup
- VIN Option Lookups (limited)


wwilliams88
-
Posts
45 -
Joined
-
Last visited
Content Type
Profiles
Events
Forums
External Paint Colors
Downloads
Tutorials
Links Directory
Collections
Store
Everything posted by wwilliams88
-
That's where I purchased my parts
-
$22.00 at Suncoast Porsche Parts http://www.suncoastparts.com/product/95222109.html
-
I have a 2013 base at 82K miles. All I've had to do to it so far is regular maintenance.
-
Yes it should work. Other people have used the spares from 996 or Boxster successfully
-
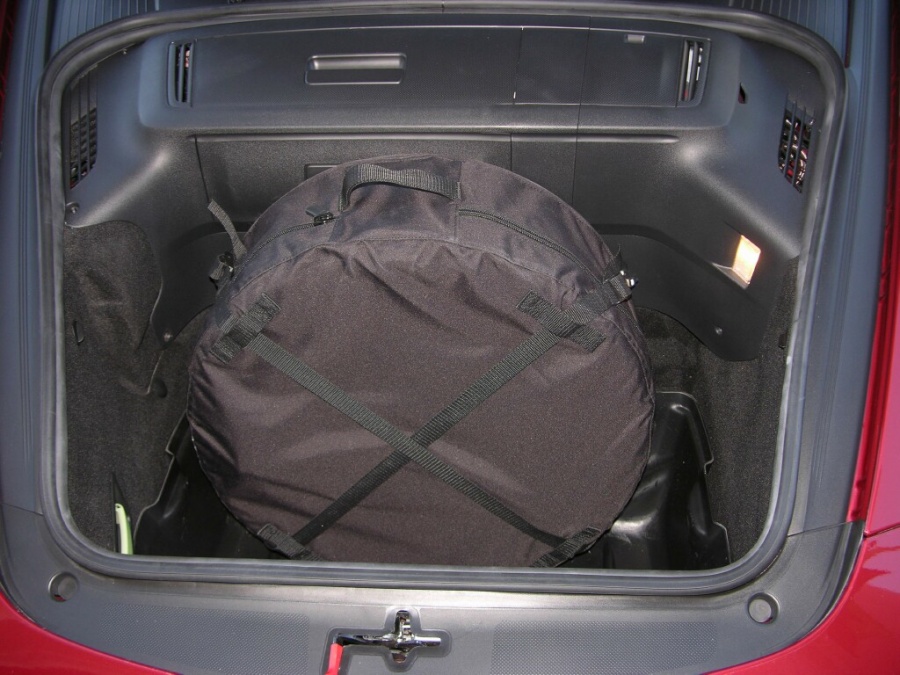
It is possible to get the collapsible spare secured in the trunk with some room to spare. This is in a 2009 C2, but other people have also used them in their C4S

-
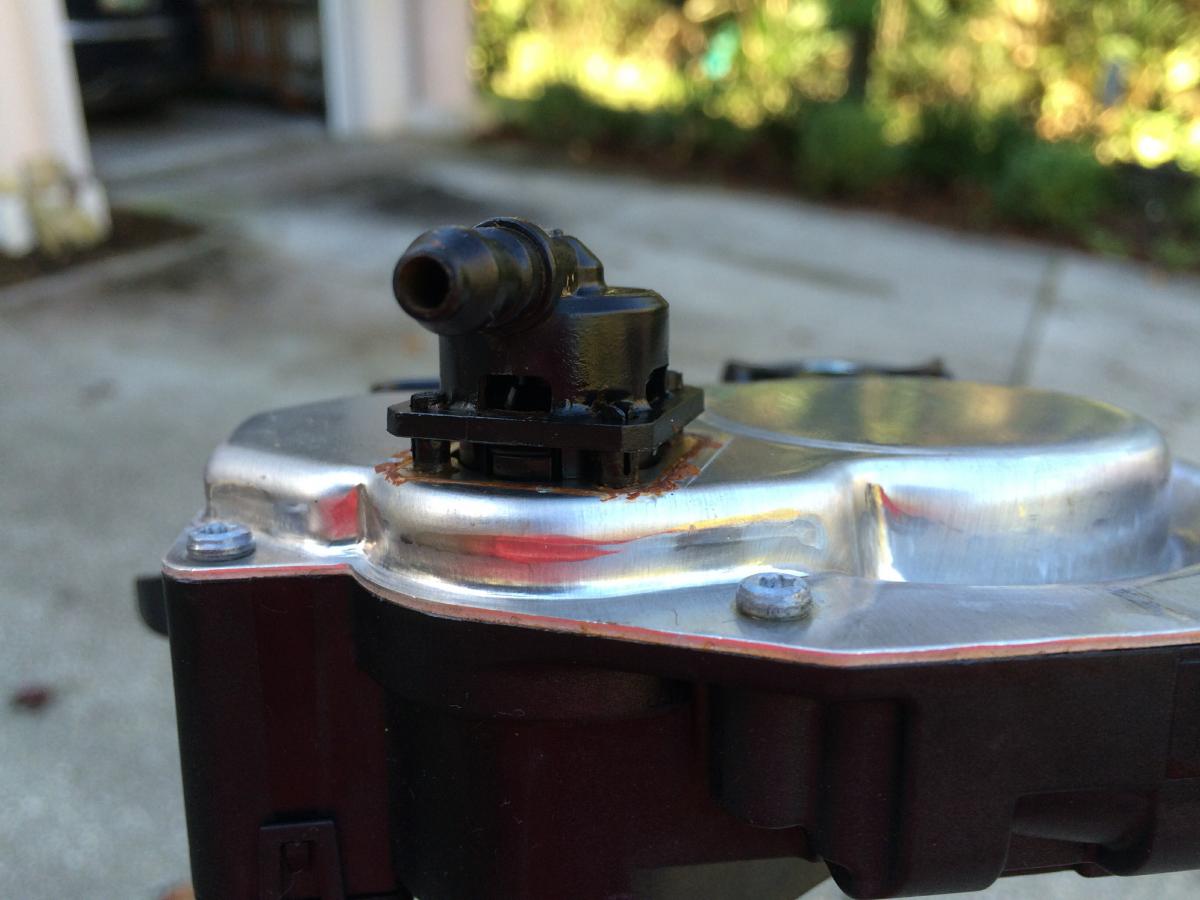
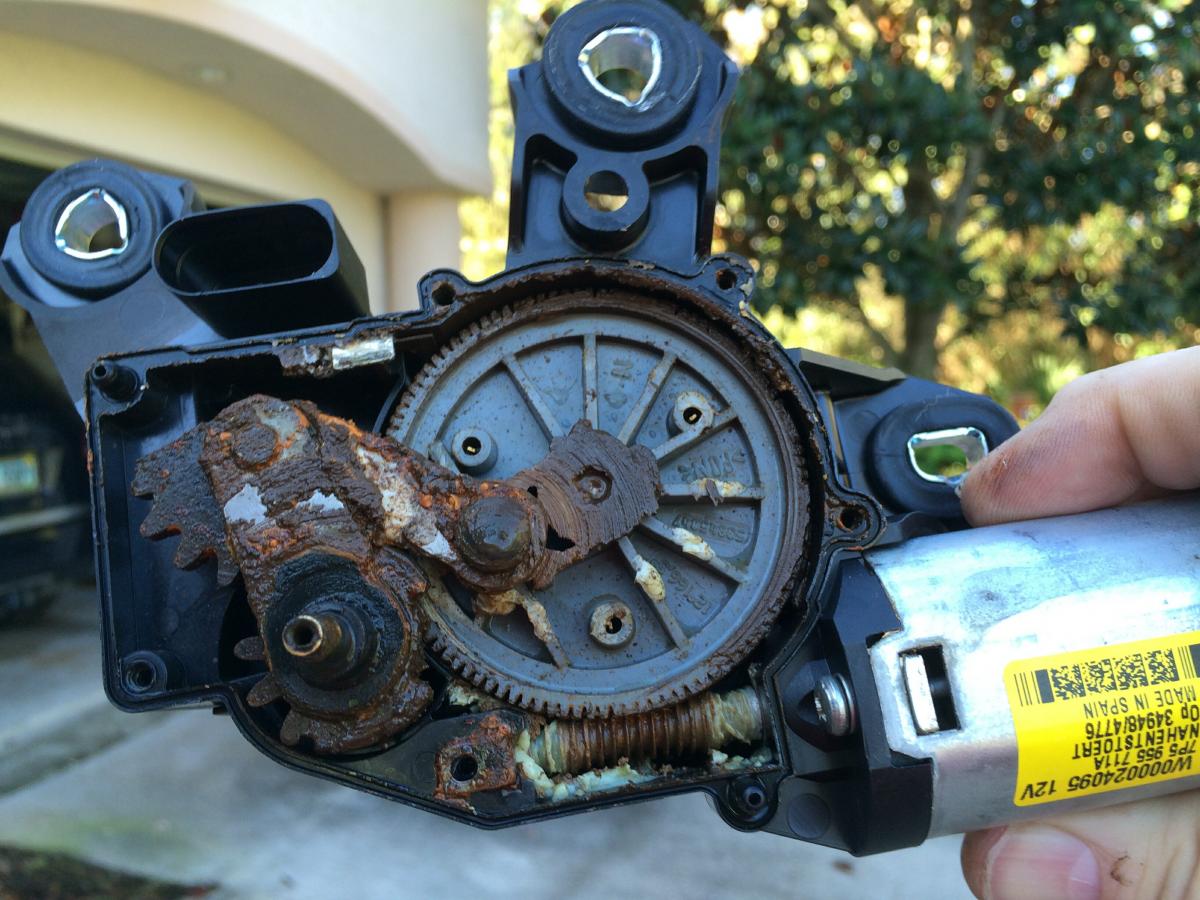
OK, found the issue. First a bit of history to put it in context. During the latter part of the warranty period. the rear window washer quit producing fluid. The dealership worked on the vehicle to "unclog" the lines and it worked again for a while. Lately though the amount of fluid squirting out of the nozzles has been anemic at best. The other symptoms that started last weekend were wiper coming on by itself, not responding to the wiper switch, and randomly stopping in odd locations. After a bit of research it appeared to be similar to a failure of the park electrodes within the wiper motor assembly in other makes and models. Based on that guess, I ordered a new wiper motor. This is what I found. It appears that during the repair, the technician did not properly seat the input nozzle of the wiper fluid to the wiper motor. The base of this nozzle should be flush to the metal, not sitting a couple of mm above it. If I turn it over it falls off in my hand. Therefore, the nozzle was squirting fluid both into the sprayer and into the gear assembly, and had been doing so for some time. When I pulled the cover off the gear assembly the grease looked mixed with rust and water. So it is very likely that the park electrodes are corroded. Replaced the motor assembly and everything works now. Total time for repair, about 1.5 hours disassembly and assembly.
-
This link works sometimes http://www.renntech.org/forums/links/link/18-porsche-piwis-tsi/ I've been having freezing off and on as well
-
Anyone? Is there a separate control module for the wiper or is it integral to the wiper motor? As of now I've pulled the rear wiper fuse so that it will quit running
-
I have a 2013 Cayenne V6 base. I need the location of the rear wiper relay. My rear wiper seems to be stuck on and I need to locate the relay to see if it is stuck in the on position Thanks
-
Windshield Washer Tank DIY I developed a severe leak in my windshield washer that was causing the tank to empty within 24 hours. The pumps appeared to be working, but i had to remove the tank to determine the cause. Turns out the internal seal of the windshield washer pump had failed and fluid was leaking out of the housing. In the process I documented the steps needed to remove the tank for your reference in the attached PDF. This is for a 2009 997.2 Carrera Base with the headlight washers. Hope this helps. Windshi Author wwilliams88 Category Carrera (997-2) - Common Fixes and Repairs Submitted 09/21/2015 11:42 AM Updated 09/21/2015 11:43 AM
-
Windshield Washer Tank DIY
wwilliams88 posted a tutorial in Carrera (997-2) - Common Fixes and Repairs
I developed a severe leak in my windshield washer that was causing the tank to empty within 24 hours. The pumps appeared to be working, but i had to remove the tank to determine the cause. Turns out the internal seal of the windshield washer pump had failed and fluid was leaking out of the housing. In the process I documented the steps needed to remove the tank for your reference in the attached PDF. This is for a 2009 997.2 Carrera Base with the headlight washers. Hope this helps. Windshield Washer Tank DIY.pdf -
I developed a severe leak in my windshield washer that was causing the tank to empty within 24 hours. The pumps appeared to be working, but i had to remove the tank to determine the cause. Turns out the internal seal of the windshield washer pump had failed and fluid was leaking out of the housing. In the process I documented the steps needed to remove the tank for your reference in the attached PDF. This is for a 2009 997.2 Carrera Base with the headlight washers. Hope this helps. Windshield Washer Tank DIY.pdf
-
Yes it does. Got one for my 2013 Cayenne
-
I'm at 80K with my 2009 C2, putting on about 17K/year. Other than regular maintenance, the only issue I had was a leaking sunroof which was fixed under warranty.
-
Depends on what it includes. I went with the maintenance plan on my 2013 Cayenne, but paid about $1400 for the 40K service on my 2009 997.2 about two years ago. Note that I added some things not normally done. I also changed the cabin and air filters myself, so it wasn't part of the cost. It did include Oil change and filter New spark plugs New engine belt (Normally not part of the service, requested by me) Wheel alignment (Normally not part of the service, requested by me) Brake fluid flush (it was close enough to 2 years since the last time) Bunch of inspections My dealerships normally tries to replace the windshield wiper every 10K miles, but this is an easy DIY, so not part of the cost I would get the dealerships to give you a breakdown of the costs starting with the cheapest quote. You could also ask around for a reliable independent shop and compare prices.
-
You still need to remove the door panel. Here is a writeup over on Rennlist http://rennlist.com/forums/997-forum/579225-diy-997-door-panel-removal.html Item 25 is held in place with melted rivets. Some people use a soldering iron to remove the old trim and screws to retain the new. http://rennlist.com/forums/997-forum/824787-replace-dooor-handle-trim.html The ones on a Caymen are similar, here is a procedure on Planet -9 http://www.planet-9.com/reviews/cayman-cosmetic-mods/p193-door-panel2f-finisher-removal.html
-
As a point of reference I just replaced the original Continental CrossContact LX Sports that came with my 2013 base with 40K miles on the tires. Three of them had 4/32nds of tread left, the fourth 3/32nds. These are the base 18" tires and I did rotate them every 10,000 miles. 14K miles seems unusual even for Goodyears. This is the type of life I would expect on the rears of my 997.2 with Michelin Pilot sports. What diameter tire is it? In my experience, if you replace just the rears, you need to get the same tire. Its going to depend on the tread depth left on the front. If you change brands or tire type, you need to replace all four. I'd go to Tirerack and read the reviews on the tires to help make up your mind. I know the Goodyear Eagles RS-A that came with my RX400h were crap, but I still got 26K miles out of them.
-
Confirmed. There are two screws behind a little plastic panel which is visible next to the tail light with the rear hatch open. There is also a ball and socket configuration which retains the other end of the tail light flush with the body and bumper cover. Pry off the panel with your fingers, remove the two screws, and gently tug on the tail light assembly straight backwards to get the ball to release from the socket. I could not determine how to remove the harness plug properly. There is a little tab on the tail light assembly which retains the plug that I ended up breaking in my attempts to remove it. Since I was replacing the tail light anyway (it was cracked), it didn't matter to me. But it would be nice to know the proper procedure if anyone has done this before on the 92A. Thanks for the advice.
-
Thanks. Will give it a try once the parts arrive.
-
Looking for instructions for removing and installing the tail light assemblies on a 2013 Cayenne base. Thanks in advance for your help.
-
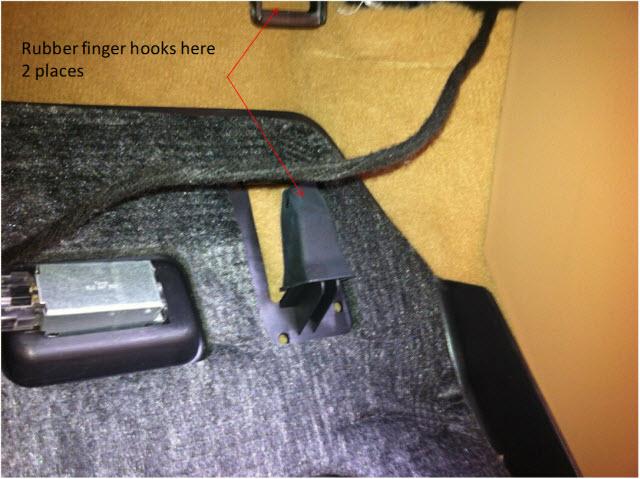
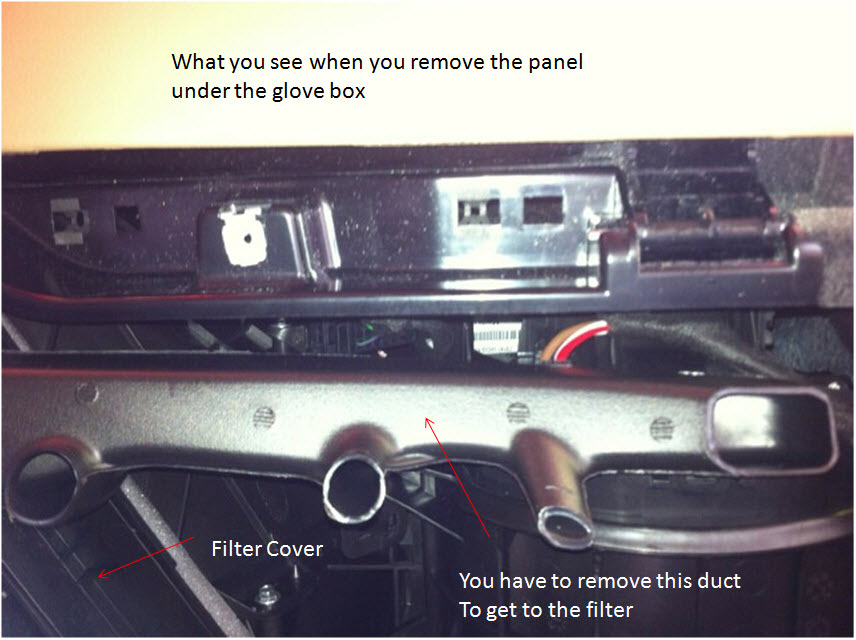
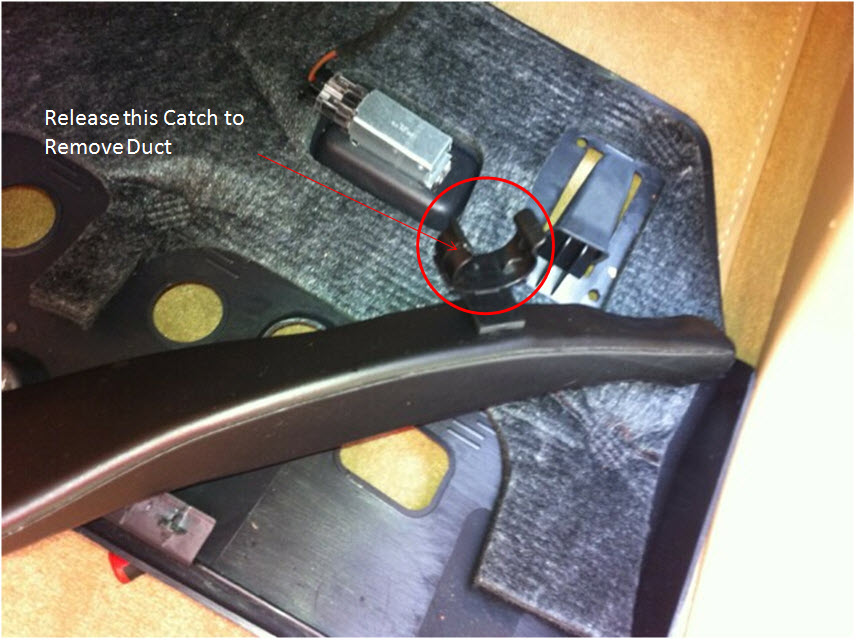
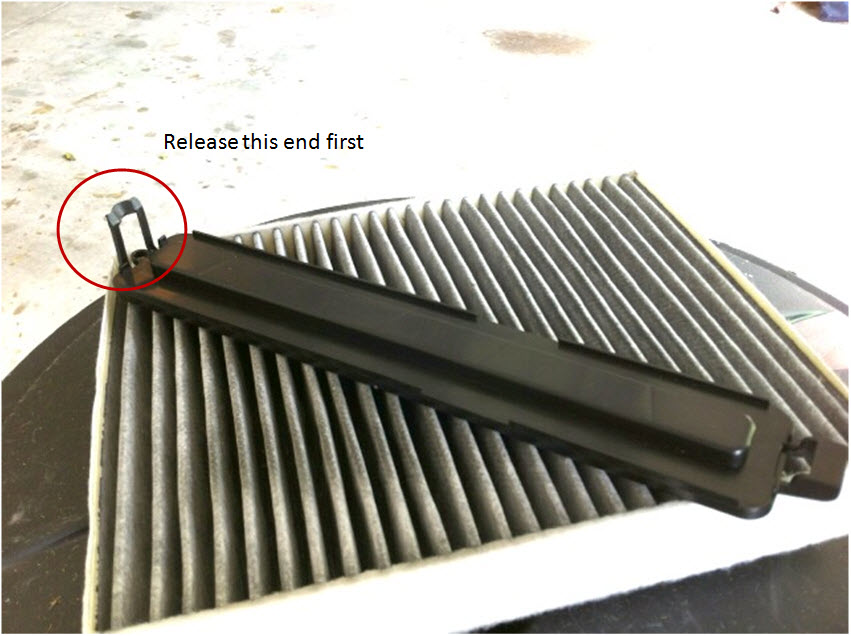
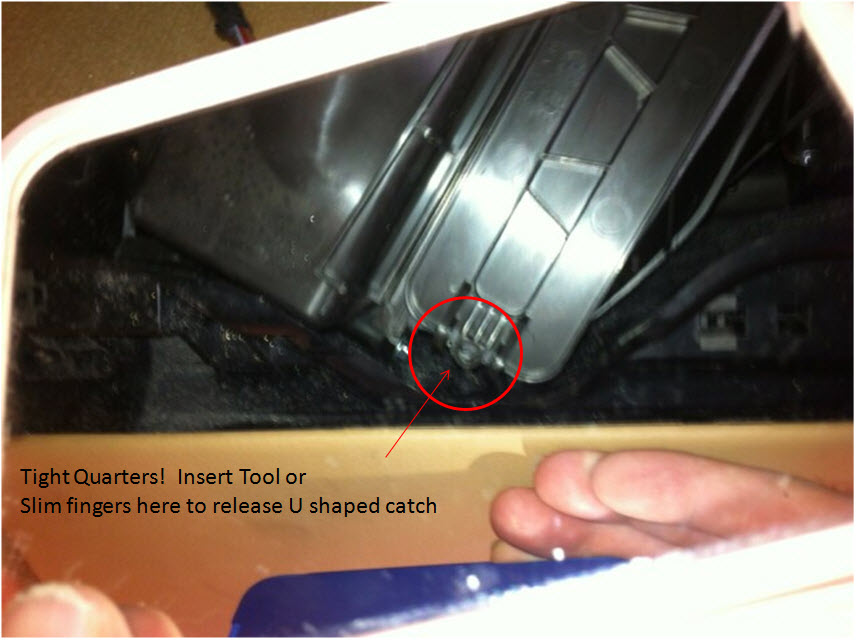
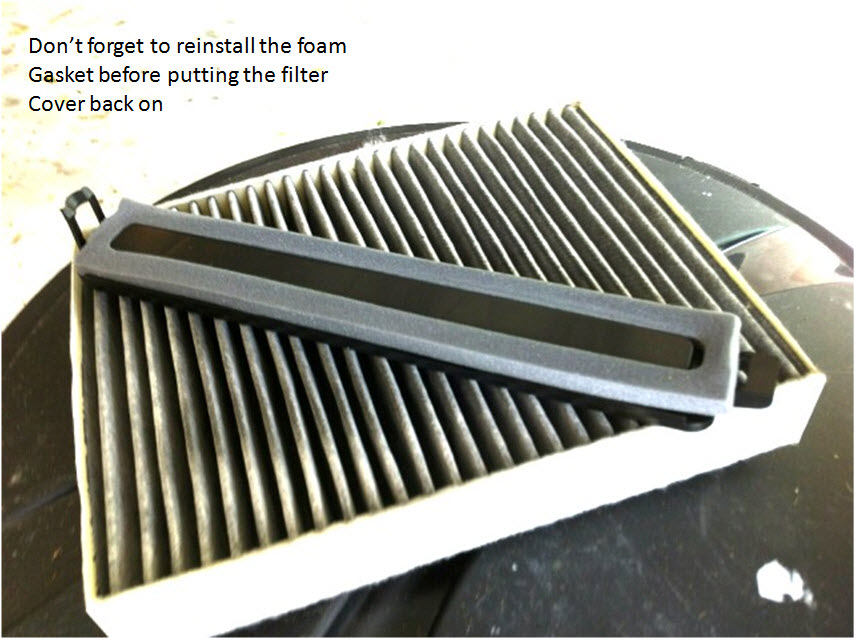
Finally got around to this and took some pics for future reference. The procedure is a bit different for the 92A than the 9PA, at least the 2013 model year. I suspect it is the same for the 2011 and 2012 model years as well. First, their is only one screw to remove, using a T2 Torex wrench. It in the front, middle of the panel. You need a panel pry tool or strong fingers to release the front catches that are still holding it in place. Slip the tool between the panel and the glove box at one end to get the snaps to release. The end at the firewall is held in place with two rubber fingers that slip into brackets near the firewall. Rotating the front of the panel down will get these to slip out. Once you have the panel off, you are confronted with an air duct that has to be removed in order to get to the filter box. There is a retaining catch near the passenger door that needs to be released first. Locate it with your fingers and pry one side open. It will slip off the post at that point. The other end is a slip fit, so wiggling will get to release. The cover for the cabin filter does not have a screw holding it in place. Instead there is a hollow square plastic retainer at the firewall side that slips over a post at that end. The passenger side has a U shaped retaining clip. You have to release this one first. Its very tight quarters at that end. I could not get my fingers in there to release the clip. I fashioned a tool out of an old hose clamp by bending one end into a tight U. I slipped this end into the gap shown, hooked it over the retaining clip, gave a tug and this end of the filter cover released. Simply slip the other end off of the post. The filter itself takes some squeezing and wiggling to remove. The filter is bigger than the opening, so you will need to get you fingers in there to compress it to get it started out of the opening. Installation is the reverse of removal. Again, you have to compress the filter somewhat to get it into the box. Once it is in there, it wont fall out. Don't forget to put the gray foam gasket back on the filter cover before you snap it in place. Slip the firewall end over the post and snap the other end over the retainer post. The air duct is next, wiggling the large end back in place and snapping the retaining clip back onto the mating post. The two fingers on the back of the bottom panel slip into the appropriate brackets and the snap the front in place. Replace the one screw and you are done. With practice and the appropriate tool to get the cover retaining clip to release, probably a 15-20 minute job max.
-
Cabin Air Filter Finally got around to this and took some pics for future reference. The procedure is a bit different for the 92A than the 9PA, at least the 2013 model year. I suspect it is the same for the 2011 and 2012 model years as well. First, their is only one screw to remove, using a T2 Torex wrench. It in the front, middle of the panel. You need a panel pry tool or strong fingers to release the front catches that are still holding it in place. Slip the tool between the panel and the glove box at one end Author wwilliams88 Category Cayenne (92A) - Maintenance Submitted 06/09/2013 10:10 AM
-
Finally got around to this and took some pics for future reference. The procedure is a bit different for the 92A than the 9PA, at least the 2013 model year. I suspect it is the same for the 2011 and 2012 model years as well.First, their is only one screw to remove, using a T2 Torex wrench. It in the front, middle of the panel. You need a panel pry tool or strong fingers to release the front catches that are still holding it in place. Slip the tool between the panel and the glove box at one end to get the snaps to release. The end at the firewall is held in place with two rubber fingers that slip into brackets near the firewall. Rotating the front of the panel down will get these to slip out.Once you have the panel off, you are confronted with an air duct that has to be removed in order to get to the filter box. There is a retaining catch near the passenger door that needs to be released first. Locate it with your fingers and pry one side open. It will slip off the post at that point. The other end is a slip fit, so wiggling will get to release.The cover for the cabin filter does not have a screw holding it in place. Instead there is a hollow square plastic retainer at the firewall side that slips over a post at that end. The passenger side has a U shaped retaining clip. You have to release this one first. Its very tight quarters at that end. I could not get my fingers in there to release the clip. I fashioned a tool out of an old hose clamp by bending one end into a tight U. I slipped this end into the gap shown, hooked it over the retaining clip, gave a tug and this end of the filter cover released. Simply slip the other end off of the post.The filter itself takes some squeezing and wiggling to remove. The filter is bigger than the opening, so you will need to get you fingers in there to compress it to get it started out of the opening.Installation is the reverse of removal. Again, you have to compress the filter somewhat to get it into the box. Once it is in there, it wont fall out. Don't forget to put the gray foam gasket back on the filter cover before you snap it in place. Slip the firewall end over the post and snap the other end over the retainer post. The air duct is next, wiggling the large end back in place and snapping the retaining clip back onto the mating post. The two fingers on the back of the bottom panel slip into the appropriate brackets and the snap the front in place. Replace the one screw and you are done. With practice and the appropriate tool to get the cover retaining clip to release, probably a 15-20 minute job max.
-
You won't like the price, but there is a spare available http://www.suncoastparts.com/product/991SPARE.html?Category_Code=991BASECHASSISWHEELACC
-
Does anyone have the instructions on how to remove and replace the shifter knob on a 2013 Cayenne base? My understanding is that the procedure is similar to the 997.2 PDK knob in that you have to twist the bottom ring counterclockwise to unlock the knob. Just want to confirm. Thanks