Welcome to RennTech.org Community, Guest
There are many great features available to you once you register at RennTech.org
You are free to view posts here, but you must log in to reply to existing posts, or to start your own new topic. Like most online communities, there are costs involved to maintain a site like this - so we encourage our members to donate. All donations go to the costs operating and maintaining this site. We prefer that guests take part in our community and we offer a lot in return to those willing to join our corner of the Porsche world. This site is 99 percent member supported (less than 1 percent comes from advertising) - so please consider an annual donation to keep this site running.
Here are some of the features available - once you register at RennTech.org
- View Classified Ads
- DIY Tutorials
- Porsche TSB Listings (limited)
- VIN Decoder
- Special Offers
-
OBD II P-Codes - Paint Codes
- Registry
- Videos System
- View Reviews
- and get rid of this welcome message
It takes just a few minutes to register, and it's FREE
Contributing Members also get these additional benefits:
(you become a Contributing Member by donating money to the operation of this site)
- No ads - advertisements are removed
- Access the Contributors Only Forum
- Contributing Members Only Downloads
- Send attachments with PMs
- All image/file storage limits are substantially increased for all Contributing Members
- Option Codes Lookup
- VIN Option Lookups (limited)


Ant64
-
Posts
5 -
Joined
-
Last visited
Content Type
Profiles
Events
Forums
External Paint Colors
Downloads
Tutorials
Links Directory
Collections
Store
Everything posted by Ant64
-
Broken Oddments Tray Hinge
Ant64 replied to Loren's topic in DIY Articles - Carrera (996) - Common Fixes and Repairs
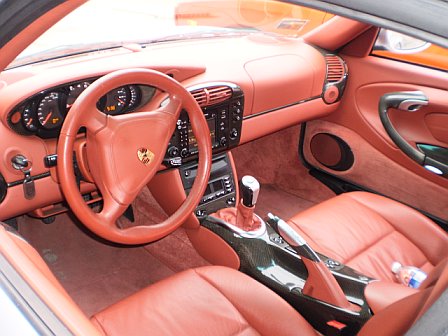
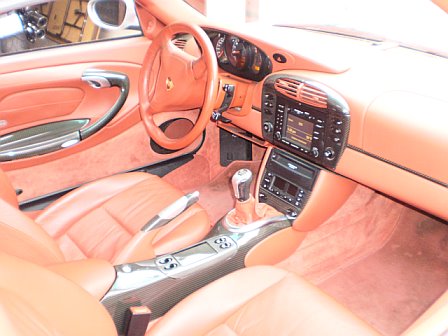
I removed the entire center console, as the pictures and directions suggest. After I did the repair, I thought it would be possible to make the repair without removing the entire console. I would try and repair it without removing the whole thing first, if you determine you need to remove it, then remove it. If you do end up removing it, don't forget to put painter's type tape at the base of your emergency brake to avoid the type of damage I caused mine when I removed it! Post back and let us know if you had to remove the whole center console. -
-
Broken Oddments Tray Hinge
Ant64 replied to Loren's topic in DIY Articles - Carrera (996) - Common Fixes and Repairs
I just did this on my 01 996 Turbo a couple nights ago. Once I removed all of the screws and the side cover to the emergency brake, I had a tough time getting the console out, even with the passenger seat all the way down. I couldn't get the right angle to get the front part of the console out from underneath where my ventilation and seat warmer controls are. When I finally got the right angle I noticed that in my many attempts to remove, I had really torn up the leather at the base of my hand brake! :censored: :cursing: The pictures were taken before I replaced the hinge. You can see on the driver's side photo where the leather has a blackish smudge, the leather to the left of the smudge is the area that got affected. So now, when the brake is engaged you can really see how bad it looks! Man, for something that was supposed to cost me $30, I'm not sure how much this is gonna cost to fix! Sheesh! I found replacement hand brake levers, but they're priced between $200 and about 4 to $500! OUCH!!!! And they weren't even in my color combo! I feel so bad about this! Maybe an upholstery shop? Anybody know any good ones in Chicago, IL? On a side note, I priced out the hinge replacement kit, the cheapest Porsche part I found was for $22.50. With shipping it would have been closer to $30. When I called my local dealership, they told me $38, I asked if they could price match, he said he couldn't go as low as 22.50, but he could do $28, so my out the door price was $30 and some change. Never hurts to ask!
-
Ignition Switch Issue, Revisited
Ant64 replied to alpha's topic in 996 Series (Carrera, Carrera 4, Carrera 4S, Targa)
Hi, I think I'm having ignition problems on my 01 996TT, what kind of ingnition switch did you get? If it will work on my car and you still have it, I'll take it! Let me know, thanks! -
First time poster. Love you love your forum! :renntech: Anyway, I just did this repair on my 01 996 TT, the only additional thing that I had to do on my car, for ease of access to the part, was to remove the rear most plastic covering underneath the car. Once I did that, I was easily able to follow these directions! To remove the plastic cover, I used either a 9 or 10 mm socket and I forgot the number of the torx bit, but once you're under there, it's pretty easy to figure out.