Welcome to RennTech.org Community, Guest
There are many great features available to you once you register at RennTech.org
You are free to view posts here, but you must log in to reply to existing posts, or to start your own new topic. Like most online communities, there are costs involved to maintain a site like this - so we encourage our members to donate. All donations go to the costs operating and maintaining this site. We prefer that guests take part in our community and we offer a lot in return to those willing to join our corner of the Porsche world. This site is 99 percent member supported (less than 1 percent comes from advertising) - so please consider an annual donation to keep this site running.
Here are some of the features available - once you register at RennTech.org
- View Classified Ads
- DIY Tutorials
- Porsche TSB Listings (limited)
- VIN Decoder
- Special Offers
-
OBD II P-Codes - Paint Codes
- Registry
- Videos System
- View Reviews
- and get rid of this welcome message
It takes just a few minutes to register, and it's FREE
Contributing Members also get these additional benefits:
(you become a Contributing Member by donating money to the operation of this site)
- No ads - advertisements are removed
- Access the Contributors Only Forum
- Contributing Members Only Downloads
- Send attachments with PMs
- All image/file storage limits are substantially increased for all Contributing Members
- Option Codes Lookup
- VIN Option Lookups (limited)


cmgleason
-
Posts
67 -
Joined
-
Last visited
Content Type
Profiles
Events
Forums
External Paint Colors
Downloads
Tutorials
Links Directory
Collections
Store
Posts posted by cmgleason
-
-
78' 924 @32, 84' 911 Targa@ 38, 03' Boxster @61, & current 04' 996 Targa@63 Yea I really am that old!!
-
If your car is a 996 it may well have the oem version of the non-dimming mirror. If so that mirror is removed by sliding it down from its mount. You can check it by removing the plastic around the base on the OEM version.
-
I special ordered an 84' Targa with the Fuchs wheels. As I recall they were 15" wheels. Latter I purchased 16" BBS 2 piece gold wheels for winter tires. Although it was a long time ago I clearly remember that the BBS wheels were larger as I was concerned that the speedometer would not be correct which it was not. However I liked the look. I do not recall any option for those BBS wheels from the factory.
Got another question re 1984 ROW Targa. Were BBS wheels a factory option? Haven't seen anywhere that they were but thought that I would ask.Thanks, Steve
PS GREAT website!!!!!!
-
Thought I'd try this again with the thought that someone may be able to see a 996 & 997 Targa next to one another & get a measurement. I've been told that the rooflines are essentially the same so I am hopeful that this can be done. Thanks cmg
-
As a word of caution you might want to check your insurance policy to verify that you have full coverage for a cracked windshield just in case something goes awry as some of the posts indicate. I upgraded my insurance for a few dollars & was surprised that I had a $500 deductible. Did'nt need it but just in case...
I have an auto-dimming mirror I want to swap out with the existing mirror (on my '03 S). I plan on tapping power for the mirror from the dome light. But I need to know how to get the existing mirror off. Of course, the Porsche mirror mounting tab won't work with the mirror I'm planning on replacing it with so I'll have (unfortunately) 2 tabs on the windshield when I'm done.As an aside, why couldn't Porsche have seen fit to have an auto-dimming mirror in the first place? Even the cheapest of Kia's have them!
-
Do a search on this site for "self dimming mirror" & you will find a number of discussions including the TSB which will help you to wire a new mirror. In short use a pair of channel locks with a piece of hose over each jaw so as to not damage the existing mirror. Attach the channel locks so as to turn the entire mirror base to the right or left 90 degrees & it will come loose. Again you will find pictures on this site of my description. Porsche made a tequipment self dimming mirror that fit the non dimming base exactly so that you could use the existing windshield mount. That is no longer available but you may find an NOS example someplace. Alternatively Audi & Volkswagen used the same mirror & mount so a check at the local wrecking yard may work. Finally the Porsche factory OEM version had a windshield mount with a hole in the center for the rain sensor. I found such a mount & mirror on a Porsche wreck & it fits over the existing button perfectly so you do not need to remove the old mounting button. This mirror mounts differantly in that you push the mirror up onto the mount as opposed to turning it. I then mounted the rain sensor next to the mirror as per the tequipment TSB. cmg
-
The Tequipment mirror fits the non dimming porsche mount without modification. However the M265 factory dimming option has a larger mounting base with a hole in the middle for the factory rain sensor. I ultimately had to get the windshield mount from a wreck after purchasing an NOS "dimming porsche mirror" that turned out to be the factory option version with the larger base. This will not fit the mount for the stock non dimming mirror like the Tequipment version does. This base slide onto the windshield mount as opposed to twisting onto the windshield mount. Also I wrote to the ebay seller you mentioned to ask what mount/size his mirror had but did not receive a reply. I was interested since I can't seem to get 12V power from my interior mirror to my exterior dimming mirror & am thinking that the mirror internal circuits are not allowing the + connection when the sensor tells the interior mirror to dim. Hope this helps. Bottom line- verify the mount before purchasing. BTW the power connection cost me $85 from Sunset. It is a five wire connection for both the interior & exterior mirror.
-
Thanks Alan. That certainly helps to assure me but I am curious how someone gets something out of those vents Anybody care to comment?? cmg
I've done the same and could never find them. I just left them and forgot about them and haven't heard from them since. That was 1.5 years ago and no ill effect yet.Alan.
-
My dumb move (latest) while working on the the gps antenna in the alarm led carrier on the dash of my 04' Targa was dropping the two screws from the carrier into the hole that the alarm module wires run into or possibly into the vents themselves. Anyway I can't find them & I've tried the mirror & mag tools to no avail. I'm hoping they fell behind the radio but just don't know. I'm tempted to just forget about them but am wondering if these screws might make their way to something of importance like the vent motor. Anyone know of a way to find these easily or have a picture/diagram of how to open the defroster area? Thanks
-
Success!! As an update I found that the hatch was out of sequence presumably due to the dead battery. It thought it was open when it should have been closed & vice versa. By disconnecting the negative lead on the battery (after recharging) the hatch would either partially open or partially close. Pressing & holding the hatch release would engage the motor to fully close the hatch. Then disconnecting the battery lead would release the hatch. Thru trial & error of closing the hatch manually, pressing the switch & disconnecting the battery I eventually after 10 minutes or so got it in the correct sequence. The easy way would have been to take it to the dealer who has the diagnostic tool as Loren suggested but I did not want the aggravation not to mention the expense.
-
Loren As always thanks for the quick response but in this case the battery in new so I need to go the next step.
In the process of working on my 04' Targa I must have inadvertently left Targa hatch open. In turn after a week or so the battery ran down. When I tried to start it the engine barely turned over & everything began clicking. The hatch would not close. Each time it attempted to close it poped back up. After charging for a bit it closed fully. I disconnected the battery several times in an attempt to clear the computer sequence. Now the release switch does not "click" to release the hatch but if I disconnect the battery the hatch will release itself. If I attempt to close the hatch it will pop back open but eventually will close fully. Obviously it is out of sequence but I need some help to reset /repair this. Thanks -
In the process of working on my 04' Targa I must have inadvertently left Targa hatch open. In turn after a week or so the battery ran down. When I tried to start it the engine barely turned over & everything began clicking. The hatch would not close. Each time it attempted to close it poped back up. After charging for a bit it closed fully. I disconnected the battery several times in an attempt to clear the computer sequence. Now the release switch does not "click" to release the hatch but if I disconnect the battery the hatch will release itself. If I attempt to close the hatch it will pop back open but eventually will close fully. Obviously it is out of sequence but I need some help to reset /repair this. Thanks
-
Well I am trying to run wiring down the A-pillar in an 04 Targa & find that I can't seem to remove the pillar. As a work around I've taken off the driver side vent & unsnaped the defroster plastic by the window but find I can't remove the defroster plastic as it has a metal clip at the base which goes into the A-Pillar. I really need to remove the A-Pillar to get the defroster vent back without breaking it but the searches I've done show only the boxster or cab. A-Pillar removal. The Targa A-Pillar is one piece going from the dash & across the drivers window. Thanks for any help.
-
As background, I have been on a similar quest for quite some time so here is what I have researched/know. The Tequipment kit has two differant relays that the rain sensor plugs into. In the early version (no longer available) the relay is adjustable with an adjustment screw at the relay itself to vary the speed. The latter relay has one speed only & is not adjustable even though both versions have the same part number. In neither case does the variable dash switch operate even though the TSB states that it will. There has been a number of comments on the confusion within the TSB related to the Tequipment option but if you check the TSB (search rain sensor)on this site it will give you further info as well as the wiring connections requested. In the factory OEM M265 option which includes both the interior/exterior mirrors & integrated rain sensor the dash variable switch is a differant part number 99661312710a05 than the stock unit & has four connectors rather than two presumably to connect to the additional control unit for the sensor as well as for a differant relay from cars that do not have the M265 option. It does fully control the variable wiper speed. I have a new NOS early Tequipment kit with the adjustable relay that I purchased prior to attempting to do the full M265 option. At the moment I need the 10 pin harness that goes from the dome light to the various parts ie control unit, dash switch, relay, door mirror etc. to complete my install so I was waiting to sell this NOS Tequipment sensor but if you are interested PM me. Regards cmg
I am looking at retrofitting a rain sensor, and/or a variable speed wiper. I have a few questions I was hoping someone could give some pointers on please:1. Does the rain sensor allow the wiper's speed to change depending on the size of the downpour?
2. I understand the variable speed wiper relay is replaced by the rain sensor kit wiper relay. If I have it connected up, would the variable wiper potentiometer on the dash still somehow function in this setup?
3. The harness from the rain sensor to the relay only contains three wires, is this correct? If so, it would seem that two of them would be ground and 12V, the other one would be the variable output - going to the relay to do its magic. Is this a correct assumption? Anyone measured/know for sure? This would then give the possibility for using just an aftermarket rain sensor (less than <$100) and maybe use the variable wiper relay instead? i.e: essentially replacing the variable relay input from the dash potentiometer with the rain sensor? Doable?
Another reason I am thinking about the aftermarket rain sensor setup is this particular one I am looking at also gives a headlight trigger when dark.
-
Hi Ben- I have a new double din Pioneer mounting bracket that I did not use as well as some other pieces like a wiring plug for a double din install. I need to check to see all that I have but it will be much less than purchasing a new install kit even if you need some other pieces which are readily available. If you are interested send me a PM cmg
Im planning on doing a double din install on my '00 Boxster, it currently has the single din set up with the ac/heat controls up top.From reading the forums it seems that moving those controls down isnt too hard. What Im worried about is the mounting bracket for the double din radio up top.
Do most double din radios come with this bracket?
I was looking at a poineer deck and i didnt come with this bracket? Does anyone know where I can purchase this bracket from?
- Ben
-
Just to confirm, your system works as follows: while moving forward you are listening to radio, you put the car in reverse, the video on the HU changes to the rearview camera, when you put the car into another gear the video changes back to the radio screen Yes That is how it works. I'll check & let you know.
Cris -If it wouldn't be too much trouble, I would greatly appreciate you looking into what you did with the HU purple wire. I have essentially done the same as you with the camera (power, ground drain hole) and I know the camera is working fine b/c when I put the camera rca into A/V1 or A/V2 , select A/V on the HU, and put the car into reverse the camera video works fine.
Just to confirm, your system works as follows: while moving forward you are listening to radio, you put the car in reverse, the video on the HU changes to the rearview camera, when you put the car into another gear the video changes back to the radio screen.
If this is the case, I could really use your assistance with the purple wire as I have otherwise recreated your set-up. Thanks!!!! -
Jeremy
-
Jeremy- I ran the power wire from the reverse camera to the right side back up light. I accesed that by removing the tail light & running the camera + lead thru a drain hole to the + wire of the reverse lamp. thus anytime reverse is selected you have power to the camera. I grounded the negative lead to a bolt on the engine lid latch. I need to check but I don't believe I did anything with the HU purple wire since that is also power & would be redundent.
Cris -I am very pleased with the DNX-9140 and attempted to install my back-up camera today. I can confirm the camera is working fine, b/c I get video in A/V 1 and A/V 2 when the camera is hooked-up to these inputs. When the video rca is hooked into the back-up camera, however, I am not getting any video. My assumption is that this may relate to not having the reverse wire hooked up. Did you ground the reverse wire (purple) or connect it to another lead?
I would really like to be able to put the car in reverse, have the 9140 automatically switch to back-up camera and then go back to radio/ipod once I put the car into another forward gear. FYI - I have the back-up camera grabbing power and ground from the reverse lights. Thanks for your assistance! -
Jeremy
-
Thanks much! That makes it much clearer. I kept trying to turn the rod but eventually ended up placing the ringed fitting in the various groves. Now the reverse shift is fine but I did order the adustment tool from the dealer for $15. After I finish double checking the neutral position anyone needing to borrow that tool let me know & I'll send it along.
You don't actually turn or adjust anythjing threaded..I don't think it's actually a thread, but lots of consecutive rings that appear to be threads. The shifter end snaps down and grabs the rings. Loren is correct, always better to count the rings (threads), then the shifter end HAS to end up in the same place. You do have to remove the center console again, but that's it. When in Neutral the shift knob should be pretty much plumb, but can be a little canted towards the driver. I've had the 997 one in mine for over a year, no issues at all, all better than original. -
Speaker wiring is not HU specific. Typically you have 4 channels Front & Rear, Left & Right & perhaps a sub mono channel which needs to be connected to either a sub woofer possibly in the passenger footwell or door subs if you have them. If you have an upgraded system with say standard door speakers as well as F & R you might want to combine the fronts with the doors as two channels & the rears as the other two channels. In my experience HU's have preouts for the amp and/or can be connected directly to the speakers. The speaker connections are easily accessed at the amplifier in the luggage compartment. Try a search for "speakers" "Pioneer" or "Kenwood" There is even a DIY for stereo installs on the site.
The cars a 996 Carrera 2 1998I did not have the amp replaced, i have been looking on the forum but could not find anything related to a JVC double din unit.
Cheers
Steve
What year /model do you have? Is the car equipped with the MOST system which requires that the amplifier be replaced?Alternatively did you have the amp replaced? There are many threads on this site to install doulble din HU's which you might want to search that will give you a number of options for consideration. Worked for me.I have recently had a JVC KW-AVX720 Double din head unit fitted, the sound quality was ok...so i thought i would do some research into upgrading my door speakers...i removed the head unit to find that my dood speakers were not even wired up to the head unit, and i cannot see anywhere to wire them, the company that fitted the unit have shut down so i am a bit stuck, any help gratefulDid they tap into your old connector plug or just cut wires and start from scratch. I would think you should be able to find some free wires sitting behind the head unit. I assume they would be ganged together in pairs for a +/- configuration.
I think the wires have been taped up and left behind, was just unsure how to conect these up to the unit, i am sure they have not connected them for a reason, no idea why though
-
What year /model do you have? Is the car equipped with the MOST system which requires that the amplifier be replaced?Alternatively did you have the amp replaced? There are many threads on this site to install doulble din HU's which you might want to search that will give you a number of options for consideration. Worked for me.
I have recently had a JVC KW-AVX720 Double din head unit fitted, the sound quality was ok...so i thought i would do some research into upgrading my door speakers...i removed the head unit to find that my dood speakers were not even wired up to the head unit, and i cannot see anywhere to wire them, the company that fitted the unit have shut down so i am a bit stuck, any help gratefulDid they tap into your old connector plug or just cut wires and start from scratch. I would think you should be able to find some free wires sitting behind the head unit. I assume they would be ganged together in pairs for a +/- configuration.
I think the wires have been taped up and left behind, was just unsure how to conect these up to the unit, i am sure they have not connected them for a reason, no idea why though
-
That would be for the left or drivers side. Also is their a part number for the combination interior self dimming mirror with integrated rain sensor which runs from the behind the dome light to the relay switch & control unit for the same car or is it part of the main harness? Thanks.
-
Thanks Loren but just in case I can't get that could you give me the number of the base &with the harness?
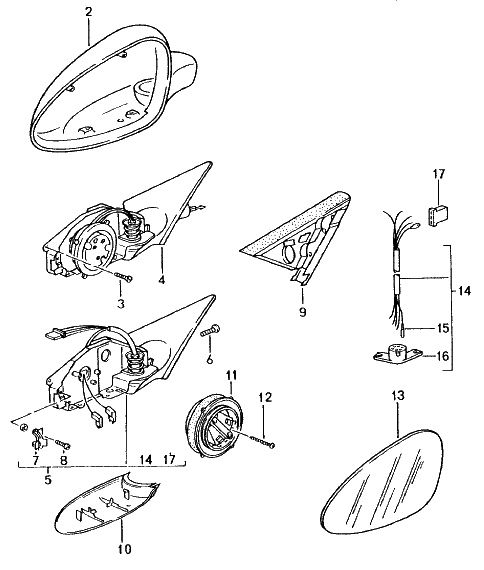
I really only need the wiring harness which appears on the right side to be #14. I was under the assumption that it could not be purchased unless one purchased the triangular base with wires which appears also to be #14.Hi I need the part number for the triangular exterior mount for the self dimming mirror with memory seat. There are 12 wires in this mount. It is for an 04' Targa. Thanks cmgWhich item?

-
Yes I did but the B & M instructions simply say to go back to step 35 if one encouters resistence. That step has you installing the base. I did not see apicture of the adjustment but now that I know it is a threaded end I will find it. Thanks much!!
Thanks Loren Can you point me to how the cabel is adjusted? Does it screw out at the console or elsewhere?Your reverse cable adjustment (blue cable) is off. You will need the alignment tool to adjust.As I recall the tool is just a few dollars.
Did you read the instruction here and B&M's short shifter instructions?
The threaded end of the cable is the adjustment.
-
I really only need the wiring harness which appears on the right side to be #14. I was under the assumption that it could not be purchased unless one purchased the triangular base with wires which appears also to be #14.
Hi I need the part number for the triangular exterior mount for the self dimming mirror with memory seat. There are 12 wires in this mount. It is for an 04' Targa. Thanks cmgWhich item?
Mirror Photocell
in 996 Series (Carrera, Carrera 4, Carrera 4S, Targa)
Posted
Hi- I recently installed an OEM interior self dimming mirror in a n04' Targa. this is the one that has the integrated rain sensor in the middle of the windshield mount. I need to have someone confirm the correct photocell to cover to cause the mirror to dim to confirm that it is wired correctly. There are two photo cells: 1)one on the reflective glass side & 2)one on the plastic back. When covered one causes the mirror to dim & the other one does nothing. Which one causes the mirror to dim when covered? Thanks cmg