Welcome to RennTech.org Community, Guest
There are many great features available to you once you register at RennTech.org
You are free to view posts here, but you must log in to reply to existing posts, or to start your own new topic. Like most online communities, there are costs involved to maintain a site like this - so we encourage our members to donate. All donations go to the costs operating and maintaining this site. We prefer that guests take part in our community and we offer a lot in return to those willing to join our corner of the Porsche world. This site is 99 percent member supported (less than 1 percent comes from advertising) - so please consider an annual donation to keep this site running.
Here are some of the features available - once you register at RennTech.org
- View Classified Ads
- DIY Tutorials
- Porsche TSB Listings (limited)
- VIN Decoder
- Special Offers
-
OBD II P-Codes - Paint Codes
- Registry
- Videos System
- View Reviews
- and get rid of this welcome message
It takes just a few minutes to register, and it's FREE
Contributing Members also get these additional benefits:
(you become a Contributing Member by donating money to the operation of this site)
- No ads - advertisements are removed
- Access the Contributors Only Forum
- Contributing Members Only Downloads
- Send attachments with PMs
- All image/file storage limits are substantially increased for all Contributing Members
- Option Codes Lookup
- VIN Option Lookups (limited)


CBRacerX
-
Posts
11 -
Joined
-
Last visited
Content Type
Profiles
Events
Forums
External Paint Colors
Downloads
Tutorials
Links Directory
Collections
Store
Posts posted by CBRacerX
-
-
On 5/10/2014 at 10:39 AM, Loren said:
Pressure plate -- 17 ftlb. (23 Nm)
Dual Mass Flywheel (per sequence) -- 65 ftlb. (85 Nm)
Single Mass Flywheel (per sequence) -- 67 ftlb. (90 Nm)
(click to enlarge)

Thanks Loren! I did a recent 997.1 GT3 RMS replacement using this value (DMF). It is all back together and running fine. Then I happened to look at the factory manual for the same procedure and below is how that read. Am I looking at an outdated workshop manual?
Installing double-mass flywheel
Note
Before re-installation, clean the friction surface of the flywheel with a clean lint-free cloth that has been
soaked in solvent naphtha or acetone.
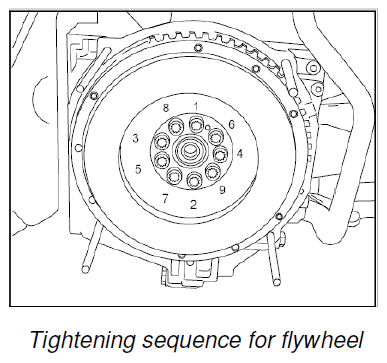
1. Position double-mass flywheel on the crankshaft's dowel pin and press on to the crankshaft flange. Insert
all fastening screws (8).
2. Align toothed segment 9538/1 and tighten fastening screw
again.
3. Screw in and tighten fastening screws in diagonally opposite sequence. Initial tightening: 19 ftlb. ;
Final tightening - torque angle: 120 °
4. Remove toothed segment.
-
Looking at what seal I was sent, I realize my problem is with the metal/rubber seal that is around the perimeter of the glass - not the seal between the body and the windshield. I'll post a picture later, but it appears there are two seals stacked here, and one of them is attached to the glass directly.
-
On 6/27/2010 at 10:54 PM, kbrandsma said:
You need five wires. Three of one kind and two of another. The yellow VW wires terminate in a special male connector.
You should have three VW wires exactly the same (part # 000-979-009). You cut two of these in half (you now have 4 wires) and install them into the plug-in connector (part # 999-650-056-40) in slots 2,3,4 &5. The cut ends of these wires will be spliced into other wires later. You take the thitrd wire (uncut) and place one end into connector slot #1. You cut the free end of this wire close to the end and crimp on a 6mm eyelet to the end. This eyelet gets connected to ground.
You should also have two other VW wires (part # 000-979-010). You cut these in half. You now have 4 wires. Connect the cut end of these wires to the wires above that occupy slots 2,3,,4 & 5 of the plug-in connector. Label these. The plug-in connectors snaps into the 4th stalk on the steering wheel column. The ground gets place behind a ground screw.
In 2001 and up Boxsters the wires connect to the Grey Instrument Cluster connector in the following order.
#2 to pin #23 on grey cluster
#3 to pin #22 on grey cluster
#4 to pin # 21 on grey cluster
#5 to pin #24 on grey cluster
Hope this helps!VERY helpful, thank you! It's not clear what connector to use from most posts.
-
I am going to attempt this on my 2001 986 - the rubber trim (996.541.531.01) is badly sun damaged.
-
Thanks for this thread, I have found it very useful as I prepare to install the LN Pro double row bearing on my 2001 single row 986S. As usual, I see JFP providing invaluable advice and experience. THANK YOU! If your shop was closer I'd be happy to buy a round :)
-
I'll add myself to list of folks who need one of these. I'm good with buying one or renting.
Thanks in advance for any assistance.
Chris
New owner of '01 986S with blown RMS
-
Just happened to me today after car sat out in a heavy rainstorm (at the local garage for the annual inspection). I ordered a new belt since I have no record of this one being replaced and it might be 12 years old!
-
I just performed an adjustment on my 2002 996 where the rear of the window was touching the quarter window. I was successful, but along the way I learned more about how the window adjustments work. Some of this will slightly contradict information above.
MOST important, the adjustments found above the door inner cover are not the upper window rail attachments. They are the window glass CLAMPS as described above, and are only available when the window is fully raised:
Here are the bottom of door adjustments:
-
I'm struggling with this same issue on my 2006 Cayman S - except mine stays on all the time but a mechanical gauge shows I have plenty of pressure. Replacing sensor did not help and the wiring from the sensor to the DME (Pin D24) is perfect.
Can anyone confirm that the idiot light sender in the 987 shows no resistance with the engine off and infinite resistance with the engine running. From what I can tell, that is correct behavior.


Flywheel and Pressure Plate Torque Specs
in 997 GT3, GT3 RS
Posted
I found this reference to the 67 ft-lbs from the 996 GT3 single mass flywheel install procedure: