Welcome to RennTech.org Community, Guest
There are many great features available to you once you register at RennTech.org
You are free to view posts here, but you must log in to reply to existing posts, or to start your own new topic. Like most online communities, there are costs involved to maintain a site like this - so we encourage our members to donate. All donations go to the costs operating and maintaining this site. We prefer that guests take part in our community and we offer a lot in return to those willing to join our corner of the Porsche world. This site is 99 percent member supported (less than 1 percent comes from advertising) - so please consider an annual donation to keep this site running.
Here are some of the features available - once you register at RennTech.org
- View Classified Ads
- DIY Tutorials
- Porsche TSB Listings (limited)
- VIN Decoder
- Special Offers
-
OBD II P-Codes - Paint Codes
- Registry
- Videos System
- View Reviews
- and get rid of this welcome message
It takes just a few minutes to register, and it's FREE
Contributing Members also get these additional benefits:
(you become a Contributing Member by donating money to the operation of this site)
- No ads - advertisements are removed
- Access the Contributors Only Forum
- Contributing Members Only Downloads
- Send attachments with PMs
- All image/file storage limits are substantially increased for all Contributing Members
- Option Codes Lookup
- VIN Option Lookups (limited)


1schoir
-
Posts
2,739 -
Joined
-
Last visited
-
Days Won
6
Content Type
Profiles
Events
Forums
External Paint Colors
Downloads
Tutorials
Links Directory
Collections
Store
Posts posted by 1schoir
-
-
I'm not aware of any adjustments, as long as the clam shell closes well.
Not sure of exactly what you are referring to when you say the top has more "slack".
I would double check that both of your plastic ball cups are intact (the ones attached to the front pushrods). The top can work with only one attached but it won't pull down on that side when open completely or closed completely.
Regards, Maurice.
-
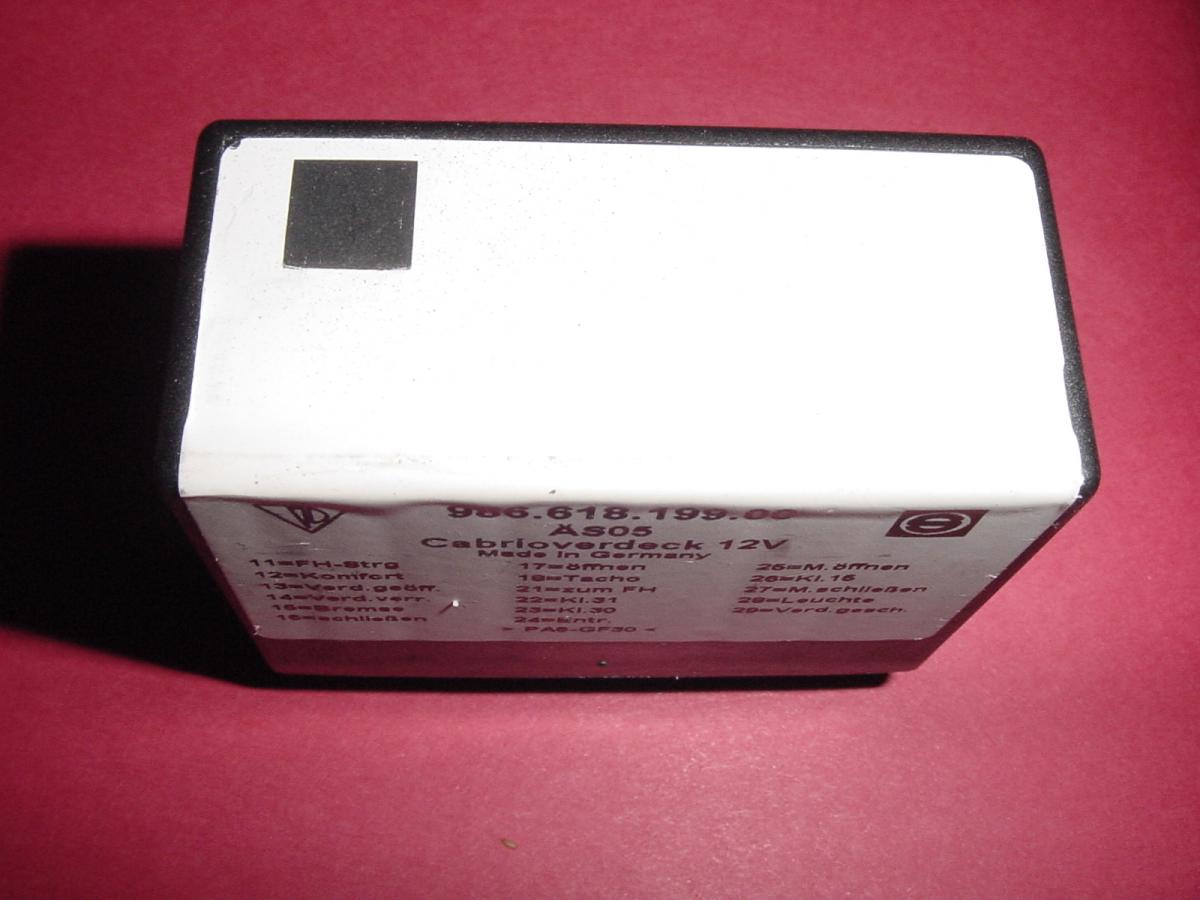
Your '99 Boxster should have the triangle symbol on the double relay.
Before replacing it with a new one, try taking it out and rapping it sharply against a hard surface, such as a desk. That will sometimes free up the contacts inside. Also, when re-installing it, push it in and pull it out a few times as that will help to clean up any minor corrosion on the spades of the relay and the receiving contacts in the tray.
If that doesn't work, I would inspect the parallel strip microswitch for cracks. If the parallel strip microswitch is not defective, you could then try to replace the relay with a known good one. Perhaps you have a friend with another Boxster who would let you try it before you purchase a new one.
Regards, Maurice.
-
What year is your Boxster and which double relay does your Boxster have (i.e., triangle or square printed on top surface of double relay)?
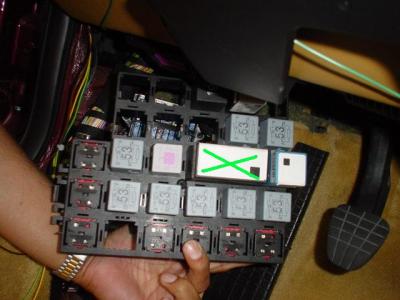
The double relay is located above the fuse box in the left footwell kick panel (this is the way it is on U.S. cars, not sure if the location is identical for right hand driver cars).
Here is a photo of what you are looking for (this one is the one with the square, generally for Boxsters 2000 to 2004):

Here it is in the relay panel, indicated by the green "X" (note that the relay panel has been removed from its attachment points in the kick panel area).
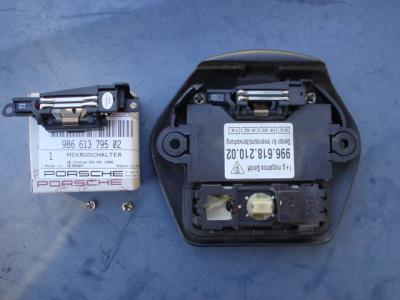
You will probably also have to check one of the two microswitches that are contained INSIDE the convertible top latch handle housing receptacle.
Here is what those parts look like:
One likely culprit is the parallel strip microswitch, which you can see in the photo above. Inspect it for continuity and for hairline cracks, which are relatively common and could cause a completely dead response, such as the one you are getting.
Regards, Maurice.
-
Thanks for posting the instructions.
Can't wait to try to build one as soon as the weather gets back to normal here in the Northeast U.S.
Regards, Maurice.
-
How do you make a "homemade smoke machine" and how does it compare to the big $$ commercial units?
Regards, Maurice.
-
:cheers:
Thanks for posting the details of your solution. I'm sure this will help someone else along the line.
Regards, Maurice.
-
 1
1
-
-
Scott:
That is a "blank", and it's gloss black. It fits into one of the empty spaces on the left side, but I believe that you have to fit a small wiring harness with an LED on the end of it. That LED ends up in the middle of the bottom half of the blank "switch".
I will get a photo of it and post it for you.
Regards, Maurice.
-
Here is something that might help you:
Boxster Conv Top Microswitch Troubleshooting.pdf
Regards, Maurice.
-
Most of the "Vehicle Service Contract" companies have earned a very bad reputation, a very well-earned one.
You will find that they appear to honor the contract on relatively small items and that they get very creative in the manner in which they disclaim coverage as the cost of the particular repair increases.
There are some that are particularly dishonest (U.S. Fidelis comes readily to mind) and others that just exemplify the insurance business model: collect premiums, try not pay claims.
If you must get one, at least make sure that there is an insurance company backing them up. By law, that insurance company must be listed in the Vehicle Service Contract. That gives you some assurance that you have some recourse but that recourse is usually only meaningful when a lawyer gets involved.
The suggestion to put the money that you would spend for a service contract aside and perhaps invest it while you are waiting for needed repairs to pop up is a good one and you will usually come out ahead with that approach. You will definitely have a lot less aggravation.
I have represented a number of Porsche owners with these claims and the horror stories you hear are not without justification, so tread carefully.
Regards, Maurice.
-
If you are looking for what Porsche refers to as the "blinddeckel" or Spoiler Control Indicator, the part number is 986 613 425 00 A01.
Regards, Maurice.
-
A few comments on your top operation:
1. Your second supposition, wherein you asked whether what makes the light go out is an "after-run time" is correct. In the "A Version" setup ('97-'99), the after-run time is triggered by the clamshell pressing down on the small black lever microswitch on top of the motor.
2. Putting a small foam block on the underside of the clamshell triggers (presses down) that switch a split second earlier and that turns off the motor and the dashboard light a little bit earlier in the rotation of the V-levers on the transmissions.
3. Jinster is also right on the money regarding the "sacrificial" nature of the front pushrods (specifically the plastic ball cups on those pushrods). You can only risk breaking the lug as shown in your photo with the ill-advised "custom" metal ball cups or if the small, thin (14mm?) hexagon end of the lug is not securely tightened onto the frame.
4. The B-pillar microswitch serves mostly to reverse the direction of the rotation of the V-levers by reversing the direction of the spinning of the electric motor.
5. If your top appears to be retracting (i.e. the leading edge of the top pulls away from the top horizontal edge of the windshield frame) before it has completed the cycle, the overall length of your pushrods must be adjusted to the optimal length. The optimal length will result in the leading edge of the top meeting the top horizontal edge of the windshield frame at the completion of the cycle.
Don't be afraid to keep your finger on the switch. Instead, buy a couple of spare plastic ball cups. There is a guy in Belgium or the Netherlands who had them manufactured and he may still be selling them.
Regards, Maurice.
-
Excellent! If you get the new door lock assembly and need a little help or encouragement, let me know. I have a garage with all the tools we might need and I've done the replacement on my Boxster. I'm a block away from the Freeport Village Hall.
Regards, Maurice.
-
I just found the DIY for this. http://www.renntech.org/forums/topic/25464-cab-drivers-window-auto-droop/?hl=window+microswitch#
Still debating whether to do this myself. I've had the door panel off and that wasn't too bad. Seems like a lot of tricky connections to this thing, but probably sounds worse than it is.
Pelican Parts has it for $190 with free shipping. For my 2000 Cab, the part number for the driver's side is 8N1-837-015-C-M1002
It does sound worse than it is and is very doable. Take lots of digital photos when you are removing the old assembly for reference and you won't have a problem.
AutohausAZ has the same part number for $23 less.
Regards, Maurice.
-
I also just replaced the whole mechanism. $160. If you want to try my old micro switches you can have mine. I know they work but may not be in the best condition. The lock plastic actually wore out on mine
@Chicagospeed996. Where did you find the part for $160? I'm seeing $240 online.
Here it is at AutohausAz for $167 for the driver's side and $157 for the passenger side (free shipping, no tax): http://www.autohausaz.com/search/product.aspx?sid=sbkcdy5521sicp55is0klz45&makeid=800019@Porsche&modelid=1388314@911%20CARRERA%202%20(996)&year=2002&cid=13@Body,%20Trim%20%26%20Lighting&gid=11410@Door%20Lock%20Assembly
I couldn't find it on Amazon.
Regards, Maurice.
-
The cup and drain tube are one piece and you are better off replacing the entire part rather than just replacing the teacup.
The part number that you have listed is for the passenger side, so make sure that is the side that you need.
There probably won't be a need to replace the clamps that hold the tube in place but they are cheap enough to buy so that you can have them on hand. The parts diagram shows that there are 4 needed. Not sure is that is two for each side.
You should also probably remove the forward piece of the rear wheel well liner so that you can see where the drain hose exits.
Regards, Maurice.
-
It's a straightforward repair but you will have to remove the convertible top and frame to get proper access to remove the drain tray.
Once you remove the drain tray, you will see a small teacup-like shaped "funnel" to which the drain hose is attached. You will have to have access from the bottom as well so that you can properly route the new hose.
I'm wondering how you determined that you need a new drain hose. If there is a leak in that area, it's most often caused by a crack in the "teacup" or the hose has become detached from it.
Regards, Maurice.
-
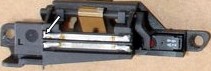
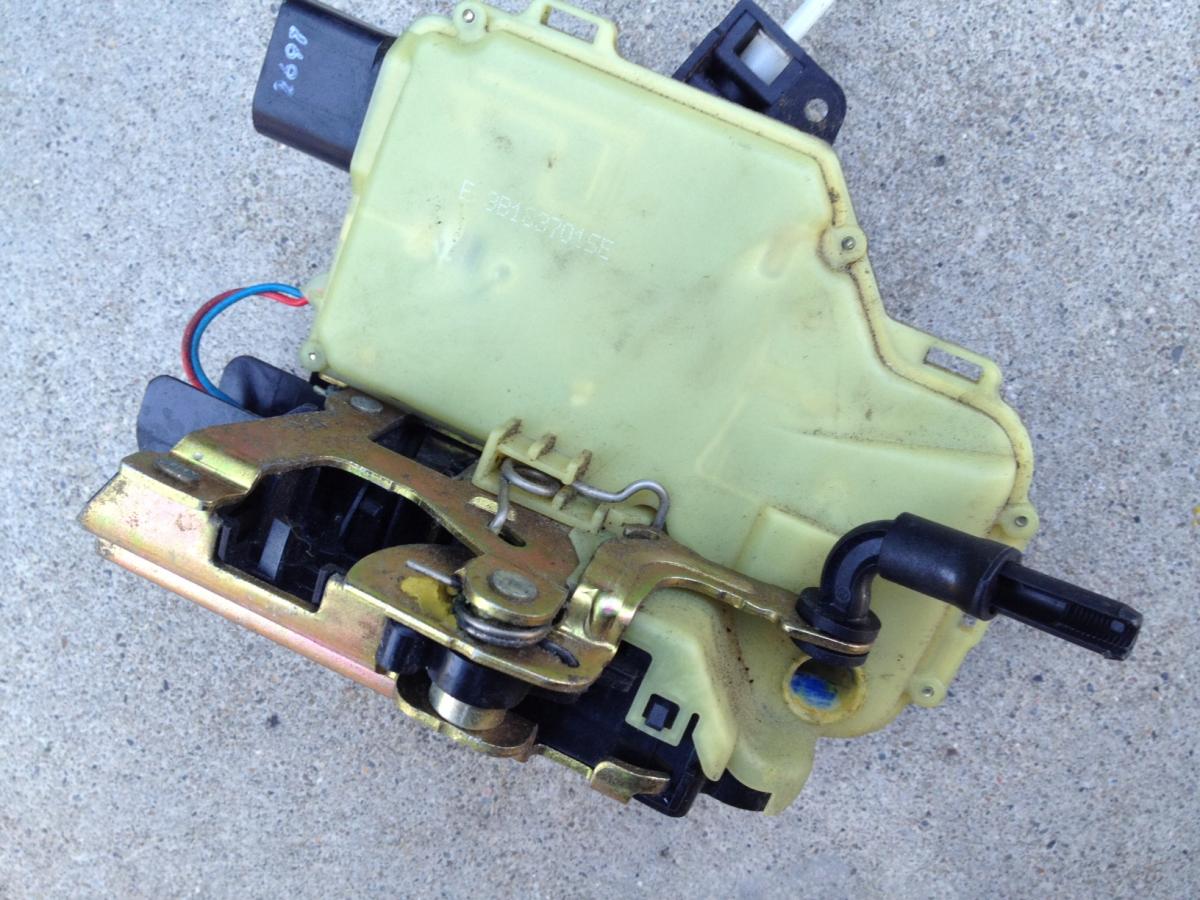
The most likely cause of this particular problem is inside the door lock assembly, inside the door. It's either in the circuit board or in the microswitch in that assembly.
There are a number of soldered connections on a small circuit board inside that door lock assembly which can crack and cause the exact problem that you have described. The soldered connections on the circuit board can be reheated and re-soldered for a good repair. The microswitch usually can only be replaced but Porsche does not sell that microswitch bi itself, only the complete assembly.
To definitively determine the cause you will have to remove the door panel and peel back the waterproof covering and then remove and test the door lock assembly.
Here is a photo of my door lock assembly ('97 Boxster), yours will look very similar. The circuit board in question is inside the large white plastic housing and the soldered connections that usually crack are the ones that are on the edge of the circuit board, where the connector is attached (near the top left corner of the photo). The movement (from its weight) of the connector is probably what causes the cracks.
There are a lot of posts on the microswitch issue on this forum. Do a search here and you'll get a better idea of what you are dealing with if it turns out to be the microswitch.
BTW, to see the cracks in the solder you will need a large magnifying glass. They are almost microscopic.
It won't cost you anything to inspect the circuit board or to fix it if you are good with a soldering iron before considering the expense of a replacement door lock assembly.
Regards, Maurice.
-
 1
1
-
-
Remove the caliper with the stuck piston and flood that piston and its bore with PB Blaster and let it set overnight. Then, while using a C-clamp to hold the other piston on that side in place (and similarly restraining the two pistons on the other side of the caliper), use compressed air to force the stuck piston out.
BE VERY CAREFUL when applying the air pressure as the piston could come flying out with great force.
If it's still stuck, you could try to first compress the piston further into the bore with a large C-clamp before applying the air to force it out.
Again, I cannot overemphasize that you must be very careful when applying the air pressure.
Once you have the piston out you will have to examine the surface of the sides of the piston and the surface of the cylinder bore in which the piston was housed to see if they only have minor surface rust. If so, you can polish them with FINE emery cloth with some clean brake fluid. It will be easy to see if the surface comes out completely free of any rust stains or pitting.
If necessary, you can then use the rebuild kit to replace the seals (and the pistons if the kit comes with it).
Regards, Maurice.
-
There are two-part epoxy panel bonder cartridges that can fix the broken tab and make a permanent repair. One of the manufacturers is SEM. They come in a dual-cylinder cartridge that mixes through a (disposable) dispensing nozzle at the other end as the trigger is pulled on the cartridge gun. The chambers in the dispensing nozzles force the two elements to intermix thoroughly before coming out of the nozzle end and the resulting mixture is as strong as, or stronger, than the original material. You can use it to glue and reinforce your original broken tab or you can build up a new tab and shape it with a dremel and files. This material is commonly used in auto body shops to repair plastic pieces that commonly break under the hood in a collision. This avoids having to buy a completely new piece and saves on removal and replacing labor.
Regards, Maurice.
-
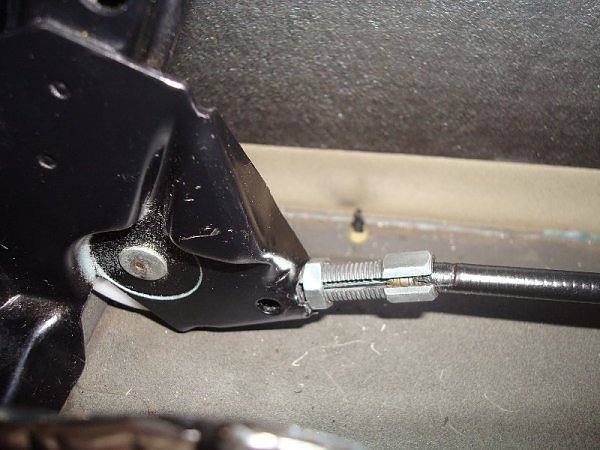
Excellent find, RFM! I actually forgot that I had posted that a while ago. This is what inevitably happens (to some of us) with age! :eek:
The bicycle brake adjuster does just slip right over the existing cable. All you have to do is inspect your cable first to make sure that it is not frayed or unraveling itself. If the cable is intact, you do not need to do anything to the cable (which would also complicate the repair). Just slip the slit adjuster over the cable and adjust the tension so that there is no slack being taken up when you first pull on the door handle.
If it's adjusted correctly, the downward movement of the window (for that 1/2 inch) will be nearly instantaneous with the pull of the handle.
Here are two photos of two versions of the fix, depending on the amount of slack that has to be taken up. Note that the key is that the bicycle brake adjuster holds the outer sheath pulled back from where it would otherwise produce slack in the inner cable:
As I said earlier, if your cable is intact there is no need to replace the entire window regulator or even the cable.
Regards, Maurice.
-
It is definitely your regulator and more specifically some slack in the cable. The slack is usually caused by the failure of one or more of the plastic "spacers" or flanges.
There is an ingenious fix which costs only about $1.00 to implement. It involves installing a bicycle brake adjuster inline to take up the slack. I learned about the fix on 986forum and used it on my Boxster, where it has been working perfectly for almost two years.
If you want more details, let me know and I'll dig up some pics.
Regards, Maurice.
-
Yes, the storage box can remain in place, as long as it is attached and located properly.
Glad you enjoyed the articles. There is a lot of useful information in them.
Let us know how you make out once you make the adjustments. It will help the next guy.
Regards, Maurice.
-
This can be adjusted. Start with taking care of the latch clearing the wind deflector.
Do a search here as I have detailed the steps to achieve the needed clearance in earlier threads.
For the most part, it only involves loosening the three bolts on each side of the base of the B-Pillar of the convertible top frame and pulling back before tightening the bolts again.
Regards, Maurice.
-
If I am reading Nev's explanation of his fix correctly, he can only be referring to the drive cables that plug into the back of each transmission and the other end of each one into the center drive flanges on each side of the electric motor.
The part number for the cables is 986.561.717.03. (Same part number for both sides). Each cable lists for about $50.
If you do replace the cables, which is a relatively straighforward DIY, please let us know whether that resolved the issue.
Regards, Maurice.
-
1
-

Swapped a top, make the problems stop!
in 986 Boxster Convertible Top Issues and Solutions
Posted · Edited by 1schoir
Dave:
Most guys doing this swap have that little problem with the latch just touching the top of the plexiglass windscreen and the solution is the one that you tried.
I suggest you try it again a couple of times to see if you get any improvement. Make sure you are pulling back (and slightly up) with a lot of force and that you don't release the pressure until you are certain that it will not move forward again by properly tightening up the one rearmost bolt. It helps if you have one or two other guys (maybe your wife can help :eek: ) pulling back while you tighten the bolt.
If that doesn't work, you will have to slightly elongate the three holes on each side by using a dremel with a carbide bit on the forward part of each of the three holes.
As for the window issue, there are three adjustments that can be done to the final position of the window, two of which can be done without removing the door panel. Fortunately, the vertical (height) adjustment can be done without removing the door panel, with access to a torx screw through one of the holes on the underside of the door. I wrote this up a few years ago here. If I can find the thread, I'll post a link to it. If neither of us can find it, I'll look for my photos and post is again.
One question:
Since yours is a '99, you should have the "A Version" convertible top double relay, and since you didn't mention swapping relays, etc., I'm assuming that your new glass-windowed top is on an OEM three-bow frame, with GAHH or Robbins covering. Or, have you done the complete electrical conversion to the "B Version" setup found in the 2000 to 2004 Boxsters?
Regards, Maurice.