Welcome to RennTech.org Community, Guest
There are many great features available to you once you register at RennTech.org
You are free to view posts here, but you must log in to reply to existing posts, or to start your own new topic. Like most online communities, there are costs involved to maintain a site like this - so we encourage our members to donate. All donations go to the costs operating and maintaining this site. We prefer that guests take part in our community and we offer a lot in return to those willing to join our corner of the Porsche world. This site is 99 percent member supported (less than 1 percent comes from advertising) - so please consider an annual donation to keep this site running.
Here are some of the features available - once you register at RennTech.org
- View Classified Ads
- DIY Tutorials
- Porsche TSB Listings (limited)
- VIN Decoder
- Special Offers
-
OBD II P-Codes - Paint Codes
- Registry
- Videos System
- View Reviews
- and get rid of this welcome message
It takes just a few minutes to register, and it's FREE
Contributing Members also get these additional benefits:
(you become a Contributing Member by donating money to the operation of this site)
- No ads - advertisements are removed
- Access the Contributors Only Forum
- Contributing Members Only Downloads
- Send attachments with PMs
- All image/file storage limits are substantially increased for all Contributing Members
- Option Codes Lookup
- VIN Option Lookups (limited)


deilenberger
-
Posts
614 -
Joined
-
Last visited
-
Days Won
6
Content Type
Profiles
Events
Forums
External Paint Colors
Downloads
Tutorials
Links Directory
Collections
Store
Everything posted by deilenberger
-
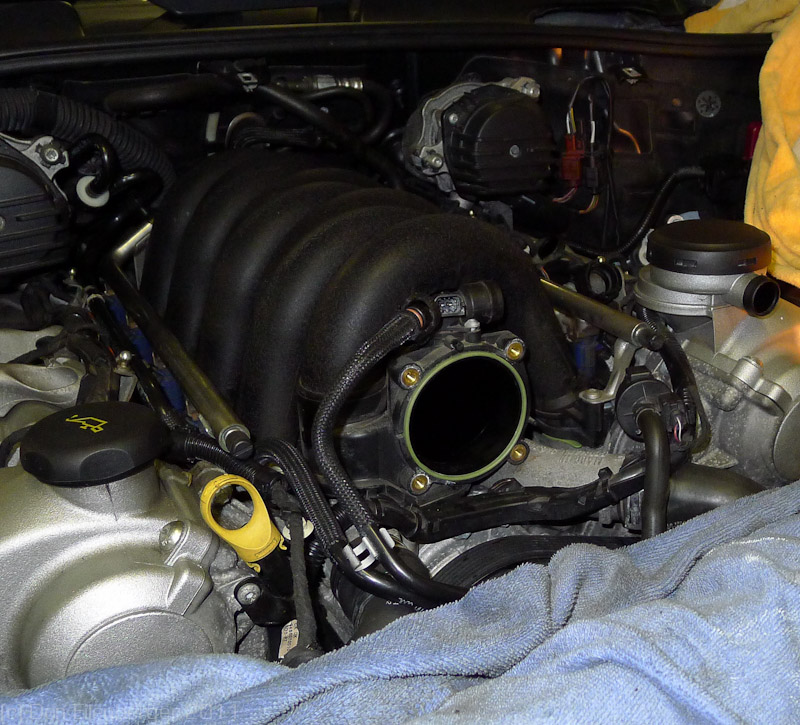
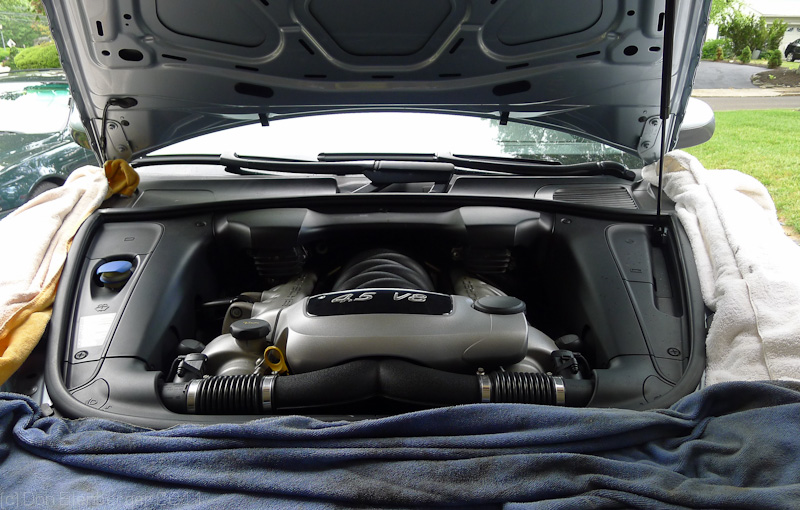
Details of the upper heater hose stubs. Note the condition of the O rings. These were removed without major damage to them by clamping the end of the tubing in a vice, and rotating the thermostat cover while pulling away from the hose. The O rings are not in great shape, although there was no leakage seen. It does appear it was around time to replace them. All the parts getting roughed into position. The pipe being moved is the one that goes into the front of the thermostat housing (facing the water pump area) and the pipe goes down to the alternator to cool it. This pipe has two O rings that seal it up - neither is included in any kit I can find. I'll post the PN's here when I have a chance. The O rings should be replaced when this job is done but I suspect rarely are since Porsche didn't include them in the service-bulletin "kit" listing. Since we didn't have new O rings to use - the pipe also received a good layer of RTV, including under the face-flange that holds it into the thermostat housing. All the plumbing is in place now.. :rolleyes: Closeup of the generator cooling pipe - with RTV used generously to assure it seals up well: And the intake manifold goes back on: The truck sat overnight again, so the RTV could "set" - and was filled and bleed. Eventually it went home with me, and all the plastic went back on. It's running quite happily at 180F, and has taken about 1 pint of additional coolant to top it off. Hope the photos are useful!

-
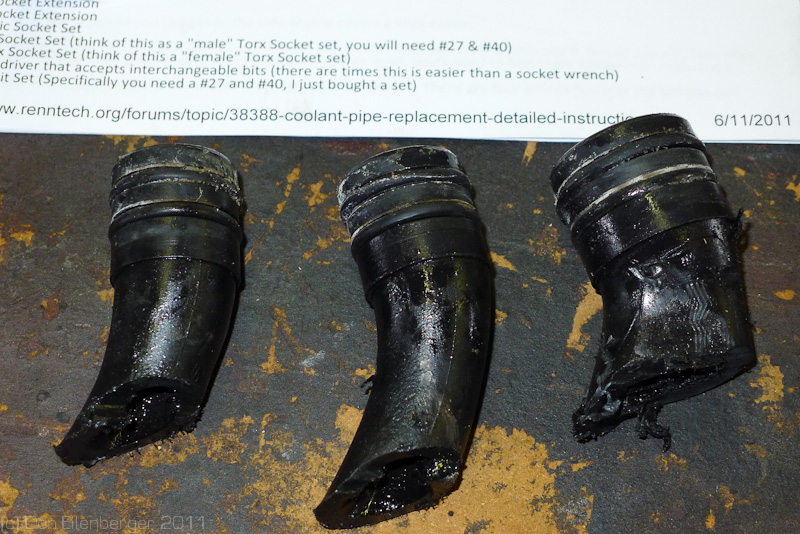
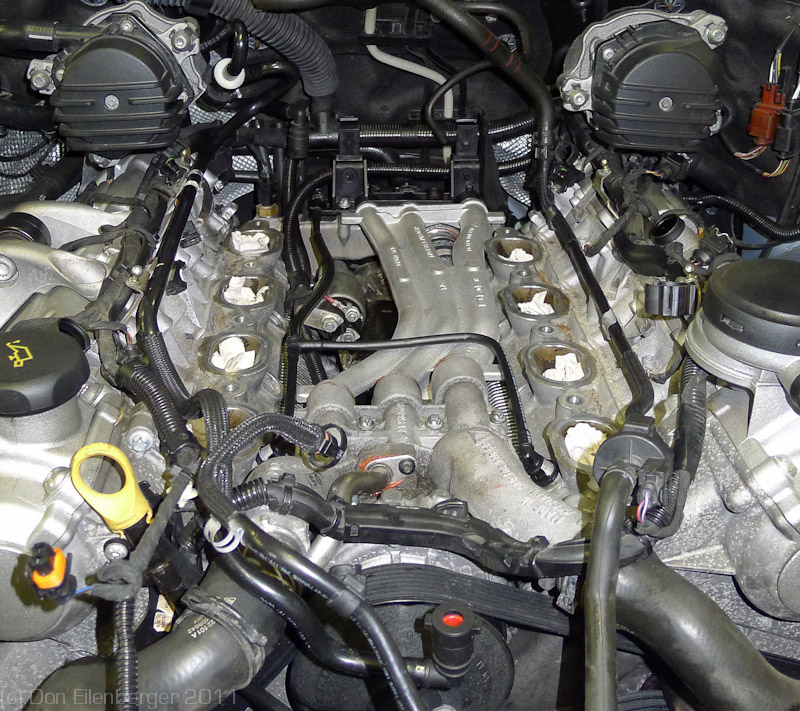
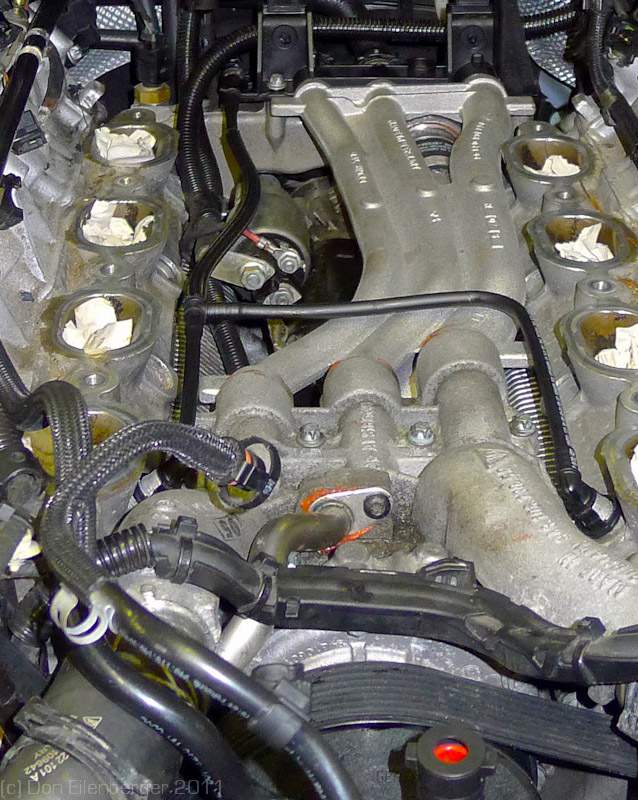
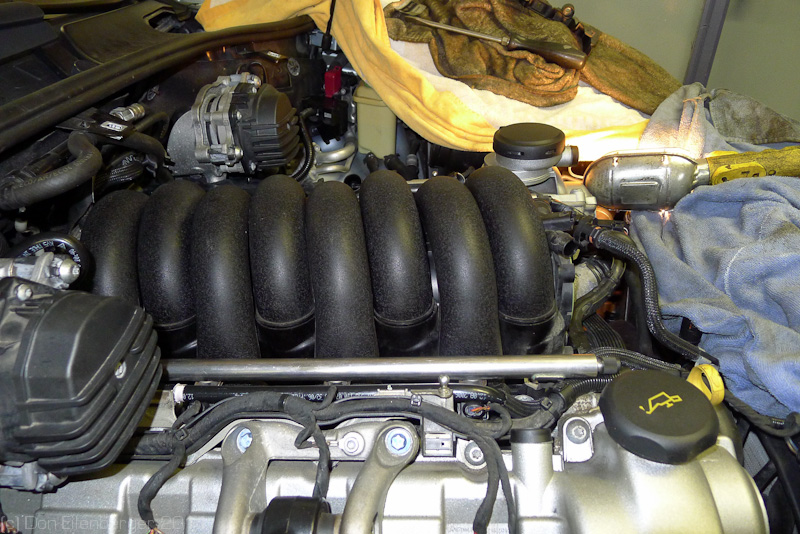
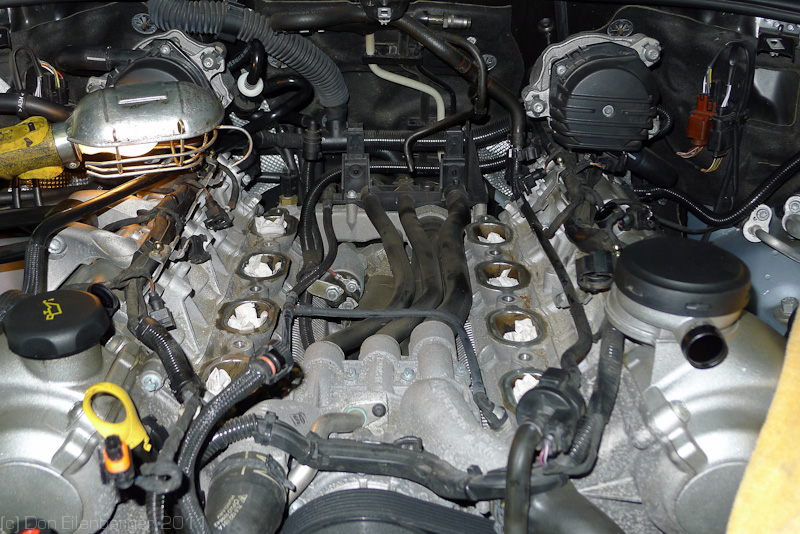
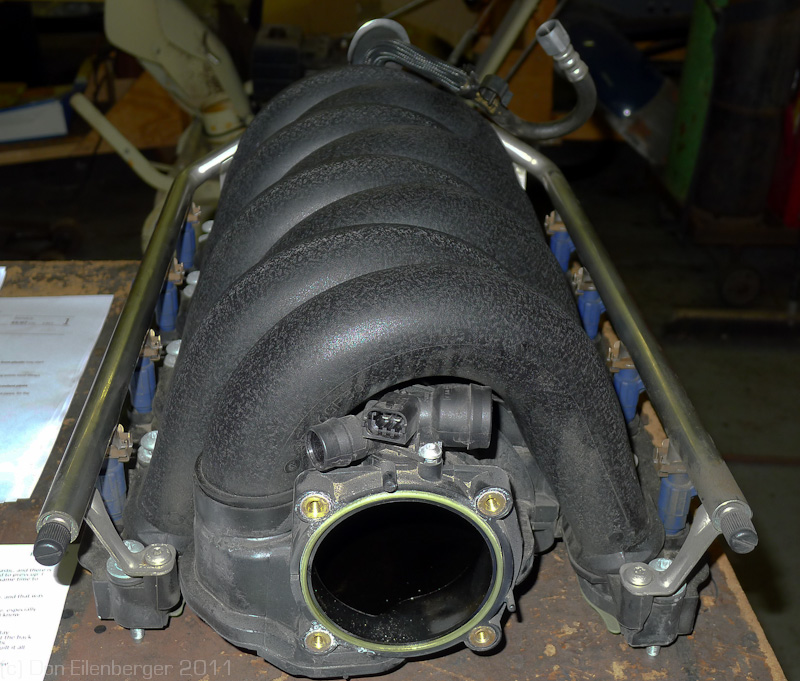
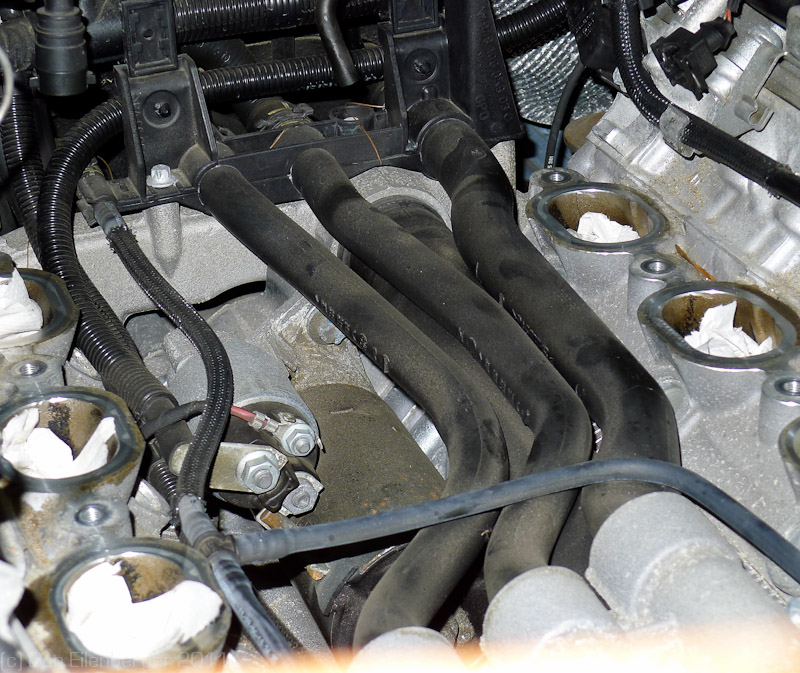
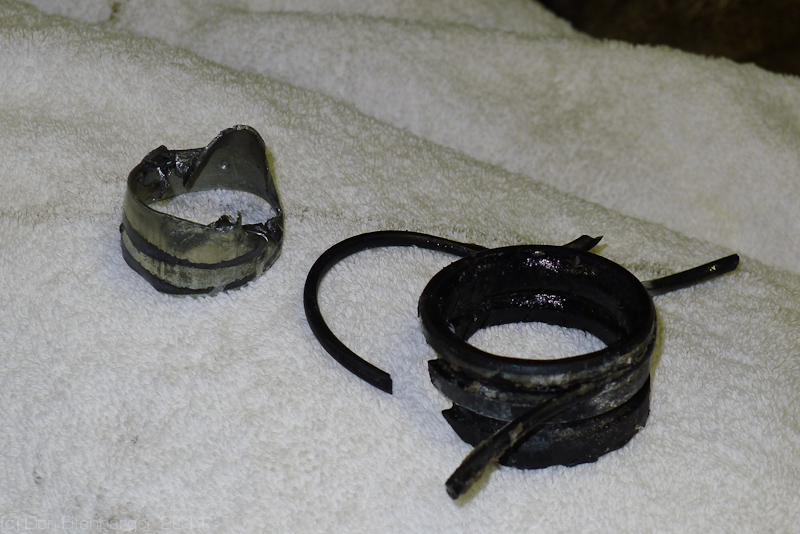
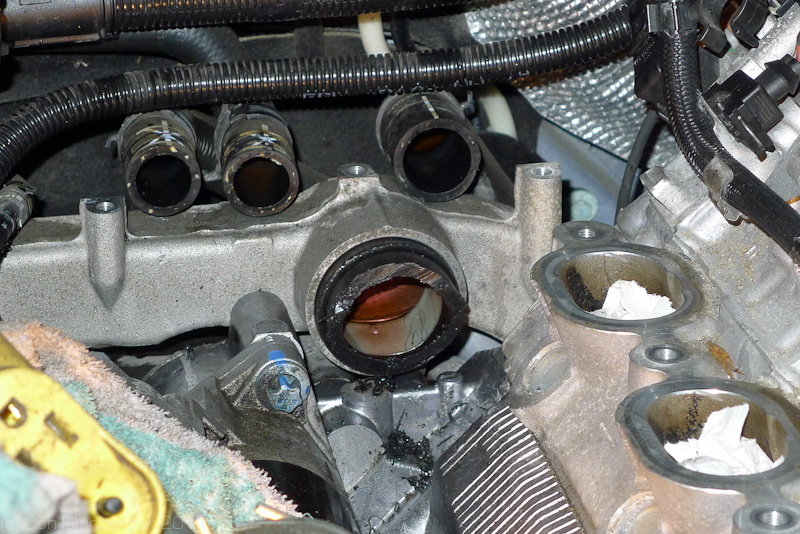
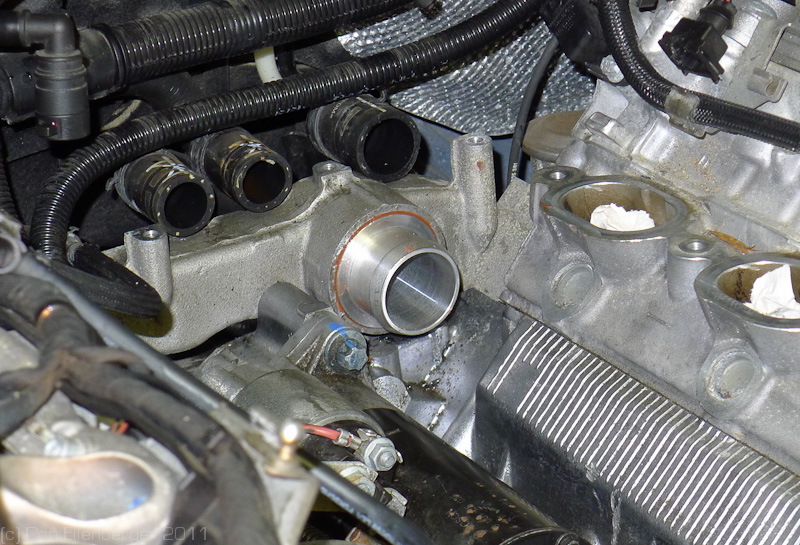
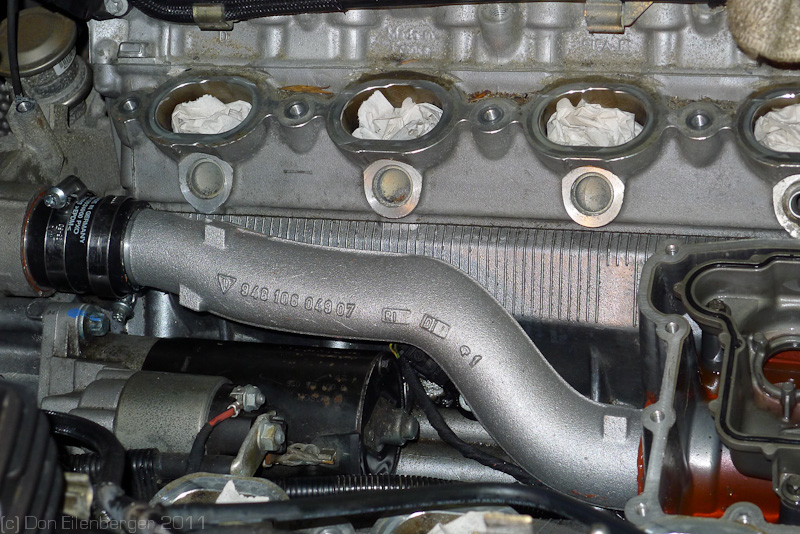
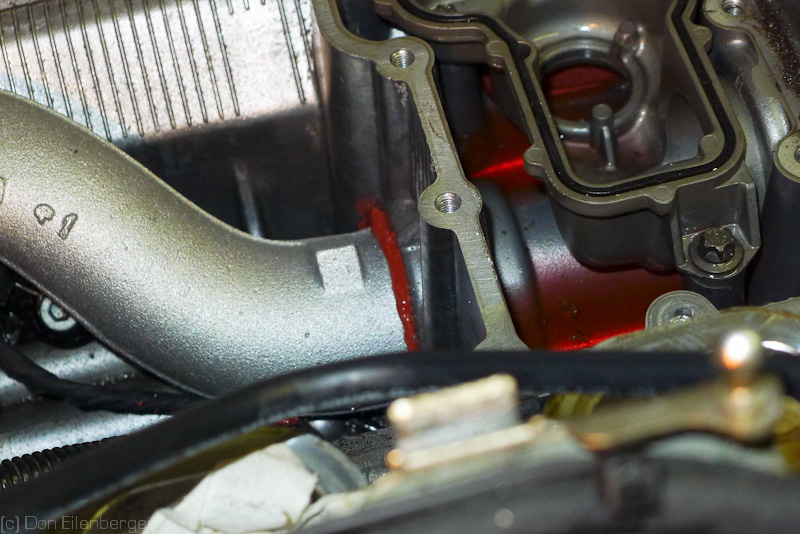
The next morning, by the time I got to his shop - my mechanic friend had the intake manifold removed and out of the way. Fuses 13 & 14 were removed to disable the fuel pumps (check your vehicle fuse listings to make sure it's the same ones on your truck), the fuel line disconnected, a bunch of hoses moved out of the way, the Y pipe, MAFs, and intake throttle body were all removed, followed by the manifold with the fuel rail and injectors left attached. The intakes were stuffed with paper towels, and deeper surgery is about to occur. First a view of the existing pipes: Look good don't they? There were no leaks, the pipes were still resiliant (not brittle) and all looks well. The manifold sitting on a bench.. the bolts are captive so no fear of loosing one down an intake. You can see the fuel line connection on the other end of the manifold. Closeup of the old pipes: After cutting off the ends of the top pipes near the thermostat housing cover: Sorry - No shots of the big pipe cut up - and drilled and attempted removal. It's not coming out without a lot of force and bloody knuckles. The rings used to reinforce the ends of the plastic pipes are thick stainless, and don't give up without a fight. Once those are gotten out (using chisels and screwdrivers and large pliers) the plastic bit pulls out fairly easily. This is what was left of the end that went into the thermostat housing: The other end still in the cylinder-heat cooling manifold: And after removal (and cleaning up of the bores) - the first NEW fitting goes on the engine. Note the RTV used along with the new O rings to make certain there are no leaks. While the old pipes looked good - the O rings looked less good. There was dried coolant between the two O rings, meaning the innermost one had started allowing coolant past. I would guess that before long the outer one would have also deteriorated to the point of allowing leakage. I think this is simply an age/heat/time thing. The hope is - the RTV sealant will help seal this joint even better, and the aluminum pipes should never need removal. The other end of the big pipe in position with the rubber stub still back on the pipe: The pipe in position, with clamps holding the rubber hose stub in position. The end of the big pipe that goes into the thermostat housing - also sealed with RTV and the two O rings.
-
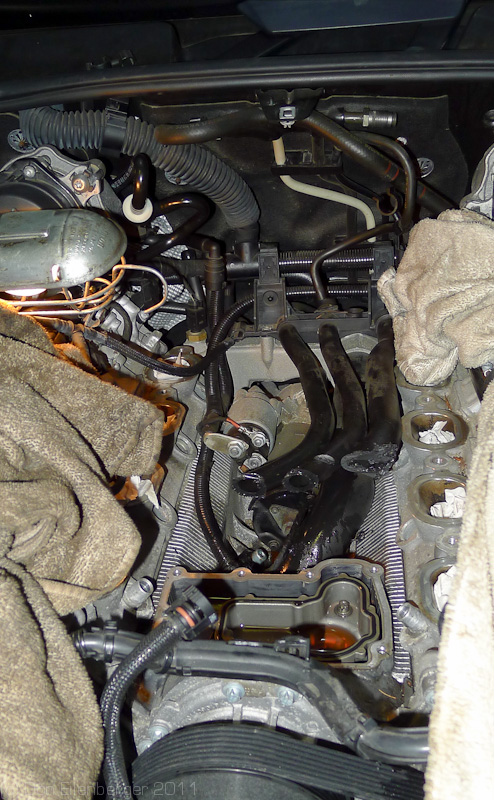
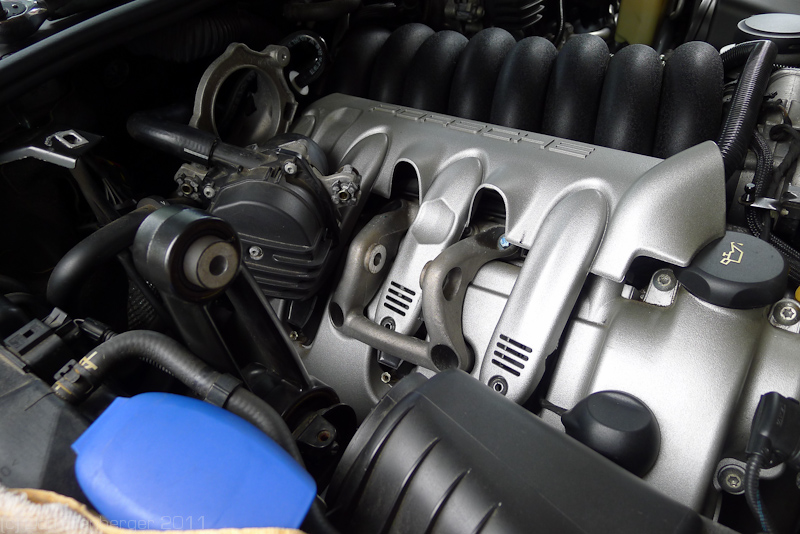
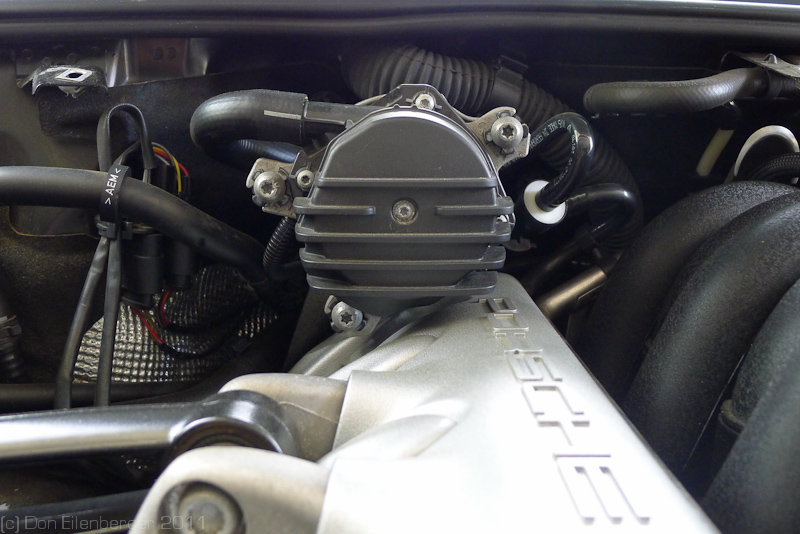
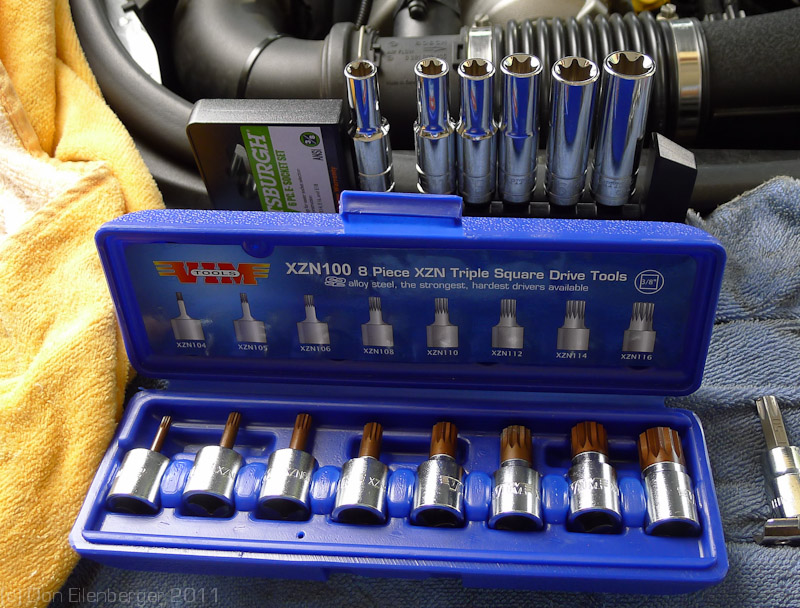
The continuation of day 1 - plastic removal.. Using the Triple-Square driver to loosen the engine brace bolt. The other end of the bolt has a 16mm nut on it. Use Loctite BLUE medium strength when reinstalling it. Brace moved out of the way. The nut on the body side must be loosened to swing it up. Loosening the air-pump mounting so I can pull it up just a bit: This takes an E-Torx-10mm (external Torx 10mm). Which allows me to wiggle the plastic beauty cover out from under the brace-mount. This cover comes out at an angle, and feels like it is going to break. So far it hasn't. The factory service manual shows exactly this technique for removing it. If it didn't look a bit crude, I'd leave both valve-cover beauty plastic covers off.. engine would probably run cooler, be lots easier to do coil/plug swaps and wouldn't have this chore to do whenever you want to get to anything: And that was the end of day 1 - it took about an hour to get to this point. I refastened the air-pumps to their brackets, making the truck driveable, took it to my mechanic to leave it sit overnight and cool off so it could be worked on the next day.
-
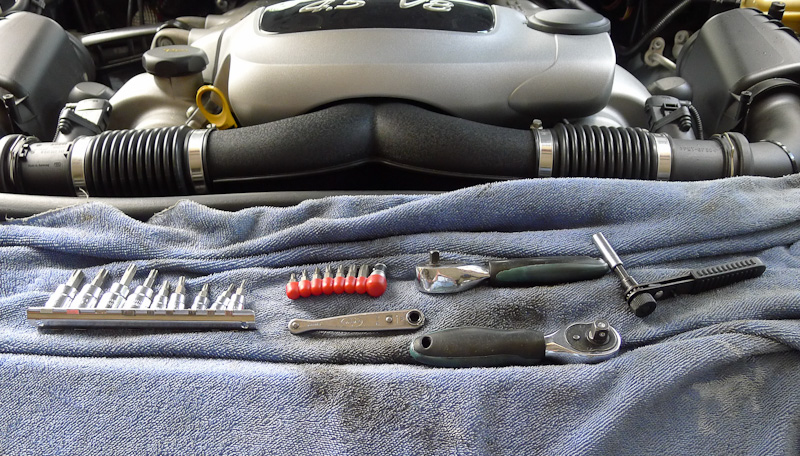
Thought I'd add some images to this excellent DIY: Tools and impliments of destruction: The tool on the right is a Chapman ratcheting hex holder from a Chapman tool set. I have several of these left over from decades ago, and find them about the most useful tool I own. The ratchet accepts standard hex/torx/screwdriver 1/4" hex-drive bits, and accepts a magnetic extension. Hard to beat for removing the multiple Torx fasteners used on the P truck. Area prepped for initial exploratory surgery: Gotta remove this screw (T-10): Plastic decorative panels removed: Passenger side air-pump - remove: Driver side air-pump, remove from bracket: Using Chapman tool with torx bit and extension to remove decorative cover screws: Chapman tool in tight quarters - no extension used: More tools needed: E-Torx and Triple-Square drivers"
-
Dog helps those who.. :P
-
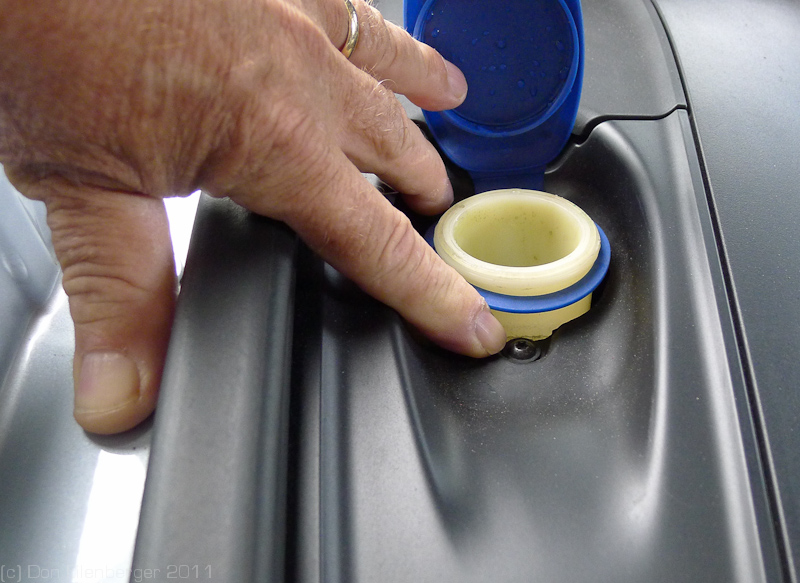
I've been keeping an eye on my coolant level all day, and smelling the engine compartment.. :unsure: Yesterday I drove it about 30 miles locally, then let it cool and checked the coolant. It was right at the minimum ring on the level indicator. I topped it up to the MAX ring. The difference is about a pint. After running it today, I checked and when hot it was about 3/8" above the max line (but not up to the cap level where it would burp out..) From reading the service manual on cooling - they show the level ring being read when the coolant is cool, so I'm guessing my level is OK. Went about another 40 miles today, and no signs of any leakage I can see. I could smell coolant evaporating a bit this AM - but that isn't a surprise since the valley under the pipes is actually rather deep, and looks like it can hold a lot of coolant before overflowing to the bell housing area. There was some coolant that remained in the valley after changing the big pipe out, despite my best efforts at sucking it up with rags and paper towels.. so I think that's what I was smelling evaporating today. Since this was well below the level of the starter it wasn't a big concern. The smell greatly diminished as I used the car and then ran it through the local carwash (which ate my rear-wiper arm.. another story..) Didn't smell anything at all when I got home from dinner out (Fatheads day!).. ----------------------------------------------------- Interestingly - I found a repeated warning in the service manual section on cooling - to not open the system when hot (not an unusual warning - due to fear of scalding) - but also warning to let the system completely cool off before closing it IF it is opened when hot. The claim is made that "severe damage to the cooling system components" could occur. The warning has me totally baffled. The service manual describes using a vacuum system to bleed air from the cooling system (first evacuating the system, then injecting coolant into the under-vacuum system) so I can't see any slight vacuum formed as the coolant contracts when it cools being a problem, especially if the reservoir coolant cap is working correctly (it's supposed to let air INTO the system when a vacuum forms due to cooling.) It's a very puzzling warning to me.. Update - I asked my mechanic about this warning, he said he's seen it before. Apparently if the system is closed and the engine started before cooling off an air bubble can form in the system due to the minor vacuum pulled on the system. If the air bubble happens to be someplace like the water pump - this can cause rapid overheating due to the lack of coolant circulating. Update 2 - Wiper arm. As is not uncommon, it broke off in a car wash (despite being taped down.) Kudos to Rain Tunnel car wash on Rt 71 in Bradley Beach NJ and the owner Mike Conti. I contacted him this AM from the car-wash, and he immediately came down. He saw the truck, and said "We have to fix that.." He had the local Porsche dealer on speed dial and was friends with the service manager - turns out he has owned several Porsches. He said to the service manager "I'm sending a customer with a Cayenne-S down, fix his rear wiper.. and charge me." He then handed me a number of complimentary free car-wash coupons. I went to the dealer - they replaced the arm and the wiper, and said "Thank you for letting us serve you.." All around - a quite pleasant experience. I highly recommend Rain Tunnel Car Wash in Bradley Beach, it's owned by a decent and reputable businessman!
-
BTDT - and they did share the CPO warranty claims they did on the car.. but none of the original owner's warranty info. I have a friend... so maybe I can get that info..
-
Good to know. I've examined mine - looks newish. No rust on it, paper PN tag on it, rubber mount looks fine. No record of it being done, but I have no records from the first owner, only records from the second owner who bought it CPO and then sold it 8 months later at a very substantial discount. I'm still taking the spare bearing with me when I drive to California and back.. :)
-
Other points to concern you are: 1 - Driveshaft (although it isn't clear to me this is a problem with the '06 model year. Porsche changed the PN quite a few times, and my hope is - that was because of an improved design/construction.) There are some DIY's on rebuilding the shaft yourself with an $80 replacement bearing, or you can buy rebuilt ones from one of several vendors (claiming to be better then the original) for about 1/2 of Porsche prices on it. 2 - Coils. They can go bad. Not an awful thing - an owner can replace them (it's a PITA, but you CAN do it.. you do need a few special - but inexpensive - tools.) Porsche has a extended warranty on coils they replaced under warranty, or - and this isn't clear - they may be warranting ALL the coils. Only Porsche and their dealers seem to know for sure. You might ask the seller about these items. Other then that - the beasts seem pretty much like any German car. You can expect oddball electrical stuff. It's good to buy a Durametric code reader. Overall the build quality seems superior to BMW, and perhaps Mercedes, and certainly Audi/VW. Running costs - it has a reputation for eating brakes/tires - but I suspect a lot of this is related to driving enthusiasm. If you're a DIY - lots of aftermarket brake options are available at much less cost then from Porsche. If is a big HEAVY vehicle so fuel mileage isn't great - mine does 13-14 around town, up to about 16 on occasion. On the highway, at 75MPH with cruise control set - it will top 20MPG. It's comfortable, drives much lighter/smaller then it is (and then most SUVs.) Oil change is 8-9 quarts of Mobil1 0W-40, and a $20 filter. 60k service is a DIY if you're a DIY'er - nothing too horrible. Plugs are $$$ at a dealer, and can be found for about $5-6 each on Amazon (same identical Bosch plug.) Ditto on air filters and the cabin filter. The PPI is an excellent idea. I just completed the cooling pipe replacement on mine, I'm carrying a spare driveshaft center bearing and a spare coil in the spare-tire well. My law of spare parts ("You'll never need what you have..") should make those parts unneeded.
-
Thanks much for the DIY - it was used extensively today. Did the job today with my friendly independent (I hold the light, hand tools, pull on things when needed, bring coffee...) This is a fairly intense job. Unless you're a dedicated DIYer - I'd look for some professional assistance. Biggest ugliest part of the job is getting the old big pipe out. That alone took about 3 hours. The rest of the job isn't awful - just a lot of dissembling and reassembling. I can't emphasise how big a PITA it is getting the stubs of the old pipes out. I thought about the possibility of some sort of puller (like an expanding internal bearing puller) to pull the **** things out. Wonder how the Porsche techs do it. Did find enough corrosion on the openings where the new pipes go to see that the primary O ring had allowed some coolant past, and it was just the secondary ones that were preventing leaks. There were no leaks, which was a good thing, and the pipes actually weren't at all brittle (actually they appeared just fine..) The small pipes weren't a big problem to remove from the thermostat housing cover - used a vice and some big channel locks, and twisted/levered them out. Because of the corrosion in the bores (which we cleaned up as best we could with sandpaper) we used RTV sealant on all the fittings as we reassembled, except the short rubber tube that seals the two halves of the big pipe - that got the Porsche magic $25 grease. It's sitting overnight to let the RTV set up and will be pressurized and finished filling it in the AM. It would mean it would be more difficult to get apart if it needed it - but knocking on wood - I hope it never does. I took a bunch of photos which I'll post with some comments when I have a chance to download them and do a bit of editing. Items missing from the kit I bought (Sonnen Porsche.. the $350 one on their website): the O ring for the small metal pipe on the front of the thermostat housing cover. Used RTV on it. The intake manifold gaskets. The magic grease. A seal fo the throttle-body to intake manifold. And of course the horribly expensive Porsche coolant (which is probably relabled GM stuff..) And the hose clamps for the short length of tubing connecting the two halves of the big pipe (size is 30-40mm). Possibly unneeded: The bracket for the heater hoses - old one and new one looked IDENTICAL despite having a new PN; the emissions hose that goes over the top of the pipes - we replaced it since we had a new one, but the old one looked perfect.
-
Sounds like you didn't use the triple-square (12 point) "spline" driver that's needed for the bolts. To get the torque-arm out of the way, you remove the bolt going through it on the engine end, loosen the bolt on the body end and then swing it up out of the way. The bracket mounted to the engine.. this unbolts, but you DO need the special drivers to remove it. The bolts may appear stripped out, but the design has a very shallow (and many) recesses in it, which requires the special wrench/driver to remove. Trying to do it with torx or allens isn't gonna work. BTW - if the bottom bolts were stripped out, chances are excellent it's the threads in the valve cover that are stripped, not the bolts (the bolts are steel, the valve cover is aluminum.) While it's sloppy on the part of the dealer not to drill and helicoil the stripped out threads it's also an expensive job, and they may not have wanted to do it without your express consent (the other choice is to replace the valve cover - very large $$$.). The mechanic may have just tightened them up as much as he could and left it that way, which means the bracket may have been R&R'd, and all your plugs and coils may have been installed.
-
Looks great. This job will be done on my S this week hopefully, I'll bring my camera along and perhaps try for some shots to use to illustrate it. :thankyou:
-
Actually - I did ask: http://www.renntech.org/forums/topic/36895-coolant-pipes-recommendation/page__view__findpost__p__200292 the answer I got was there was a T - which there isn't on non-turbo engines.
-
FWIW - the "kit" from SunCoast is much more complete. Looks like all it's missing is the tube'o'grease: http://www.suncoastparts.com/product/PKCAYPIPE.html?Category_Code=955sWaterCooling
-
Indeed most people would - but it must be a language problem. We aren't communicating. The question is - is the latest version BETTER and IMPROVED over the original one(s)?
-
Someplace in this thread it had been stated that the NA V8 also had a T in that position. I ordered the part that was designated as the T (with the extra outlet blocked off) when I ordered the coolant pipe replacements from Sonnen. There is NO T on the non-turbo. What I received is a simple formed coolant hose. Luckily it only cost me $10 for that error, but I hope this helps others to avoid making the same wasted purchase.
-
I ordered this "kit" - and found parts ARE missing: 1 - Hose clamps for the short stub hose to join the two parts of the big pipe. PN: 999-512-389-01, cost at the local dealer - $6.78/each - total $13.56 2 - The assembly grease "Synthesto Glep GR" - PN 000-043-204-68, cost at the local dealer - $24.73 (I think the grease is multipurpose, wish they'd used it when they sold me the antifreeze.. ) 3 - Intake manifold gaskets. Dunno about you - but when this sort of gasket is disturbed I figure on replacing them. "Intake Distrib G" - PN 9480110-145-01 cost at local dealer - $31.64/each - total $63.28. 4 - Antifreeze. Not planning on using the old stuff over, and didn't expect it in the "kit" since it would be costly to ship. PN 000-043-301-05 "Antifreeze 3.7" - cost from local dealer $44.24/each - total for 2 gallons - $88.48 (WOW - and they didn't even kiss me..) Total from the local dealer was $190.05 + tax = $203.36 The "kit" from Sonnen was $396.97 - PLUS - $50/shipping. The shipping cost seems excessive to me since it was shipped in a flat-rate FedEx box. Dunno how much it cost them - it does appear they ship with 3 day delivery, so that can be a bit expensive. So far - the total is $600.33. Hopefully that's all the parts it will need. I also saw in a thread here that there is a T fitting at the rear of the engine that should be replaced. It was suggested in the thread that this be replaced when doing the pipes. I used PET to look it up - and ordered that from Sonnen with the rest of the stuff. Cost at their price was about $10.00. Thing is - there is NO T fitting on the '06 CS - what appears in PET as a fitting with two hose stubs attached (and the outlet of the T blanked off) is actually just a hose. Straight through. No plastic T at all. Don't waste your money.
-
Sam, I don't think anyone here can tell you IF you can return the car since you've given no details of the purchase contract terms. There is a sales term known as "AS-IS" - meaning you bought the thing with all warts/problems/etc, known and unknown. If that's part of your purchase contract - unless your state has a law (and lots do) allowing you to cancel a purchase within ## hours - you are screwed. If your state does have that sort of law - you must notify the seller within so many hours - and I would want to do it in a way that can be traced, ie - certified mail, a sherrifs deputy, whatever. In this case you're asking for advice on an item you spent some considerable sum of money on - and you're gonna do what people on the Interwebz tell you to? BAD idea. It may be time for you to visit a professional - like a real life in person lawyer. It might also be a very good idea on your next purchase if you pay to have a PPI done (Pre-Purchase-Inspection) by the Porsche dealer on any other used vehicle you might consider, since it would seem like non-working AC would be obvious even to a casual browser of a used vehicle.. again a case where professional help might save you a buncha'money. Good luck!
-
Latest part number for 06 Cayenne S is 955 421 020 15. Found that - guess I wasn't clear. Has Porsche actually changed/improved the parts or is the newest the same old crap with a new PN?
-
An interior latch release would be useful for when a valet/porter is trying to unload luggage. The button for the fuel door - useless IMHO. Guess that's why BMWs have the interior rear-hatch/trunk-lid release button, and no fuel door release (the fuel door unlocks when the car is unlocked.)
-
Anyone know the parts succession on this? In looking at my VIN# against the cardan-shaft - there are 6 different ones listed as being for my VIN. If I had to guess - Porsche/VW changed (perhaps improved?) this design quite a few times..
-
?? I've never felt insecure with the car unlocked - if I do - I lock it. And what are little kiddies going to do with an unlocked fuel door? They can't drink from it.. are they inhaling fuel vapors? Color me confused in NJ.. :rolleyes:
-
I think we are talking about two different things. There is power assist closure (which is where the latch assembly pulls the tailgate fully closed once it's engaged) and power open/close (where the tailgate can be opened or closed using power.) There is no button for power assist closure, although it appears that some models did get buttons for the electrical latch release in the drivers door pocket (along with a button for the fuel door.)
-
If the car is unlocked - the fuel door is unlocked. Press on the trailing edge and it pops open. And it doesn't lock with the auto-lock for speed - it only locks when you lock the car with the key (button or in the door.) Just like my BMWs actually. Seems much simpler then having to press a button to open the fuel door.
-
Update - the Cayenne now has a backup camera. "installs on vehicle in just minutes!" HA! :eek: - that's true if you count about 300 minutes as "minutes".. Start to where I am now - about 5 hours. Advanced Auto sells several by Peak (the antifreeze makers).. I picked the one with the smaller display (2.5") since it would fit in the sunglass cubby - it's wireless and consists of a camera assembly, a transmitter that hooks to the camera output, and a reciever/display (with the 2.5" color display.) Cost is about $80, Having installed it (and tomorrow gonna finish cleaning up the installation) my recommendation is - don't. What a PITA job. :censored: Dunno what Porsche(VW) was thinking when they designed the interior - each and every panel I had to take off was held in place by a multitude of impossible to release fasteners. The typical fastener is an expanding steel one mounted to the panel that goes into a corresponding hole in the body. The dogleg panel in the luggage area where the small (3" or so) speaker is located has at least 12 fasteners holding it in place. That's just plain crazy. The fasteners do not want to release from the body and many of them pulled free of the plastic mount on the panel. The tailgate carpeted liner - well - that one is also crazy. There are three rows of the fasteners.. the bottom ones are the most difficult to get out. There is no way to really see where they are located, I ended up pulling out the red and white lights that are in the panel and working by feel. I also removed the trim around the latch assembly - since there is a fastener there. I ended up with a license plate mount camera. Not terribly attractive (part of tomorrows cleanup is remounting it to a black license plate frame I have.) I did end up having to drill a hole for the wiring behind the license plate. Luckily I have some tiny metal hole saws, so the hole was as small as I could make it, and the metal was cleanly cut. I then treated the edge with paint to prevent rust, and used a body-panel plug that seals tightly against the sheet metal to seal it after putting a hole in the center of the plug for the wiring. The wiring goes from there over to the right side (facing the back) where I passed it through the grommet that one wire bundle came out of behind the black trim wiring duct on the side of the tailgate. It's secured to the wire bundle in the duct with tiny tie-wraps. It goes from there to the hinge assembly. There is an extension of the duct that covers the hook shape bit of the hinge - and no way I could find to fish the wire through it, so.. it ended up being tie-wrapped to the side of the duct for that short distance. Seems to clear everything fine. Next the wire goes into the roof area. There is a large rubber seal stuck to the roof that seperates the hinge area from the interior of the roof (this is found after removing the trim that goes from the headliner back to the opening - that has the trunk light in it..) That trim was also a PITA since it had 15 fasteners (3 rows of 5.. talk about overkill..) to remove. I was able to work these out by starting at the back, using a big screwdriver to lever each fastener out of the inner body. I poked a hole in the rubber seal and fished the camera wire through it, then sealed it off with some self-adhesive rubber that I have. Next it routes down the C pillar around the dogleg at the back end of the rear side window and down to the chamber where the Bose amp and the CD changer live. This also has the wiring for the brake light assembly running through it, so it was a natural place to grab the power for the transmitter for the camera. I mounted the transmitter above the opening for the compartment behind the plastic liner with some super velcro, plugged everything together, hooked up the power and tried it out. It works. Reasonably well actually - gives a nice view of the area behind the vehicle. It seems to work OK at night just by the light from the backup lights. The receiver/display is suction cupped to the windshield at the moment. Tomorrow I'll start thinking about pulling the overhead console to mount it in the sunglass cubby and power it off the Homelink power feed. The receiver has a standby mode - where nothing is displayed until the receiver sees a signal. Put the truck into reverse, the transmitter powers on, sending a signal that turns on the display and you have a image of whats behind you. There are wedges provided with it to mount the camera to a sloping license plate mount. I found one set of wedges worked well with some extended bolts for the bottom license plate mount. The upper won't work since it would block the tailgate release switch. On a scale of 1-10 PITA jobs - it ranks right up there at about an 8 - mostly due to German overengineering.. I've found the same thing on BMWs - an excessive number of fasteners for interior panels make it a real job to get to stuff. I'll take a few photos of the finished results tomorrow. I was going to take DIY photos for the job, and quickly decided not to since I wouldn't want to encourage anyone to tackle this particular job.