Welcome to RennTech.org Community, Guest
There are many great features available to you once you register at RennTech.org
You are free to view posts here, but you must log in to reply to existing posts, or to start your own new topic. Like most online communities, there are costs involved to maintain a site like this - so we encourage our members to donate. All donations go to the costs operating and maintaining this site. We prefer that guests take part in our community and we offer a lot in return to those willing to join our corner of the Porsche world. This site is 99 percent member supported (less than 1 percent comes from advertising) - so please consider an annual donation to keep this site running.
Here are some of the features available - once you register at RennTech.org
- View Classified Ads
- DIY Tutorials
- Porsche TSB Listings (limited)
- VIN Decoder
- Special Offers
-
OBD II P-Codes - Paint Codes
- Registry
- Videos System
- View Reviews
- and get rid of this welcome message
It takes just a few minutes to register, and it's FREE
Contributing Members also get these additional benefits:
(you become a Contributing Member by donating money to the operation of this site)
- No ads - advertisements are removed
- Access the Contributors Only Forum
- Contributing Members Only Downloads
- Send attachments with PMs
- All image/file storage limits are substantially increased for all Contributing Members
- Option Codes Lookup
- VIN Option Lookups (limited)


tunetec
-
Posts
14 -
Joined
-
Last visited
Content Type
Profiles
Events
Forums
External Paint Colors
Downloads
Tutorials
Links Directory
Collections
Store
Everything posted by tunetec
-
997.1 facelifting question
tunetec replied to seskiyapan's topic in 997-1 Series (Carrera, Carrera 4, Carrera 2S, Carrera 4S)
Yes those are the heat sheilds but the bottom of the bumper wraps around the bottom of them and the screw holes are in a different place. I believe the plastic solid parts on the heatshields are a different shape hence the new bumper stretching over them rather than sitting flush. Some bits have to be cut off or modified, its not ideal anyway. -
997.1 facelifting question
tunetec replied to seskiyapan's topic in 997-1 Series (Carrera, Carrera 4, Carrera 2S, Carrera 4S)
If you have a centre rad then the middle vent is just a clup in trim that leaves the front open for ventilation, it is different to mine which is solid with deflectors left and right. -
Oil leaks
tunetec replied to brendel's topic in 997-1 Series (Carrera, Carrera 4, Carrera 2S, Carrera 4S)
Had same oil leaks on mine. Main culprit for most things covered in oil was the drive shaft seals as these will spray out oil in wider locations. As the last post mentioned best to get up on ramp and clean underneath with brake cleaner, degreaser etc and then check again in a few days time. If your drive shaft seals are leaking check soon as you dont want your transmission to run low on oil. Mine was leaking at sump oil plug and also oil pressure plug location as well. Had issue with coolant drain plug as well, think it was all caused by salt and corrosion from off the road. New washers fixed this fine, easy job as well, RMS still has slight weep but not major enough to change just yet and doesnt drip on the floor. -
That is funny, one of the old school mechanics I know who is over 70 years of age used to put paving slabs in their older 911's in the day to stop this.
-
Hi , I am little late jumping on this thread but have the exact same problem with my 2005 C2S. Very light and twitchy on the front, any bump or groove in the road will try and pull it from side to side. Speeds over 100mph start to become quite twichy and i will be holding on to the wheel pretty firm. After reading the other threads I am starting to think the tyres may be contributig to this as the car seemed fine before having the wheels refurbished. I had all four wheels refurbished not long back, had brand new rear tyres fitted but put the fronts back on as not worn as such. Like a fool i never marked which tyre was N/S or O/s and although the Pirellis aren't directional tread pattern i'm thinking i may have the tyres on the wrong sides. This shouldn't really make any difference as both wheels were balanced properly and directions are correct. The only thing i am thinking is if they were the wrong sides and the tyre wear was fractionally out then the wheels could be toeing in more than before. I guess i need to swap the tyres back over but now living in Melbourne australia and not been able to drive much over 80kmh not had the need. Think i will see what happens when i put new tyres on the front again. Also have the same knocking/bumping sound coming from front suspension/tyres from cold. I am too thinking this could be the Pirelli P Zeros compound as had exactly the same feeling from a Ferrari 360 i had, all front ball joints were fine but still felt hard on the front.
-
Alternator packed up on my C2S as well. Could have got away with just a new regulator, most common fault if still kind of working. However once it was out i had the whole thing rebuilt with new bearings, regulator etc from Auto Electrics shop, came back like brand new, 120 UK pounds, worth the money.
-
997.1 facelifting question
tunetec replied to seskiyapan's topic in 997-1 Series (Carrera, Carrera 4, Carrera 2S, Carrera 4S)
I actually used some hosing off another car, think it was a Mercedes, its all the same diameter, chopped it up and extended the existing piping. If you speak to your Porsche dealer they can sell it you in a length it is standard washer hose be the same for all the porsche models i guess. The hose fixes in the bottom part of the bumper at the bottom, fit you grills first and then locate it in, its a bit of a tight fitting thats why its best to get the lenght correct before fitting properly. To put the metal strip back on the rear bumper is a couple of small rivets, you can do it with a hand rivet gun, easy to do. If you haven't got one you can buy cheap from hardware DIY store, in fact in the UK you can buy them fromt the cheap pound shops. The heatshieds have fixings in them that the bumper attaches to. As the Gen 2 bumper has locating holes in a different place the existing heatshields dont fit very well and protude slightly. Cant remember off the top of my head the price of them but they weren't that expensive may be 100 pounds per side. Personally i would change them as you dont want the bumper bulging out at the sides or a view of the heatshield with bits cut out. It will still be visible even when the car is on the ground, if you look at yours now you can see them behind the back wheels. -
997.1 facelifting question
tunetec replied to seskiyapan's topic in 997-1 Series (Carrera, Carrera 4, Carrera 2S, Carrera 4S)
The front of the car, looks a lot better. Thing is then need Gen 2 wheels and wing mirrors, where do you stop though lol
-
997.1 facelifting question
tunetec replied to seskiyapan's topic in 997-1 Series (Carrera, Carrera 4, Carrera 2S, Carrera 4S)
One thing i missed off, exhaust pipe trims for the bumper, these aren't cheap £60 each!!
-
997.1 facelifting question
tunetec replied to seskiyapan's topic in 997-1 Series (Carrera, Carrera 4, Carrera 2S, Carrera 4S)
1) You have to replace the whole washer jet it is in a complete unit it is not just a pipe connected to the top bit that sticks out. The jets are about 4 inches long and lock in to the bumper complete in one unit with a chrome top. The hose is standard washer jet hose about an inch in diameter. The existing can be used vou need about another 2 feet of hose and a t piece adaptor to make it all fit properly. The hosing was the only part that needed to be fitted properly because the air scoops behind the bumper have a recess for the pipe. The rear bumper at the bottom centre between the exhaust pipe holes has a slide on metal strip where a screw locates it to the bottom of the car. This is pot riveted on to the bumper. You will need to take this off and fix to your Gen 2 bumper. You could trim the heat shields but the Gen 2 bumper locating screws are in a different place than the Gen 1 so it will need modifying a bit. Also as the back of the car is pretty open to the eye, no inner wheel arch trims it may look a bit ugly and defeat the whole idea of upgrading to the newer spec. -
I have a 2005 C2S and when I got in the car the other day the climate control wasn't working properly. Turned settings to low and although the fans started up no cold air so checked a few things and decided best thing was to get regassed as Compressor seemed to be working ok. Had the gas topped up slightly and had cold air again but only for 2 days. However, climate on low temp settings is now making a whining/hissing noise from under the dash, passenger side n/s UK car. It is like a sucking hissing noise of varying pitches and now increases at higher revs. The low temp is very slightly cold so i'm presuming not entirely out of gas. Question is do you think there is leak or another problem from under the dash where the air con internals are? One thing i have noticed for a long time prior to this happening is a ticking/clicking noise coming from the same area under the dash, almost like the sound of a flap or valve constantly opening and closing. Should I have the gas emptied and refilled from scratch with some dye and new oils to see if this will overcome the problem. I guess if the gas is going low i have a another problem somewhere else.
-
A good PDR guy would make that perfect with the glue removal technique. They can glue a small pad to the dimple and slowly pull it out from the outside. They would then reshape any high spots with a wax or aluminium tapping tool. I had a dent twice as big as that in the same place and now you wouldnt know it had even been there. Don't worry the glue process doesnt pull the paint off. Make sure you get a good PDR guy to do this as some better than others. Dent Craft trained guys from the states good place to start, their equipment quality.
-
997.1 facelifting question
tunetec replied to seskiyapan's topic in 997-1 Series (Carrera, Carrera 4, Carrera 2S, Carrera 4S)
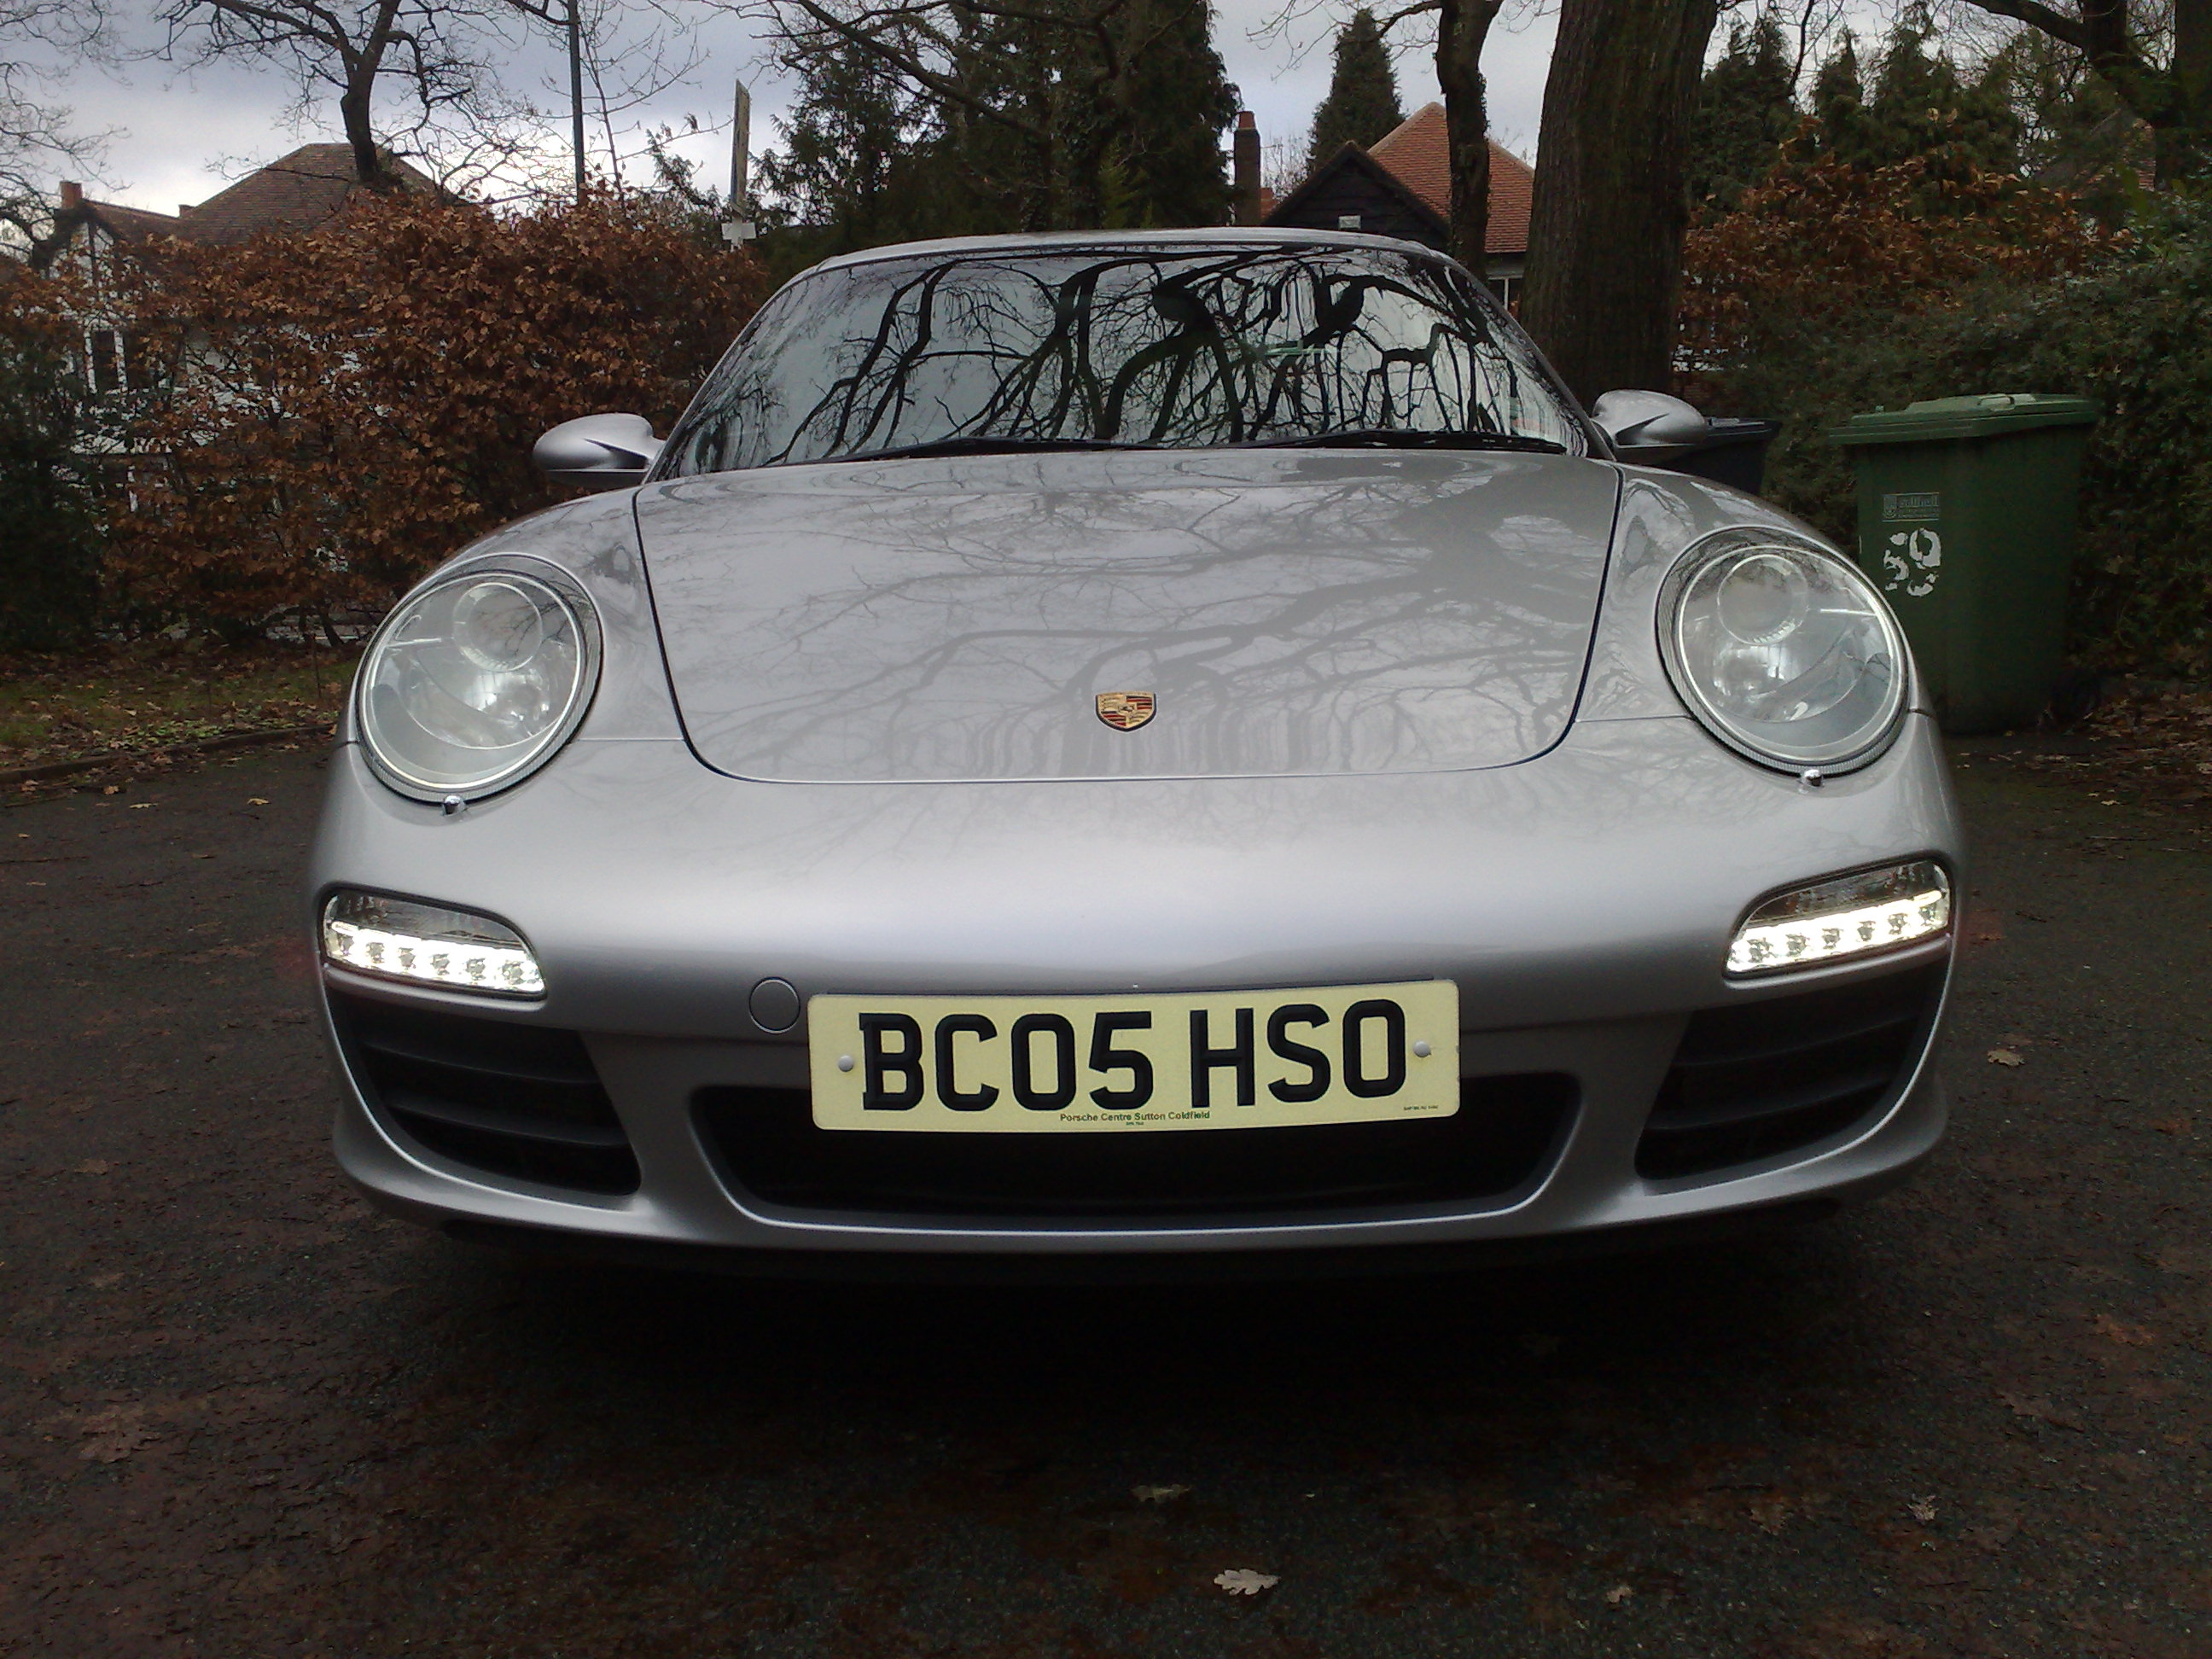
I did front and rear conversion to my 997 C2S, in short bits you will need, no part numbers i'm afraid: FRONT BUMPER BUMPER GRILLS , LEFT AND RIGHT AND CENTRE SCOOP (CHOICE OF 2 BETWEEN AUTO CAR WITH CENTRE RAD AND MANUAL) NEW WASHER JETS X 2 (OLD ONES DIFFERENT SIZE AND CANT BE MODIFIED) NEW WASHER HOSE - OLD HOSE ISN'T LONG ENOUGH AND NEEDS MODIFYING TO COMPENSATE ANGLES OF NEW JETS. BUY NEW LENGTH FROM PORSCHE BEST, THIS IS THICK HOSE INSIDE RADIATOR SCOOPS. THESE SIT BEHIND THE BUMBER AND ACROSS THE RADS. OLD ONES ARE WRONG SIZE FOR NEW BUMPER LED DAYLIGHT RUNNING LIGHTS 2 X MINI LOOMS THAT CONNECT TO LED LIGHTS AND WILL BE SPLICED IN TO EXISTING LOOM. FRONT LIGHT CONTROL MODULE REAR REAR BUMPER REAR LIGHTS - OLD LOOM HEADS WIL FIT IN ALTHOUGH SLIGHTLY DIFFERENT SHAPE, SLOWLY PUSH THEM ON, BUT MAKE SURE THEY FIRMLY CLIP IN, REAR CONTROL MODULE REAR BUMPER FIXING STRIP. THIS IS WHAT THE BUMPER SCREWS LOCATE TO FROM INSIDE TOP OF ENGINE BAY. GEN 2 SPACED OUT DIFFERENT. YOU COULD MODIFY YOUR OLD ONE BY DRILLING IN NEW FIXING HOLES LEFT AND RIGHT EXHAUST HEAT SHIELDS. DEFFO CHANGE THESE, SOME PEOPLE USE THE GEN 1 HEATSHIELDS BUT THE BUMPER WONT SIT PROPERLY SO IF YOU ARE GOING TO THE EXTENT OF FACELIFTING BEST TO CHANGE THESE USE THE BOTTOM CENTRE OF THE OLD GEN 1 BUMPER METAL STRIP TO ATTACH TO YOU NEW GEN 2 BUMPER. YOU WIL NEED THE OLD POT RIVETS DRILLING OUT AND REFIXING TO YOUR NEW BUMPER REVERSING SENSORS- DONT BUY NEW ONES*** YOUR OLD ONES WONT FIT IN THE HOLDERS THAT COME WITH THE GEN 2 BUMPER. WHAT YOU CAN DO IS HEAT YOU OLD BUMPER UP SLIGHTLY WITH A HEAT GUN AND REMOVE YOUR GEN 1 SENSOR HOLDERS. THESE CAN THEN BE GLUED TO YOU GEN 2 BUMPER WITH WINDSCREEN BOND OR STRONG 3M TAPE. ENSURE YOUR OLD ONES ARE FREE FROM OLD GLUE AND FLAT AND CLEAN BEFORE FIXING TO YOUR GEN 2 BUMPER. THIS IS A BIT OF A TIME CONSUMING EXERCISE BUT SAVES YOU THE BIG EXPENSE OF BUYING 4 NEW SENSORS. NUMBER PLATE LIGHTS CAN BE TRANSFERRED FROM YOUR OLD BUMPER. LIGHT MODULES WILL THEN NEED PROGRAMMING AND SET TO LED'S SOME LATER CONTROL MODULES CAN BE CHANGED IN THE FIRMWARE, REARS I THINK HAVE LED OPTION BUT THESE ARE ON LATER GEN 1 CARS. FRONT WILL ALWAYS NEED CHANGING, THINK IT IS THAT WAY AROUND ANYWAY. MY 2005 NEEDED NEW MODULES FRONT AND REAR. -
997.1 facelifting question
tunetec replied to seskiyapan's topic in 997-1 Series (Carrera, Carrera 4, Carrera 2S, Carrera 4S)
See Below