Welcome to RennTech.org Community, Guest
There are many great features available to you once you register at RennTech.org
You are free to view posts here, but you must log in to reply to existing posts, or to start your own new topic. Like most online communities, there are costs involved to maintain a site like this - so we encourage our members to donate. All donations go to the costs operating and maintaining this site. We prefer that guests take part in our community and we offer a lot in return to those willing to join our corner of the Porsche world. This site is 99 percent member supported (less than 1 percent comes from advertising) - so please consider an annual donation to keep this site running.
Here are some of the features available - once you register at RennTech.org
- View Classified Ads
- DIY Tutorials
- Porsche TSB Listings (limited)
- VIN Decoder
- Special Offers
-
OBD II P-Codes - Paint Codes
- Registry
- Videos System
- View Reviews
- and get rid of this welcome message
It takes just a few minutes to register, and it's FREE
Contributing Members also get these additional benefits:
(you become a Contributing Member by donating money to the operation of this site)
- No ads - advertisements are removed
- Access the Contributors Only Forum
- Contributing Members Only Downloads
- Send attachments with PMs
- All image/file storage limits are substantially increased for all Contributing Members
- Option Codes Lookup
- VIN Option Lookups (limited)


seabass
-
Posts
5 -
Joined
-
Last visited
Content Type
Profiles
Events
Forums
External Paint Colors
Downloads
Tutorials
Links Directory
Collections
Store
Everything posted by seabass
-
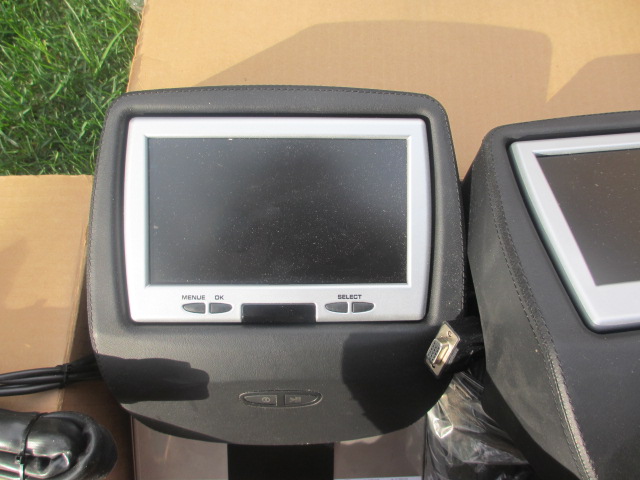
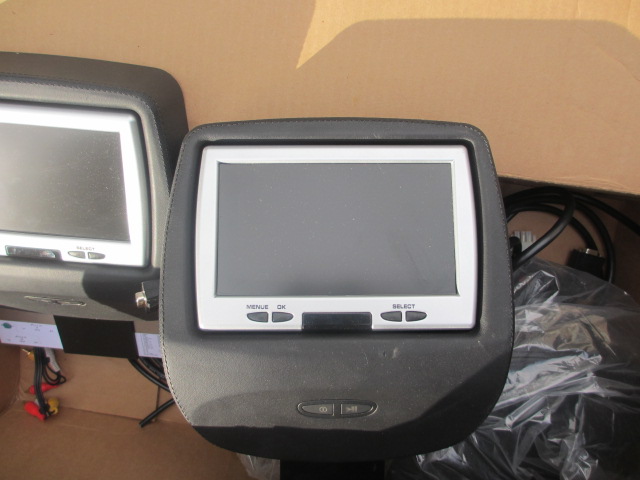
Looks pretty crappy to me. I had the stock screens removed when I bought the car and replaced with aftermarket so the picture of them is out of the car. However as you can see from the attached picture there is no gap between the monitors and the headrests.

-
Looking for tires
seabass replied to ciaka's topic in 9PA, 9PA1 (Cayenne, Cayenne S, Cayenne Turbo, Cayenne Turbo S)
Try this site in the first post there is a PDF. I was looking around at different tire sizes, and this was one of the best resources for possible sizes people have tried. Not CTT but close ;) http://www.clubtouareg.com/forums/f44/maximum-tyre-sizes-t1-and-t2-45129.html -
10-12 city, up to 19 on the highway and 8 pulling a travel trailer. Turbo model.
-
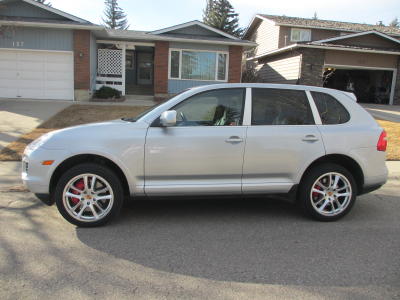
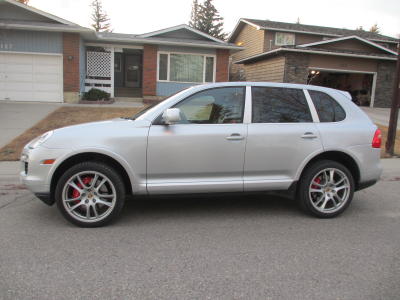
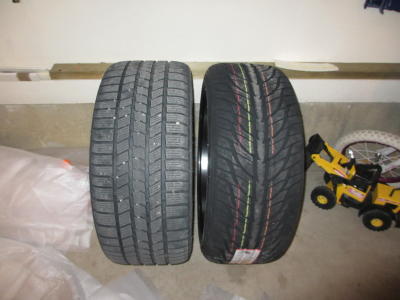
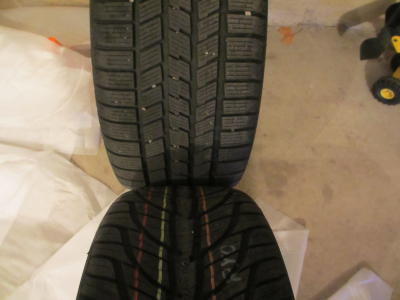
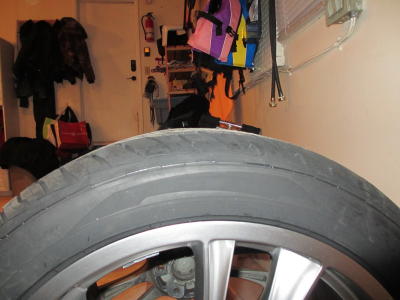
My CTT came with the factory 21" GTS rims and winter tires. When I started the hunt for summer tires, for a 21 inch rim I only found true summer tires. The tire shop mentioned that summer tire start to harden and lose performance at about 9 deg Celsius, by contrast winter tires are good up to 15 deg C. Quite frankly here in Canada it could be a low of 9 deg C any day of the year. Since I have seen snow in the mountains the summer months, I did not like the idea of the CTT be hobbled by a tire that could not handle the changing weather when we are out touring around. The solution I found was High Performance All Season tires. The drawback they don't make them for a 21 inch rim. I like the look of the GTS rims on my Cayenne so I found a set of replica rims except 20 inch instead of 21 inch. The result is I could jump into the world of HP All Season tires which seem to be a good fit for Canadian Weather. The new rims are 20X9.5 5X130 +53 with 433 MHz tire sensors. I chose the GENERAL 275/40/20 GMAX AS-03 to go with them. The old rims where 10J x 21 ET 50 with Perelli snow tires 295/ 35 R 21 The new replica rims and tire combination are 10 lbs lighter per tire and wheel. I believe the weight was 55 lbs for the new and 65 lbs for the old. Overall the replicas look ok. Something unexpected is all the finishes that you see are paint. Mine are a bright silver, on the inside of the rim they are black. So I would say it is a completely unfinished aluminum, my guess is that over the years they likely will need touch ups. The finish though was perfect, no imperfections to speak of. If the silver does not hold I might change them over to black. For a cost comparison they are very inexpensive choice for rims, about 800 for 4 with centre caps. They balanced easily with little weight. Side view with replica 20" rims Side view with OEM 21" rims Comparison of width, from 275/40 to 295/35, the v trend pattern are the general 275/40 Comparison of hieight, I could not see the difference between the two.
-
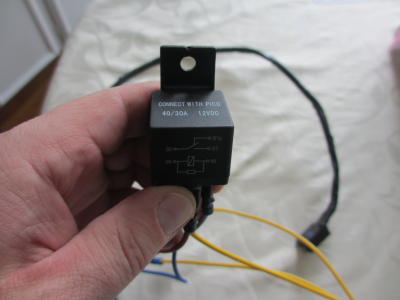
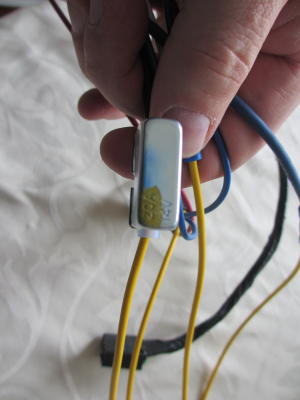
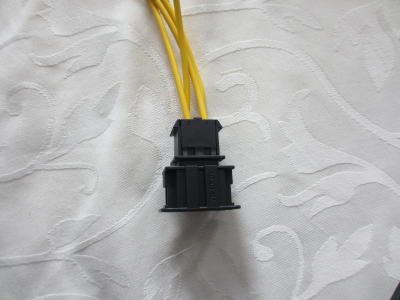
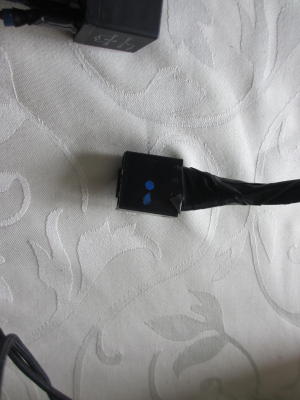
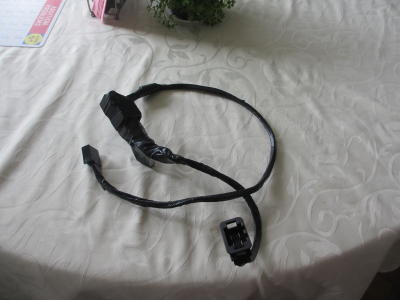
I just finished installing a Prodigy Brake Controller today on a 2008 Cayenne. I found a couple of write ups that were helpful but not completely clear. First off if you have a Trailing Hitch installed on your Cayenne you also have a factory trailer wiring harness for a 7 pin connector. By the hitch, there is a blank plastic piece that needs to be removed and replaced with a 7 pin connector. You can get this connector from your Porsche Parts department, Part PNA-955-118-93,it was $30 CND so it will be like $2 in the US. Now if you don't want a brake controller just buy a 7pin to 4 pin converter and you are done. Running lights, Brake Lights and Turn signals will all be working. If you do want the brake controller, you need to build a harness. There is a pretty good write up from Tekonsha on how to make the harness for reference. http://www.macscheck...scheCayenne.pdf However what they do not mention is the newer Cayenne's do not have brake switch with a red/black wire, it has been moved into the engine bay. So you will have to make use of the brake signal in the factory 4 pin connector. Which in the end is just as simple, so lets start. Parts. Likely 10" of wire. A bunch of squeeze on connectors if you can't soldier like me. A 20A 12V micro breaker A 20A/30A 12 4-5 pin relay, from an auto parts store (this will be labelled with pins 85,86,87,87a(not used) and 30.) The VW connector, 1J0972782 and 2 VW connector wires 000979228 I believe all of these parts was about $70 with the connector wires being the most expensive. The objective is to take the 4 pin factory connection under the dash and prep it for the Prodigy controller. For the most part this is direct connection. 1. Take the VW wires 000979228 and cut them in half so you end up with 4 wires with a connector on each end. 2. Insert all 4 of the wires into the VW connector 1J0972782. On the connector there are numbers 1 to 4. 3. Start with connector wire 1 which is the vehicle ground. You need to end up with two grounds, one for the prodigy harness (white) and one for the relay pin 85. To achieve the two wires, I used a marrette, twist the connector wire 1, the prodigy harness white, and 5 inches of other wire into one Marrette. Connect the new wire you added to pin 85 on the relay. 4. Take connector wire 2 which is the vehicle 12V, run it to the 20A 12V micro breaker, off the other side of the micro breaker use another Marette and bring in the 12V out of the micro breaker, the black wire from the Prodigy harness and 5 inches of other wire. Run the 5 inches of other wire to pin 30 on the relay. 5a. Take connector wire 3 which is the vehicle brake signal. Run is wire directly to pin 86 on the relay. What you are doing is converting the brake signal to a constant 12v signal that the Prodigy will understand. 5b. To finish up this, connect the red wire from the Prodigy harness to pin 87 on the relay. 6. Take connector wire 4 which is the vehicle output to the trailer electric brakes. Connect wire 4 directly with the blue wire on the Prodigy harness. You should end up with something that looks like this. A few shots of the parts: The relay The Micro Breaker The VW connector The Prodigy connector The final CTT harness for any model year as far as I can tell. So all you do is plug the harness in and connect the other end to the Prodigy. These pictures are were taken from some other peoples posts. Remove the lower plastic cover above the brake and gas pedal. One torx screw. Look straight up on the left hand side and find the factory 4 pin trailer connector. It is inside a little grey cover exactly as shown below. Plug the harness into the factory plug and test. Use a few zip ties to hold everything in place. Test your harness without the Prodigy hooked up, you should have 12v between white and black on the harness. When you apply the brake you should have 12v between the while and red. If everything checks out, put the plastic cover back on and mount your controller. The final test before hooking it up, is checking that pin 1 to 2 on the rear 7 pin connector gives you a voltage output when applying the brakes. I hope that helps someone doing this simple install, the dealer quoted me $600 plus parts to do the same job, so I am happy with the result of doing it myself. Happy towing.