Welcome to RennTech.org Community, Guest
There are many great features available to you once you register at RennTech.org
You are free to view posts here, but you must log in to reply to existing posts, or to start your own new topic. Like most online communities, there are costs involved to maintain a site like this - so we encourage our members to donate. All donations go to the costs operating and maintaining this site. We prefer that guests take part in our community and we offer a lot in return to those willing to join our corner of the Porsche world. This site is 99 percent member supported (less than 1 percent comes from advertising) - so please consider an annual donation to keep this site running.
Here are some of the features available - once you register at RennTech.org
- View Classified Ads
- DIY Tutorials
- Porsche TSB Listings (limited)
- VIN Decoder
- Special Offers
-
OBD II P-Codes - Paint Codes
- Registry
- Videos System
- View Reviews
- and get rid of this welcome message
It takes just a few minutes to register, and it's FREE
Contributing Members also get these additional benefits:
(you become a Contributing Member by donating money to the operation of this site)
- No ads - advertisements are removed
- Access the Contributors Only Forum
- Contributing Members Only Downloads
- Send attachments with PMs
- All image/file storage limits are substantially increased for all Contributing Members
- Option Codes Lookup
- VIN Option Lookups (limited)


texanz71
-
Posts
22 -
Joined
-
Last visited
Content Type
Profiles
Events
Forums
External Paint Colors
Downloads
Tutorials
Links Directory
Collections
Store
Posts posted by texanz71
-
-
To close out this thread:
I removed the mounting plate completely to figure out what was going on. It turns out nothing was broken, but I did strip the end of the 5mm clamping bow. I was able to shave it down temporarily, until I can order a new rod. The mounting plate was pushed too far back, thus not allowing the clamp to engage properly. After a lot of time spent with alignment of the mounting plate, I finally got the light back in place.
For others who might come across this issue; the headlight does need to be pressed inward as much as possible, but the locking clamp should not feel like too much of a struggle. Check the alignment and try again!
-
Thanks Loren,
I think there may have been an issue with the mounting plate. I played with it so much that I ended up breaking the locking mechanism!! So new question: Does anyone know what I need to change and how to go about install?
-
Thanks for the quick reply... I have seen this video but it does not actually demonstrate the replacement. I am looking for someone who actually knows the alignment and trick to get them to lock in.
-
2000 Porsche C4 with Litronics...
I removed my headlights to replace some of the bulbs; now I can not get the headlights to snap back into place. Is there a trick to this? I reviewed the owner's manual instructions and I have been trying for almost 2 hours. I was able to get the driver side to snap into place, but I don't know how I did it. I am still stuck on the passenger side.
Please help, I need to drive the car tomorrow!
Thank You.
-
I just had my top replaced after a collision. Finish Line in Santa Clara came highly recommended to me and they did a great job. The top looks and folds perfect. I even had him put in a tinted vinyl window which I always wanted.
-
Did you try unplugging the radio completely and seeing if it starts up?
-
Did you try jump starting just to rule out a weak battery?
It could be a faulty switch or somehow the key chip is not being recognized. Do you have another key to try?
-
You need to press the side tabs in and wiggle it out at the same time. I found it helps to stick a finger in the tape slot and use it for leverage to pull!
-
Loren, Thank You for clarifying. I can't understand why they would use an indicator light like that. I am glad to hear there are no issues with my car.
-
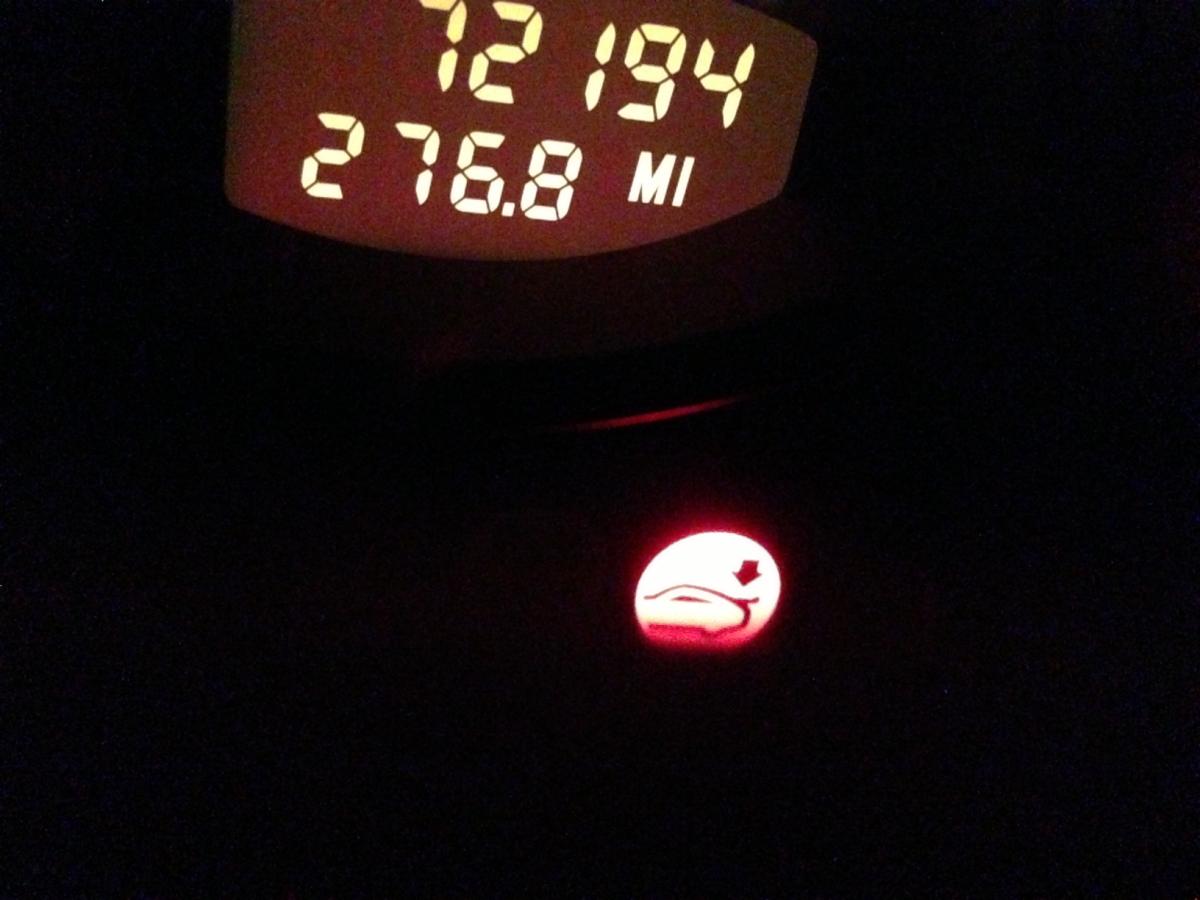
2000 Porsche Carrera 4 Cabriolet
I am having a consistent problem with the rear engine compartment lid indicator light. Each time I turn the car on, it stays illuminated. After I place the vehicle in drive and drive forward about 20 feet, it turns off and stays off.
It seems like it would be the rear latch, but here are what I've tried that are confusing me:
1) When the rear engine lid is shut, the instrument cluster light displays as stated above, however the cabrio top operates as normal.
2) When the rear engine lid is ACTUALLY ajar, the cabrio top will not work
3) I tried unplugging the wire that connects to the lower latch mechanism. There are only two wires, so I tried shorting it out to see if it would turn off the indicator light. With the two wires in both the open and shorted position, it did not change the indicator light. (This makes me think it is something other than the lower latch microswitch)
4) It was annoying me so much, that I even tried pulling the bulb from the instrument cluster. When the bulb was removed completely, the cabrio top went into safety mode and would not operate at all. Once I replaced the bulb, the cabrio top worked normally again.
Has anyone experienced this? How many sensors are there for the rear lid? I know this isn't a huge problem, but it is annoying to see a false indicator light each time. I bought the car used and have been fixing all the little problems; this is the last piece before it is 100%!
The members on this site have been a huge help. Thanks in advance for any advice.

-
Autozone let's you loan tools free of charge; I think for about 1 month at a time. I loaned a set of these once and they worked well:
This is the main page showing all tools available for loan:
http://www.autozone.com/autozone/accessories/Tools-Garage-and-Equipment/Loan-a-Tools/_/N-26vd
-
Yes, my first suggestion is to diagnose the MAF by unplugging the connector from the air intake and starting up the car to see how it runs.
Second, If you have an OBDii reader I would also suggest seeing if there are any fault codes present.
-
Did you try starting it up with the MAF disconnected? That is a way to test for a bad MAF. Are you getting any OBDii codes?
-
The first time taking it out takes some patience, and took me about 30 minutes. You just have to work slowly so you don't damage any of the bezels or dash. The leather dash areas are very sensitive and many people have left permanent marks on their dash!! Do not pry against any leather surface when removing the bezels. You must be very careful between the steps of pulling the cluster out and disconnecting the harnesses. It is too easy to let it rest on the dash area in front of the steering wheel. Just remember to wrap everything in thick bath towels and use several. Do not let any piece touch the dash without two layers of towel!!
These are the best step-by-step instructions I've found
There are two types of bulbs used in the instrument cluster. You cannot find them at an autoparts store and the dealer wants to charge almost $20 each to special order them!
I ordered mine from pelicanparts.com; these are the bulbs:
1.5 Watt bulb for the larger displays (This is the one you need)
You might want to just change all 3 large display bulbs while you have the cluster removed.
1.2 Watt bulb in case you need to change any of the warning indicators
-
Is it garbled or blacked out? This area of the cluster is backlit by one light bulb. Can you see the readings when you shine light on the display?
-
Thanks to everyone's help, I have finally been able to resolve this annoying problem!! :D
fpb111 (Post #4) was exactly right with the TSB he posted. It was actually coming from the windshield trim on the driver's side. I only tested the inner trim that faces the windshield before. The noise was coming from the outer trim that faces the painted surface of the A-pillar.
I was able to locate the exact location by using a compressed air hose and blowing it along the trim until I recognized the noise. I sealed it with a generic black sealing putty. No more noise!!
-
Thank you again for the suggestions to try, but still no luck. The windshield was replaced by the previous owner and I checked the trim which is glued down very well. I tried taking it for a drive with the top down and used my hand to feel the windshield trim. The trim did not move, but it still made the same sound. I'm wondering if it could have something to do with the front vent in front of the wipers.
Also, I am missing most the undercarriage panels including the front left and right that sits close to the bumper. Could this be allowing air into the driver's side cabin area?
I appreciate the suggestions; I am totally lost where to continue.
-
Thank you for the reply. I tested the wing and it is working properly. I set the speed alarm and it is a completely different sound.
This is a high-pitched wind noise that sounds like a kettle boiling water!
I have created a video while driving to show the sound and how it changes with speed. There is no consistency in the actual MPH, I think it is just the wind resistance.
Also, it seems like it is coming from the instrument cluster, but it could be somewhere nearby from the driver's side window area.
-
I have an unusual buzzing noise coming from the instrument cluster area on my 2000 Carrera 4 with white dials. I know there is a TSB from Porsche but it seems like it is for the 997's. I can not tell if it is air related or from an electronic buzzer.
The buzzing noise occurs at about 75MPH and above. It is inconsistent, sometimes it will start at 75MPH and other times at 83 or 85 MPH. Based on the inconsistency and the sound, I am thinking it could be wind related, but how is wind making its way to the cluster? It sounds just like an electronic buzzer and I noticed something that looks like a buzzer on the back of the instrument cluster when I changed some bulbs a month ago. Could this be a speed related alarm?
It is very annoying and I don't know where to start; I appreciate any advice.
If this does not sound familiar to anyone, perhaps I can try and create a video of the problem and post it.
-
I just went through this same issue. I did end up fishing 8 wires from the head unit, through the rubber seal (upper driver side foot well), behind the battery to the passenger side, then drilled a small hole to get to the amplifier. I hard wired the head unit directly to the speakers with no amp in between and have been happy with the sound quality. I had to wire the front dash and door speakers as "front" and the rear speakers as "rear." I wanted to get the job done and this method worked fine for me. If I were to do it again, I would order a used amp from ebay that is compatible with the harnesses.
-
Thanks for the awesome info, I would have been lost without your post.
If anyone else is trying to look for the Pressure Regulator I found it under part # 986 325 603 00
The best I could find was for $320, where did you see it for $220?
IMS Lawsuit is in motion..
in 996 Series (Carrera, Carrera 4, Carrera 4S, Targa)
Posted
Why are the 1999 & 2000 models not considered part of the group that is susceptible?