Welcome to RennTech.org Community, Guest
There are many great features available to you once you register at RennTech.org
You are free to view posts here, but you must log in to reply to existing posts, or to start your own new topic. Like most online communities, there are costs involved to maintain a site like this - so we encourage our members to donate. All donations go to the costs operating and maintaining this site. We prefer that guests take part in our community and we offer a lot in return to those willing to join our corner of the Porsche world. This site is 99 percent member supported (less than 1 percent comes from advertising) - so please consider an annual donation to keep this site running.
Here are some of the features available - once you register at RennTech.org
- View Classified Ads
- DIY Tutorials
- Porsche TSB Listings (limited)
- VIN Decoder
- Special Offers
-
OBD II P-Codes - Paint Codes
- Registry
- Videos System
- View Reviews
- and get rid of this welcome message
It takes just a few minutes to register, and it's FREE
Contributing Members also get these additional benefits:
(you become a Contributing Member by donating money to the operation of this site)
- No ads - advertisements are removed
- Access the Contributors Only Forum
- Contributing Members Only Downloads
- Send attachments with PMs
- All image/file storage limits are substantially increased for all Contributing Members
- Option Codes Lookup
- VIN Option Lookups (limited)


creekman
-
Posts
474 -
Joined
-
Last visited
-
Days Won
1
Content Type
Profiles
Events
Forums
External Paint Colors
Downloads
Tutorials
Links Directory
Collections
Store
Posts posted by creekman
-
-
I didn't try to lift the car, the following was just with the lift posts free standing. I started up the pump to test the 2 posts... right side goes up, but the left doesn't move. Then the right side that went up, doesn't go down. I'm going to bleed the left side to see if that is what keeping the lift arms from going up, then check to see if the bleeder valve is clogged up? Do I need to drain the reservoir before removing the bleeder valve? I thought I would get some input before calling Danmar...
Any other suggestions on what's going on will be appreciated...
-
You are correct in that Rennlist isn't much for the DIY home mechanics. It is a great site for P-car owners but this site is the best place for learning how to fix your car. I have saved lots of time and money by being a contributing member, which reminds me... it is time to donate again. Thanks Loren.
Well said...
-
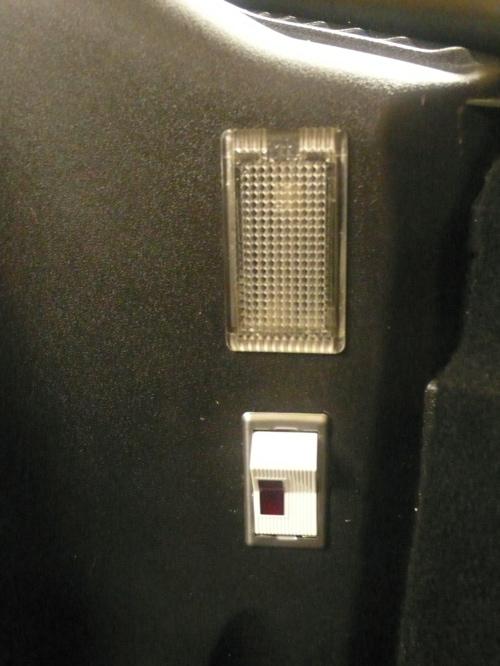
I believe that the trunk light is on the same circuit as the interior lights, so when the interior lights go off the trunk light will go off... I have an issue w/ the trunk micro switch since it doesn't turn off the light. It was suggested by one of our members to try some electrical contact cleaner on the micro switch before replacing the $75.00 switch. However most of the time you don't need the trunk light on anyway so I installed a lighted switch which allows me to control the trunk light.

-
fpb111, I can't help myself,,, that's half the fun of messing with the car. If I see something that I think can be improved, then I try to solve the problem. Hey, if nothing else it keeps the gray matter stirred up. The hockey pucks seem like a good solution, but lack inter-locking of the car pk pts to the lift arms. I'll report back if my concept works, stay tuned, film at eleven...
-
Here's a good video for the Maxjax install... I think the directions could be better, and the supplier certainly could supplement the install directions with a good video. Here's one that shows the whole install procedure.
On the Corvette forum one guy showed using a 90 degree fitting at the hydraulic hose quick disconnects so the hoses lay flatter on the floor, good idea. I just got one set of disconnects, yet on several pics and videos they show 2 sets, one at the base of the post, and the other at the divider on the hydraulic cart? Am I missing one set or do you have to buy a second set if you want the flexibility of removing the hoses from the cart? I thought maybe removing the hoses from the hydraulic cart would allow air into the system so bleeding would be necessary?
P.S. I see that the Parts inventory only show 2 each of the quick-disconnect fittings!
-
GMAN... Great information... I did a quick search on e_bay, but didn't come up w/ the puck info. I had thought about cutting down the factory lifting pins, then welding a machined turned dowel that had a domed top. The domed top would find it's way into the car body receiver better and the factory supplied lifting pin. The cut down pin would act as a shoulder for the receiver to sit on. I hope you can follow my ramblings.
I have the room to go as far as I want, what would you suggest as a good safe separation between the posts? I'm presently at 125" out to out on the base plate. That gives me 20" between the inside face of the post and the door.
Many thanks for your reply,
-
fpb111, thanks for the reply... I think you've just answered my question with what I've thought, but couldn't verify. Yes, right now at 115" there's no give in the car location between the posts. I hadn't thought of that, but your assessment makes sense. I'm already with hardly any adjustments for the inner arms. If the car was slightly off the center line then there's no way to adjust the pad setting on the near side.
I still think the install directions should address the clearance between the posts and the side of the car which would also give you some play of the inner lifting arms. I read on the Garage Forum where a professional installer used epoxy to insure that there was no movement of the anchors. I have a good concrete 4" floor, but sometimes that means your at the minimum thickness. I was evening thinking of making a test hole under the center of the post base to confirm the thickness. Also I think I'll turn a 5/8" sleeve x the diameter of the base plate hole so my pilot hole is centered on the base plate hole. My only worry here is that I'm not sure the sleeve will stay in place with the roto-hammer.
I like the yellow and black finish on the MaxJax, it goes w/ my Speed Yellow, the blue of the Long Horn unit would have bad color clash... :-) I know from a friend of mine that deals with Chinese manufactures that they'll knock off someone idea without any hesitation. Someone might have approached the Chinese Maxjax manufacture and had them build the same lift.
-
For my 2003 C4S can someone tell me the distance they used between the posts. I see that the manual calls for up to 115" for "sport cars". My out to out on the tires is 69", that only leaves about 23" on a side for the door opening. Also at that dimension the pick up arms will reach the car body pick points without having to extend the inner arms. I have the room to move the post further apart, but just wondering if that's advisable. My 230 lbs just doesn't go through the opening very gracefully... I can also see that it would be prudent to glue some corner rubber on the post where the door could hit it if you weren't careful.
I e-mailed MaxJax, but haven't heard anything from them yet...
-
Looks like a "knock off"... did I miss the price? If it was cheaper I'm guessing that they would have shown the price?
-
987_RDC,
I looked around for a used one, but even at $1,500 I would have still paid shipping. I ran a wanted ad on Craig's list for a couple of months w/o any results. I started to put the pieces together this evening, as with any product made in China the directions could be a lot better. It's one of those things that you could do a lot easier the second time. It's a nice piece of equipment, everything is built heavy duty. You really need 2 people to get the parts unpacked. I had it on a trailer so it was a bit of a back breaker get everything on to the garage floor. Tomorrow I'll set the post anchors.
What dimension did you use for the spacing between the uprights?
-
Sisuguy, thanks for the info... To use the lifting pads without any "hockey pucks" you must have pushed the lifting pads all the way in to clear the sheet metal skirt? I got my Maxjax on sale at Costco. They also delivered with a lift gate so there was no additional charge for the delivery.
-
I just use a Hockey puck on mine. Works great.
That might be a tough item to find in Texas... I guess a cow paddy wouldn't work? Then you had enough clearance for the arm, factory pad and your "hockey puck" w/o running the car over 2X12's?
Thanks,
-
 1
1
-
-
My question is after looking at the rubber covered lift pads they appear to be to big to catch just the jacking position on the under body. i haven't set the unit up yet so I don't know how much clearance I'm going to have between the top of the pad and the bottom of the car? I can see that you might make a shouldered pin to catch the 4 jack points. Any one been through this?
Thanks,
-
Mine re-sets at whatever speed I'm at by pushing the lever forward. Just push the lever forward when you are at the speed you want. If I want a slower speed I touch the brake coast down, and push the lever forward.
Hmmm, I believe that's the problem w/ mine, if I do that it goes back to the original speed unless I turn off the C/C and turn it back on... then it will take the new speed. So I might have a hiccup on mine. I'll play w/ it a little more and give ya a post update.
Thanks for your reply...
-
Pushing down on the lever reduces the speed. One mph for each click, or you can hold it down until you reach the speed you want.Pushing forward on the lever increases the speed one mph for reac click or again hold it until you reach the speed you want, or just click it once if you are at the speed you want.
I hate to labor this, but on my daily driver I can just push the set button and it will take the present speed. I can click 70 MPH, slow to 50 MPH then click again and it sets the new speed. I don't think the 996 C/C does that? You either have to do as you say, hold down the lever until the desired speed is attained, or turn off the cruise control button on the end of the stalk/lever then reset the button, then push the lever again for the desired speed?
Correct?
Thanks,
-
Thanks Bill... Maybe I'm missing something, but I don't see an answer in the manual to my original question?
-
I'm still trying to figure out the cruise control operation. Am I correct, if you're going 70 MPH on the cruise control, then want 50 MPH you have to turn off/on the C/C before resetting to the lower speed? The use of the C/C stalk/control certainly isn't intuitive at best? I thought my "84" was primitive, the 2003 didn't get much better... maybe it's just me?
Thanks,
-
I fixed mine by spraying contact cleaner on the microswitch followed by wd40
Great idea, might save me $75.00...
-
Swede-man, How about posting a "butt" pix when the tires are mounted, that way we get a twofer, tires and tail lights...
Thanks,
-
Question... can any Apple/Mac products work with the Durametric system. I saw on their web site that it is only compatible with P/C platforms. Is there any alternative to that?
Thanks,
I recently got the Pro version (to share with "the cadre of compulsive Porsche people") and use it on my MacBook Air. On the MacBook, I run virtualbox with Windows XP. So, it will work on a Mac, but it needs to be inside of a vm. Let me know if you need more details.
keytohwy
keyto hwy... I ended up getting an old PC lap top from my Daughter. I'll buy it off of her since she just had it gone through it. It's not the fastest thing going, but will get the job done. I purchased the Durametric Enthusiast. So far it's been great, however I need to learn a lot more to be able to use it effectively. Loren has been a big help, as well as JFP IN pa, and Ahsai... You guys really make this site the best, many thanks...
-
Swede-Man,
Have you looked at the plastic mounting tabs on the tail light housing to see if the plastic is any heavier. 3 of my 4 tabs are either cracked or broken. I've been trying to figure out how to re-enforce the tabs, but the plastic mounting tabs are pretty intricate to replicate in aluminum. Tell us how the Dectane housing fit the car...
Are the Michelins stock sizes front and rear?
-
Ahsai, thanks for the explanation, I think...
Are you saying that I've had 2586 spark plug firings that were at the rev limit? And the last firing at the rev limit occurred at 2224 hrs? I understand that I had a mechanical overrev at 1925.5 hr. The computer information doesn't count 6 spark plug firings, only one? So the Range 1 and 2 numbers have nothing to do w/ the hours?
Does the 2258.2 total running hours equate to the 60,000 miles? Is there a comparison here, hours vs miles?
Thanks for your reply, remembering that I'm of the timing light generation...
-
I hope you don't mind me jumping in on your thread... I'm trying to find my way around my new Durametric tool. Here's my ECU information reading:
1. Range 1 -
Number of ignition starts - 2586 - for 2224 hrs.
Does this mean the car has been started or the key has been turned on 2586 times for a total run time of 2224 hrs?
2. Range 2 -
1/1925.5 hr.
This means that the car was over rev one time at 1925.5 hours?
3. Operating hours - 2258.2 hrs. - Why is this different from the Range 1 hours?
4. If you figure that my car has 60,000 miles on the clock and it took 2224 hrs of time, then that averages out to 27 MPH. Could that be right?
Thanks,
Mitch
-
Thanks Loren... I'll do it.
Anyone looking for this information, go to:
1. Tool bar, DIY tools
2. Click Maintenance Schedule
3. Click Maintenance Booklet
MaxJax 2 Post Lift...
in Workshop Tools
Posted
Here's what I've made for my new MaxJax 2 post lift to lift and positively connect the car to the lifting arms. I'm going to turn some nylon washer that will fit over the pin base to protect the undercarriage receivers. I haven't tried the lift yet since I'm considering moving and didn't want to drill a bunch of holes in the floor and wasting the mounting anchors.
The first pix is the factory supplied extension pins that I cut down, the second pix is the new pin welded to the factory cut down lifting extension. I liked the idea of a positive connection between the lifting arm and the car receiver. I'm going to put the car up on a friend's lift tomorrow and determine whether I need to make the pin base a larger diameter. More later...