Welcome to RennTech.org Community, Guest
There are many great features available to you once you register at RennTech.org
You are free to view posts here, but you must log in to reply to existing posts, or to start your own new topic. Like most online communities, there are costs involved to maintain a site like this - so we encourage our members to donate. All donations go to the costs operating and maintaining this site. We prefer that guests take part in our community and we offer a lot in return to those willing to join our corner of the Porsche world. This site is 99 percent member supported (less than 1 percent comes from advertising) - so please consider an annual donation to keep this site running.
Here are some of the features available - once you register at RennTech.org
- View Classified Ads
- DIY Tutorials
- Porsche TSB Listings (limited)
- VIN Decoder
- Special Offers
-
OBD II P-Codes - Paint Codes
- Registry
- Videos System
- View Reviews
- and get rid of this welcome message
It takes just a few minutes to register, and it's FREE
Contributing Members also get these additional benefits:
(you become a Contributing Member by donating money to the operation of this site)
- No ads - advertisements are removed
- Access the Contributors Only Forum
- Contributing Members Only Downloads
- Send attachments with PMs
- All image/file storage limits are substantially increased for all Contributing Members
- Option Codes Lookup
- VIN Option Lookups (limited)


pongobaz
-
Posts
27 -
Joined
-
Last visited
Content Type
Profiles
Events
Forums
External Paint Colors
Downloads
Tutorials
Links Directory
Collections
Store
Posts posted by pongobaz
-
-
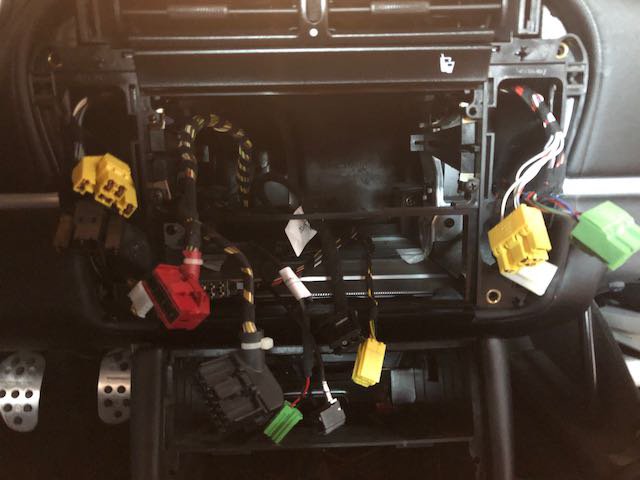
Super easy to install on a MOST equipped car. Sound is so much better than the CDR-23 and finally the BOSE system sounds proper. I'll have my Porsche Centre enable the turn by turn with PIWIS in the spring, even if I prefer using Waze than the Porsche maps. Hopefully they'll have figured out where to get the software update to get rid of the mildly annoying glitch with the trip odometer randomly resetting.
Here's a complete list of parts needed to convert to double DIN and install the PCCM+:
- PCCM+ (for 2003 996 C4S, Bose CDR-23 MOST) 996-642-591-00c
-Navigation Maps 996-642-502-00C
- Retaining bar 996-552-653-04
- Front support frame 996-552-231-1201C
-Front A/C panel frame 996-552-339-0001C
-Two screws PAF008933
-Upper storage tray 996 552 253 01 01C
-SiriusXM SXV300 Connect Vehicle Tuner for Satellite Radio

-
Vacuum around the switches. Sand and grit gets trapped in there and when it rolls around it causes the hood to pop. Ask me how I know :rolleyes:. Try that first before breaking out the tools.
-
Congrats on your 996 and welcome to the board, the dealer sells the kit or check eBay.
I'd stick with the factory carbon.
First post here on Renntech...Just bought a 996 and need to spruce up the interior and this looks like something that I can do (did a full dash swap on my 951). Where does one get the trim kit? Pongobaz - if you have any thoughts on where to get the carbon fibre kit in Canada - I would greatly appreciate the advice.
Many thanks
Fergus
Got mine from Eric at bumperplugs.com
-
To save me from buying new wheels, my local Porsche dealer yesterday put my 2003 C4S 6 speed onto Pirelli W240 Sottozero Series II 295/35/18 tires at the back, and put 235/40/18 tires on the front. The steering doesn't feel as tight as my summer Conti's, which are 225/40/18's in the front. Should the dealer have put 225's on the front? Will this tire combination be okay with my AWD?
Nope, you're fine and your dealer did the right thing; the wider front make the rolling diameter of the fronts and rears the same since the winter rears have a slightly higher profile (35 vs 30). This keeps your PSM and ABS system happy. I've been using the same size tires for the past 3 winters with no problems. Just replaced the worn rear last month with the same thing once again and now I'm ready for it's fourth winter (if it ever snows).
-
A quick spray of white lithium grease solved my squeaky pedal 3.5 years ago.
-
I would've sworn that the 60K service called for replacing the poly-rib belt, but now when I pull in the major and minor maintenance schedules (from this website) it simply says "Poly-rib belt: Check condition".
Can anyone clarify? Are these things good until 90K?
Thanks in advance.
Mine was starting to develop cracks at 80,000Kms. I changed it myself in about 30 mins...very easy and cheap DIY.
-
Thank you all 3 above for replying so fast. (I am a new Porsche owner, and already have the window regulator and now front latch problem identified through this forum. Thanks for the quick reply).
For troubleshooting, and maybe creating a reference thread for others, I will try each of your 3 suggestions in sequence and see which one will solve this particular problem.
Once the weather stops acting up, ...I will try those in this order,:electrical troubleshooting first, then mechanical: 1) Disconnect battery reset CPU, and test. 2) Clean possible grit in under the release switch on the driver's door sill, and test 3) Rebuild the latch per DIY above, and hope... Should be able to reportback in a 2, 3 days.
Thanks and whoever has a similar issue,...stay tuned.
P.s.:I will have to use the Radio Code thread in this forum after action #1 above...
---------------------------------------
2003 C2 Cab. 6 speed man.
Just to follow up on my suggestion to vacuum first, here's a couple of old threads on rennlist where guys had the same problem (and solution): http://forums.rennlist.com/rennforums/996-...id-opening.html http://forums.rennlist.com/rennforums/996-...-and-a-fix.html
-
Mine was doing that last summer; it cropped up suddenly one day and was driving me nuts. I did a search and everything from faulty latch to misaligned hood came up. The solution: there was a little bit of grit under the release switch on the driver's door sill; that area gets a lot of dirt dragged on it as your feet rub past getting in and out of the car. Every time I would accelerate, some that sand/grit would roll under the switch just enough to activate it. I took my vacuum and cleaned the area and voila! Fixed. I spoke to a tech at the dealership later and he confirmed that this is pretty common. Try that first before you start spending money on parts & service.
-
For bugs, use Stoner's Bug and Tar remover. For all plastic lenses, I use Plexus cleaner with a microfibre towel to clean and polish. NEVER use paper towels; they scratch.
-
Rennline Fire Extinguisher seat mount
this is a very easy install to do. The instructions are pretty clear, but I thought that some of you would appreciate more photos of what's involved. The kit comes with all the hardware and a few spare mounting bolts and nuts. You must provide your own extinguisher (which should come with it's own mounting plate). I really like this kit which like the Brey Kraus unit, mounts to the seat and not to the floor. The unit is compact enough that it doesn't interfere with leg room and it moves alo
-
Author
-
Category
-
Submitted04/24/2008 05:30 AM
-
-
That's a powerful read, indeed. Look's too much to me like the plenum is just placebo effect..but it sure does look cool.
Looks cool sitting on the bench maybe, but you can't even see it once it's installed. Instead spend the $1000 on some interior cosmetic upgrades (shifter, ebrake, etc...) that you can see and enjoy.
-
Also in Toronto. I use Shell 91 instead of the Sunoco 94. Sunoco achieves the 94 rating by adding up to 10% ethanol. When I used it in the past, my tailpipes had lots of sooty buildup. Shell does not put any ethanol in their 91 and its recognized as a Top Tier gasoline.
-
Don't use Lexol for leather on the dash. It has been specially dried by Porsche to stay shrink resistant but if you rehydrate it with Lexol or other conditioners, it will make it too supple and over time, it might begin to come unglued from the base. On the dash, door, pillars, etc... I use Aerospace 303 Protectant since it contains UV blockers. Don't overdo it. Spray it directly on the surface or on a clean applicator or cloth and wipe/buff off any excess. It won't be sticky and attract dust and it won't be shiny like some of the other products out there. I then use Lexol for the seats where I want the leather to be supple. And buy a cheap sunshade or the grossly overpriced Porsche one as a measure of prevention on days when the sun and heat are brutal.
-
Don't use Lexol for leather on the dash. It has been specially dried by Porsche to stay shrink resistant but if you rehydrate it Lexol, it will make it too supple and over time, it might begin to come unglued from the base. On the dash, door, pillars, etc... I use Aerospace 303 Protectant since it contains UV blockers. Don't overdo it. Spray it directly on the surface or on a clean applicator or cloth and wipe/buff off any excess. It won't be sticky and attract dust and it won't be shiny like some of the other products out there. I then use Lexol for the seats where I want the leather to be supple. And buy a cheap sunshade or the grossly overpriced Porsche one as a measure of prevention on days when the sun and heat are brutal.
-
With the UCR region of the PCA, you can use an M or SA 2000, but it's recommend that you get an SA2005 so that you don't risk being excluded from events with other regions. I got a Pyrotect SA2005 full-face from Apex (rennlist sponsor who offers a 10% discount to all rennlisters) for $248 (-10%) included free shipping and a helmet bag and cotton balaclava. Not affiliation, just a satisfied customer.
-
Very nicely done pongobaz!
Do have small hands - because several folks have said those screws are nearly impossible to get to.
Skinny long fingers...also a guitarist!
-
Just did this upgrade. After reading all the posts, I decided I wanted to challenge myself to doing it to full factory specs without breaking any pieces and using all the screws to put the trim back in. I started with the long piece on the passenger side. First remove the underdash cover (foam) held in place with 3 plastic screws. Then remove the glovebox:
There really isn't any need to remove the vent since there is plenty of room back there:
With the screws out the piece just pops out:
Contort yourself under the dash (move the seat back as far as possible!) and you'll be able to clearly see the screws:
Next, remove the instrument cluster by first removing the hazard switch:
and the microphone cover:
then remove the two screws and the whole assembly pulls off (makes sure to disconnect the cluster in the back (3 plugs: gray, blue and green as wells as the mic and hazard switch)
remove the lower "horseshoe" around the steering column (screws are visible once cluster pod is out) and then you have access to the back of the trim pieces on either side of the column. I removed the driver's side vent but I don't think it's really necessary. Got all the pieces off without any damage and installed the new pieces with every single screw:
All buttoned up:
All in all it took me about two hours from start to finish going slowly and carefully to protect the full leather dash:
Use the right tools and take your time!
-
 1
1
-
-
If you have the same tips as I do, then the center bar of the quad tip tend to get carbon build up as in my picture. I use some Brasso to get them clean (sorry no after pics, but they do look perfect after a good cleaning).
-
I don't know about the 987/997, but on the 996 you can slide the visors of the stems. It makes it easier and cleaner to work on them.

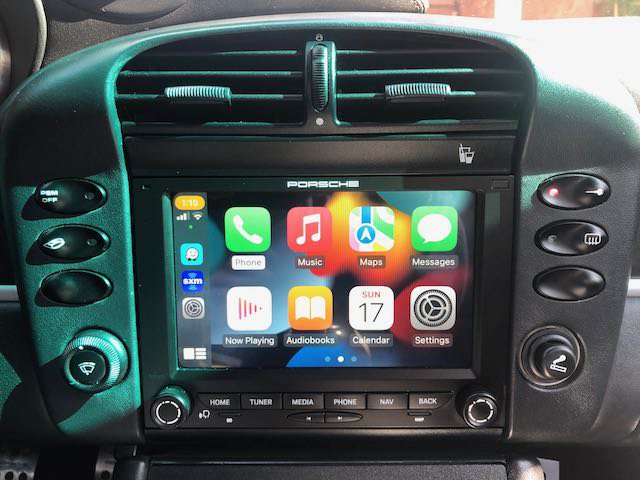
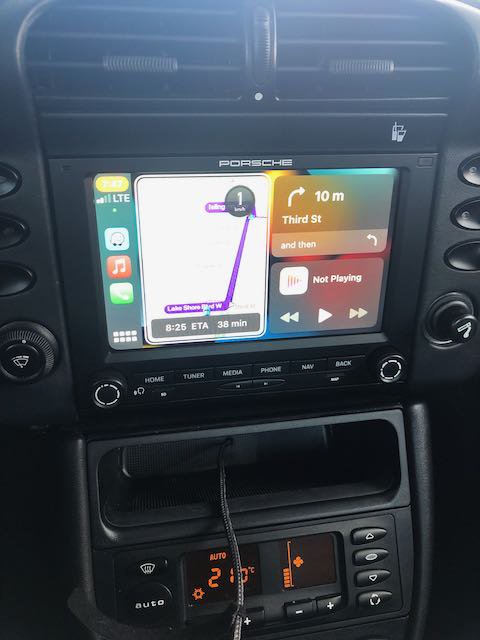


Porsche classic radio PCCM Plus
in 996 Series (Carrera, Carrera 4, Carrera 4S, Targa)
Posted
No you cannot.