Welcome to RennTech.org Community, Guest
There are many great features available to you once you register at RennTech.org
You are free to view posts here, but you must log in to reply to existing posts, or to start your own new topic. Like most online communities, there are costs involved to maintain a site like this - so we encourage our members to donate. All donations go to the costs operating and maintaining this site. We prefer that guests take part in our community and we offer a lot in return to those willing to join our corner of the Porsche world. This site is 99 percent member supported (less than 1 percent comes from advertising) - so please consider an annual donation to keep this site running.
Here are some of the features available - once you register at RennTech.org
- View Classified Ads
- DIY Tutorials
- Porsche TSB Listings (limited)
- VIN Decoder
- Special Offers
-
OBD II P-Codes - Paint Codes
- Registry
- Videos System
- View Reviews
- and get rid of this welcome message
It takes just a few minutes to register, and it's FREE
Contributing Members also get these additional benefits:
(you become a Contributing Member by donating money to the operation of this site)
- No ads - advertisements are removed
- Access the Contributors Only Forum
- Contributing Members Only Downloads
- Send attachments with PMs
- All image/file storage limits are substantially increased for all Contributing Members
- Option Codes Lookup
- VIN Option Lookups (limited)


dporto
-
Posts
215 -
Joined
-
Last visited
-
Days Won
2
Content Type
Profiles
Events
Forums
External Paint Colors
Downloads
Tutorials
Links Directory
Collections
Store
Everything posted by dporto
-
 Just an FYI...The spirolock can be a challenge to install, don't get frustrated/give up - just when you think "how the *&$@$#%$ does this thing go in"... it will go in It's a little surprising that you didn't take the original one out before you pulled the bearing though...It must have made it somewhat difficult...The vario-cam pads are ridiculously easy/quick to do. I think the most important/time consuming part of dealing with them is getting all the mating surfaces of the heads and cam covers properly cleaned/prep'd/sealed. Also make sure you get the cams properly timed once you get everything put back together. Good Luck
 -
3.4 to 3.6 swap?
dporto replied to johnmh's topic in 996 Series (Carrera, Carrera 4, Carrera 4S, Targa)
I wasn't so lucky with the rest of my exhaust hardware... a bit a of a nightmare actually... lots of cutting and breaking of old/rusted bolts! -
H&R Spring Rates
dporto replied to MikeM's topic in 996 Series (Carrera, Carrera 4, Carrera 4S, Targa)
You may be able to get a spacer for the bottom of the spring (where it sits on the perch) to get you back up to "level"... FWIW I put the H&R's (with Bilstein B8's) on my C4 and although it's a little stiffer than my stock suspension, the "ride" is so much smoother. The stock sus. was so shot that bumps, cracks etc. were super harsh - no so with the new shocks/struts/springs - even though they're quite a bit stiffer. I also put the H&R heavy duty adjustable sway bars on it and it really handles amazingly. -
3.4 to 3.6 swap?
dporto replied to johnmh's topic in 996 Series (Carrera, Carrera 4, Carrera 4S, Targa)
Yeah, the exhaust system is like a puzzle due to the way the pipes cross over. It's possible that if you take the rear engine support bracket off (the one that hangs on the engine mounts) you may then be able to remove the mufflers and cat pipes in one piece. I'd say it's a long shot though. Just as a note, on my engine the bolts from the headers to the heads all came out easily - none broke, and none of the heads stripped either... Good luck -
3.4 to 3.6 swap?
dporto replied to johnmh's topic in 996 Series (Carrera, Carrera 4, Carrera 4S, Targa)
^Exactly my thought process^! I just got the bank 1 cam cover off last night and will start into the vario-cam pads tomorrow...Good luck with the project -
3.4 to 3.6 swap?
dporto replied to johnmh's topic in 996 Series (Carrera, Carrera 4, Carrera 4S, Targa)
Hi John, You're probably talking to JFP, but I'll interject anyway (since I already hijacked your thread...). FWIW, I decided on "The Solution" because I plan on keeping the car. Even with this decision I was a bit torn, as who knows whether I'll actually get more than another 75,000 mi. out of it (that's what the ceramic bearing is supposedly good for). I figured it was worth the "do it once and forget about it" factor - it's only $... In looking at the upper vario-cam pad last night it didn't look badly worn at all. I'm hoping the bottom one is worse, and that's what gave me the out of range deviation... From what I can see of the other chain rails (the large black ones - IMS and main chains) they don't look worn either. Clearly the black debris in my oil screen was sealant... -
3.4 to 3.6 swap?
dporto replied to johnmh's topic in 996 Series (Carrera, Carrera 4, Carrera 4S, Targa)
I actually do have the "bicycle skewer" tool to compress the tensioner. Also, the one on bank 1 is regular right handed thread - lucky I guess. I got the cam cover off tonight. It's quite a messy sealant job so it'll probably take me a fair amount of time to get it cleaned up. -
3.4 to 3.6 swap?
dporto replied to johnmh's topic in 996 Series (Carrera, Carrera 4, Carrera 4S, Targa)
JFP - Thanks for all the help!!! Yup, first timer here. It seems to be a little simpler by pulling the cams, though if it's "safer" yet more difficult to do them while they're in, I would probably opt for the difficulty. My question is, do I lock them down to remove the cam cover and then remove the lock downs (the cam end holders) ? Or, do I just not lock them down at all? Also, remove the 3 chain tensioners correct? They're already out, as I just finished installing a new IMS bearing (LN IMS Solution) so I would not be putting them back to do the variocam chain rails?. -
3.4 to 3.6 swap?
dporto replied to johnmh's topic in 996 Series (Carrera, Carrera 4, Carrera 4S, Targa)
I get that, but how do you change the Vario-cam pads without taking the cams and tensioners out? And, how do you take them out safely without breaking them. I keep going back and forth on this - there seems to be conflicting advice? - Thanks -
3.4 to 3.6 swap?
dporto replied to johnmh's topic in 996 Series (Carrera, Carrera 4, Carrera 4S, Targa)
JFP- I hope this isn't a hijack of the thread (I don't think so, since it's related). So, to change out the cam chain tensioner pads, you have to actually remove the cams...In order to remove the cams, they can't be locked down... I find this to be a bit of a conundrum. Which is it lock them down or not? I've seen a couple you-tube videos and the cams clearly can't be locked down in order to remove them. Do you use the end lock tools to hold them down until the covers are removed and then remove the tool? Thanks in advance -
Time to spruce up my leather
dporto replied to Kim's topic in 996 Series (Carrera, Carrera 4, Carrera 4S, Targa)
The dyes are always going to be a little different in color due to the aging and/or fading of the leather in your car. That being said, the stuff I used (Leather World) is very very close and looks great after being applied. It has also held up extremely well after a year and a half. I have no reason to believe it won't continue to hold up and keep looking great. -
It's finally my turn - RMS / IMS leak
dporto replied to smak's topic in 996 Series (Carrera, Carrera 4, Carrera 4S, Targa)
Considering all the work involved plus the cost of the tools (basically the same regardless of the bearing you use), it seems foolish to try to save $ on the bearing itself... -
Which IMSB is this?
dporto replied to dporto's topic in 996 Series (Carrera, Carrera 4, Carrera 4S, Targa)
You got it JFP and bruthah Justice! I had also sent the photo to LN engineering (it's their "classic dual-row retrofit")but hadn't heard back from them. Thanks for chiming in guys! -
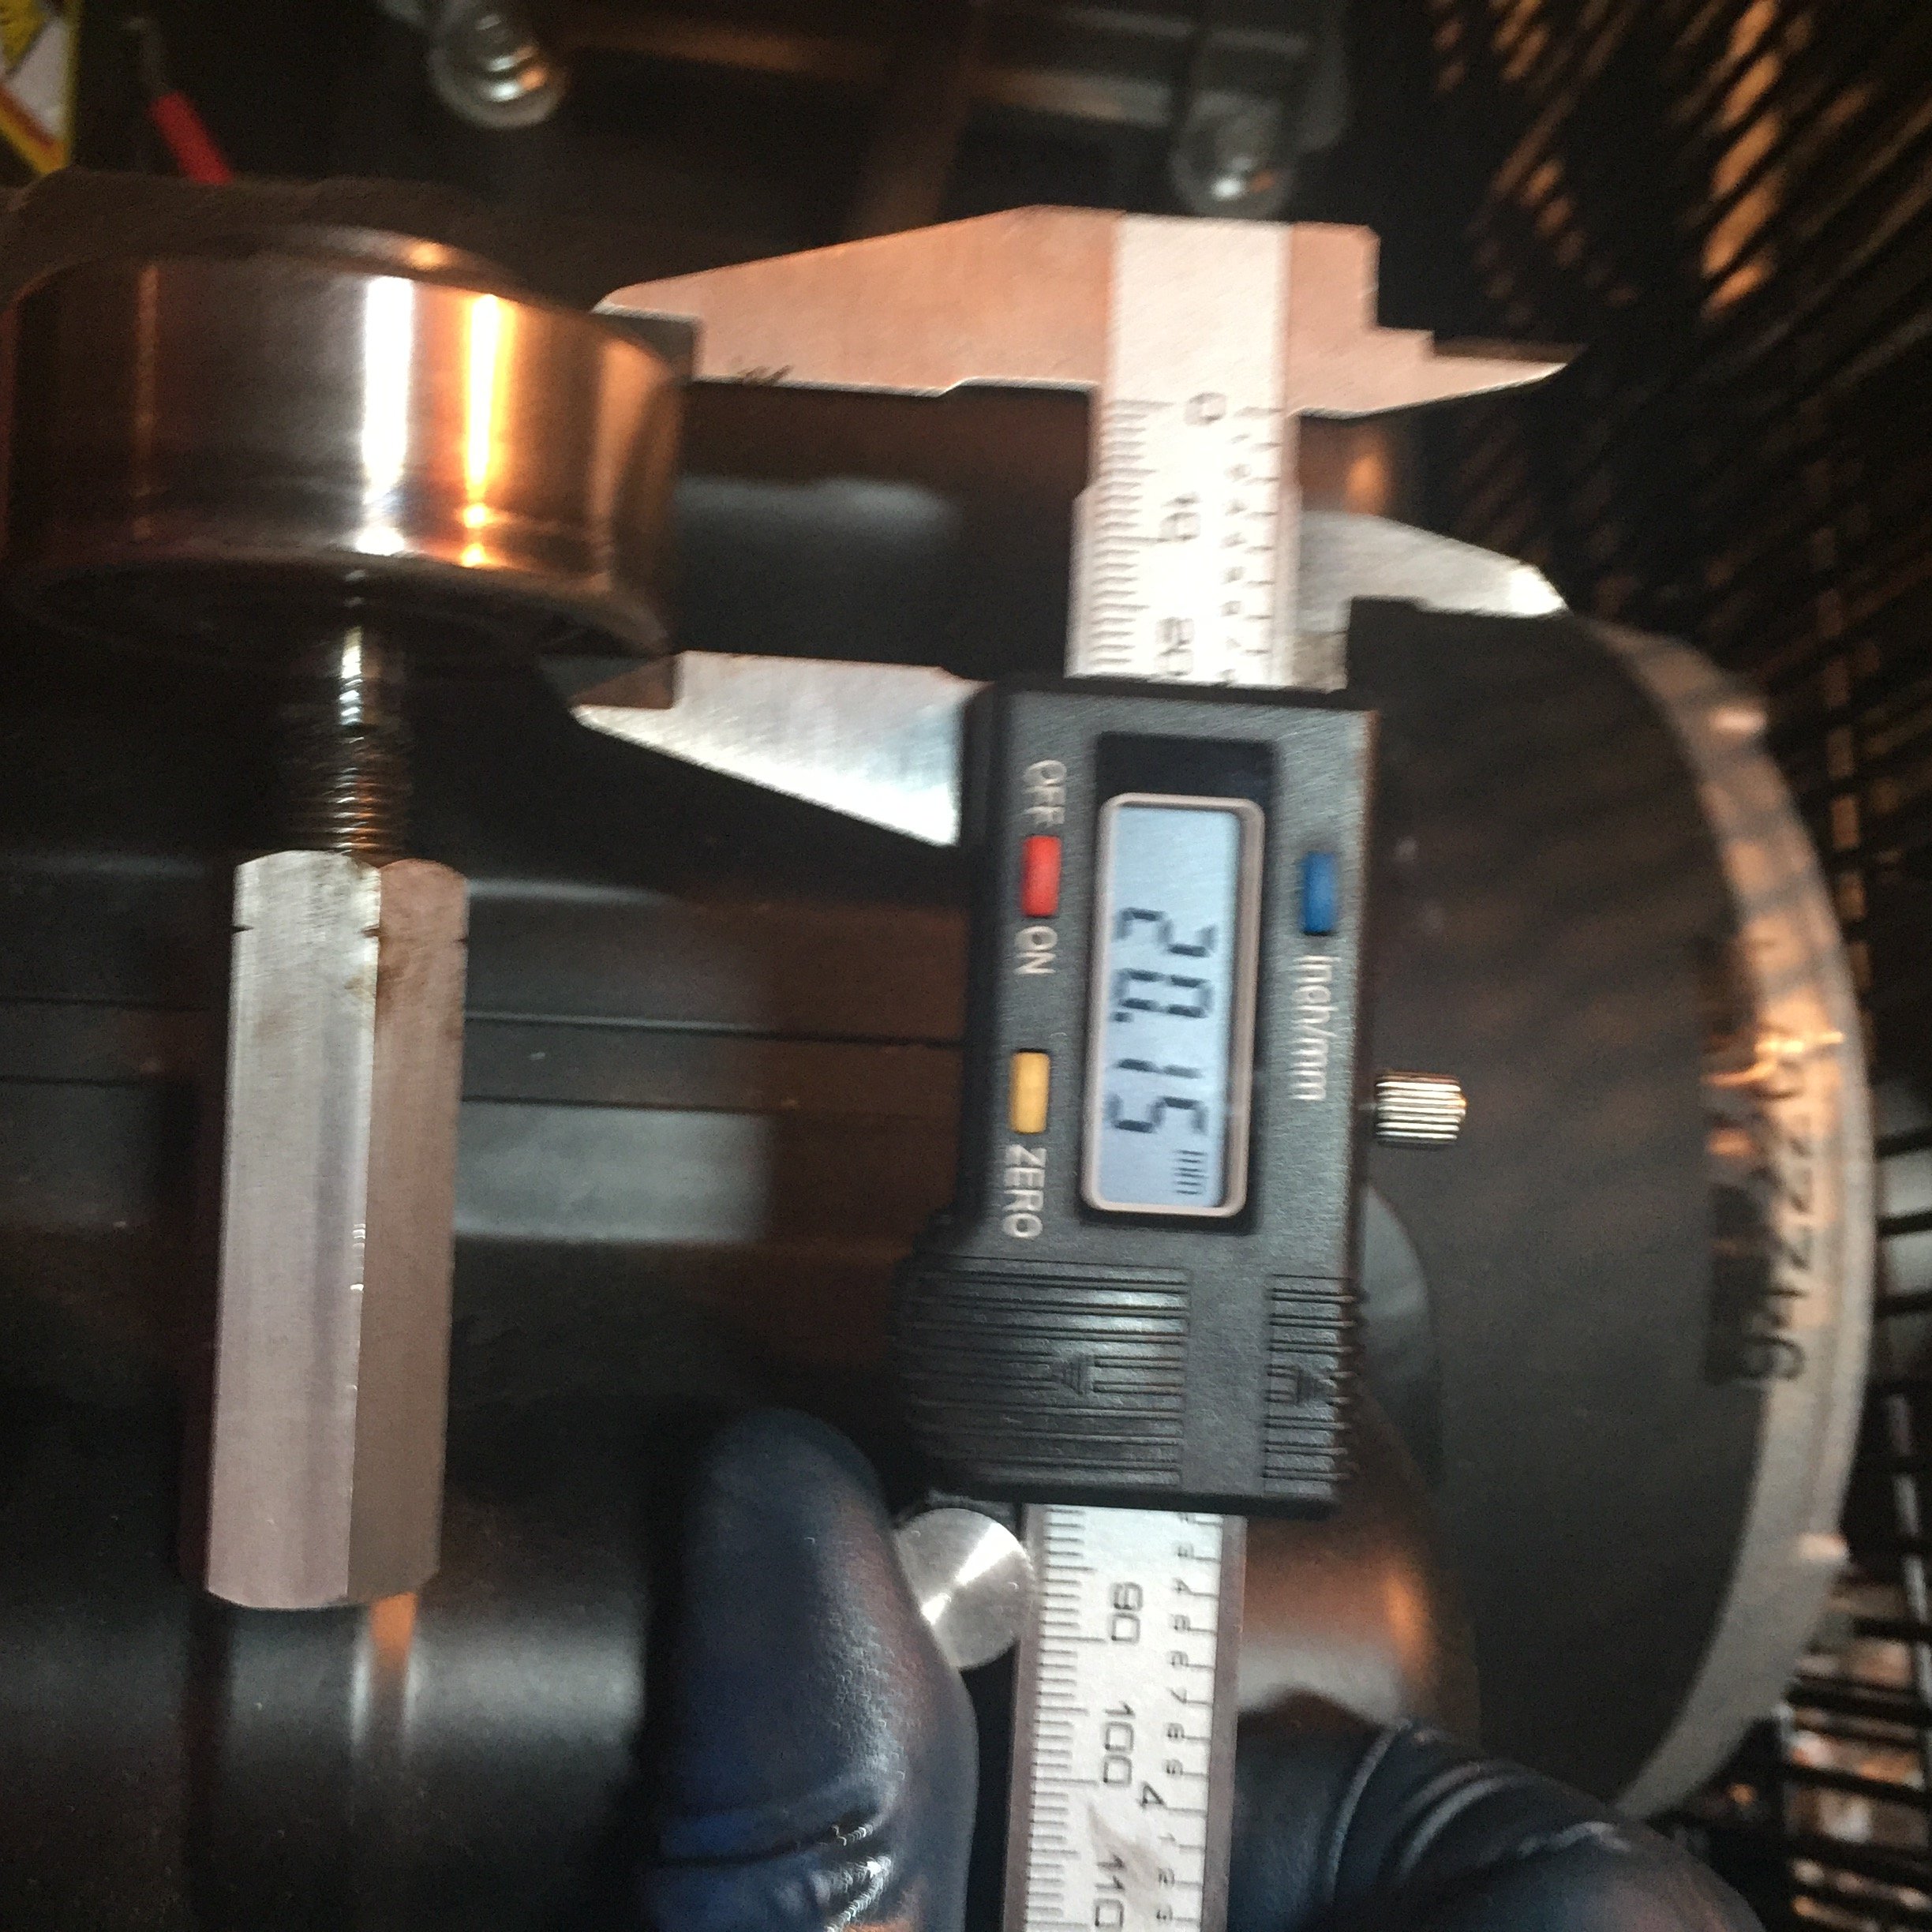
Title says it all. I removed this from my engine yesterday. I just want to confirm what I've got before I order an IMS Solution

-
Under DIY tools if you click on TSB's, they all show up, but if you click on a specific file all you get is a page showing the file number...no actual TSB ???
-
Yeah, I don't know about the thread yet, as I haven't gotten to them yet. I was a little confused about locking the cams...
-
So, it's still a little early for this question, but I figure I may as well get it out of the way. While I get that the crankshaft should be locked/pinned at TDC, I'm wondering about locking the camsfaft(s). If I do, how would I change the pads and/or chain?
-
^Good point^ !!! I think my DIY build will work on the car as well - I was replacing the entire suspension so I wound up taking the carrier off (I aslo had a heck of a time removing the bolt that holds the shock body on so I had to take that one off). In any case, for the "pro's" who do this job on a fairly regular basis $600 and change is a very reasonable price for a well designed/constructed tool - I'm sure it pays for itself in short order.
-
I've had this problem since I bought my car - the previous owner had it as well, and he ran out of gas. ** My "fix" is to reset my trip Odometer each time I refill the tank. With a full tank, I now check my trip odometer on occasion and when I reach 200 miles I refill the tank. This leaves me a reserve of about 100 miles (roughly 5 gal.). While this isn't what I'd call an ideal situation, it has worked well for over two years now and I haven't run out of fuel - not even close...Last time I was at my local dealer I mentioned the fuel guage problem to the service manager, and asked if he could recalibrate my gauge - his response was "no that can't be done, we'd have to replace the fuel level sender unit"...That's why I don't take my car to the dealer...
-
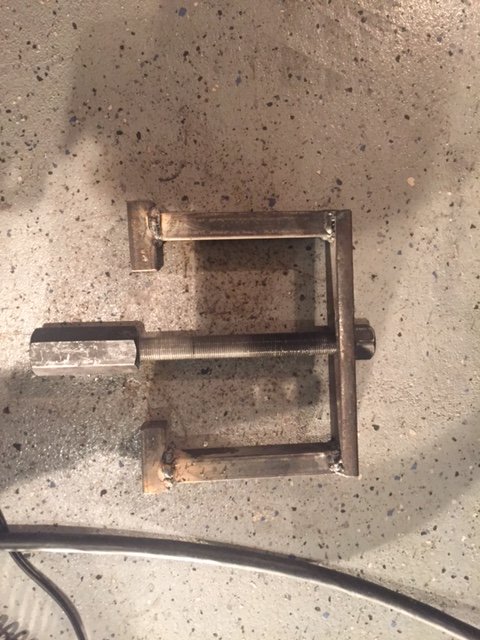
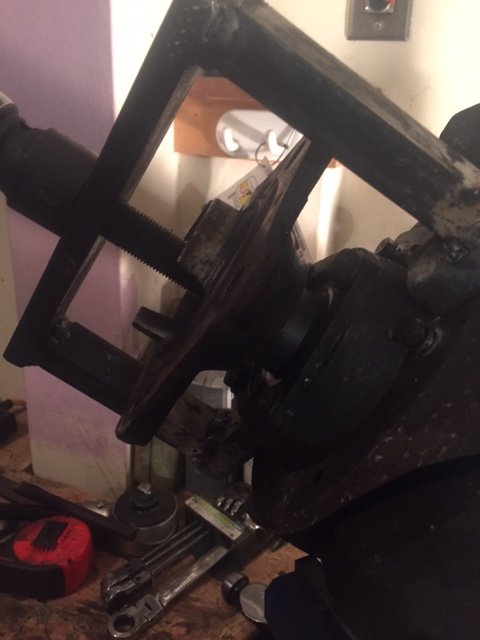
That's pretty much the dea, nice write upl! I created my own tool with a bearing puller and a "Bridge" that I made out of some 1" stock I had lying around - It worked flawlessly and it sure beat laying out $600 for the SIR tool - $90 (for bearing puller set) and a little welding time. It's certainly not as pretty as the sir tool, but I'm not using it on "customer cars" so cost was a major concern...
-
So, in taking my car apart in preparing to drop the motor/transmission, I've broken off a few of the integrated studs that the T5 plastic nuts thread onto. It's pretty amazing that the steel stud would break before the plastic nut, but I digress... Does anyone know if these studs are available? Any ideas of where to try to find them? suppose I can always just get some threaded stock to weld on, but if I can find the original parts I would prefer that.
-
If it aint broken...
dporto replied to pedefede's topic in 996 Series (Carrera, Carrera 4, Carrera 4S, Targa)
Sounds like a bad ground to me. I would be wary of the dreaded Y-Cable...It's a well documented weak link. If it was the immobilizer you'd be "dead in the water". Check/clean all your ground connections then put your battery on a "tender"... Good luck -
^Ha^ I know... I'm finding a bunch of little stuff along the way as well - lots of rusted screws, bolts, speed nuts etc...Which of course all need to be fixed. I'm trying to address the things I can as I run into them. If it's too much of a delay/sidetrack, I'll set it aside for a time when I can give it the attention it needs. I got a couple hours in yesterday evening and got the coolant drained, the under-body panels and all the under braces out of the way of the transmission. In romoving the body trim pieces in front of the rear whewels I found some pretty serious rust/rot. It was clear that these pieces had never been removed and the corners were just packed with dirt that had accumulated there over the years. I'll defi nitely have to revisit these areas and do some serious rust removal/remediation. Tonight/tomorrow should be cable/wire connections to the transmission etc...Almost forgot to mention the axles...
-
I'm in the midst of doing this job now. I haven't gotten to the cam covers yet as I'm still focusing on dropping the engine/transmission. I only get a couple/few hours at a time to work on it so it's pretty slow going (nights/weekends - in between everything else that needs to be done in my "free time"...). I got the AC compressor out last night and the engine bay is just about clear (all wires/connection that need to be removed). Hopefully if all goes well I'll be dropping the engine/transmission by next weekend - this weekend is kind of screwed with the holiday's...
-
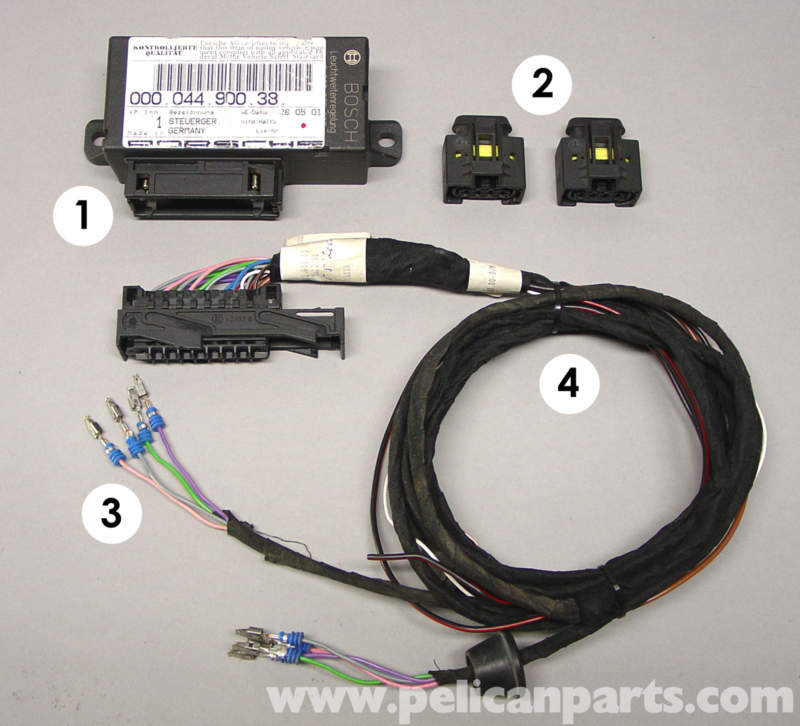
I know this is an old thread, but it relates to what I'm experiencing so I'll give it a resurrection! I've got the " 1 Engine path left" and "2 Engine path right" faults in Durametric. My lights do work, but sometimes they act strange (intermittently). On occasion, if I have the high beams on and activate a left turn signal, the litronics will move up and down. Other times, the left turn signal won't work at all if the high beams are on... I did clear the code, but it comes right back. The locking tab on the Litronic connector on the right headlight is broken (not the blue receptacle - the black 4 pole "D" connector) the connector itself is ok, just the lock is broken - perhaps leading to an intermittent connection. The problem is, I can't find these connectors anywhere - I thought I found them on Alibaba but it turns out that the stock pins on the wiring harness won't fit into the shell (the shell fits perfect). They're clearly very similar, but not quite right. If I have to replace the pins, I will - but I'd rather find the proper plug. The one I found is actually a Mercedes part - The plugs can be seen here in this photo from Pelican Parts (#2). The major caveat being that they don't sell them seperately - and claim they can't get them... I can't believe it's so difficult to find a connector like this. Anyone have any ideas? Experienced problems like these?