Welcome to RennTech.org Community, Guest
There are many great features available to you once you register at RennTech.org
You are free to view posts here, but you must log in to reply to existing posts, or to start your own new topic. Like most online communities, there are costs involved to maintain a site like this - so we encourage our members to subscribe or donate. All subscriptions and donations go to the costs operating and maintaining this site. We prefer that guests take part in our community and we offer a lot in return to those willing to join our corner of the Porsche world. This site is 99 percent member supported (less than 1 percent comes from advertising) - so please consider an annual subscription or donation to keep this site running.
Here are some of the features available - once you subscribe RennTech.org
- View Classified Ads
- DIY Tutorials
- Porsche TSB Listings (limited)
- VIN Decoder
- Special Offers
- Paint Codes
- Registry
- Videos System
- View Reviews
- and get rid of this welcome message
It takes just a few minutes to register, and it's quality Porsche information at a low cost.
Contributing Members also get these additional benefits:
(you become a Contributing Member by subscribing or donating money to the operation of this site)
- No ads - advertisements are removed
- Access the Contributors Only Forum
- Contributing Members Only Downloads
- Send attachments with PMs
- All image/file storage limits are substantially increased for all Contributing Members
- Option Codes Lookup
- VIN Option Lookups (limited)


Mr.Flip
-
Posts
50 -
Joined
-
Last visited
Content Type
Profiles
Events
Forums
External Paint Colors
Downloads
Tutorials
Links Directory
Collections
Classifieds
Store
Everything posted by Mr.Flip
-
Boxster Recurring Coolant Dump Problem
Mr.Flip replied to DrivingQuant's topic in 986 Series (Boxster, Boxster S)
I had a similar problem with my 02 boxster, turned out to be the O ring in the bleeder valve on the reseviour. I found out when I took the cover of the reseviour off, drove around, and parked it. When it started dripping on the ground I looked and saw it was from there. Dealership had the 2 o rings (one big, one small) for less than $4. Took it apart and turns out that the big O ring was tightened so much it ripped. Replaced and drove fine for a year. Leak happened again and it was the same o ring. This time I put a thin layer of silicone on it and it's been fine ever since! Sent from my iPhone using Tapatalk -
I've had to replace the reservoir on my 05 CTT because it was cracked and leaked out antifreeze behind the front passenger tire. It's not a difficult job, and it can be done in about and hour or two. If there's not much fluid left then your fine, if there's alot then either get a big bag or kitty litter or siphon it out. Remove the plastic covers on the passenger side, remove the passenger headlight (you'll need to take out the neck for the washer fluid, and there's a 16mm bolt to remove for the torque strut mount right under the tank), unscrew (at the engine) and take out the torque strut assembly, remove the torx screw that holds the tank on in the bottom, then remove the hoses that surround it and the main hose at the bottom. Install in reverse order. Sent from my iPhone using Tapatalk
-
You can use the right knob to scroll through the settings and push it to select what's highlighted. After that just push any of the buttons on the bottom to get back to where you want to be. Sent from my iPhone using Tapatalk
-
Best bet is to remove the manifold, I've had to remove mine a couple of times for the coolant pipes and coolant tee in the back. Even with my small hands it was a pain to get back there. Sent from my iPhone using Tapatalk
-
If you have a scope then you should be able to view it without even taking off the water pump. I remember changing the pipes and I saw a gap in between the intake manifold and valve cover on the drivers side towards the front where I could have snaked my scope in. I'll go back to it tonight and verify but I'm pretty sure there is a gap. Sent from my iPhone using Tapatalk
-
Headrest question
Mr.Flip replied to Mr.Flip's topic in 9PA, 9PA1 (Cayenne, Cayenne S, Cayenne Turbo, Cayenne Turbo S)
Solved! For anyone who might be wondering the same thing, the headrests fit any cayenne from 2002/3-2010. Sent from my iPhone using Tapatalk -
Hey guys, I just had a quick question. I have an 09 Cayenne but the rear headrests are missing. However! There are some on eBay for 03-06 models. Are these interchangeable or do I have to get a second generation cayenne headrests? Thanks! Sent from my iPhone using Tapatalk
-
I had that problem a few months back, swaped it out and it was fine too. Until now. Sent from my iPhone using Tapatalk
-
Dang. How hard was it to replace them? I think I may have found my leak, the adapter piece thats part of the upgrade had antifreeze baked around the seal of it. Granted it doesn't look like that now because i sprayed WD-40 to try to get it out. Sent from my iPhone using Tapatalk
-
For about a month now my cayenne would leave some antifreeze on the ground, at first it was a little bit but now it's more like a small puddle. Parked it on a hill with the splash guard off and saw that it was leaking from the drivers side rear of the engine. Automatically fearing the infamous "plastic coolant pipes" fault in these, I went ahead and removed everything to see if it has been replaced or not(owned the car for 10 months). To my surprise (and relief) it has been. My question is this, is there any more common spots that it can leak out other than the coolant pipes in the middle of the engine? My car is a 2005 Cayenne Turbo with about 134,000 miles. Thanks in advance! Sent from my iPhone using Tapatalk
-
3.6 V6 coolant leak help
Mr.Flip replied to shonuff's topic in 9PA, 9PA1 (Cayenne, Cayenne S, Cayenne Turbo, Cayenne Turbo S)
Yeah it was an easy job. All I did was remove the plastic covers on the passenger side of the engine bay, the exhaust shield is held with one bolt that, once removed, will pull off the clips it holds onto in the bottom. From there I just felt the two bolts (one on top one on bottom) of the plastic flange, if I'm not mistaken they are both either 12mm or 13mm. -
3.6 V6 coolant leak help
Mr.Flip replied to shonuff's topic in 9PA, 9PA1 (Cayenne, Cayenne S, Cayenne Turbo, Cayenne Turbo S)
I thought so too but when I pulled up the diagram it was listed under : Porsche Cayenne M55.01 Water Pump Thermostat Housing Sent from my iPhone using Tapatalk -
3.6 V6 coolant leak help
Mr.Flip replied to shonuff's topic in 9PA, 9PA1 (Cayenne, Cayenne S, Cayenne Turbo, Cayenne Turbo S)
I've had the same problem in my 2008 v6. After removing the 2 bolts I saw it had a rubber gasket. Waiting for the dealership to call me when it comes in. (Was the cheapest there) It's technically for the thermostat. It's called a flange socket and sealing ring. Here's the part #'s 95510623100 Flange Socket 95510643100 Sealing Ring Sent from my iPhone using Tapatalk -
It's an online repair manual. I'm going to try to upload the images here. I apologize of it is not in order, the first 8 pictures are for the heater server motor

-
There is a TSB about the transfer motor going out. Maybe it's what happened with yours: 3 19/10 ENU 3978 Mar 26, 2010 Transfer Gear: Servo Motor and Control Unit (19/10) Model year: as of 2003 up to 2010 Vehicle Type: Cayenne/Cayenne S/Cayenne GTS/Cayenne Turbo/Cayenne Turbo S Equipment: Porsche Traction Management (PTM) Concerns: Servo motor and control unit for transfer gear. Information: - Display in instrument cluster: "All-wheel drive system defective", - Fault code 2033, 2039, 2041, 2042 in transfer gear control unit. This is caused by overheating of the servo motor in the "Low Range" driving program afier driving long distances due to a fault in the transfer gear control unit. As a result, the fault codes specified above are entered in the control unit. A modified transfer gear control unit is installed since October 30, 2009. Date of Introduction: October 30, 2009 Action Required: In the event of a complaint, replace the servo motor and install a new control unit. Control unit Model year 2003 to 2006: ----> 391319 Removing and insta11ing transfer gear control unit. Model year as of 2008: ----> 391319 Removing and installing transfer gear control unit. Servo motor --> 397819 Removing and installing servo motor on transfer gear. Parts Info: References: --> 391319 Removing and installing transfer gear control unit --> 391319 Removing and installing transfer gear control unit --> 397819 Removing and installing servo motor on transfer gear Sent from my iPhone using Tapatalk
-
Airbag on Steering Wheel Removal
Mr.Flip replied to Schnell Gelb's topic in 986 Series (Boxster, Boxster S)
I had a similar situation with my 01'S and 02 base. What I did was push the airbag in, in return that pushes the screws through the rubber hole and let's you unscrew they enough to get the airbag out. The problem is they push against the rubber hole and get jammed enough to not fully unscrew Sent from my iPhone using Tapatalk -
I apologize for the incorrect pictures, the website I pulled it from seemed to have changed the pictures randomly as I copied it Sent from my iPhone using Tapatalk
-
986 Boxster electrical and wiring
Mr.Flip replied to pcaengr's topic in 986 Series (Boxster, Boxster S)
I pulled some diagrams from ALLdata, sorry I couldn't put them together and draw a line, but I named them where they should go. The switch is located on the center bottom diagram, and the latch is on the Left diagram. Hope this helps
-
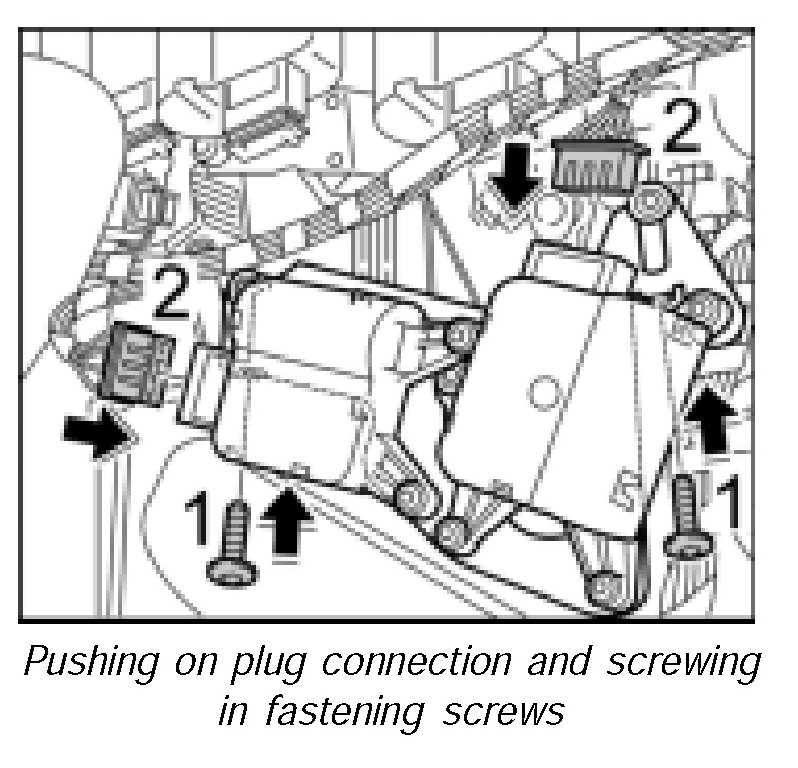
Auxiliary Air Conditioning system OEM Part Number is 95562490501 Removing And Installing Servo Motors Preliminary work Preliminary work - removing servo motor on additional air conditioner Remove rear side trim panel. Preliminary work - removing servo motor on central vent Remove centre console. Preliminary work - removing servo motor for footwell/B-pillar vents Remove front seat. Remove centre console. Removing servo motor Removing servo motor on additional air conditioner Compress air duct from above and pull it out of the air conditioner -arrow-. NOTE: Only when removing the left servo motor Unscrew the fastening screws -1- and tilt the additional air conditioner inwards at the top side. Release connector -Arrow A- and pull off -Arrow B-. Unscrew the fastening screws -2- and pull the servo motor from the air flow flap -arrow-. Removing servo motor on central vents Release connector -Arrow A- and pull off -Arrow B-. Undo the fastening screws -Arrows 2- and remove the servo motor -Arrow C-. Removing servo motor for footwell/B-pillar vents Fold up the floor carpeting -Arrow A-. Release connector -Arrow B- and pull off -Arrow C-. Undo the fastening screws -Arrows 2- and remove the servo motor -Arrow D-. Installing servo motor Installing servo motor on additional air conditioner Push the servo motor onto the shaft of the air flow flap -arrow-. Twist servo motor with air flap into the fastening position -Arrows B- and screw down with the fastening screws -Arrows 2-. Tightening torque 1.0 ftlb . Push on connector -Arrow A- until the locking tab -B- is felt to engage. NOTE: Only when installing the left servo motor Tilt the additional air conditioner inwards at the top side arrow- and screw down with the fastening screws -Arrows 1-. Tightening torque 6 ftlb . Push the air duct into the additional air conditioner -arrow- until the air duct is felt to engage. Installing servo motor on central vents Push servo motor onto the air flap -Arrow A- and turn to the fastening position. Screw down the servo motor with the fastening screws -Arrows2-. Tightening torque 1.0 ftlb . Push on connector -Arrow B- until the locking tab -C- is felt to engage. Installing servo motor for footwell/B-pillar vents Push servo motor onto the air flap -A- and turn to the fastening position. Screw down the servo motor with the fastening screws -Arrow 2-. Tightening torque 1.0 ftlb . Push on connector -Arrow B- until the locking tab -Arrow C- is felt to engage. Fold back floor carpeting -Arrow D-. Subsequent work Subsequent work - Installing servo motor on additional air conditioner Install rear side trim panel. Subsequent work - Installing servo motor on central vent Install centre console. Subsequent work - installing servo motor for footwell/B-pillar vents Install centre console. Install front seat.
-
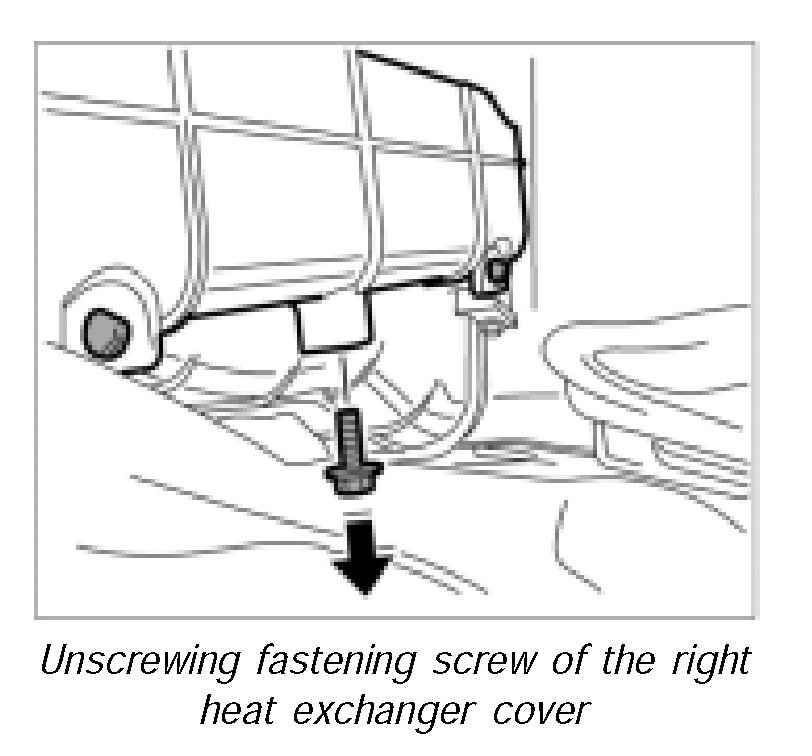
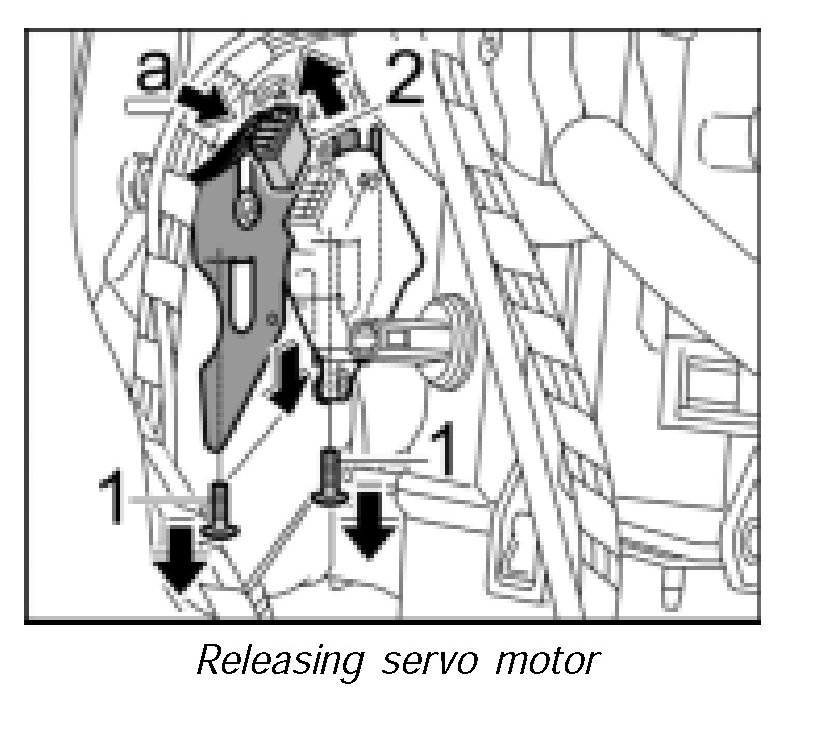
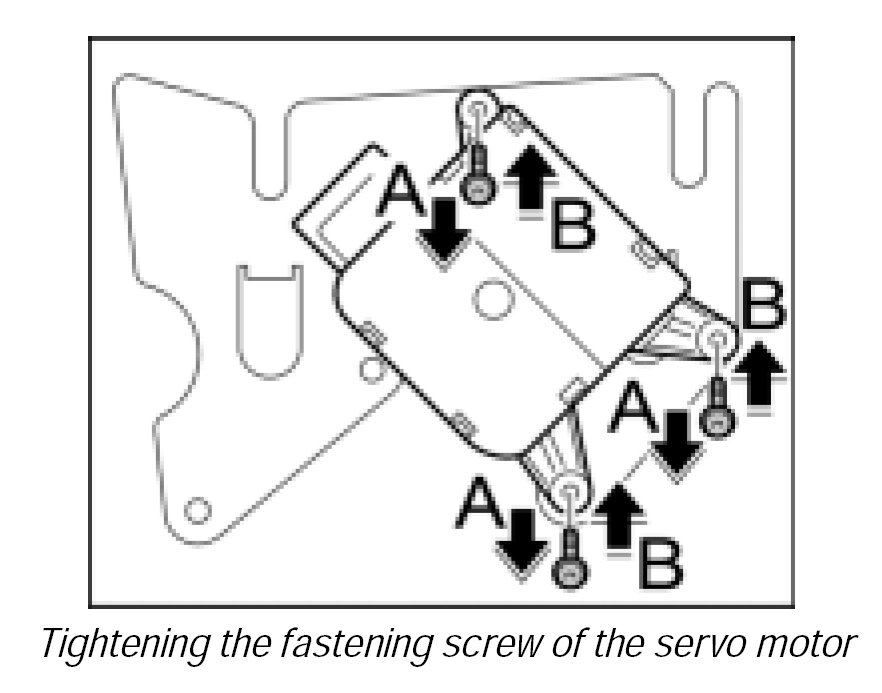
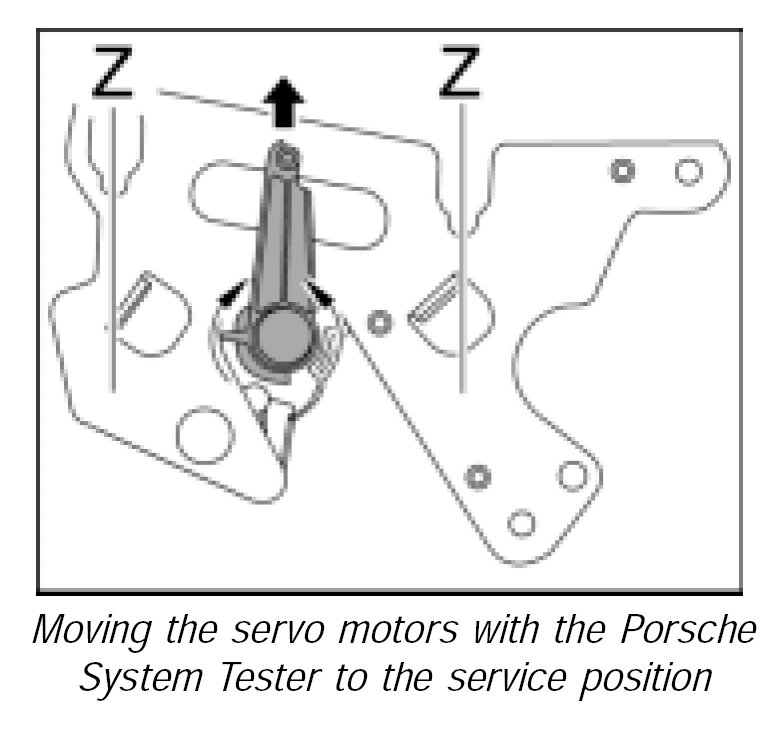
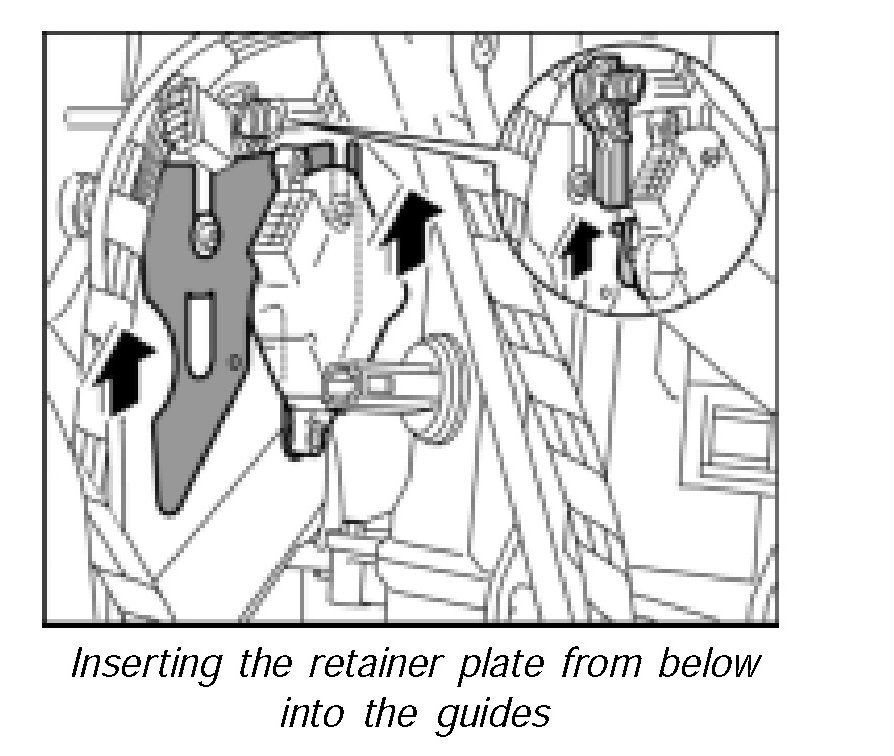
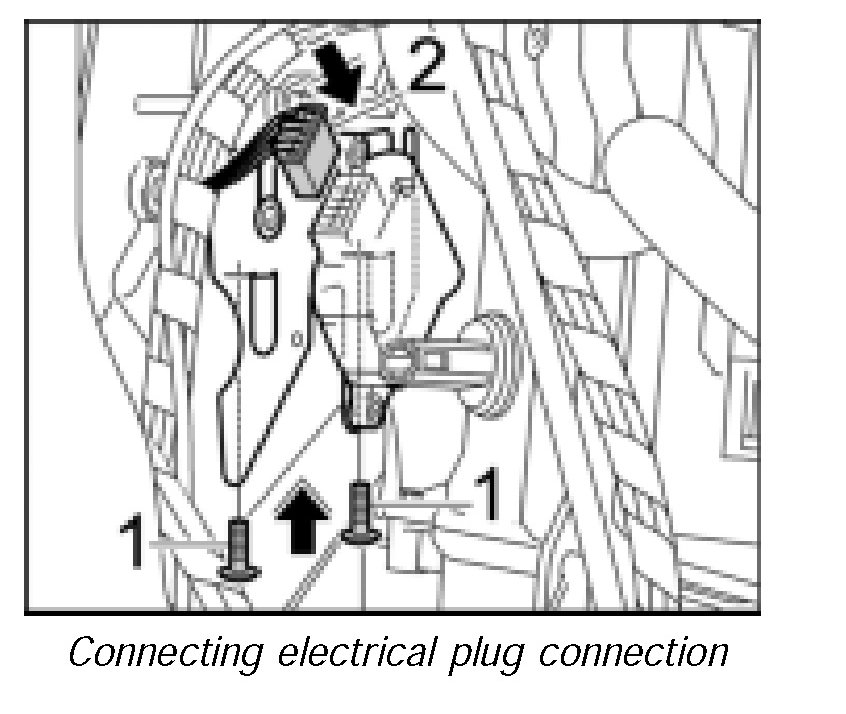
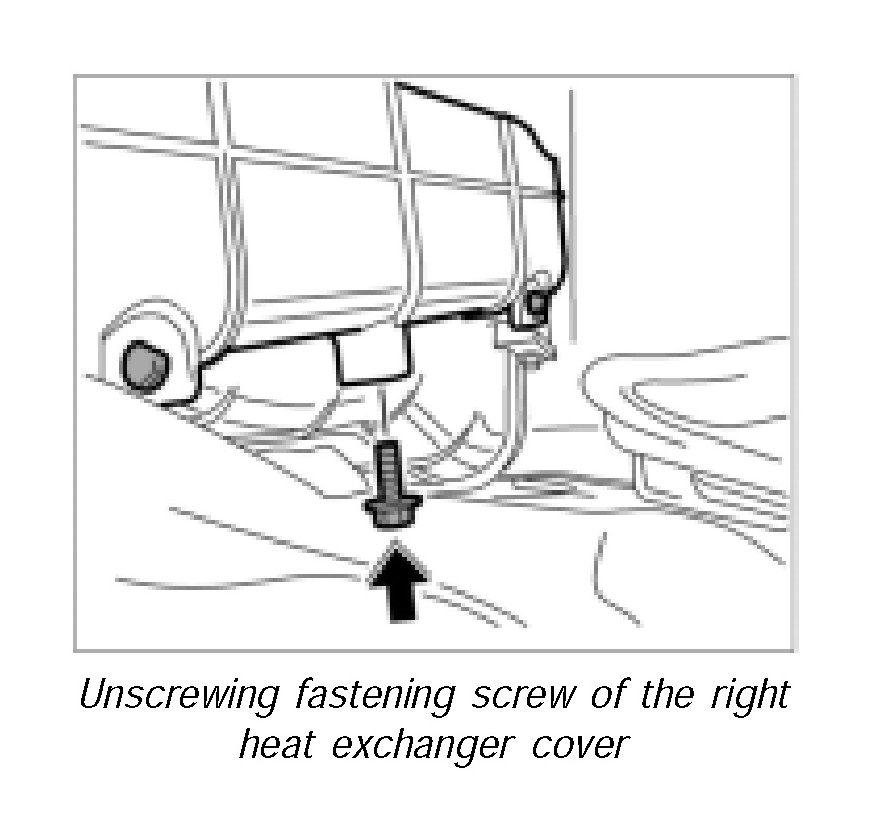
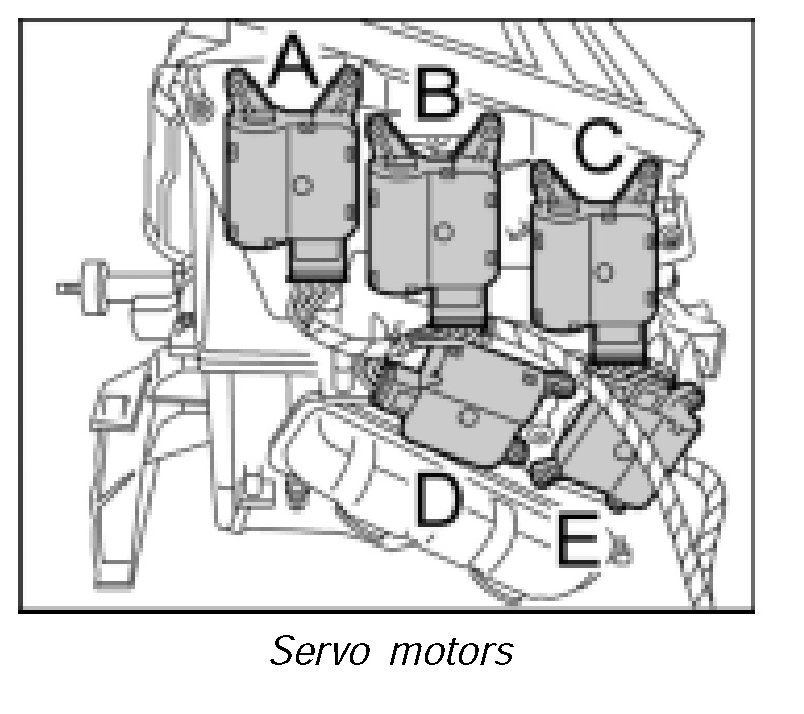
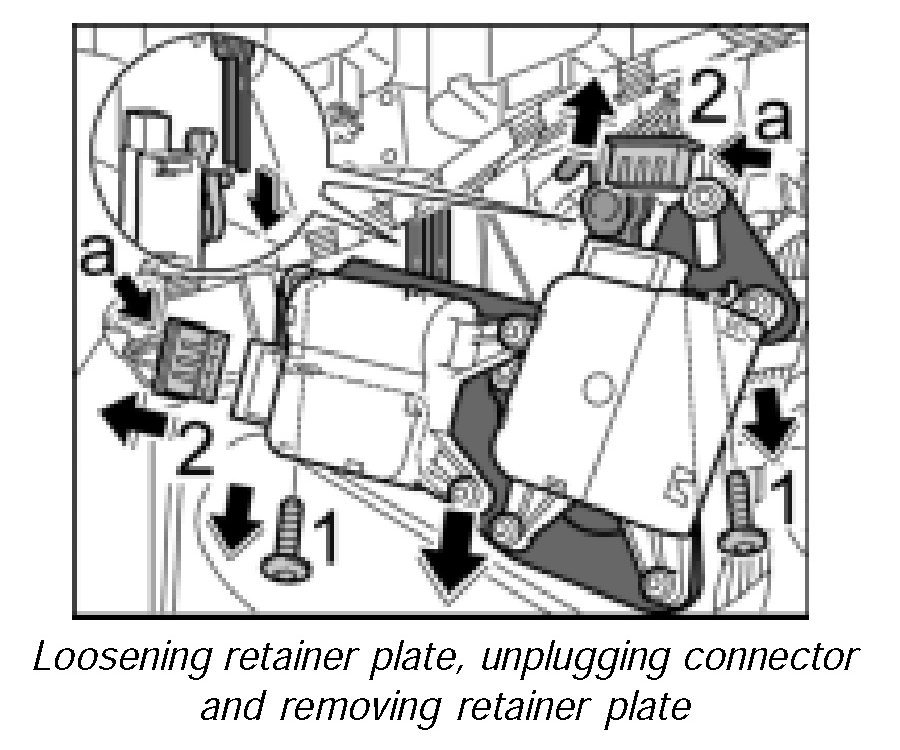
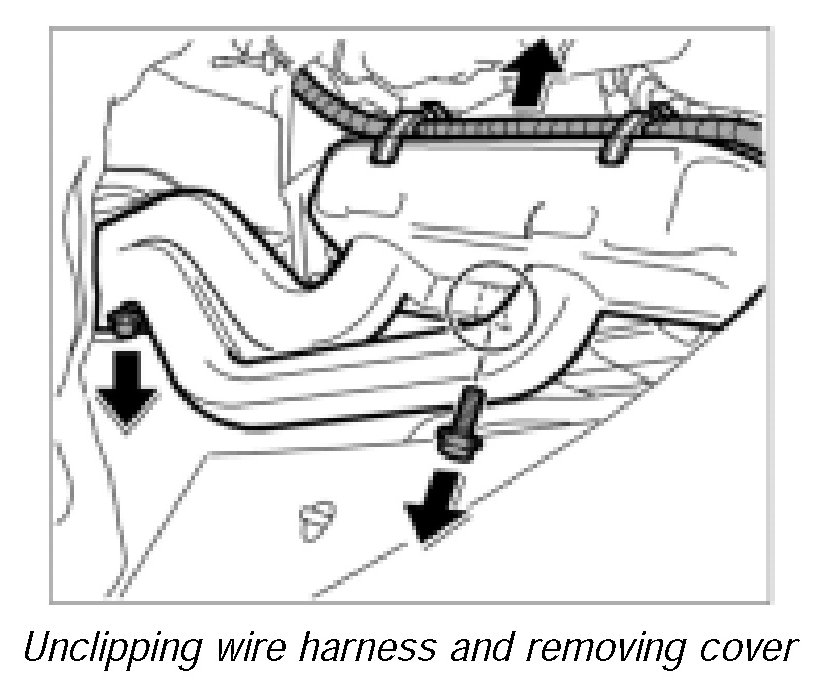
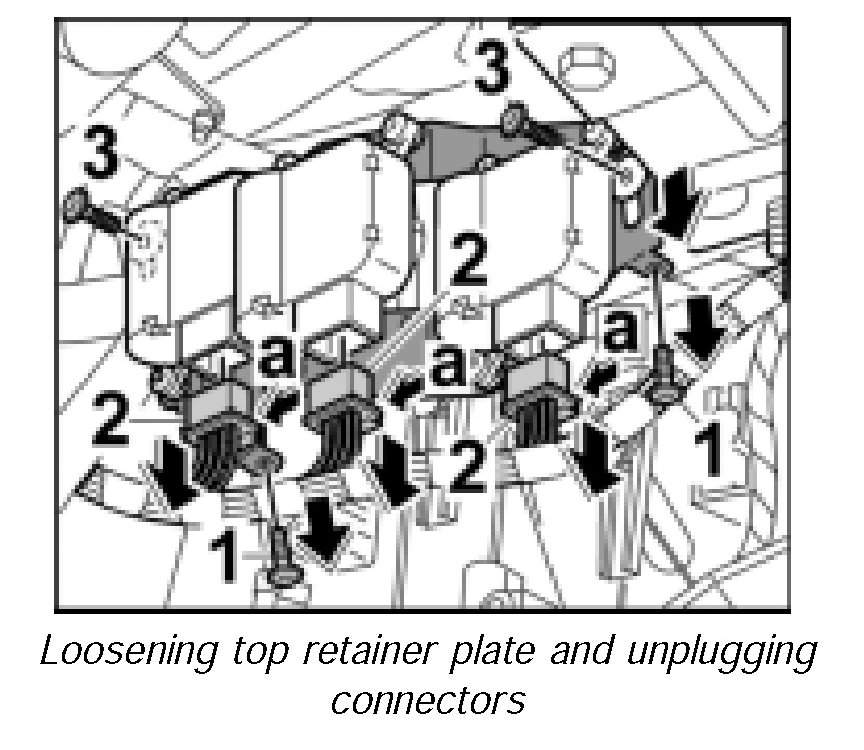
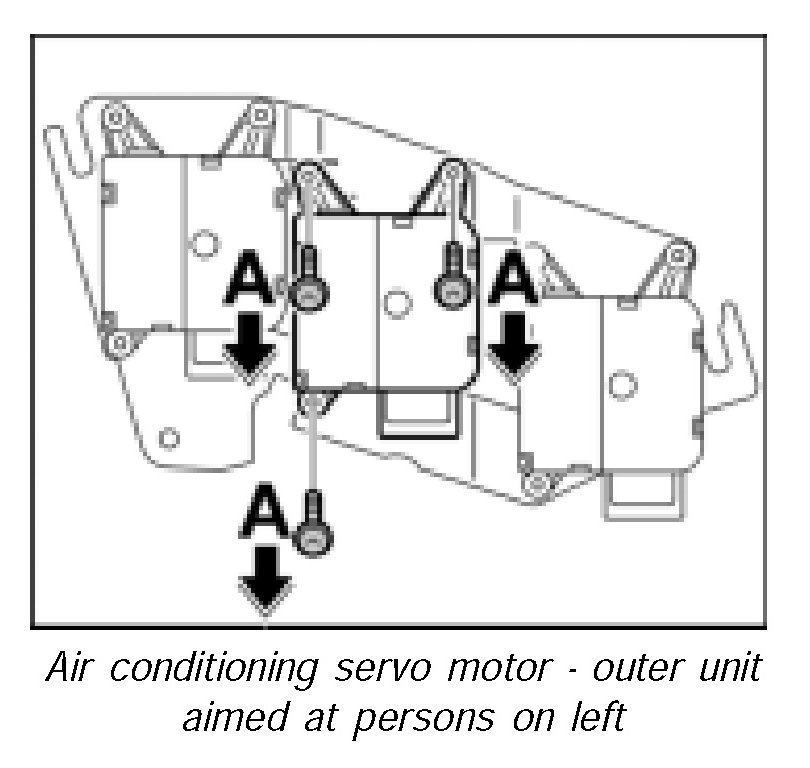
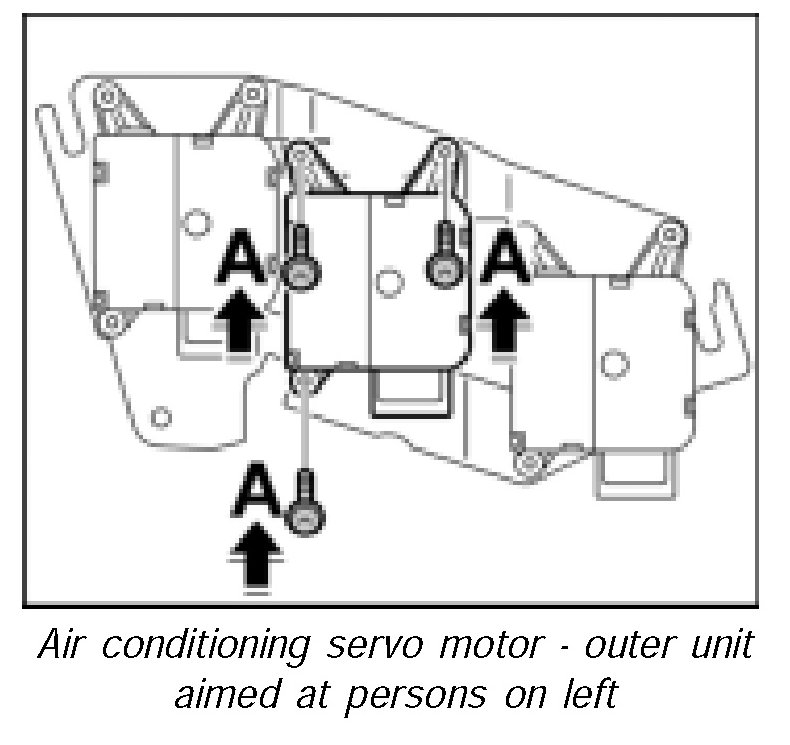
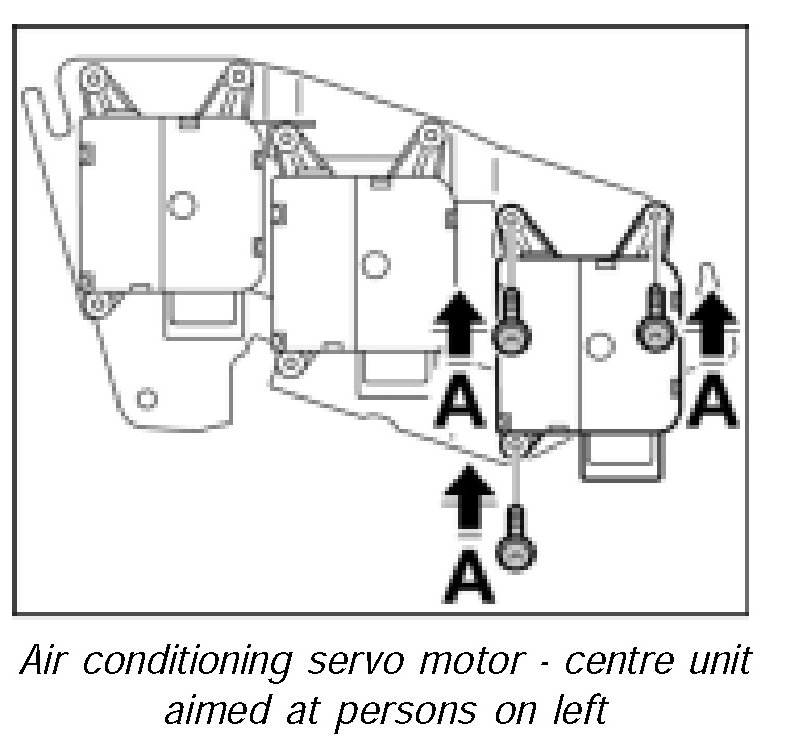
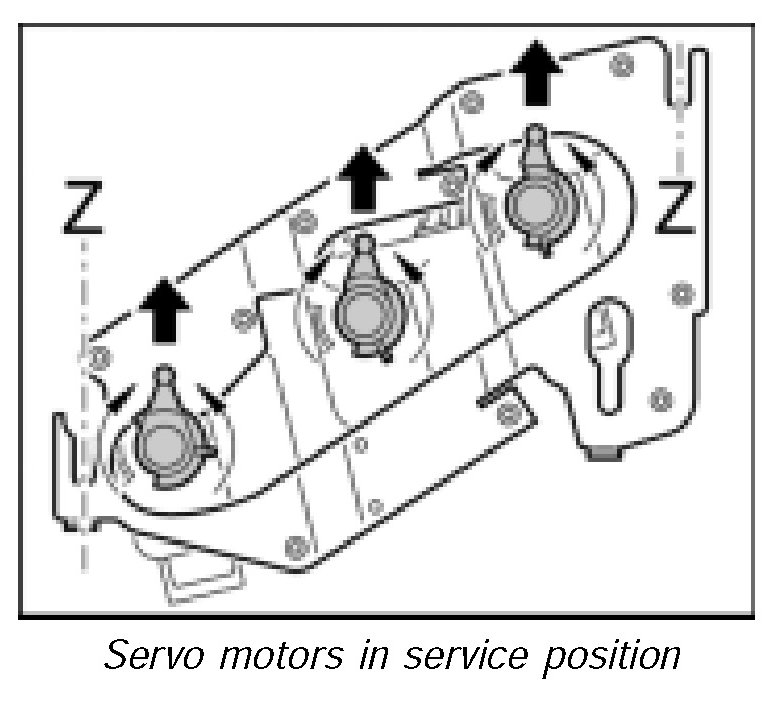
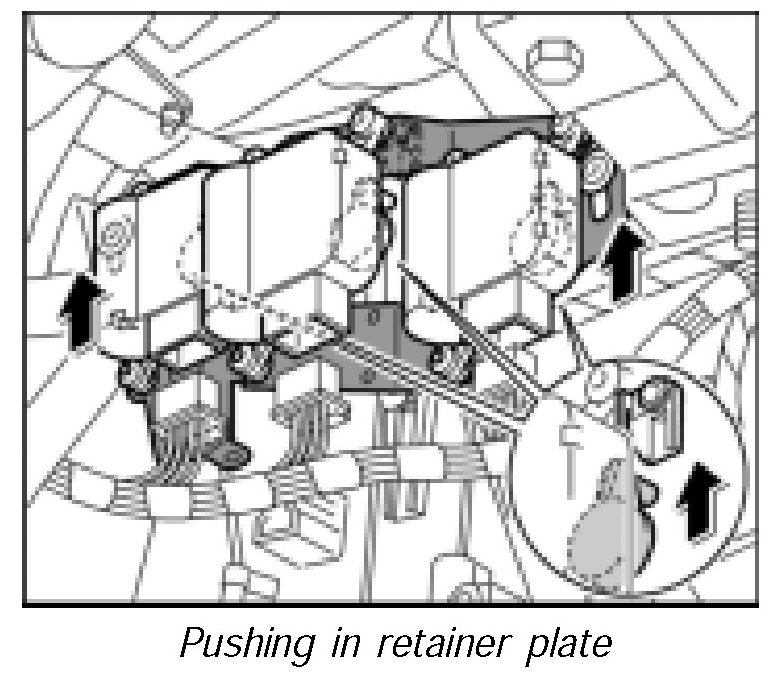
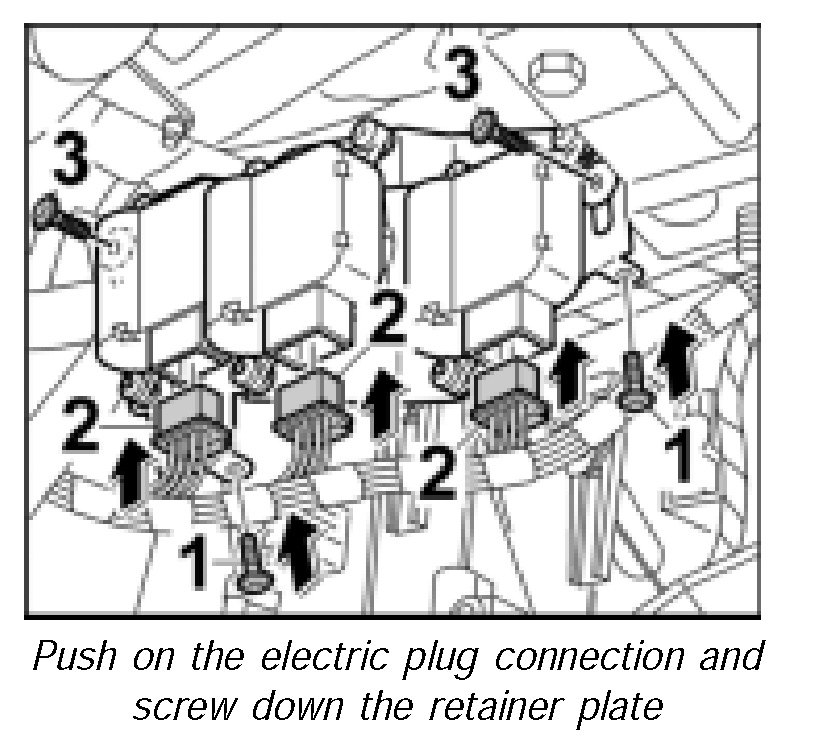
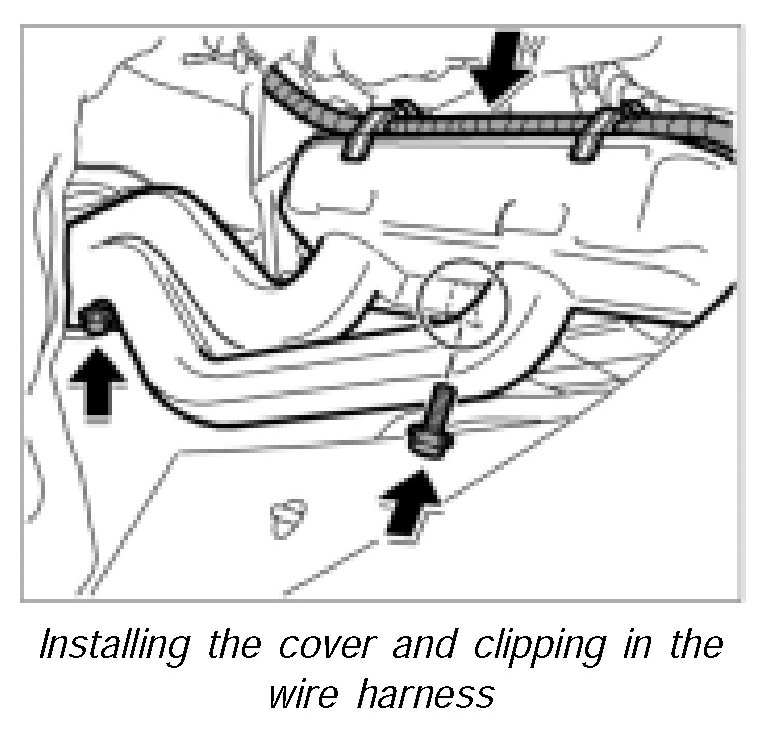
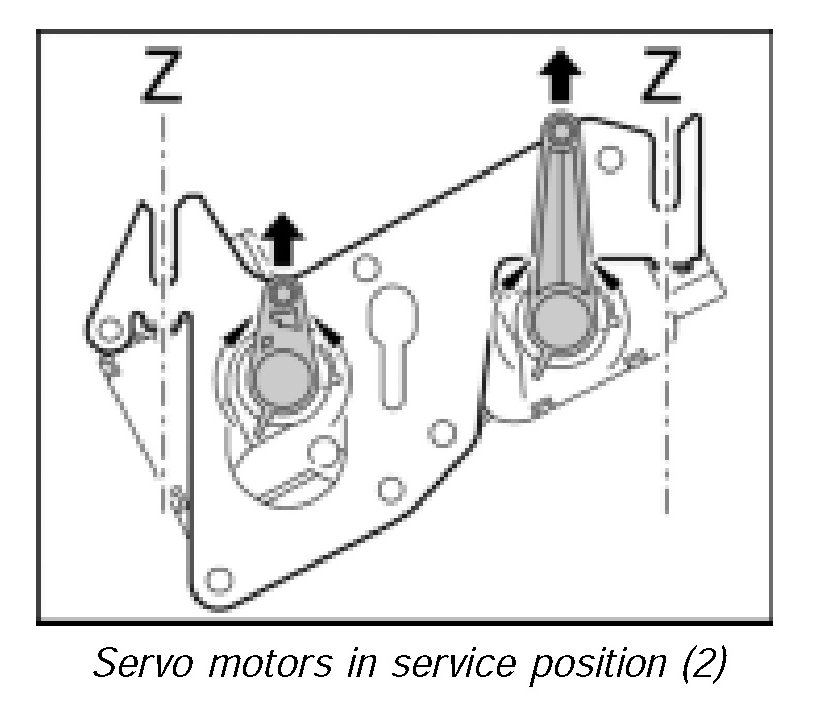
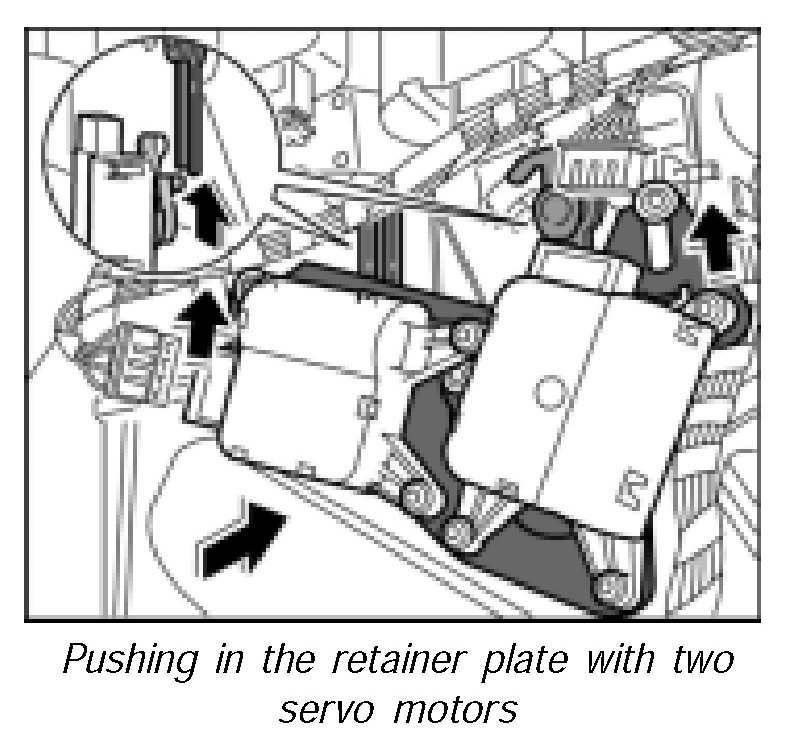
Here is the main Servo Motor repair information. The part # is 95562490101 I'll post the auxiliary repair next Removing And Installing Servo Motor Preliminary work Remove trim under dashboard on left. Remove KESSY/immobilizer control unit. Remove vehicle electrical system control unit. Remove relay carrier. Removing servo motor NOTE: The air conditioner servo motor -B- - outer unit aimed at persons on left - is located on the left air conditioning unit. The air conditioner servo motor -C- - centre unit aimed at persons on left - is located on the left air conditioning unit. The individual servo motors -B and C- are not installed on both sides of the air conditioning unit in vehicles with a manual air conditioner. These are replaced by just one air conditioner servo motor, which is installed on the left side of the air conditioning unit at the servo motor position -B-. Switch ignition off and remove ignition key before starting work. Unscrew the fastening screws -arrows 1- of the retainer plate with motors -D and E-. Press electrical connectors -Arrows 2- -Arrows a- and unplug the connectors. Pull out the retainer plate with the motors -D and E- downwards from the guide. Unclip wiring harness on the left heat exchanger cover. Unscrew both fastening screws on the left heat exchanger cover and unclip the cover. Unscrew both fastening screws -Arrows 1- of the top retainer plate with the servo motors -A, B and C-. Press in plug -2--a- and pull apart plug connection. Pull out retainer plate downwards. If necessary, loosen the guide screws -3- of the retainer plate. Unscrew fastening screws -Arrows A- and remove servo motor. Unscrew fastening screws -Arrows A- and remove servo motor. Installing servo motor Place the servo motor on the retainer plate and screw down using the fastening screws -Arrows A-. Tightening torque 1.0 ftlb . Place the servo motor on the retainer plate and screw down using the fastening screws -Arrows A-. Tightening torque 1.0 ftlb . Move the servo motors with the Porsche System Tester to the service position. The drives must be parallel to the guides -Z-. NOTE: Switch on ignition and carry out the service position menu, Drive links menu with the Porsche System Tester in the Climatronic. As an alternative, the servo motors can also be powered with 12 volts until they have reached the correct position. Always use the circuit diagram for this. Connect the electrical plug connections to the servo motors. Switch off ignition and remove ignition key. Press in plug again and pull apart plug connection. NOTE: Make sure that the drivers of the servo motors are pushed into the mountings. Insert retainer plate with the three servo motors from below into the guides on the air conditioning unit as far as it will go. Push on electric plug connection -Arrows 2- until connectors are felt to engage. Screw in both fastening screws -1-. Tightening torque 1.0 ftlb . If necessary, screw down the guide screws -3- of the retainer plate. Tightening torque 1.0 ftlb . Clip left cover into place and secure with the fastening screws. Tightening torque 1.0 ftlb . Clip in wiring harness on the left heat exchanger cover. Move the servo motors with the Porsche System Tester to the service position. The drives must be parallel to the guides -Z-. Push the electric plug connections onto the servo motors. NOTE: Switch on ignition and carry out the service position menu, Drive links menu with the Porsche System Tester in the Climatronic. As an alternative, the servo motors can also be powered with 12 volts until they have reached the correct position. Always use the circuit diagram for this. Switch off ignition and remove ignition key. Press in plug again and pull apart plug connection. NOTE: Make sure that the drivers of the servo motors are pushed into the mountings. Insert retainer plate with the two servo motors from below into the guides on the air conditioning unit as far as it will go. Connect the electrical plug, pressing on until it audibly clicks into place -Arrows 2-. Screw in both fastening screws -Arrows 1-. Tightening torque 1.0 ftlb . Subsequent work Install relay carrier. Install support for relay carrier. Install vehicle electrical system control unit. Install KESSY/immobilizer control unit. Install trim under left dashboard.
-
Thank you guys! I tried to lock it with the button on the door to no avail. Locked it with the key and tried to unlock with the handle, same thing. I'll be checking the fuses when I have time and in the meantime I'll just be locking it normally.
-
Bought a 2005 Cayenne Turbo last week and it is definitely an upgrade from my '04 S that I had before it. However, I see that the door handles have a button on them that wasn't on my old one. Looking into it I assume that it has or had Porsche Entry and Drive. The used dealership I got it from only had one key with the car and there was no "dummy key" in the ignition which from what I read is needed for Entry and Drive. My question is, how can I find out if I had it, and if I did have it, how can I reinstall it in my car? P.S. The Porsche dealer printed me a list of my options and I saw code 4F6 which the description is : CENTR.LOCK. KEYL. ENTRY W/O SAFE LOCK. SYS. Thanks guys!