Welcome to RennTech.org Community, Guest
There are many great features available to you once you register at RennTech.org
You are free to view posts here, but you must log in to reply to existing posts, or to start your own new topic. Like most online communities, there are costs involved to maintain a site like this - so we encourage our members to donate. All donations go to the costs operating and maintaining this site. We prefer that guests take part in our community and we offer a lot in return to those willing to join our corner of the Porsche world. This site is 99 percent member supported (less than 1 percent comes from advertising) - so please consider an annual donation to keep this site running.
Here are some of the features available - once you register at RennTech.org
- View Classified Ads
- DIY Tutorials
- Porsche TSB Listings (limited)
- VIN Decoder
- Special Offers
-
OBD II P-Codes - Paint Codes
- Registry
- Videos System
- View Reviews
- and get rid of this welcome message
It takes just a few minutes to register, and it's FREE
Contributing Members also get these additional benefits:
(you become a Contributing Member by donating money to the operation of this site)
- No ads - advertisements are removed
- Access the Contributors Only Forum
- Contributing Members Only Downloads
- Send attachments with PMs
- All image/file storage limits are substantially increased for all Contributing Members
- Option Codes Lookup
- VIN Option Lookups (limited)


td873
-
Posts
52 -
Joined
-
Last visited
Content Type
Profiles
Events
Forums
External Paint Colors
Downloads
Tutorials
Links Directory
Collections
Store
Posts posted by td873
-
-
Two GM engineers tested 2-3 cross-drilled braking systems and 2-3 solid-face braking systems. The pictures blurred anything on the rotors that could identify the braking systems they tested. It's a 28 page analysis/report with quite a bit of technical mumbo-jumbo.
They made a few observations (including the obvious of cracks developing around the holes), but the one that pertains to my reply is that cross-drilled rotors do improve brake cooling over solid-face rotors. Furthermore, the cooling rate increases as speed increases.
Of course, rotor design also plays an important factor. It is possible to put too many holes in a cross-drilled rotor or place them ineffectively.
The SAE article is locked w/ DRM on my personal laptop. If anybody is interested, then I'll also summarize the other observations that they noted in their conclusion if I get some time this evening. In the meantime, somebody else on another auto forum has read the same paper; you can read his comments as well if you're bored: linky, linky
I just stumbled on this thread, so I am going to reply, although a little late ;)
I suggest folks read this themselves: it is HIGHLY biased towards cross-drilling. AND it does not account for slotted or dimpled rotors or other engineered solid rotors. ONY completely solid ones (see the picture on page 24) and p.23 where they admit they didn't even look at slotted or dimpled rotors). It is unclear what types of venting/vaning the solid rotors they used have - if any!
Because of these fundamental issues, it is easy to find snippits favorable to cross-drilled rotors in the article - but only as they are compared to generic solid rotors. Again, ONLY completely solid rotors, and not race rotors with slots / dimples / vanes / vents, etc. [Note that there is plenty of discussion about the vaned design of the x-drilled - but almost no discussion on the type or design of the solid rotor. Clearly a Brembo (or other) solid rotor will operate better than less "engineered" models.] Despite the fact that they used junk solid rotors, there were still a number of points favorable to the non-crossdrilled rotors they tested!
High Performance Wear Test - conclusion: higher apparent friction levels for non-crossdrilled rotor during the 450 deg C wear test.
High Speed Abuse Test - brake system 3b had higher brake system output with smaller diameter, non crossdrilled rotors than system 3a with the larger diameter crossdrilled rotors.
Life - adding crossdrilling to the rotor design "reduces its fatigue life." This will occur at a lower number of heat cycles than ... a solid rotor. [i.e., cross drilled rotors die faster]
[There are others, but these are kinda neat]
Also, keep in mind that their test does not accurately represent real world use. For example, the tests were not dramatically affected by pad build up in the holes. This will severely change the results, since the ENTIRE premise of the article is that the holes help. In fact - they indicate that OVER 90% of the hole will clog under use! [brake system 1, full. Brake system 2, 90%.] They also state that this can have really bad results. [This also illustrates that new pad technology does NOT need the holes for venting gas.]
I also direct your attention to one of the most important conclusions - design affects performance. System 1 and 2 showed better performance with x-drilled, but system 3 showed better performancewith solid. But, what would happen with a properly designed rotor?
The closing statements of this article details the many negative affects of using cross drilled rotors. But I want to emphasize that the data presented is only a few data points regarding completely solid vs crossdrilled rotors. NOT crossdrilled vs track/slotted/dimpled/etc rotors.
Also, please refer to the more recent technical articles on the SAE site. There is a great one on Race Braking Technology (ca 2008). That one states you can improve brake cooling "through rotor design, cooling ducts ... and in some cases rotor crossdrilling can improve cooilng, but at the expense of lining wear rates" (not "in all cases"). This paper also talks in depth about brake fade.
There are a few other papers out there, but I have not read any more relevant that I can remember.
-td
-
Where you are pointing to could be a leak in the windshield washer tank and/or headlight washers (if you have them).
Both tanks are located there behind the wheel well liner (high in the fender).
Mine leaks from that same place, when I refill the washer fluid. Did you add washer fluid lately?Roger, thanks. BTW, it only leaked when the car was on a negative incline (front about 10 degrees higher than rear).
I'll put some water in the fluid reservoir today and see if it leaks.
I'll post findings for the next lucky winner ;)
-td
-
I stopped the car and noticed about a cup of fluid leaking from behind the front driver's side fender well. It actually was dribbling out from the front of my side skirt. It looked and smelled like coolant, but I'm not 100% certain it was coolant - more like 90%. Also, the coolant tank is still on max.
I've driven almost 100 miles since I saw the puddle, but haven't seen any other leaks.
Any thoughts on this?
-td

-
Alright, 2000 C2 tip with 110 k miles on it. Daily driver runs very well. Pulling up to a stoplight idle is fine for first ~20 seconds. Then there is a slight stumble, maybe 200 RPM. Comes back smooth for about 10 seconds, then stumble, then recover. Never goes below 600 on the Tach. I have read the posts about cleaning the throttle body. Done that twice, no difference. Attempted to clean down past the TB because I could see a little gunk in the runners. Also cleaned MAF more than one time, no improvement. No codes at all. Has thrown codes but they were fixed and not related. Any other thoughts on this. Car has always done this since I had it (got it with 70k). Have changed plugs, fuel filter about 85k, no difference. I have a durametric scanner but seems like when I feel like running tests I get an error message and it shuts down. New O2 sensors about 10k miles ago.
Thoughts on what else to do? Not a big issue but I sure don't want to lead to a stall at a stoplight.
How long has this been happening? And when was the last time you filled up with gas?
-td
-
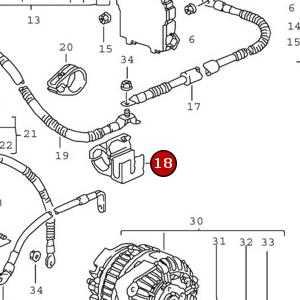
The 996 doesnt have a connection there like the 997 does. What connections have you checked so far? What voltage are you seeing at the battery with the car running?
The original quote related to the 996. When I look at the PET, there is a sub-connection somewhere between the engine bay and the battery (number 18 in the picture attached).
In any event, I have well under 13 volts after startup (idling) with nothing running (12.5v). With the lights on I have about 12.25. If I have the lights and AC on, I am around 12.1, but sometimes drops below 12 (11.9v). When I turn things on and off, I can get a voltage "spike" up to 13v, but only for a few seconds, then it drops back down to 12.5-12.6. This is checked using durametric realtime monitoring.
I know it sounds like the alternator, but when I had this one installed, it seemed to charge properly for about a month, but now it's back to FUBAR.
-td
-
My new alternator is still charging low. It's going in for a checkup next week, but I figured I'd spend a few minutes with some DIY diagnosis. I checked a few easy to reach electrical junctions, and cleaned the various connection spots, but one has eluded me. In the post below, someone mentioned a junction in the trans tunnel. Does anyone have a pic of where this is?
-td
FEW things u can checkcheck the power lead on the pass side of the engine compartment under the lil flip door make sure its clean and tight
theres another junction in the trans tunnel under another lil flip cover if they get coroded u will see low output i have seen it especially on northern cars
lastly
u need to check the excite wire on the back of the alternaotr should have 12v with the key on if you dont have battery voltae there the alt will not have output
u also could have a bad alternator....new ones have been bad before it wouldnt be the first
-
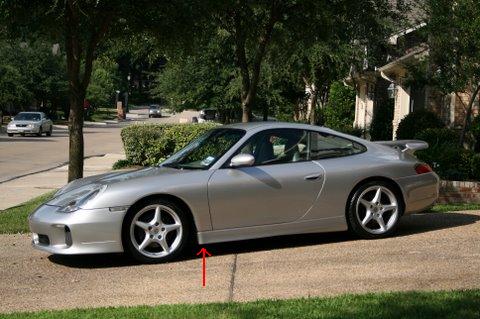
Good morning!! First off I just picked up a 2000 Carrera 2 with 6spd. Here is my questions. The only reason I ask is everytime I build/race a car I found out after the fact I should have done it a different way. The rear tires need replacing soon. So I either want to get a really aggressive tire for both street and the track. Or should I get an extra set of rear wheels and put the track tires on them. Or last should I have an extra 4 wheels/tires for the track. Please let me know my best route for this. Which tires are the best for the rear and front? I currently have the factory 18" wheels.
Thanks
brett
IMO, you should have a separate set of track rims. This will do a number of things:
Preserve the life of your street tires (won't kill them on the track)
Preserve the life of your track tires (won't waste them by driving on the highway).
Preserve the looks of your street wheels (they'll get beatup a bit on the track).
Improve handling on the track if you use a better tire (vs using a street tire).
Save money on street tires (allowing you to purchase cheaper tire that are street only)
Allow you to experiment more with track tires when you move to R-comps or slicks.
Cost less in the long run.
Keep in mind that your alignment may influence what type of street tire you get. I have a bit of negative camber, so I chose a fairly high treadwear street tire.
Also, you should not run street tires on the front with track tires on the rear. Your car will understeer like crazy. You really need similar compounds all the way around.
-td
-
Did you install the shims? See here
http://www.design911.co.uk/fu/pt66_209_-cm...ibration-shims/
I do not have any vibration noise. Also, FWIW, these shims will not work with Pagid pads, and I assume PFC either.
-td
-
I did a search, but didn't turn up anything - so I'm posting a new thread (and question).
Part I:
I have been running pagid yellows for a while, but they tend to become worthless below 1/3 of a pad. This weekend, I had one front pad chunk horrbily - to the point that it was losing material under braking so fast that the pad was eaten away to the backing plate. It was so bad that under braking it caused the car to turn. Keep in mind that this was just 1 pad on the front driver's side (the outer pad), the inner pad still had more than 1/3 remaining - although it was chunking, it was not disintegrating. On the passenger side and in the rear, both pads were still more than 1/3.
Part II:
So I upgraded to PFC-01 in the front. However, now I have a clicking noise when I tap the brake. My guess is that when there is no pressure in the line, the pads back off the rotor just a bit, and when you tap the brakes they are pushed onto the rotor causing the clicking noise I hear.
Has anyone experienced this?
-td
-
Thanks for the info. To be honest, I wasn't going to discuss the replacement here since I know many will shake their heads in shame, but the power goals are going to involve a twin turbo LSx motor- if I do this. Far beyond what a 3.4 with a supercharger will provide :). I was going to just turbo the 3.4, but there is no DIY tuning software available that I have found and I am not going to over pay a shop to tune it just because of the name. Even if I did, it still won't provide nearly the power I am looking for. With the LSX, I can do all my own tuning and fab work. I am the "nobody touches my car but me" type and this is EVERYTHING from paint to engine work to custom fabbing to tuning- I do it all. I used to own a shop doing performance work, now it is just a hobby. I just can't justify paying someone else to do it for me when I am more than capable and probably have more experience than they do :).
Awesome. Good luck with the upgrade and please keep a log or at least post some updates. The P world would be greatful for details along the way!
As for the engine, you might get more for it if you can document that it is working, provide repair/maintenance history, and have it removed by a reputable shop. Selling it sight unseen from a stranger with no additional probably won't fetch much. I think the 3.4 would be a nice upgrade for an early boxster ;)
-td
-
The power steering fluid in my 3.4L 996 sometimes overheats resulting in some spewing out the air purge value. The purge valve "cap" isn't secured very tight, and the pressure pushes it up, or sometimes off completely.
Any thoughts on the reason for this? [do the power steering lines need to be insulated/isolated?]
Any thoughts on how to fix/rig this? I've been adhering to the "put some more in" school for now. But I'd like to identify if there is a problem and how it can be fixed. FWIW, this is a crate 3.4 engine installed this year, now with around 8,000 miles on it.
-td
-
Well perhaps this is what you need then...Mine has no boing....
thanks again. i think you pointed in the right direction. this weekend i will see if there is excessive resistance on one of the camber camber plates causing the spring to bind while turning.
I have some noise and it appears to be coming from the drop links I used with the GT3 sway bars. My noise is more of a rattle than a clunk. Happens when the car is traveling straight. When there is any load on the sways (and the drop links) there is no rattle.
-td
-
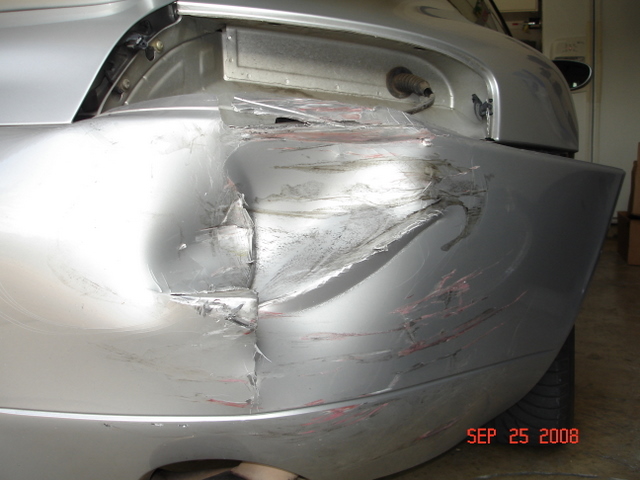
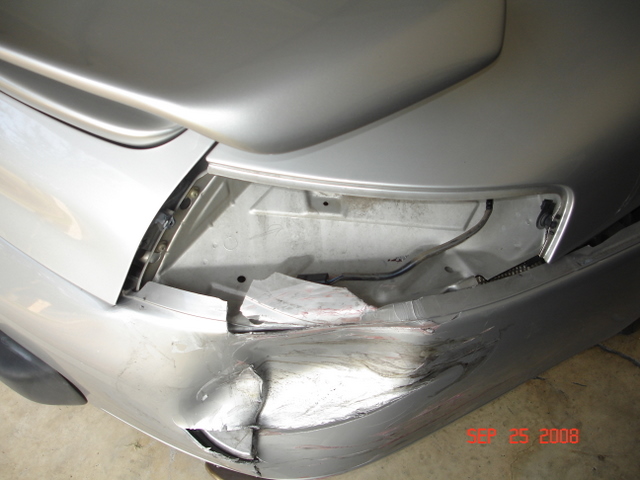
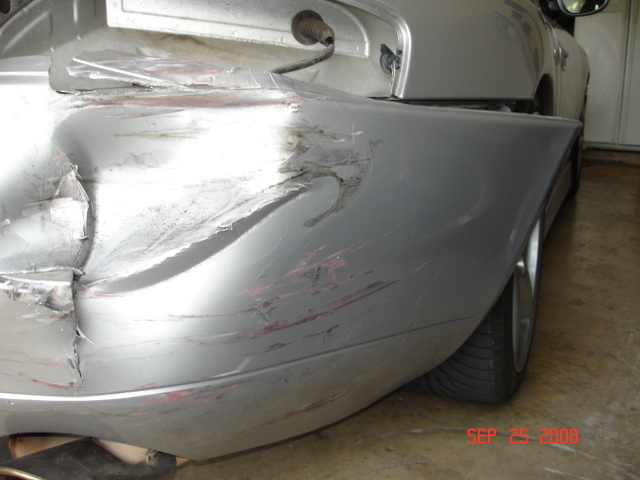
I was rear ended on Thursday. Below are some pics of the damage.
Is there any "hidden" areas I should pay particular attention to? Or damage that I should might not be apparent?
What are the chances of having frame / engine / exhaust damage?
Thanks,
Tom
-
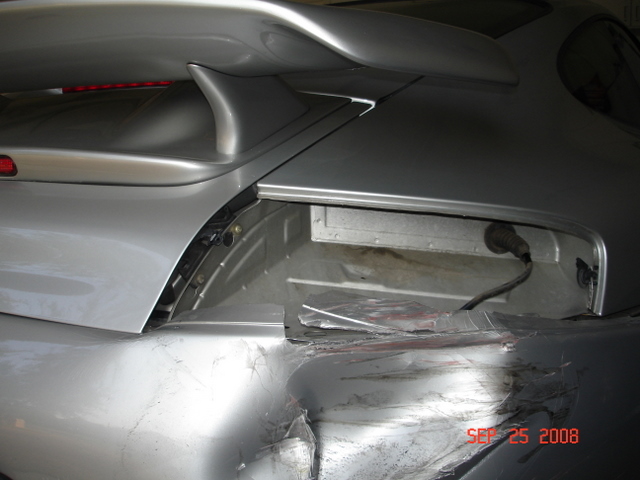
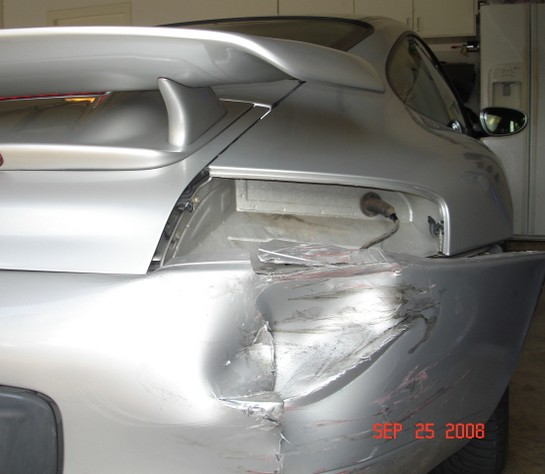
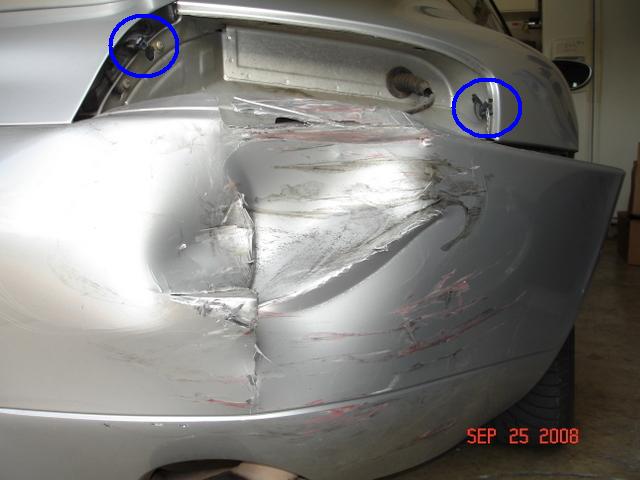
I was rear ended on the right side. I'm going to need (at least) a new bumper and tail light assembly.
The old assembly was completely broken and all the plastic parts holding it in are also broken.
2 parter:
1) I found the part number for the light assembly, but couldn't figure out what the part numbers are for the connectors. (The plastic parts that mount to the frame and also the parts that mount near the engine compartment.
996-631-496-00-M100
2) What connectors behind the bumper will I need? There are some plastic pieces I could see behind the bumper (near the heat shield) that looked broken as well.
Thanks,
Tom
-
Hey Guys,
I got a call from the dealer that did my PPI and was offered warranty on the 1999 996C4.
The car is at 52k miles, and I plan on driving it until it either it breaks or I decide on more graduate school.
The policy is fidelity, and I have heard good things about them.
The low end policy is $3500, it covers just the power train.
The high end policy is $7200, it is bumper to bumper, both are good for 5 years or 60k miles.
The only thing I am really worried about is the blown engine issue on the 996.
So should I go with the $3500 option, the $7200 option, or none at all?
I think that is slightly overpriced. When I bought my MY00 C2 it had just over 30,000 miles. The bumper-bumper warranty for 5yrs/ up to 100k was less than $3000. Although difficult to deal with, I did have a number of parts replaced under warranty including the engine. I have heard that a number of after market warranties are in this price range. $7200 is (IMO) too much for that warranty - BUT not too much for the peace of mind. You can't put a dollar value on sleeping at night. If it's the only warranty available, and you want one, $7200 is a right price...
If you get the warranty make sure you keep all the records for required maintenance and operate your car within "normal" parameters.
-td
-
Hi there,
I'm updating my 2001 996 C2 wheels to a set of "lobster claw" style 997 C2S 19" wheels.
I've been told it will look best with wheel spacers on the front. Has anyone done a similar swap and what did you go with for front spacers?
Cheers
Aaron
My only advice is this: if you get spacers bigger than 10mm, be sure to get hubcentric.
-td
-
3 parter:
What is the part number for the 996 GT3 steering wheel?
Does it come with the airbag?
Lastly, will this fit/work on my MY00 C2?
Thanks,
Tom
-
Does anyone know if there is a DIY for replacing O2 sensors? I searched using many variations of "sensor" and "oxygen" and "replace/install/change" but I couldn't locate one.
FWIW, I have 2 codes with my CEL: P1275 along with P0420.
Thanks,
Tom
-
Following up on another thread of mine (P0420 CEL) - what does Bank 1 refer to? Is this a left/right designation? Or does it mean something else?
Thanks,
-td
-
I have a CAT that seems to be having issues (or maybe the O2 sensor). It trips a CEL once in a while - maybe once a month or two or three. Anyway, after a few trips, it resets and the CEL goes off - until the next time. But I don't want to miss an important (or just another) CEL in the meantime, and the car will be in the shop to fix the offending part soon enough anyway.
So I decided to get a code reader to check the code when it happened, so I don't have to run to the dealer every time. If it's the same code as always, I want to reset it.
So, I got a Cen-Tech 94217 Code Reader at Harbor Freight (http://www.harborfreight.com/cpi/ctaf/Displayitem.taf?itemnumber=94217). This appears to be a rebadged Autel Geniscan GS400 (http://www.auteltech.com/gs400.htm). Everything is the same, right down to the manual.
Now the kicker, it accesses the car, reads the codes and displays them. I had a P0420 code.
BUT, when I try to erase the code, I get an "Erase Failure!" message.
I'm guessing that this is the reader, and not a Porsche specific issue.
Any thoughts?
-td
MY00 C2 Coupe
Appears to be DME 7.2
-
Hello, I am an owner of a 1999 996 coupe. I've had my car for 4 years now, and I'm looking into add some excitement to my car without spending lots of $. Through a classified website I found this guy in California who modifies the mufflers for $175, and he has a video on youtube that went through his muffler mod.
Here are the pictures of the mod.
http://sfbay.craigslist.org/eby/pts/670153037.html
What do you think about this mod? If it's not recommended then I'm going to stay away but $175 for this mod to add nice sound to my car is pretty attractive.
Thanks!
Fister is a poster on Rennlist. This mod is the "good" one for the 99-01 mufflers. I understand this mod is way better than stock, but still softer than Fabspeed muffler bypass pipes.
Good luck,
-td
-
Those are correct - now you will need to choose the right shims ;)
Is there a DIY for this? I'm certain that the alignment will need to be a "shop job" since the new control arms will probably change caster and toe...
Thanks again,
Tom
-
Are you trying to get more caster or more camber?
Just more camber. I think I got the answer, but please let me know if this won't work for my 00 C2:
996-341-121-90 - right conrol arm
996-341-122-90 - left control arm
996-341-441-90 - inner arm (X2)
shims and connecting pieces
And by "links" above, I actually meant the inner arm for the 2-piece control arm, and not a control arm link. I couldn't really figure out what the names were. And they still might be wrong...
Thanks,
Tom
-
I have a MY00 C2 and wanted to add GT3 control arms. Do I need to upgrade the links as well?
Loren, do you have the part numbers for the items I would need to get the install right?
Thanks,
Tom
Throttle position voltage
in 996 Series (Carrera, Carrera 4, Carrera 4S, Targa)
Posted
I connected to D13 on the DME for TPS. There are actually 6 different cables including:
D12 - Ground Pedal Value Sensor 2 [Green/Red]
D13 - Signal Pedal Value Sensor 2 [Green/White]
D14 - +5 Pedal Value Sensor 2 [Green/Black]
D7 - Ground Pedal Value Sensor 1 [Green/Grey]
D8 - Signal Pedal Value Sensor 1 [Green/Yellow]
D9 - +5 Pedal Value Sensor 1 [Green/Violet]
For some reason, my data logger shows actual values from 7.966v to 8.258v, rather than something in the 5V range.
Does this sound right for throttle position voltage on pin D13?
-td