Welcome to RennTech.org Community, Guest
There are many great features available to you once you register at RennTech.org
You are free to view posts here, but you must log in to reply to existing posts, or to start your own new topic. Like most online communities, there are costs involved to maintain a site like this - so we encourage our members to subscribe or donate. All subscriptions and donations go to the costs operating and maintaining this site. We prefer that guests take part in our community and we offer a lot in return to those willing to join our corner of the Porsche world. This site is 99 percent member supported (less than 1 percent comes from advertising) - so please consider an annual subscription or donation to keep this site running.
Here are some of the features available - once you subscribe RennTech.org
- View Classified Ads
- DIY Tutorials
- Porsche TSB Listings (limited)
- VIN Decoder
- Special Offers
- Paint Codes
- Registry
- Videos System
- View Reviews
- and get rid of this welcome message
It takes just a few minutes to register, and it's quality Porsche information at a low cost.
Contributing Members also get these additional benefits:
(you become a Contributing Member by subscribing or donating money to the operation of this site)
- No ads - advertisements are removed
- Access the Contributors Only Forum
- Contributing Members Only Downloads
- Send attachments with PMs
- All image/file storage limits are substantially increased for all Contributing Members
- Option Codes Lookup
- VIN Option Lookups (limited)


johnmh
-
Posts
78 -
Joined
-
Last visited
-
Days Won
2
Content Type
Profiles
Events
Forums
External Paint Colors
Downloads
Tutorials
Links Directory
Collections
Classifieds
Store
Everything posted by johnmh
-
No, they never go off. No overhead map lights. Weird. Car is new to me, but has never done this before.
-
My 2001 Carrera 2 Cabriolet has developed an odd issue. When I turn the engine off and get out of the car, the interior door lights stay on and the odometer remains lit. The headlight switch is off. If I lock the car all the lights go off. If I disconnect the battery and reconnect it the lights / do remain off. Once I open the door the lights come on and the odometer is illuminated and will not shut off unless I lock the car or disconnect the battery. I replaced the rotor switch at the back of the ignition barrel recently but as all else works well it seems to be installed properly. Will the operation of the top (or its lack of proper operation affect these lights?)
-
In the dark about headlights
johnmh replied to johnmh's topic in 996 Series (Carrera, Carrera 4, Carrera 4S, Targa)
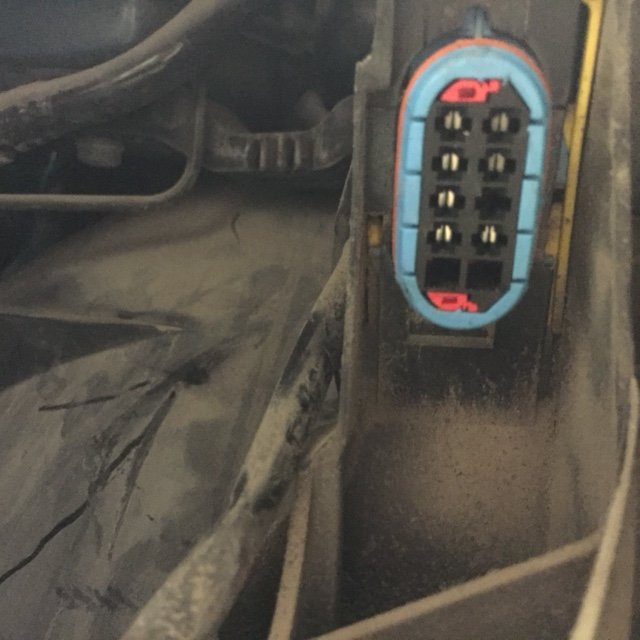
A few additional thoughts - If the right side light works and the left low beam does not - the rotary light switch on the dashboard should be ok? All other switch settings seem to operate. As well, as the high beams come on (on both sides), the plug in the back of the headlight should be fully seated in its receptacle, correct? I will check to see if some of the pins may be dirty or of the plug in the fender moves around. I suspect I can check all those headlight pins for +12v to narrow the issue further. -
In the dark about headlights
johnmh replied to johnmh's topic in 996 Series (Carrera, Carrera 4, Carrera 4S, Targa)
Then I am a bit screwed. The bulb is new, the fuse gets power. No light. No error codes on the scanner. No ideas. I hate just throwing parts at it like a ballast (or whatever that box is). -
In the dark about headlights
johnmh replied to johnmh's topic in 996 Series (Carrera, Carrera 4, Carrera 4S, Targa)
Ok, according to Pelican, part no. 2 is the low beam. No idea which bulb is the high beam. I have replaced part no 2 and the low beam does not work. Can anyone identify which bulb is which on a Litronic headlight? Is the low beam a H11 or a H3 light? -
In the dark about headlights
johnmh replied to johnmh's topic in 996 Series (Carrera, Carrera 4, Carrera 4S, Targa)
The broken clip does not worry me that much, as long as the plug stays in. I think when I replaced bulb no. 2 on that diagram I may have replaced the wrong bulb after all. The low beam bulb may be number 4. Maybe an easy fix after all. Thanks for pointing me towards the right direction. -
In the dark about headlights
johnmh replied to johnmh's topic in 996 Series (Carrera, Carrera 4, Carrera 4S, Targa)
So, the high beam switch seems ok, they come on, they go off. One problem solved. As for the left side low beam, the fuses for both low beams have 12v power and seem fine. All pins on both connectors seem fine, nothing bent or broken. With the power on, wire plug which connects to the headlights (in my fingers) has no +12v power on any of the four wires. I assume it is the connector which runs the motor that aims the headlight reflectors (so perhaps not the problem). I did not check the voltage other 7 pins in the fixed connector as I suspect they may be high voltage. Can anyone post a photo of the actual bulb which emits the low beam? I wonder of the Xenon Phillips bulb I replaced might just be a high beam.
-
In the dark about headlights
johnmh replied to johnmh's topic in 996 Series (Carrera, Carrera 4, Carrera 4S, Targa)
Fascinating. I will check the pins in the connectors today, the issue with finding a problem is the difficulty of replacing a connector with a broken or bent pin. I am less concerned if the motors do not swivel the reflectors (I can fix that later). Can you confirm that item 2 (which I have replaced, perhaps unnecessarily) is the low beam bulb? Or is the low beam bulb item 4? Just so I know I am doing this correctly, I push the turn signal column forward to turn on the high beams? Might it be possible they are not staying on because I am testing them in daylight? Does the car know and prevent you from turning on the high beams in the day? Considering it was a $6500 basket case to begin with, (with another $6k in parts in it) the car works amazingly well now; its fast, quiet and handles well. Once the lights are sorted I can begin to work on the convertible top. -
In the dark about headlights
johnmh replied to johnmh's topic in 996 Series (Carrera, Carrera 4, Carrera 4S, Targa)
I don't understand the light movement idea, the bulbs inside large glass headlights turn left and right or up and down? There are motors in the headlights that do this? Even if they do not actuate, the low beams should operate? I have not checked for movement - should it move when I turn the ignition on or the lights on? -
In the dark about headlights
johnmh replied to johnmh's topic in 996 Series (Carrera, Carrera 4, Carrera 4S, Targa)
The lights are factory. The error codes found by the reader for the headlights are: Engine path left Engine path right Axle position sensor front Axle position sensor rear I have no idea what that means in the context of a headlight. I will remove and re check the pins, but they seemed fine. -
My '01 996 Cab restoration project has the Litronic option, which seems to be a fancy way of saying Xenon. The low beam works on the passenger side only. I replaced the pricey Xenon bulb on the driver's side, but it still does not work. LHS low beam fuse seems ok. Light switch seems ok. Any other ideas? Is there a left side headlight relay somewhere? As an unrelated issue, when I pull on the turn signal stalk, both high beams work. With the light switch turned clockwise to 'on' I push forward on the turn signal stalk to turn on the high beams (and it clicks forward and stays there) no high beam lights come on. Am I missing something?
-
Cooling question
johnmh replied to johnmh's topic in 996 Series (Carrera, Carrera 4, Carrera 4S, Targa)
The good thing is that the system is bone dry, all new radiators and hoses will ensure that. I have a EBC power brake bleeder system which plugs into my compressor which I have had success with (for bleeding brakes) in the past; I was considering hooking it up to the reservoir and using it as a source of vacuum to draw coolant through the system. That Airlift tool does not seem that pricey, maybe the $100 may be worth it (and I have other cars with oddly shaped cooling systems I can use it on). Forget the garage space, this 996 is making me think about expanding my available tool box space with all the new and strange tools I require to work on it. -
Cooling question
johnmh replied to johnmh's topic in 996 Series (Carrera, Carrera 4, Carrera 4S, Targa)
Thanks. Best way to remove the air pocket? The system is completely empty now while I wait for some parts. Does it help if I lower the front of the car while raising the rear? -
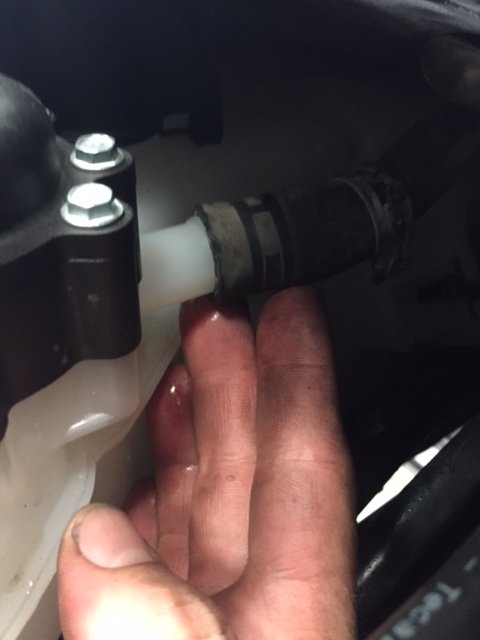
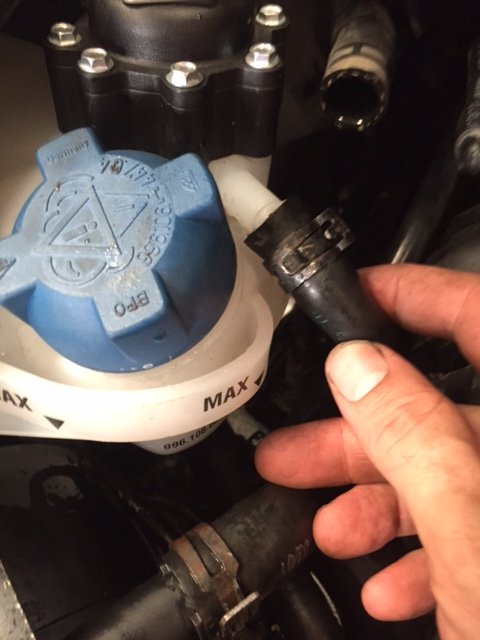
For background, my car is a U.S. spec, manual gearbox, 996 3.4 convertible. I recently purchased it cheap knowing it needed major service work. So far I have pulled the engine and installed a new AOS, oil cooler, water pump, thermostat (not OEM - supposed to open at lower temps), coolant reservoir, cap and hoses. I have also done other engine work such as variocam guides, spark plugs, clutch, pressure plate, TOB, IMS, RMS and resealed the entire engine. I intend to add a third radiator at the front of the car as well. I have had good results with Evans NPG coolant in other cars I have so I intend to use it in the 996. To use it I needed to drain the car as much as possible, run it briefly with prep fluid before draining it and adding the NPG. The issue is getting the car to run a normal temp. I first added about 1/2 of the recommended 22.5 liters of fluid (until the reservoir neck) and started the car. It ran well, but got quite hot quickly. The rad cores and pipes remained cold even after the thermostat should have opened. I then placed a sealed tube with a Schrader valve on the open reservoir filler neck and added a few psi of pressure with a bicycle pump. The bleed valve was open. A few pumps and gurgles later more coolant would go in. After a few of these pressurization cycles, it burped a lot of air out, so much so that I could fill about 22 liters of fluid in. Still, I started the car, revved it a few times and the rads barely got warm while the temp gauge approached max ( I shut the engine off as it exceeded 180f). Following more examination I noticed that the left (driver) side rad has a hole in the centre where lots of crusty pink coolant has escaped and dried over time (a replacement is on order). I removed the right side rad (it seems fine, no blockage or leaks). Two questions - What is the normal operating temp for a 996 engine when warm? There are 2 rubber hoses which connect to the top of the coolant reservoir. The bigger one towards the rear of the bleed valve (1st photo) seems to connect to the small tubes which vent from the tops of the radiators. Where does the small diameter one in the second photo connect to?
-
Actually, the locations of the indents on the outer edges of the plugs make them impossible to install incorrectly. Sorted.
-
Sorry. Uh, a 996. Convertible. Manual box. 2001. Are not all 996s not the same in terms of those two wiring connectors?
-
Stupidly during my engine out I did not mark which round multi-prong plug connected to the engine connects to which plug on the right side of the engine bay in the car. The look identical but cannot be interchangeable. Is there a trick to finding out which one belongs to a specific connector? The potential for havoc seems great here. Will they even connect to the wrong plug?
-
Thanks. Seems easy enough. Managed to get my RMS installed, tomorrow is the IMS bearing, the variocam chain buffers and the clutch. Slowly, slowly, it is coming together.
-
I have watched many videos about installing a single row IMS bearing and understand the big circlip goes in last when the bearing is fully seated. Pretty clear. What is the story for my double row bearing? The bearing came out with the skinny internal retainer ring attached to it. I assume I do not reuse the old retainer ring with the LN Engineering kit (it will arrive tomorrow via Fed Ex). Does the replacement bearing with retainer ring just slip in and seat itself when you tap the bearing in place or is there a trick to it? Does the retainer ring get installed inside the shaft first and the bearing tapped into place later? Thanks for any insight you can share.
-
3.4 to 3.6 swap?
johnmh replied to johnmh's topic in 996 Series (Carrera, Carrera 4, Carrera 4S, Targa)
I cleaned the threads on the horizontal clamp bolts with a die, heated the bolts and then lubricated them. Happily all four came loose without issue. Thanks! -
3.4 to 3.6 swap?
johnmh replied to johnmh's topic in 996 Series (Carrera, Carrera 4, Carrera 4S, Targa)
A quick question, the engine is on the bench but with the exhaust still connected to it (no desire to helicoil all the exhaust / head manifold bolts). Can I leave the exhaust in place, but simply loosen the muffler brackets in order to remove the cam covers? I can get to all the 10mm bolts which hold the cam covers in place but have no idea if I can slide the covers out from under the (unattached) brackets. For neither love nor money can I figure out how to remove the brackets with the mufflers still connected to the car and the shiny new cam locking tools will arrive on Monday. -
3.4 to 3.6 swap?
johnmh replied to johnmh's topic in 996 Series (Carrera, Carrera 4, Carrera 4S, Targa)
Thanks, same for you. I assume you are putting the cams on the bench with the solenoid unit when you do it. Please advise if it was easy or difficult. Specifically, were the painted links on the chain between the cams lined up with the dots on the cam sprockets as it shows in the manual? Are you replacing the solenoids too? After 16 years it might be time on my car, but I can neither bench test them nor see if they were replaced. No service records came with the car. -
3.4 to 3.6 swap?
johnmh replied to johnmh's topic in 996 Series (Carrera, Carrera 4, Carrera 4S, Targa)
Thanks, I will probably get the IMS solution as well. I was looking for a new project car and was offered this running manual '01 Cabrio for next to nothing. While pulling it apart has been interesting, I do not want to do it again any time soon so I am chasing things that are more preventative at this point. Once the IMS solution is in, and the variocam pads changed, I begin the process of putting it all back together and seeing if I remember how it goes back into the car. -
3.4 to 3.6 swap?
johnmh replied to johnmh's topic in 996 Series (Carrera, Carrera 4, Carrera 4S, Targa)
On a related note, do you typically also replace the lower (inner) variocam chain rails at the same time? All the pics I see are of worn upper rails (which makes sense as they do all the work). These should have a different part number but I have been unable to find them. -
3.4 to 3.6 swap?
johnmh replied to johnmh's topic in 996 Series (Carrera, Carrera 4, Carrera 4S, Targa)
Thanks, that gives the answer I was looking for as well. Tools have been ordered. Now if only I could decide between the LN IMS Solution with external oil feed ($1700) or just the ceramic bearing ($700). Probably covered elsewhere.