Welcome to RennTech.org Community, Guest
There are many great features available to you once you register at RennTech.org
You are free to view posts here, but you must log in to reply to existing posts, or to start your own new topic. Like most online communities, there are costs involved to maintain a site like this - so we encourage our members to donate. All donations go to the costs operating and maintaining this site. We prefer that guests take part in our community and we offer a lot in return to those willing to join our corner of the Porsche world. This site is 99 percent member supported (less than 1 percent comes from advertising) - so please consider an annual donation to keep this site running.
Here are some of the features available - once you register at RennTech.org
- View Classified Ads
- DIY Tutorials
- Porsche TSB Listings (limited)
- VIN Decoder
- Special Offers
-
OBD II P-Codes - Paint Codes
- Registry
- Videos System
- View Reviews
- and get rid of this welcome message
It takes just a few minutes to register, and it's FREE
Contributing Members also get these additional benefits:
(you become a Contributing Member by donating money to the operation of this site)
- No ads - advertisements are removed
- Access the Contributors Only Forum
- Contributing Members Only Downloads
- Send attachments with PMs
- All image/file storage limits are substantially increased for all Contributing Members
- Option Codes Lookup
- VIN Option Lookups (limited)

sdharmani
-
Posts
14 -
Joined
-
Last visited
Content Type
Profiles
Events
Forums
External Paint Colors
Downloads
Tutorials
Links Directory
Collections
Store
Posts posted by sdharmani
-
-
Loren, All,
Can you provide any guidance for 2008 Turbo - I have PCCB but want to swap them out with Steel rotors (and matching pads) for front and rears. I am going to be tracking the Turbo, so dont want to damage the rotors.
Thanks for your help!

-
David,
I recently got a 997TT with PCCB since my base Boxster was running out of juice on the track. What tires do you run on the 997? I used Sport Cups on the Boxster, but cant seem to get them in the 305 x35x18 if I want to run 18s.
Also, did you change out your rotors and pads? I use Pagids on the Boxster and I know they make a separate pad for PCCB. I heard from some other fellow DE-ers that it is better to change out rotors - but I still need to look into what rotors would fit (without having to change out the calipers).
Any guidance will be helpful. DE is coming up in March end, would love to take the 997TT if I can get it prepped for track.
Thanks!
Sven
Thanks Paul.
I run 18" CCW and Fikse 5s wheels on my PCCB equipped 997 GT3. The only thing that will rub will be the bottom of the rear gen 2 brake ducts if you have them attached. But only on compression of the rear suspension under load.
david
-
I recently got an 08 TT. I have the telephone module on mine but it requires a separate SIM card. I also have the steering wheel controls for telephone, but I haven't been using it. Is there a way to tie the bluetooth into the telephone module?
-
After a bit of seat time on the track, I decided to upgrade my brakes to Boxster S brakes. I am looking forward to red calipers and cross drilled rotrs to be honest - track is just an excuse :)
I am getting calipers / rotors / pads from a dismantler. Has anyone completed a brake upgrade themself? It seems that there is an issue with the rear rotors ... There is a machine shop nearby, so I could get the rotors machined on the inside if that was all that was needed. I also saw on one thread that 3mm square spaces were needed - but the thread was pretty old and the links didn't work. Finally, it also seems that all the caliper bolts need to be replaced.
Any advice is much appreciated.
Thanks!
-
Has any one found a post on doubling up spacers? I looked but havent found. I have 5 mm OEM spacers. I am doubling them up for the rear with 10 mm longer bolts. Does anyone know of issue with doubling up the spacer? I got longer screws to hold the spacers in place as well.
Thanks!
-
Wierd!! I went to do some more testing on the glove box and it got fixed by itself ?!?!?!
I am not complaining for now :)
Lauren - you can delete the post if you deem appropriate.
I was removing and replacing the dash strips when I noticed light iside the dash when I removed the flexible plastic cover under the dash. When I removed the glove box, i noticed that the light was on. I tried testing the micro-switch -- it seems to be working ok since the horn doesnt honk when i lock the car with the glove box closed and honks with glove box open.Not sure what is happening here??? Just removed the bulb for now to stop the battery from draining. I haven't done any electrical mods recently.
Can any one help. THanks in advance
-
I was removing and replacing the dash strips when I noticed light iside the dash when I removed the flexible plastic cover under the dash. When I removed the glove box, i noticed that the light was on. I tried testing the micro-switch -- it seems to be working ok since the horn doesnt honk when i lock the car with the glove box closed and honks with glove box open.
Not sure what is happening here??? Just removed the bulb for now to stop the battery from draining. I haven't done any electrical mods recently.
Can any one help. THanks in advance
-
I just installed silver strips on mine today using your instructions. Thanks a lot for posting these!! Also, it is almost impossible to replace diver key side trim without removing the left vent assembly. One above the glove box is pretty easy, the two small one are more difficult - mainly due to lack of space to use tools. I used a small 1/4" rachet for key side trim and a screw driver worked fine for middle small trim - especially since I had the climate control / radio out for the tweaks as well.
Overall, it went well - it took me about 3 hours, so you must be a real expert :)
In addition, I also installed the proper garage door opener switch that I bought from Sunset Porsche. I tapped light wires from PSM switch and cleaned up the wires for variable intermittent wiper as well using taps to illuminate.
I did have two SNAFUs - i dropped the bit (which took me 1/2 hour to retrieve with a magnet) and I broke the clips on top of the center a/c vent! What a bummer. I had to improvise and install double sided tape to keep it from moving. Also cleaned up the wires and installed proper couplers for footwell lights today. And replaced the cigarette lighte buld that I had broken earlier in wooden center trim install.
Pretty ahppy with the work I did today - ended up spending a good part of 6 hours on the car :) Very satisfying because I cleaned up all the "Oh crap" from previous mods and installed the silver strips OEM style, with all the screws and without any hammer, chisel or soldering irons.
Cheers!!
Just did this upgrade. After reading all the posts, I decided I wanted to challenge myself to doing it to full factory specs without breaking any pieces and using all the screws to put the trim back in. I started with the long piece on the passenger side. First remove the underdash cover (foam) held in place with 3 plastic screws. Then remove the glovebox:There really isn't any need to remove the vent since there is plenty of room back there:
With the screws out the piece just pops out:
Contort yourself under the dash (move the seat back as far as possible!) and you'll be able to clearly see the screws:
Next, remove the instrument cluster by first removing the hazard switch:
and the microphone cover:
then remove the two screws and the whole assembly pulls off (makes sure to disconnect the cluster in the back (3 plugs: gray, blue and green as wells as the mic and hazard switch)
remove the lower "horseshoe" around the steering column (screws are visible once cluster pod is out) and then you have access to the back of the trim pieces on either side of the column. I removed the driver's side vent but I don't think it's really necessary. Got all the pieces off without any damage and installed the new pieces with every single screw:
All buttoned up:
All in all it took me about two hours from start to finish going slowly and carefully to protect the full leather dash:
Use the right tools and take your time!
-
Hi,
How did you remove the dash strips ?
Thanks!
-
Hi,
Can you please post or email the instructions for dash removal?
Thanks
Sven
-
Hi,
Were you able to find instructions to remove the three strips on the dashboard? If so, can you please post the link (or email me at sven.dharmani@gmail.com?
Thanks very much.
Sven
Hi AllHope all is well. I write seeking help an advice in learning how to pull apart the dash. I have searched across these forums, but was not able to find the answer, so seeking some help here.
I am looking to have most of my trim pieces repainted, but of course need to learn how to pull apart each section.
The sections that I'm looking to learn how to pull apart are:
The upper part of centre console,
the lower part of the centre console
the transmission tunnel cover
the 3 strips of plastic that goes below the front passenger airbag, and besides the steering wheel column
the two side air vents
the inside door handles
Finally, I'm looking to pull off the strip that is part of the door handle and extends to where the door pockets are.
I'm not sure if I'm explaining myself, so I've attached a photo with the sections of the door that I would like painted.
Thanks heaps to all who reply.
Oh and I'll be taking heaps of photos of each stage, so please let me know if anybody is interested in photos of each stage.
Thanks!
-
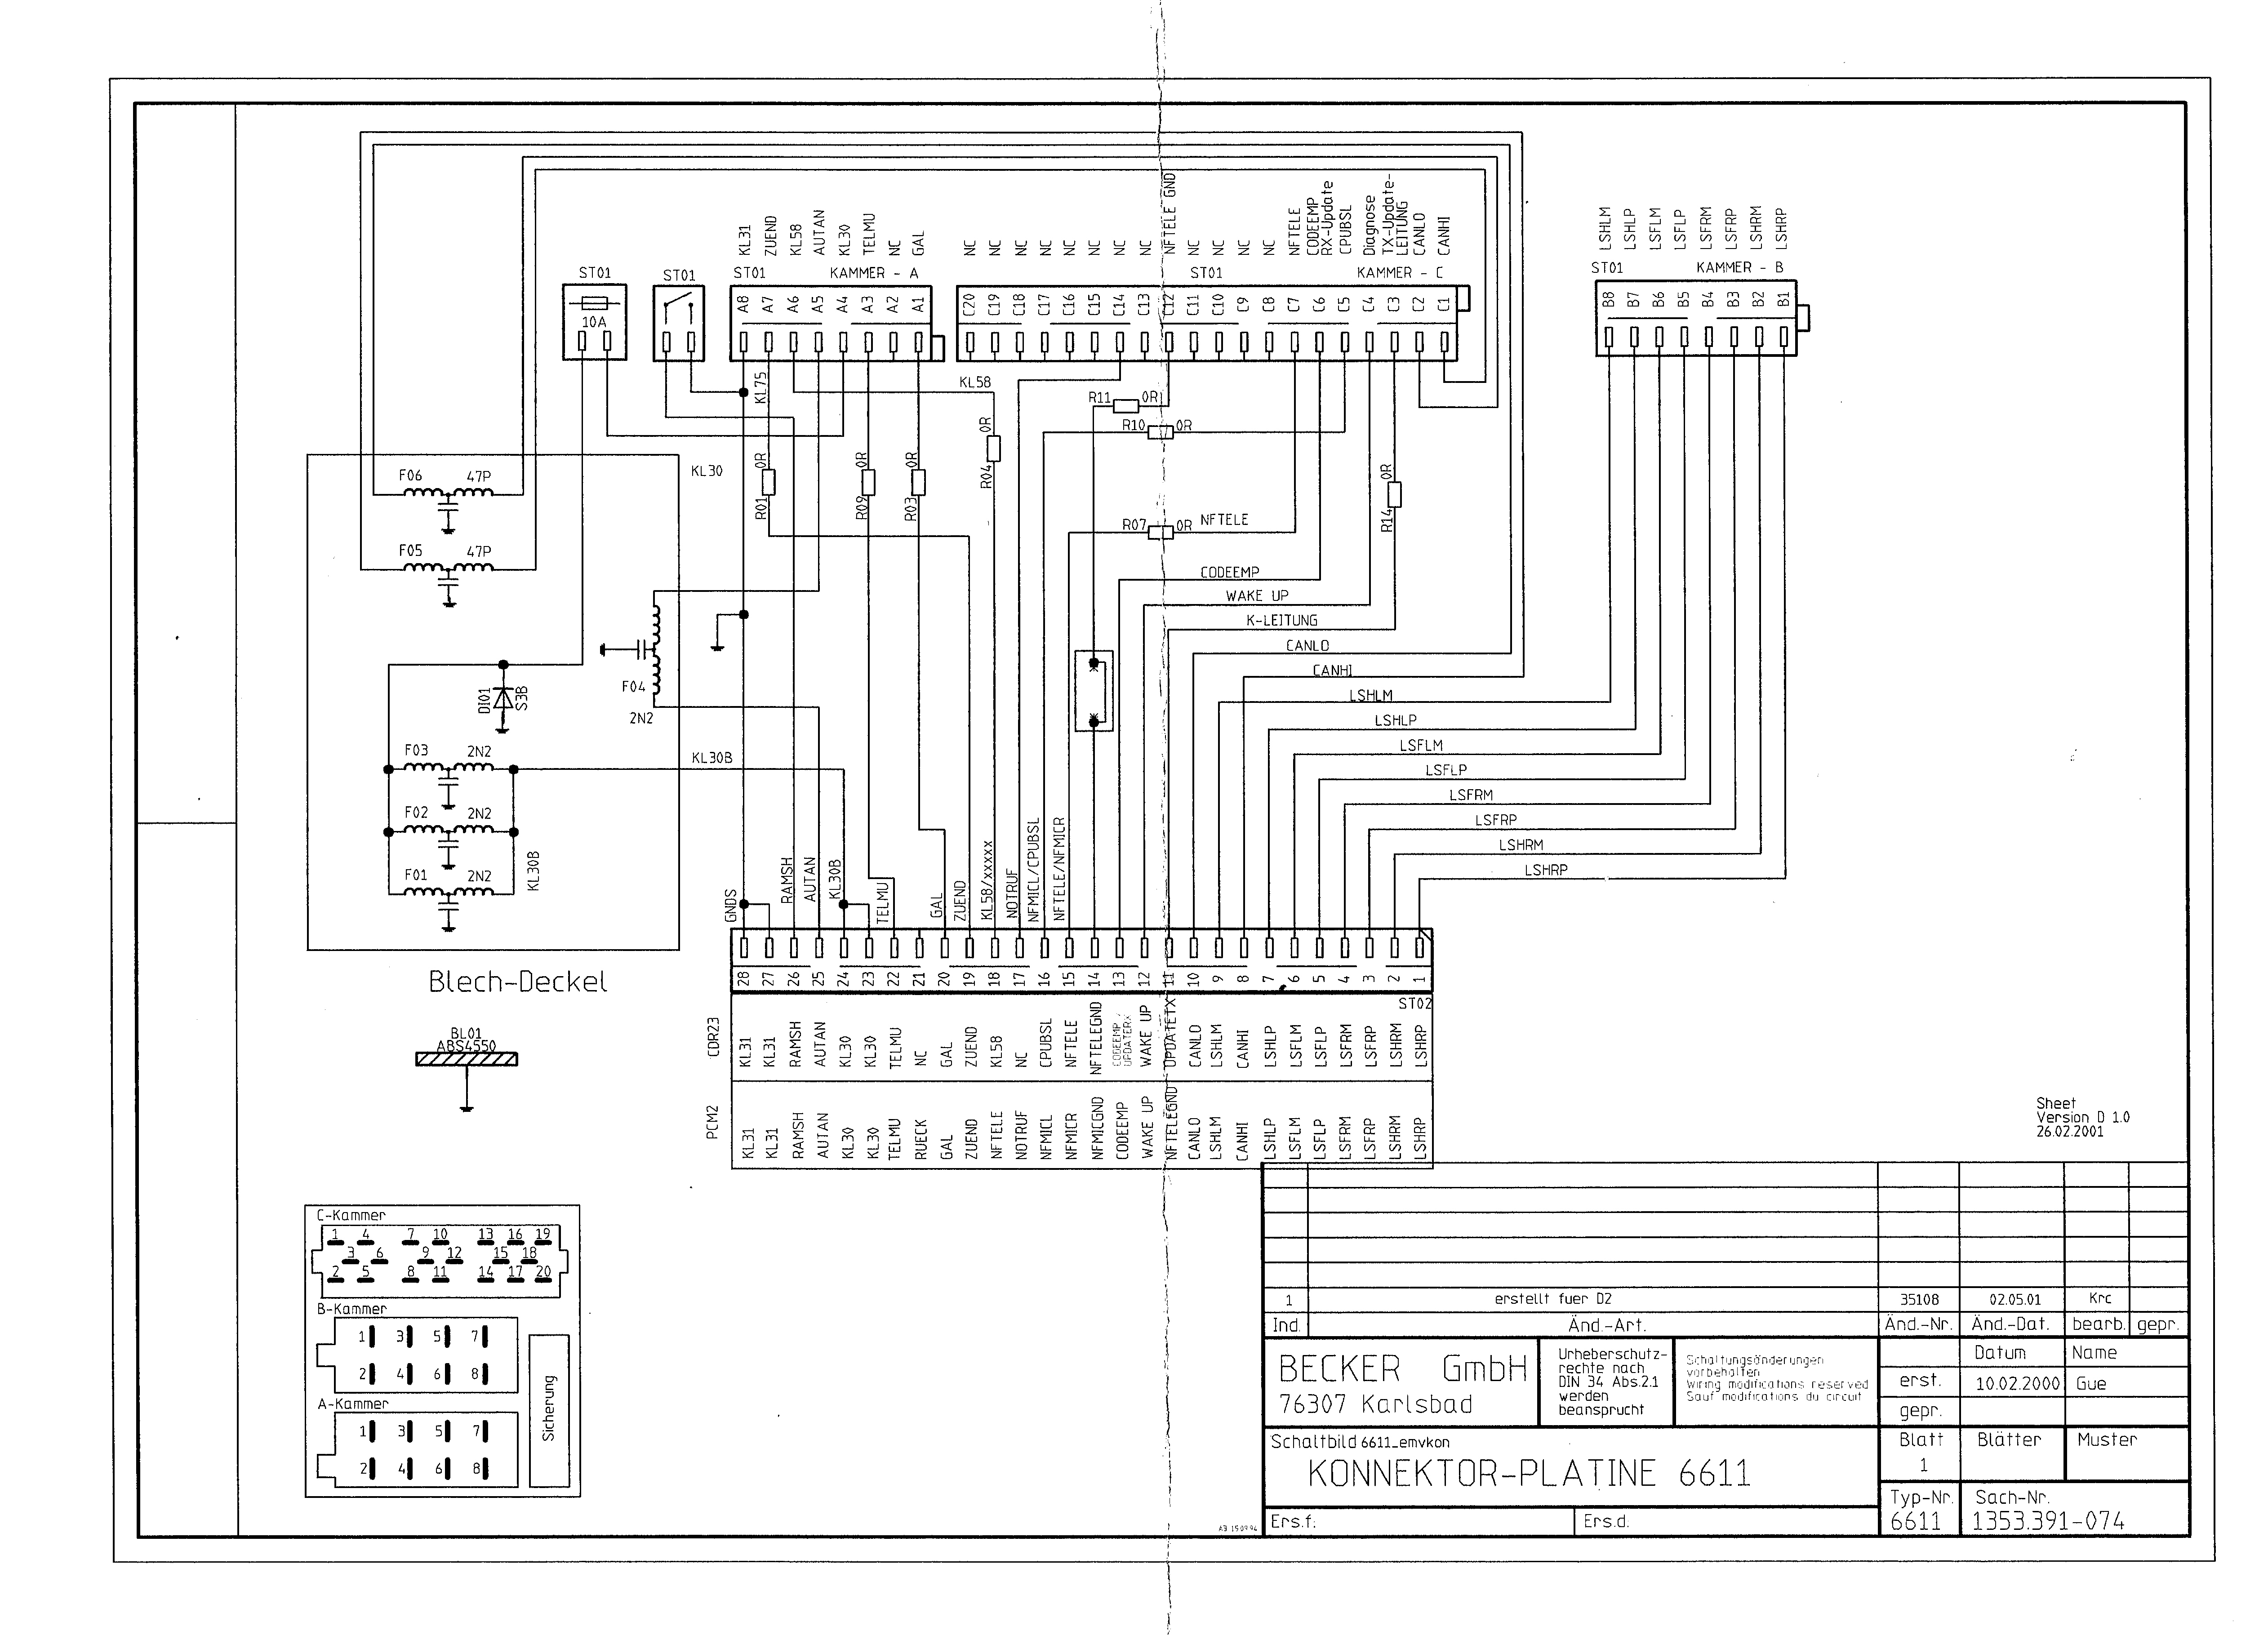
Becker CDR-23, 2003 Boxster
I was able to get the WIRING DIAGRAM for Becker CDR23. Does anyone know how to interpret this? I am pretty sure there is a way to put a bypass switch for iPod.
-
I just installed the rear speakers on 2003 Boxster with hi-fi option. Most of the instal went fairly smoothly.
I am unable to find the spot/grommet to route the cable thru the firewall to front - amplifier. Can some one help please ?
Thanks !!


PCCB Brake rotor swap to steel (track use) - 2008 Turbo
in 997 TT, 997 GT2
Posted
Thanks Loren.
I don't have center lock wheels. One of the guys at DE mentioned that steel rotors were a direct swap without changing the calipers. And that pads for steel rotors were exact same size & thickness as pads for ceramic. So it seems like there may be a straightforward swap but I want to check if any one has tried it yet.
Thanks!
Sven