Maurice,
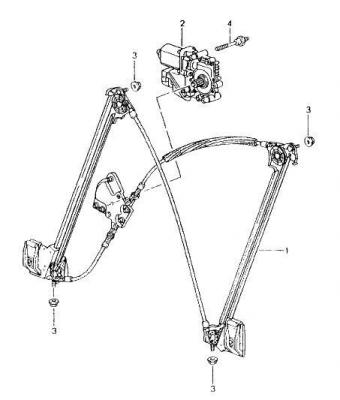
Your right the 986 and 996 have different setups, I just cheated (see tech note 57 51 37 for the hard way) if you place the glass in the same position and just adjust the glass holder clamp to hold the glass at the bottom and adjust the screw holder up and down.
Items 3 screws at the bottom were also marked using tape and a black pen to ensure the angle was the same.
I just checked my minimum window height and it fine.
note. after reconnecting the battery the windown regualtor controller needs to "learn" the max and min travel values, just hold the window switch down for 5 seconds and its reaches its limits and the ECU will store these values, so when you pull on the door handle the window will drop by a set amount to clear the seal before the door is fully opened.
Here is the real Porsche POSES tech note 57 51 37 - Adjustment instructions for assembly of the door, details to setup. (without picutures)
Standardising the power windows
The system must be re-standardised after an interruption in the power supply to the power window electronics in the door. The position values for the short-stroke lowering function, position-controlled lowering function in the case of convertible top actuation and enabling for "automatic start-up of window closing" (one-touch function) are redefined. The standardisation process is initiated by continuous actuation of the operating button Raise window .
Hold down the button Raise window until the window is closed and is switched off by the blockage detection function of the power windows.
Precondition for operation of the power windows
Ignition switched on.
Ignition key should not be removed from the steering lock with the ignition switched off.
The door is opened for the first time after switching off the ignition.
Door opened.
Fitting the door window in the clamping jaws
1. Insert the door window through the door channel into the clamping jaws of the front and rear drivers.
2. Position the door window corner flush with the driver at front.
Note
The bottom edge of the window must rest on the screw during adjustment.
3. Tighten the clamping jaws after completing the adjustment.
Tightening torque: 8.5 Nm (6.5 ftlb.)
Adjusting the door window angle in the vehicle's longitudinal direction
Driver
1. Adjust to equalise the angle of the door window on the clamping jaws of the driver (upwards or downwards).
Adjustment range 10 mm
2. Tighten the clamping jaw after completing the adjustment
Adjusting the door window height
1. Adjust the upper limit stops of the drivers by screwing the Torx screw T30 in or out with socket E6 in or against the direction of travel.
Adjustment range approx. 15 mm
2. Adjust the drivers so that they meet the upper limit stops at the same time.
Note
The adjusting screws of the drivers for the upper limit stops for the door window height are accessible through 2 holes at the bottom of the door.
Adjustment procedure:
1. Open the doors
2. Lock door lock with a screwdriver.
3. Move the power window regulator into its upper position.
4. Adjust door window height at the drivers so that the door window evenly projects approx. 2 mm above the roof strip.
Checking the adjustment
1. Close the doors.
2. Use a wax marker to mark the door window along the roof strip.
3. Actuate the door handle until the window lowering function is activated.
Adjustment valve for window lowering function approx. 13 mm
Note
The wax marking along the door window should be uniformly approx. 4 mm.
Adjustment of the door window pressing force on the door seal at the top and sides
1. Move the power window unit rails by approx. 10 mm outwards or inwards.
Note
The adjusting nuts of the power window unit rails for the pressing force of the door window upper edge against the convertible top are accessible through two holes at the bottom of the door.
Adjustment procedure:
1. Open the doors.
2. Move the power window regulator into its upper position and undo the combination nuts M 6 of the power window rails.
3. Adjust the power window unit so that the upper edge of the door window is sufficiently pressed against the door seal at the side
Tightening torque: 10 Nm (7.5 ftlb.)
Checking the adjustment:
Clamp a sheet of paper between the door window and door seal.
Note
It must not be possible to pull out the sheet of paper.
Adjusting the lower stop of the power window unit
Note
When replacing the power window unit, make sure that the correct position of the lower limit stop is selected for the respective model.
There are two bores lying one above the other with the screwed-on limit stops in the front power window unit rail.
A limit stop for the model 986, 986S must not be removed.
Regards,
Chris.


