Welcome to RennTech.org Community, Guest
There are many great features available to you once you register at RennTech.org
You are free to view posts here, but you must log in to reply to existing posts, or to start your own new topic. Like most online communities, there are costs involved to maintain a site like this - so we encourage our members to donate. All donations go to the costs operating and maintaining this site. We prefer that guests take part in our community and we offer a lot in return to those willing to join our corner of the Porsche world. This site is 99 percent member supported (less than 1 percent comes from advertising) - so please consider an annual donation to keep this site running.
Here are some of the features available - once you register at RennTech.org
- View Classified Ads
- DIY Tutorials
- Porsche TSB Listings (limited)
- VIN Decoder
- Special Offers
-
OBD II P-Codes - Paint Codes
- Registry
- Videos System
- View Reviews
- and get rid of this welcome message
It takes just a few minutes to register, and it's FREE
Contributing Members also get these additional benefits:
(you become a Contributing Member by donating money to the operation of this site)
- No ads - advertisements are removed
- Access the Contributors Only Forum
- Contributing Members Only Downloads
- Send attachments with PMs
- All image/file storage limits are substantially increased for all Contributing Members
- Option Codes Lookup
- VIN Option Lookups (limited)


stuartj53
-
Posts
6 -
Joined
-
Last visited
Content Type
Profiles
Events
Forums
External Paint Colors
Downloads
Tutorials
Links Directory
Collections
Store
Posts posted by stuartj53
-
-
I did it!
But now I have a problem: The PCM2 unit doesn't work properly
I think it's a software problem, because it's blocked. The screen works, volume blocked, phone works, radio station blocked, but all the buttons aren't operative.
I have to replace the car battery
Did you get it fixed in the end?
-
Stephen
Can you post an update on how you got on doing this job. I have to also do it and would like some feedback.
-
Trying to make contact with Tim. Want to do this repair but want assurance that it works in practice. Anyone else done this work? Feedback please.
-
Can you tell me how long that this will take to do?
Is it a job for the unskilled. The nearist I have been to this is building a PC?
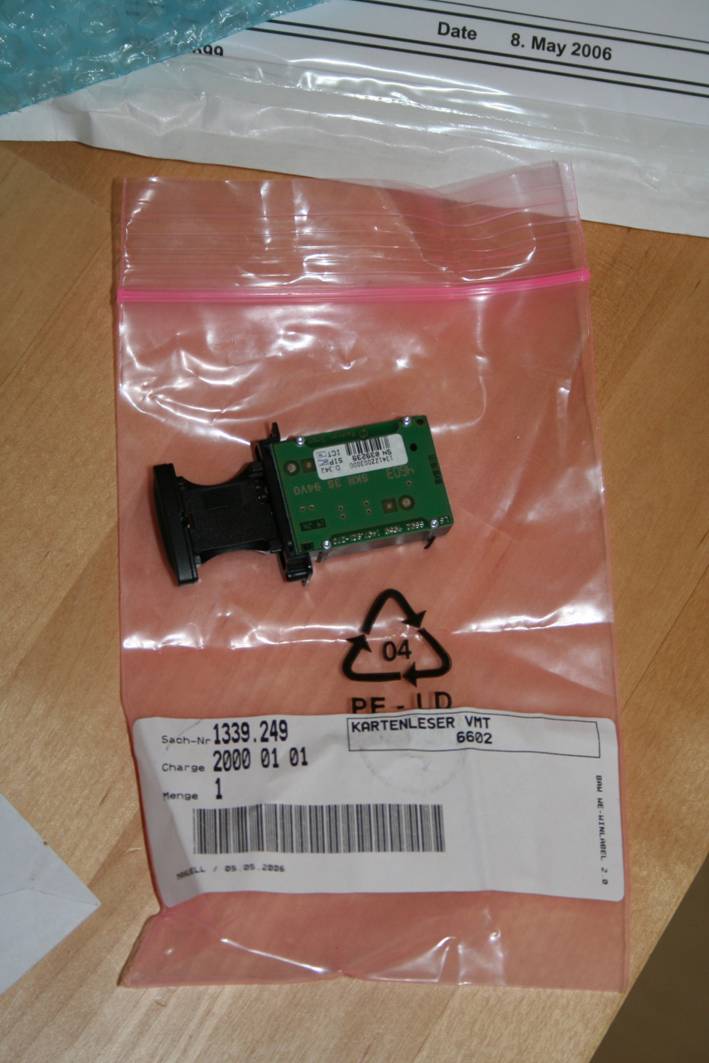
So, if you've got a sim card tray in a PCM 2 unit which either stays in or stays out, you'll need a new sim card tray. You can order a new one by contacting Becker direct and asking for your local becker parts reseller. In the UK, its around £20 plus VAT.
In terms of fitting, you'll need a set of torx head drivers, numbers 8 and 6. You'll also need a 5mm hex head allen key.
You don't need to disconnect the battery, but its probably adviseable. Remember on UK (and probably all European cars) leave the key in the ignition turned on before you disconnect your battery, else your neighbours will be as unhappy as mine with the secondary siren going off!
1 - Remove the horseshoe facia. There are other posts on this, but it is a push fit. I got mine off by pullinig gently the inside of the facia from each side of the air vents.
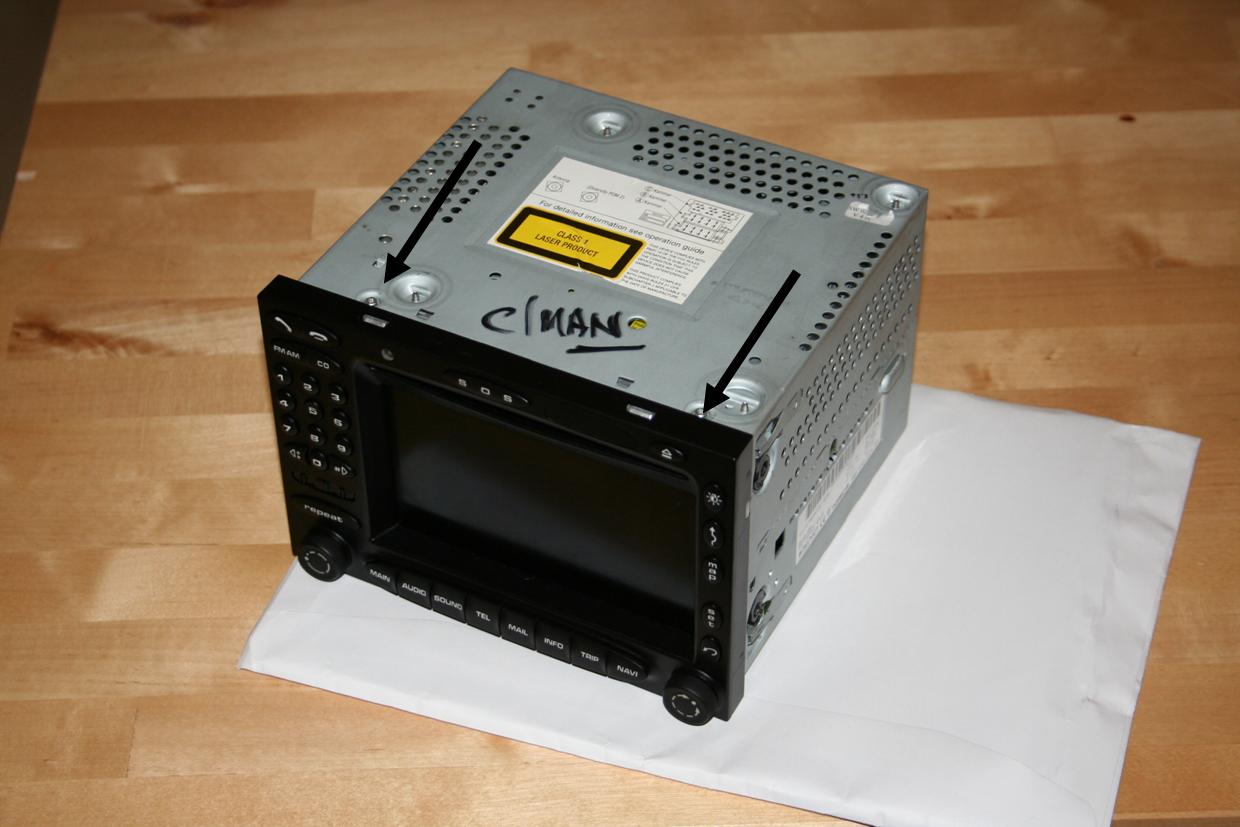
2 - With the allen key, rotate the 4 screws (2 either side) of the PCM unit, which will push in some arms which stop the unit coming out.
3 - Pull out the unit and disconnect the connections on the back.
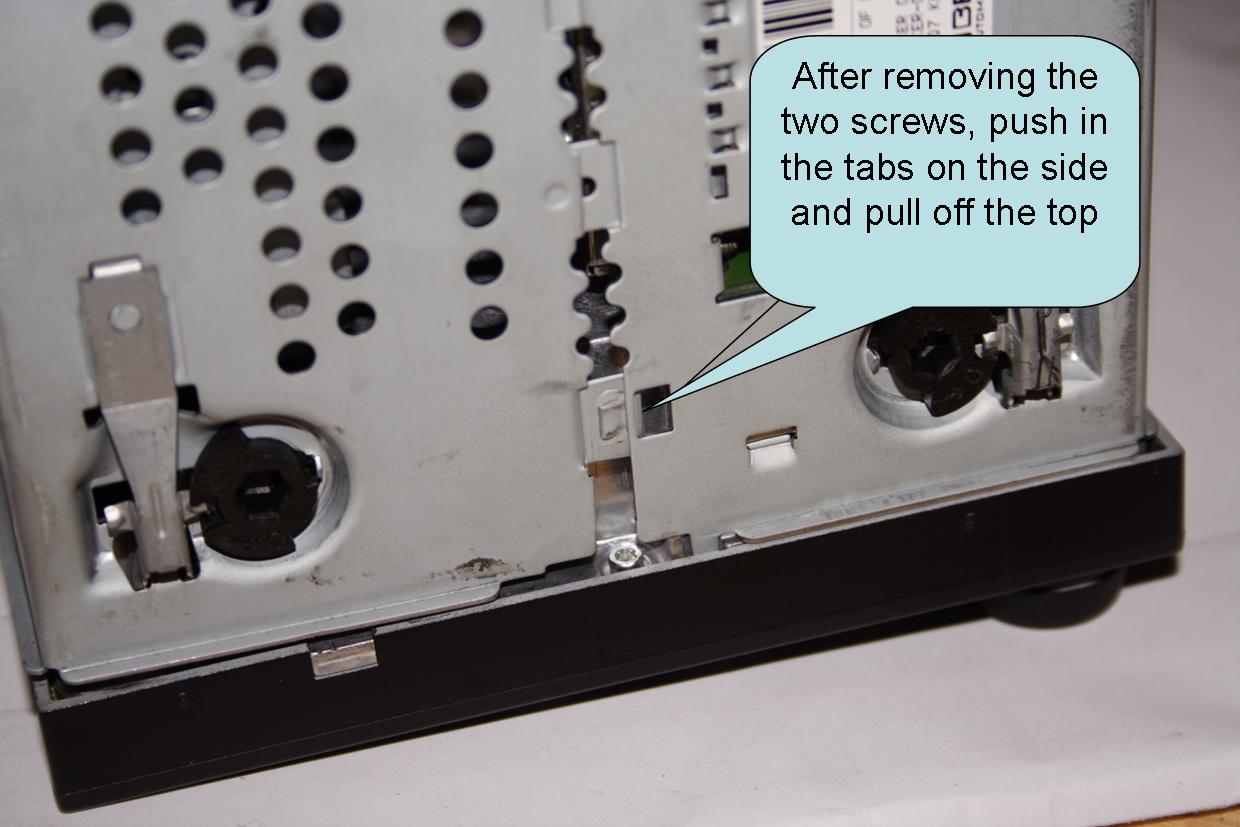
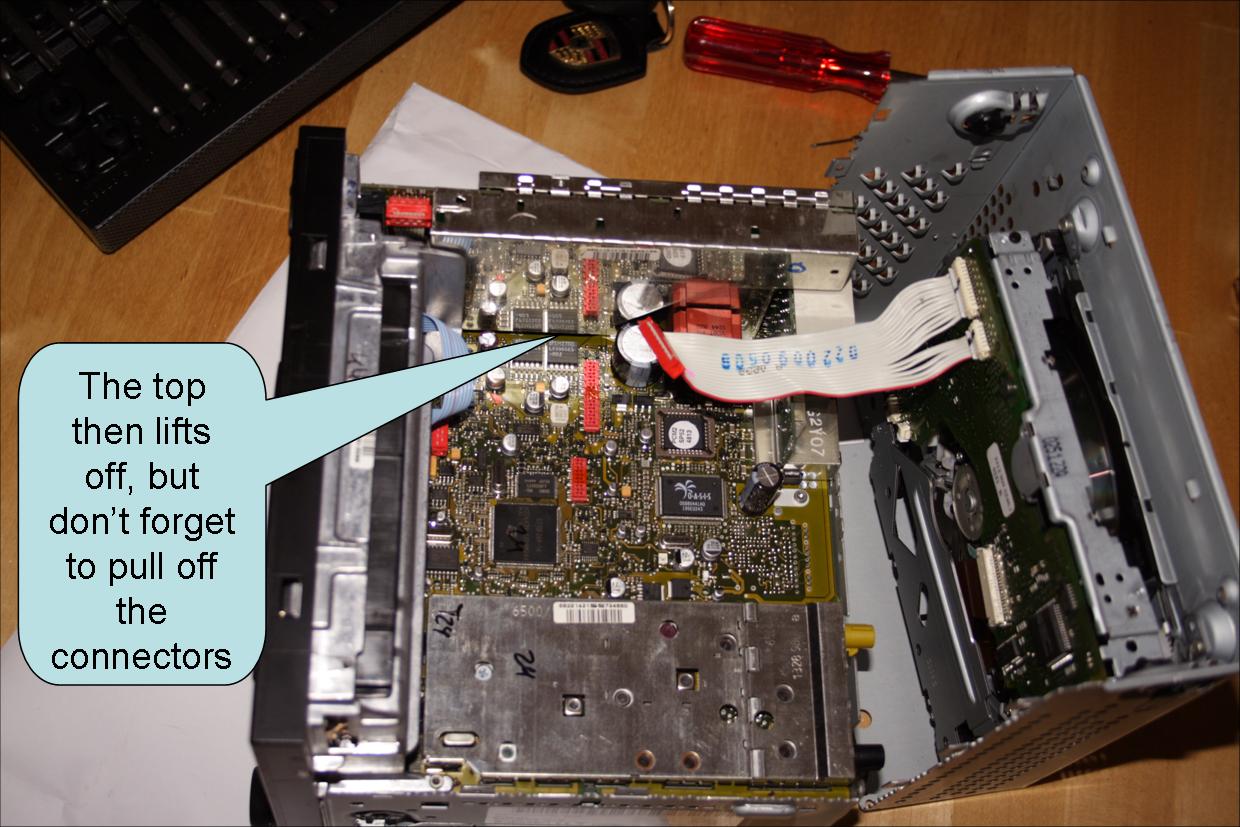
4- Unscrew the two torx head screws on the of the unit. The top half then pulls off from teh front first. Be gentle with this, as it holds the CD player and there is a wired connection between the top and the bottom parts. You'll need ot pull off the connector.
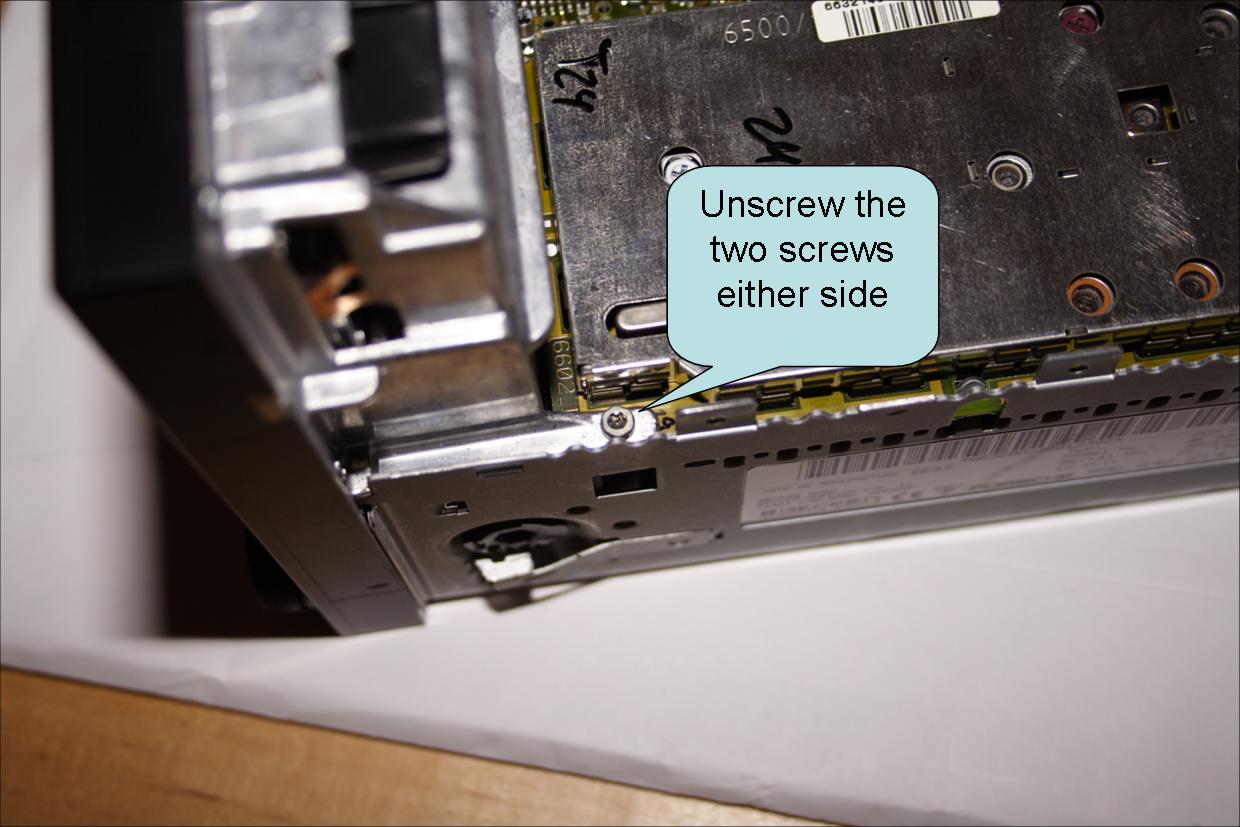
5 - Unscrew the two screws on either side of the case holding the bottom to the front casting. The front then pulls off with some teasing but again, be careful as you'll need to disconnect wire connectors.
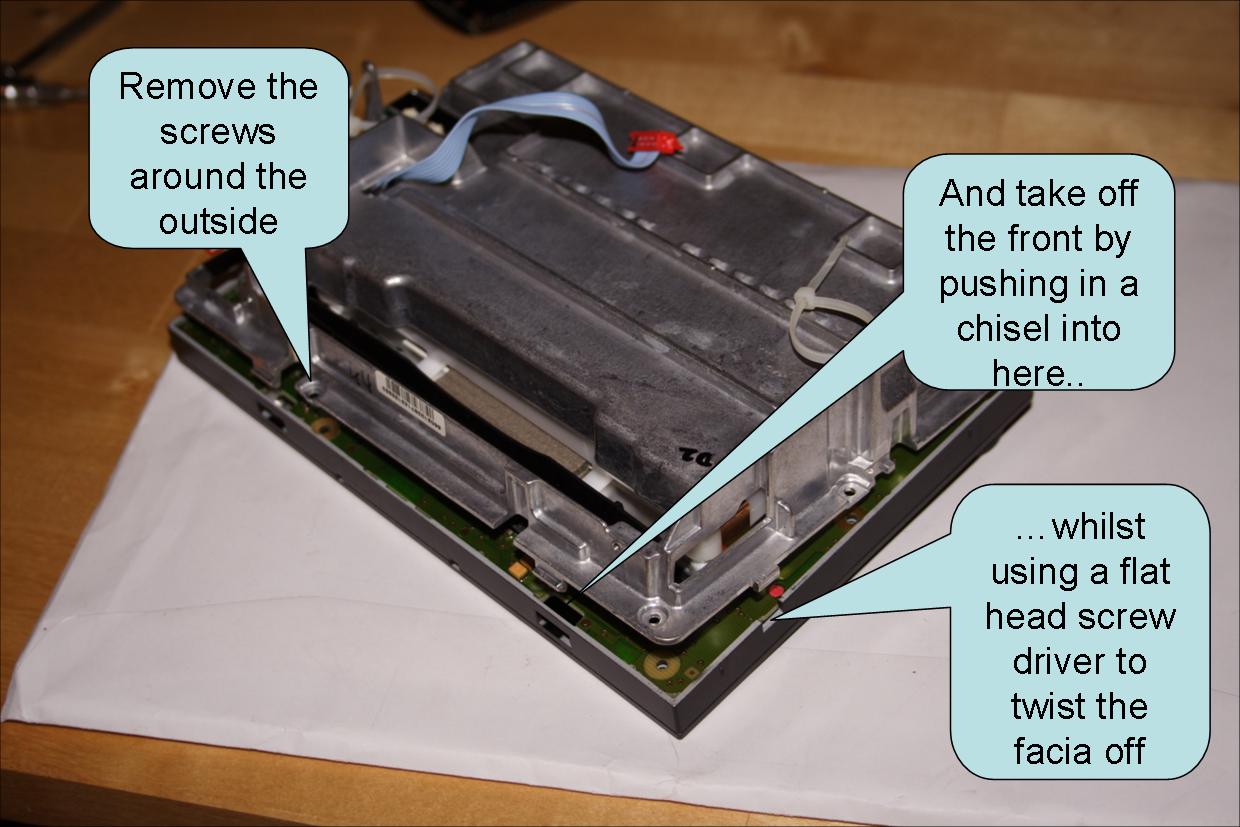
6 - Once the front is a stand along piece, unscrew the torx head bolts all around the outside and you now need to get the front off of the casting. This is a little tricky, but the best way is to insert (gently!) a chisel inbetween the plastic casing and the casting around the push on slots to push the plastic up enough to pass over the casting, then use a flat blade screw driver inserted and twisted into the slot in the side to push off the front. You'll need to do this side by side.
7 - Lift off the casing and thread the wires out (you'll need to thread them back through the casing when you refit it)
8 - Lift off the LCD screen and the metal side springs and disconnect the wire connector. By now, you can see the sim card holder.
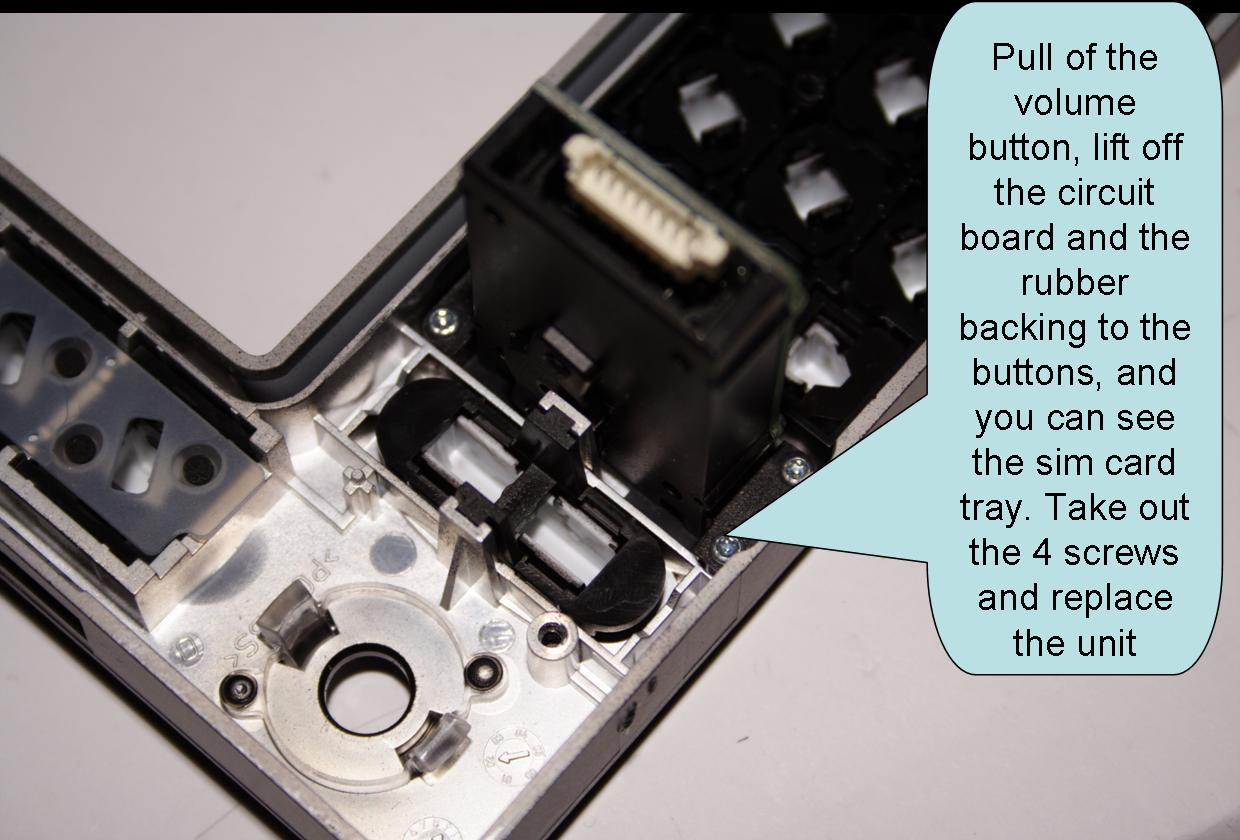
9 - Pull off the volume know (its a push fit) and lift up the circuit board, and the rubber button moldings.
10 - Unplug the sim card holder (if you havn't already) and unscrew the 4 screws (number 6 torx) holding the sim card tray in.
11 - Put the new tray in and reverse all the above. Don't forget to take a note of where all connections were, and reconnect all wires on the way back.
-
So, if you've got a sim card tray in a PCM 2 unit which either stays in or stays out, you'll need a new sim card tray. You can order a new one by contacting Becker direct and asking for your local becker parts reseller. In the UK, its around £20 plus VAT.
In terms of fitting, you'll need a set of torx head drivers, numbers 8 and 6. You'll also need a 5mm hex head allen key.
You don't need to disconnect the battery, but its probably adviseable. Remember on UK (and probably all European cars) leave the key in the ignition turned on before you disconnect your battery, else your neighbours will be as unhappy as mine with the secondary siren going off!
1 - Remove the horseshoe facia. There are other posts on this, but it is a push fit. I got mine off by pullinig gently the inside of the facia from each side of the air vents.
2 - With the allen key, rotate the 4 screws (2 either side) of the PCM unit, which will push in some arms which stop the unit coming out.
3 - Pull out the unit and disconnect the connections on the back.
4- Unscrew the two torx head screws on the of the unit. The top half then pulls off from teh front first. Be gentle with this, as it holds the CD player and there is a wired connection between the top and the bottom parts. You'll need ot pull off the connector.
5 - Unscrew the two screws on either side of the case holding the bottom to the front casting. The front then pulls off with some teasing but again, be careful as you'll need to disconnect wire connectors.
6 - Once the front is a stand along piece, unscrew the torx head bolts all around the outside and you now need to get the front off of the casting. This is a little tricky, but the best way is to insert (gently!) a chisel inbetween the plastic casing and the casting around the push on slots to push the plastic up enough to pass over the casting, then use a flat blade screw driver inserted and twisted into the slot in the side to push off the front. You'll need to do this side by side.
7 - Lift off the casing and thread the wires out (you'll need to thread them back through the casing when you refit it)
8 - Lift off the LCD screen and the metal side springs and disconnect the wire connector. By now, you can see the sim card holder.
9 - Pull off the volume know (its a push fit) and lift up the circuit board, and the rubber button moldings.
10 - Unplug the sim card holder (if you havn't already) and unscrew the 4 screws (number 6 torx) holding the sim card tray in.
11 - Put the new tray in and reverse all the above. Don't forget to take a note of where all connections were, and reconnect all wires on the way back.
SIM Tray replacement
in 996 Series (Carrera, Carrera 4, Carrera 4S, Targa)
Posted
Has anyone any feedback on the replacement of the SIM Tray as posted by TIM. I want to do this but wish feedback on how well its worked. If you have done it please post :renntech: