Welcome to RennTech.org Community, Guest
There are many great features available to you once you register at RennTech.org
You are free to view posts here, but you must log in to reply to existing posts, or to start your own new topic. Like most online communities, there are costs involved to maintain a site like this - so we encourage our members to donate. All donations go to the costs operating and maintaining this site. We prefer that guests take part in our community and we offer a lot in return to those willing to join our corner of the Porsche world. This site is 99 percent member supported (less than 1 percent comes from advertising) - so please consider an annual donation to keep this site running.
Here are some of the features available - once you register at RennTech.org
- View Classified Ads
- DIY Tutorials
- Porsche TSB Listings (limited)
- VIN Decoder
- Special Offers
-
OBD II P-Codes - Paint Codes
- Registry
- Videos System
- View Reviews
- and get rid of this welcome message
It takes just a few minutes to register, and it's FREE
Contributing Members also get these additional benefits:
(you become a Contributing Member by donating money to the operation of this site)
- No ads - advertisements are removed
- Access the Contributors Only Forum
- Contributing Members Only Downloads
- Send attachments with PMs
- All image/file storage limits are substantially increased for all Contributing Members
- Option Codes Lookup
- VIN Option Lookups (limited)


gandrade1
-
Posts
398 -
Joined
-
Last visited
Content Type
Profiles
Events
Forums
External Paint Colors
Downloads
Tutorials
Links Directory
Collections
Store
Posts posted by gandrade1
-
-
Question for you DIY'ers out there... I upgraded my dash and door factory speakers w/ new Alpines. They sound worse than the crappy Nokias that came out. Problem being that weak Nokia 4x40 factory amp. That being said, I am looking to upgrade it to a Blaupunkt THA plug & play amp. You can buy that amp (4 channel) plus a wiring harness from Crutchfield so that you don't have to run any new wires nor splice any existing wires. You just plug that wiring harness into the back of the Becker factory radio, then plug the harness you just unhooked from the back of the radio and plug it into the other end of the new harness, then hook remaining plugs into the amp. And you're done. My question is, where is the best place to mount the new amp? Under a seat? In the spot where the factory amp is located? That seems to make the most sense, but how do you get the wiring harness through the fire wall and into the front trunk area to hook into the amp? Any advice or previous experience on the board? Appreciate the help. BTW, this is going into a 99 Boxster... :cheers:
Is this the AMP you are talking about Blaupunkt THA475? The specs seem to be sufficient, while much superior to the HAES OEM amp's.
I would try to mount it in the trunk (original location) to avoid the mess of having to hide the wires in the cabin, find a good location (underneath the passenger's seat, maybe?). I would follow the existing wires to see how they go from the cabin to the trunk and try to route the wires through there....
I want to do the same conversion in the near future (for the summer)....So keep us posted.
Best of luck,
Gus
-
Hi guys,
Eventually I will go back to my country in South America and I grew to love Porsches so much that I won’t be able to go by without one :eek: …Also, I go there twice a year for vacations and I do miss a great drive.
The issue is: price of Pcars in my country (dollar based) are between 2 to 3 times the US price, used or not; my country does not allow an individual to import a used car unless it is 25 years or older.
Given these circumstances, I have been thinking for a while about getting an 80 to 85 911; get a new engine and parts mounted to it and export the baby home, for my visits or for the event that I do go back to live there.
Since I am a novice to the Porsche world I was wondering what route to take - what year to get; what model, MY to search for; what to look for in the car (body probably, since I intend to replace the main mechanical components) and how much to expect in expenses to get the car in good shape. It will be a weekend drive as well as some track exposure.
I understand this is kind of a curve ball, but what better to think about during the weekend. Just kidding (maybe?!?) :cheers:
Thanks,
Gus
PS: I am budget conscious!
:renntech:
-
you might add some security torx drivers.
Security Torx ?
-
Excellent topic.
I am also interested in the feedback.
So far I have purchased a torque wrench at Home Depot (Husky);a tool set from the same brand with several distinct sockets, extension and two drivers;a low profile jack and 4 jack stands from Sears;a torx bit set also from Sears; an oil cap 'socket' from Autozone and a simple screwdriver set.
Best,
Gus
-
The CPO is nice.
But, there are hundreds of these cars for sale. Try to find one with less issues.
Agree with White that there are a lot of these cars on the market, and many with fewer issues. On the flip side, if you really like this car you can use your RMS concern as leverage to pay 50K (maybe less) for this car and put the $7K in an account for the uncertain event you have another RMS failure after 2 years (when the CPO warranty expires).
Any problem within these 2 years you are covered and I believe you can easily prove the problem unsolvable if you have another leak and try to get them to replace the engine while under warranty (have heard many of these stories)...
Good luck,
Gus
-
Gus,
what he means is to close the valve more if you see a lot fo bubbles. I used to do the same mistake and would go through 2+ bottles of fluid for every bleed. If you see a lot of bubbles, close the valve then open the with only 1/4 turn. The bubbles should now be the ones in the system only
Thanks Izzy,
I will follow your suggestion.
Best,
Gus
-
I'll add a key point to keep in mind: the bleeder valve CAN introduce air into your drain tube when the fluid is flowing! This will give the appearance of air coming out of the caliper when in fact it is seeping in past the valve threads. You only need to open the valve about a quarter turn, much more will guarantee some air bubbles. If you have this problem, you can prove it's being introduced at the valve by pushing the valve in, sealing the threads. If the air bubbles stop - there's your source. When your done make sure the valve is securely closed!
Apparently I had this problem yesterday and waited too long for the bubbles to clean - ran out of fluid in the last wheel and will have to start over... :cursing:
I am not sure I understand the test you suggest above - pushing the valve in, sealing the threads. What are you suggesting we push in?
Thanks,
Gus
-
Hi guys,
Gathered all the tools, bought the bleeder and am trying to start the bleeding on my 01 Boxster right now...and already have a question (sorry).
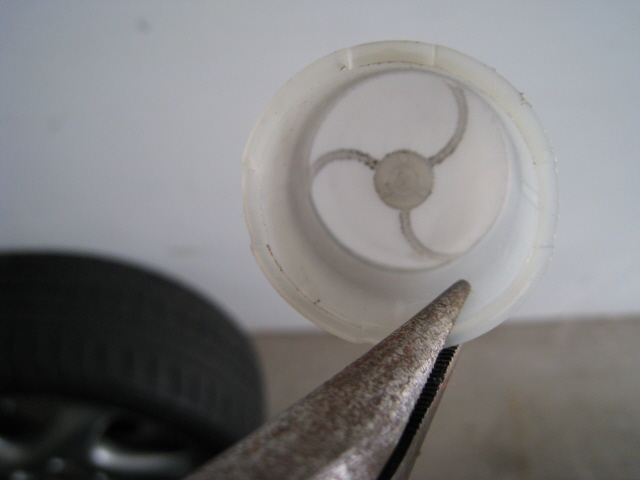
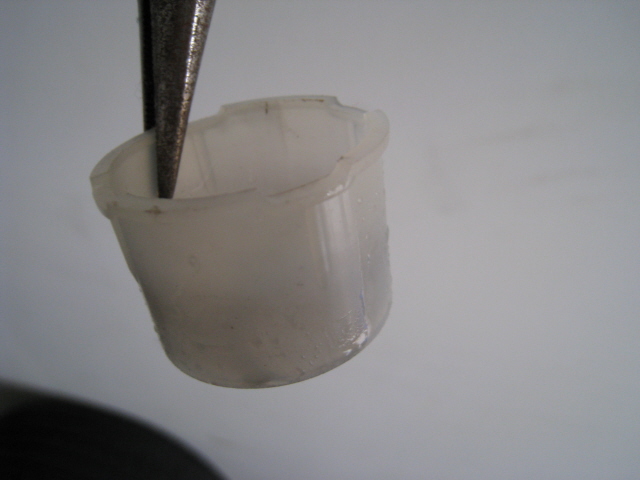
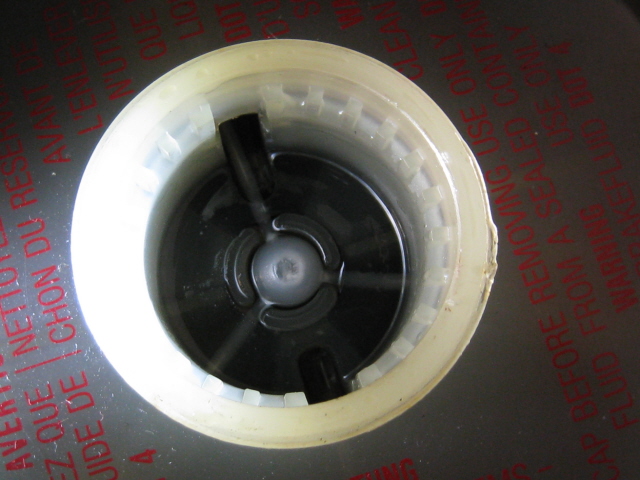
I opened the fluid reservoir and removed the first screen (please see pic below), but even after I did I have something on the way (looks like a small fluctuating ball - is it the fluid level sensor?)
Do I need to remove anything else?
I dont see how I can remove fluid with that thing on the way...
Thank you so much....
Gus

-
I am bleeding my brakes tomorrow and I intend to put my MY01 Boxster on 4 jack stands for the first time. Was thinking of doing a wheel at a time using only a jack, but I guess it is too risky...
I noticed that the suggestion here is to put the front on stands and then the rear. I can't clearly locate the place where to position the jack in the rear of my Boxster and I would also like to avoid removing the skid plate in the rear (does my car even have one? :huh: ).
I have changed the oil in the past (using ToolPants method) and put the left side on stands. I feel confortable working the jack on the sides using the so-called alternate lifting points. I was wondering if I can put one side on stands first (rear and front) and then the other side (rear and front)?
Let us say I put the left on stands first - Is there a risk that the stands will shift when I jack the right side to put the stands?
Thanks,
Gus
-
Happy to Gus! Loren's advice was to put tape on the cables to fix their location before disconnecting from the shifter. If you do that you can put them into the short shifter in the same location. If you don't do this then you need to adjuct with the tool included with the Factory linkage.
donlycan
Thanks,
will do....
Gus
-
1. Yes, you can do one wheel at a time - in the proper sequence.
2. A small wrench will work fine.
3. You will need less new brake fluid (less intermixing) if you remove most of the old fluid from the reservoir first.
4. You should see no bubbles when the fluid is coming out bleed valve. If you see bubbles then it is not yet clear of air. You should have a nice firm brake pedal.
Thanks, Loren
Is it a problem if I need to move the car (i.e. use the brake) between bledding one wheel and another to get more space in my garage?
Will a jack work or do I need to put stands (I am not bleeding the clutch)?
Best,
Gus
-
Getting ready to bleed the brakes!
Quick questions from a first timer:
(1) Can I just jack the car up one wheel at a time or do I need to put it on stands? My garage is tight and using 4 stands at the same time is a challenge...
(2) How do the bleeding valves open and how do I tighten them up with the 'bleeding tubes' connected to them? Do I need any tool?
(3) How much fluid should I pump out of the reservoir before I fill it up with new fluid? I am also thinking about using the pump from a liquid soap or something.
(4) What can go wrong and how do I know if the bleeding worked, before I put the car back on the road?
Thanks as usual,
Gustavo
:renntech:
-
Im not so sure about it being a straighforward process. Im in the middle of installing a Recaro SRD sports seat in my 996 and am going to need to attach the Porsche tunnel-side seat belt receptacle to the new seat. I am in the process of doing my homework on it now and looking at hardware adapters, etc. Brey-Krause makes an adapter R-9005 that might be required. Im going to try it without the adapter first.
The situation is that I am using a Recaro floor-mount bracket and sliders, so I know that I will need an floor-mount adapter to get the seat in. I have found side-mount adapters that have the hole in them to mount 996 seat belt receptacles... or you could even drill a hole in a side mount. But with a floor mount you do not get a hole to fit the stock 996 seat belt receptacles.
There is a hole on the Recaro bracket under the seat that might work if my seat belt receptacle assembly is long enough and flexible enough to bolt there and flex 90 degrees up and around the side of the seat. If not then so far the only thing Ive found is the BK R-9005 adapter that might work if it is not going to interfere with the recaro seat hinge which is directly above the previously-mentioned mounting hole.
Im taking pics as I go and once its all done I will post a DIY for mounting Recaro Sport seats in a 996.
I am very curious on how you ended up mounting the seat belt receptacles...I am going through the same process, but my seats are Kirkeys. I also want to retain the original seatbelts.
Any ideas?
Thanks
Gus
-
Being lazy and letting someone fit your lights is like getting an electrician in to change a light bulb.
Well...You might be understimating the work that goes in a properly done HID conversion - I did mine and it didn't take only 30 min. I did have fun doing it, though, but it did take some interest and attention.
Just a thought,
Gus
-
On Friday my buddy and I installed short shifters (OEM) in our cars(his-Cayman S and mine 997). Loren had provided me with some excellant advice.
Hi donlycan,
Would you be so kind as to share the advice. I am thinking of doing the same in my MY01 Boxster.
Thanks,
Gus
-
You are correct sir - no side impacts on a '97.
Just got the results of the PPI - rear main seal leaking badly - this deal is cancelled. Hope the guy will return my deposit.
Always pays to have a PPI done by a Porsche dealer.
i don't know if i'd consider a leaking RMS a deal-breaker. if you are getting a good enough deal on the car and you made money on the other Boxster, putting $1200 into it for a new RMS isn't too bad. or maybe you could get the guy to take $1200 off the price to account for the new RMS.
you probably have a 50% chance of *any* Boxster you buy eventually having an RMS leak. you might as well have the seller 'pay' for it now. ;)
Better yet...Ask the owner to get the job done in a dealer under the extend warranty he holds on the car! That way the seller only has to pay for the deductible and you will be sure that the RMS replacement is done correctly! Also you will see what this warranty he claims to have is all about!
The car looks great by the way...
Good luck,
Gus
-
Anyone????
:eek: Come on guys! This must be a topic that interests not only me!?!? :eek:
-
Just out of curiosity - what is the main difference between the German Canvas and the Sonnendeck Canvas?
Thanks,
Gus
Hi Gus,
They have a different weave from each other, the Sonnendeck Canvas is more resistant to fading. The German canvas is also cut a little differently - I think it may have a slight edge over the other for inititial fit. Least that's what I hear from GAHH.
Someone else probably knows more...
david
Sorry to read about your own top issues earlier...some people just don't have any respect.
Thanks, Zodman
I actually found someone to sew a new plastic window on my top (for $350)....I guess I should go for a glass window next.
-
An Update...
Looks like they have re-added the Sonnendeck Canvas. When I inquired with them the other day via the "live support" feature on their website, I was told they weren't going to carry it any more.
I guess they changed their minds...or something. They also lowered the price of the Sonnendeck Canvas to $959.00 from the previous amount of $975.00. The German Canvas is still at the same raised price mentioned above.
I called them today via "phone" to see if they are in fact going to carry the Sonnendeck Canvas or if it is reduced in price for being discontinued, and I was told that they will continue to carry it.
Hope that helps anyone that needs this info.
david
Just out of curiosity - what is the main difference between the German Canvas and the Sonnendeck Canvas?
Thanks,
Gus
-
Hi guys,
Thanks to your help I have recently cleaned the TB on my 01 Boxster and, yes, it runs much better!
I must confess that was the first time I opened the engine compartment in the one year I have had the car and, man, does it look dirty!!!! I did a search to find a way to clean / wash a Porsche engine and I found some general tips, such as cover the eletronic and electric components. I also asked a dealer and from the height of his knowledge he said - we don't mess with that...
Well, I am thinking about messing with that and was just wondering whether any of you have successfully cleaned or washed a Boxster engine and know its peculiarities. I know there is an expert here in Concours - Orient Express - whose 996 is cleaner than many of the new cars we see at dealer lots. I was wondering if anyone has any tips for the Boxster: what to use? parts to cover and how to cover them?
Thank you so much, once more.
Gus
-
Hey guys,
I did the GT3 Delete console install ....It makes a lot of difference. It is a great improvement for tall drivers like me.
Thank you so much for all the help I got here.
Gus
-
After the drain plug is removed, remove the stand, and "lower car until engine just touches the drain pan and let oil drain." Your car will then be level while the oil is draining. If you are going to watch the oil drip for a full 20 minutes then you will need a beer.
After the oil is done draining jack the car up and put the stand back in place. Install and tighten drain plug, don't forget the washer. Tighten the cannister.
At our work on cars days we usually get the women to change the oil....
Hahahahha...That is great man!
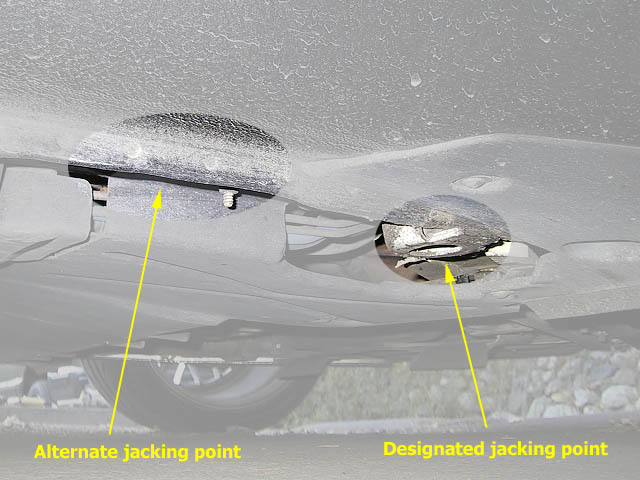
BTW, I gave it a try today... Jacked the car up through the alternative jack point (pic below) on the left side, but as I raised the jack to get enough clearance to put the stands, the jack felt very unstable (pulling towards the car!) Is this normal? Well, I didnt think so... So I had the beers and came back in!
Is my jack too short for my stands, or is the load capacity too low? Could it be the surface of my garage? This is my jack Craftsman 2-1/2 Ton Floor Jack, Low Profile and these are my stands Craftsman 2-1/4 ton Jack Stands....
Well, the owner manuals state that the jack (2.5 ton load) will go as high as 14.2 inches (360.68 mm) and the stands as low as 10-5/8 inches (270mm). I am using the stands at their lowest.
-
I jack up just the left side. Then slide me and the drain pan and the tools under the car. Unscrew filter cannister and replace filter and o-ring. Screw cannister back on my hand. Then slide drain pan over to the drain plug. Remove plug. Make sure old crush washer comes out. Lower car until engine just touches the drain pan and let oil drain.
Then jack up the car and replace plug with new washer. Slide oil pan out of the way. Tighten filter cannister and plug.
Beer is optional.
I am getting ready to do my first oil change. I bought 4 stands and one low profile jack. I also added hockey pucks to the stands and jack with the help of someone from this forum.
My question is: how can you jack only the left side? What about the need for the car to be leveled? Is it safe to have only two jack stands in the car? Do you have some pics of where you jacked the car (I am assuming you used the alternative jacking point) and where you placed the other stand?
Sorry for the many questions, but I want to make sure I do this safely.
Thanks,
Gus
-
2. Now, from the inside of the passenger compartment (behind the outboard side of the driver's seat), remove the semi-circular carpet-covered plastic trim panel from around the base of the roll bar. This trim panel is attached with an 8mm bolt at the top (just loosen it, you don't have to remove it completely) and there is a phillips screw near the bottom that is well hidden in the carpet covering. The screw is about 6 or 8 inches from the floor and just forward of the firewall. Remove the panel. This will remove the defroster hook up, and you will see the B-pillar microswitch, which must be disconnected from its connector near the floor. There is also a zip-tie that will have to be cut, as the zip-tie holds the wire to the roll-bar.
Hi Maurice,
Thank you so much for the complete instructions above.
I took a look at the top and found most of the parts you mentioned except the ones in number 2 above. Do you have any pics of what I have to disconnect here?
In addition, based on your experience on how to reassemble the top, do you think I should try to remove the 'plastic clips' (red in my case) or just go for removing the bolts with the big washers and marking the position of the 'arms'.
Thanks,
Gustavo
Short Throw Shift Kit on Ebay
in 986 Series (Boxster, Boxster S)
Posted
I paid $200 for this....
Did I get the real one?
It came in the box with instructions... Bought it online from what I believe to be a reputable store.