Welcome to RennTech.org Community, Guest
There are many great features available to you once you register at RennTech.org
You are free to view posts here, but you must log in to reply to existing posts, or to start your own new topic. Like most online communities, there are costs involved to maintain a site like this - so we encourage our members to donate. All donations go to the costs operating and maintaining this site. We prefer that guests take part in our community and we offer a lot in return to those willing to join our corner of the Porsche world. This site is 99 percent member supported (less than 1 percent comes from advertising) - so please consider an annual donation to keep this site running.
Here are some of the features available - once you register at RennTech.org
- View Classified Ads
- DIY Tutorials
- Porsche TSB Listings (limited)
- VIN Decoder
- Special Offers
-
OBD II P-Codes - Paint Codes
- Registry
- Videos System
- View Reviews
- and get rid of this welcome message
It takes just a few minutes to register, and it's FREE
Contributing Members also get these additional benefits:
(you become a Contributing Member by donating money to the operation of this site)
- No ads - advertisements are removed
- Access the Contributors Only Forum
- Contributing Members Only Downloads
- Send attachments with PMs
- All image/file storage limits are substantially increased for all Contributing Members
- Option Codes Lookup
- VIN Option Lookups (limited)


gandrade1
-
Posts
398 -
Joined
-
Last visited
Content Type
Profiles
Events
Forums
External Paint Colors
Downloads
Tutorials
Links Directory
Collections
Store
Posts posted by gandrade1
-
-
Gustavo:
What a bummer! Where was your car when it happened?
If your top is in good shape (other than the cut window) you can save some money (and wear and tear on the canvas itself that would result from stripping and re-installing the top) by removing the entire top with the mechanism and bringing that to a reputable shop to sew in the vinyl window.
If you want to go down that route, let me know and I will post some steps on the removal and re-installation. Removal takes less than 1/2 hour and you cannot make a mistake when you re-install it because the bolts are self-centering.
Regards, Maurice.
I went to the movies on a shopping mall in NJ (Garden State Plaza) on Friday, but did not notice the cut until next morning when I woke up and decided to work on the Throttle Body cleaning. I park my car overnight in an individual garage so no way it could have happened there .
The route you suggest seem pretty reasonable. I would definitly appreciate if you could send me the steps. How do I find a reputable shop in the area? Have you heard of any?
Thanks,
Gus
-
Hi guys,
It happened to me this weekend. Some unhappy guy slit the plastic window on my convertible top, I guess only for the fun of it :angry:
Ok, now my choices are: (1) pay the $1,000 comprehensive insurance detuctible + differential between the dealer hourly rate and the insurance covered rate and have a new top (with plastic) installed; (2) Find someone who will sew a plastic window on my current top (and, no I dont have the skills to do it myself) and I will be picking on its imperfections evrytime I look at it; (3) Pay the $1,000 bucks to the insurance and get a GAHH top installed by a reputable shop that doesn't go over the $50 hour rate that my insurance covers !!! 50 bucks, come on!
I need some guidance. What do you guys suggest?
Does anyone happen to know a good shop in NJ / NY area that will do the job well?
Thank you so much,
Gustavo
:renntech:
-
Last time I did this was at a work on cars day - so the engine was still warm.
I don't recall it being a big deal - I just wiggled it back and forth until it came off.
Maybe a warm (but not hot) engine would help?
Thanks geoff and Loren,
I cleaned the TB yesterday. Well, I guess the warm engine helped a bit but it was a challenge, nevertheless. The air duct is tough to get out and, yes, even worse to get in. Took me, over one and half hour of squeezing, pushing and pulling to get it back in. :angry:
Well, all said and done I like the results, but I am sure I coul dimprove my technique a lot!
Thanks, guys
Gustavo
-
Thank you so much geoff,
I guess your assessment is very close to mine - it is not a 30 minutes to 1hr job and would deserve some thought on to what the steps are to remove the TB and reassemble everything. And yes, cleaning the throttle is the easy part!
That being said, your steps sound pretty clear to me and simply explained so that someone with my modest skill set can pursue. Thank you very much....
I will give this thing another try, during the weekend and will let you know what I come out with. If you don't mind I will bother you for some help if I get stuck once more.
Thanks,
Gus
No problem. I wish I could have come up with the magic sequence of twisting, wiggling and swearing that worked for getting the tube off and later back on the throttle body. If not for that challenge, the whole task is just a little more than a half hour job. If anyone has any tricks or tips, I'd love to hear for the next time. Maybe Loren or TP know some magic trick :P
Guys, I gave it a another try today... the air duct just wont give away. I am getting frustrated. I think all the dirt accumulated around the throttle, just made the tube even stickier and it wont come out. I have been pulling pretty hard to the point where the intake moves slightly.
Is there an easier way to do this. Could it be that the cold made the tube even harder to remove? It was indeed a pretty cold day today around here in NJ.
Any ideas from the Boxster masterminds?
Thank you so much,
Gustavo
-
Hello, am new to all this but finally wanted to make my dream of owning a Porsche come true.
I am looking at a 03 Twin Turbo Coupe for $66,900. 19,000 miles. Seems to be in excellent condition and have done a CARFAX report that came back without any issues - except door window checked twice? The rest of the specs are: Polar Silver Metallic with Black full leather interior. Equipment includes: 6-speed transmission, aluminum look interior, heated seats, center console painted to match the exterior, Porsche headcrests in the front seats, footwell lighting, stainless steel exhaust pipes, aluminum dials, and a power sunroof.
So is this a good buy? What should I be looking out for on this car? Any ideas on maintainence cost/year? Are these the right rims for the car?
Any other suggestions?
Thanks very much.
Stephen
The car looks amazing and the history encouraging, however do not get any PCar, specially a turbo, without a Pre-Purchase Inspection... I was looking at a spotless 03 Carrera a couple of months ago, clean carfax, 22k miles. Got the PPI done, it turns out it had a leak (RMS).
If the PPI is done by a reputable shop, they can also provide you with an idea of what maintanence costs to expect.
My 2 cents....
I hope it works out with this baby.
Good luck,
Gus
-
Thank you so much geoff,
I guess your assessment is very close to mine - it is not a 30 minutes to 1hr job and would deserve some thought on to what the steps are to remove the TB and reassemble everything. And yes, cleaning the throttle is the easy part!
That being said, your steps sound pretty clear to me and simply explained so that someone with my modest skill set can pursue. Thank you very much....
I will give this thing another try, during the weekend and will let you know what I come out with. If you don't mind I will bother you for some help if I get stuck once more.
Thanks,
Gus
-
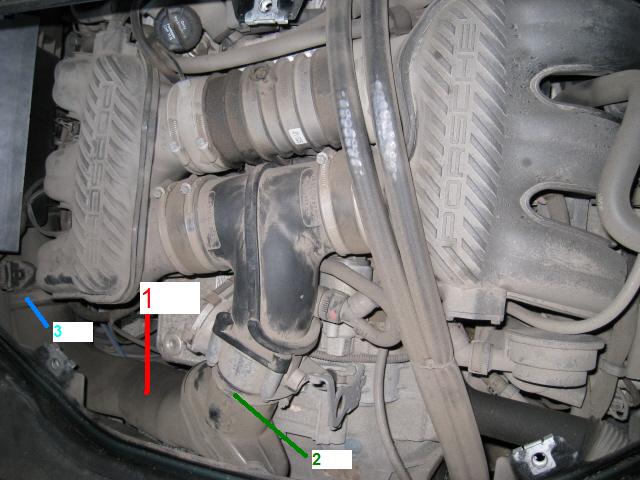
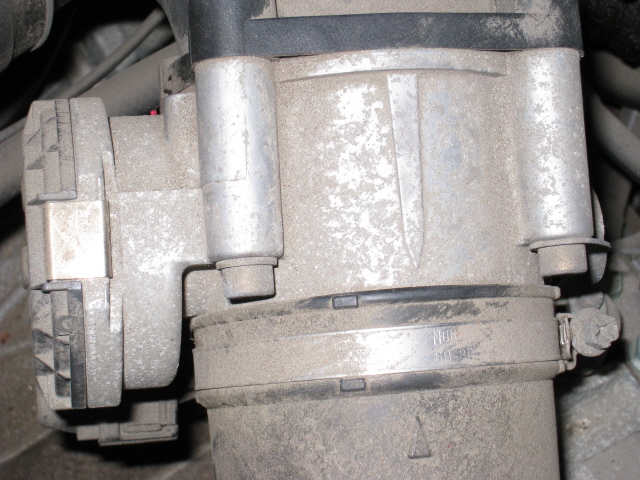
Hi guys, I opened the engine again to take some pics and I tried to get the TB out once more.
In the picture below I loosened the hose clamp in blue, number 3 (the screw popped out and got lost in the open parking lot and I had to replace it with a generic, PepBoys clamp). Then I loosened the other hose clamp - number 2. After all this I could not move the tube a single inch from the TB, but the number 3 end came out easily. Should I just keep on pulling the end close to the TB or is there an easier way to do this? Can I cause any damage by pulling hard...
I also added a second picture just to show how dirty the Throttle is on the outside... I really need this cleaning.
Any help is appreciated.

-
The red oval is the throttle body. 1997-1999 is non-egas. You can see the throttle cable in the picture.
I was trying to keep it simple if there is room to remove just the idle valve from throttle body. Have not tried to do it this way on a Boxster, but it can be done this way on a non-egas 996. To clean inside the throttle body itself you need to remove the large tube that comes from the air box.
Hi Tool Pants,
I opened my engine for the first time the past weekend with the intent to remove and clean the throttle body (TB). I have a 01 Boxster (egas) 40k miles. I gave up because the engine was very dirty in general and the components (tubes) don't look as flexible as I assumed they would be. I decided to give the engine a superficial clean and pursue the TB this week.
I was surprised how little space there is to access the parts and screws specially the ones in the lower portion of the TB. I am not sure whats the best sequence to get the TB out of there and in - hopefully :unsure: - again .
I have a couple of questions:
(1) What do I need to remove in order to have space to get the TB out of the car? Should I remove the air duct (large tube) in the end opposite to the intake ?
(2) Are there any other component I need to remove, tubes to disconnect.
I am very inexperienced working with engines and am a little skeptical on whether I can get this all back in....But want to give it a try. Any advice is greatly appreciated.
Thanks
Gus
-
I have had a hardwired Escort 850 for one year now...Apart from the false alarms it is good overall. I heard from friends and read that the Valentine 1 is very similar except for the arrows - both rank the same in tests except for Ka band where Escort is superior.
I would try the new Escort 950i - it supposedly eliminates false alarms through GPS capabilities, has a more modern design and can be purchased in almost any reputable eletronics store - price is very close to the Valentine's.
Just my 2 cents
Gus
-
3. Might not hurt since you will be in there anyway.
Hi Loren,
Were can I find instructions on cleaning the MAF? I know the product to be used is different.
Thanks,
Gustavo
-
How to with pictures
I couldn't find it here using the search but there is this rather complete description here
Thanks Mike,
I will do the cleaning this weekend...Couple of Questions:
(1) Do I need to disconect the batery before I do it to avoid any CEL codes? Can this process lead to CEL codes at all?
(2) What pressure should I put when puting the screws back together? I just bought a torque wrench and have been looking for an opportunity to use it... :jump: Hahahahah
(3) Should I go ahead and take the opportunity to clean the MAF ? If yes, where do I find instructions...
Thanks,
Gus
-
Hi guys,
I moved the AC Unit to the upper console and the faceplate that surrounded it in the lower console doesn't fit.
I need to know what the part number is for the frame that goes around the AC in the upper console.
I know that many have done the opposite - moved the AC monitor to the lower console and might an extra faceplate ... I would be willing to buy it.
Thanks,
Gus
-
There are some threads that describe how to use hockey pucks to protect the 4 jacking points. I can't figure out why anyone is worried about the paint finish on the bottom of a jack point. Only a mechanic will ever see it. Therefore, any jack that fits firmly under the jack point will do, in my opinion. Personally, I use a Torin Aluminum Race Jack with Single Piston Pump — 1 1/2-Ton, Model# T8150121 which is a nice lightweight jack for under $100 that handles the car easily. For jack stands, personally I made mine out of wood blocks with a 6x6 base and 3.5x3.5 inch top about 10.5” high which just gets the tire off the ground for removal of wheels (there's photos and descripts somewhere in Boxster forums, but which I can't recall). I own 2 sets of heavy duty steel jack stands but the tops are sort of U shaped and will not fit firmly under the jack point. Besides, their min height is unnecessarily high.
As for "alternate jacking points", the area several inches behind the front jack point and several inches in front of the rear jack points is a great spot, but personally I would distribute the weight better than the concentration of a hockey puck (guess that I'm just not much of a hockey fan!). I made a roughly one foot long piece of 4x4 with a saw slot approx 3/8" deep and 1/4" wide along it's length. This supports the body along the entire foot of length and has clearance to the delicate rocker panel. Just slide your low racing jack under it and pump.
Ramps… There are plenty in stores, but I built mine from 3 progressive layers of 2x6s with angles at the ends to allow the car to climb on. I have 4 such ramps with the only difference that only the back ramps have wheel stops. The resulting 4.5 inches is usually enough, but in some cases I want it a bit higher, so I have a few longer precut 2x6s to boost it to 6” of lift…just tack them on with a screw when needed. I’m changing the oil as we speak with this and it’s a great height. I advise making ramps longer than you think you need them. You want the car to be fully up each 1.5” before rising up the next 1.5”.
OK, all of this stuff is wood. I can afford the ’01 Boxster but not every service device on the market, so DIY items like these are saving me money and are much more stable than factory build items, sacrificing versatility and light weight. I don’t mind!!!
Good luck,
Bob
Thank you guys for all the help...
I am leaning towards a not so expensive jack adapted with the hockey puck...
My big concern now is how to keep the car stable and safe during the repair, should I go for jack stands ? If so, what kind works?
I wish I were good at wood working, but that is another skill I am still to acquire.
My other question is: dont ramps replace the need for jack and stands? I found these online:ramp What do you guys think?
Best,
Gus
The ramps in your link are typical of what you can get and any parts store, sears, etc. There are plastic alternatives now which may not slide (be pushed) as easily. These ramps are a quick, steep rise....therefore the car may try to push them when attempting to drive up. The ones that I described made of wood are a gradual incline, 1.5" at a time. I have 4 ramps so I can elevate all 4 wheels at once if I want. Can't do that with the commercial ones like in the link. Not enough clearance under the car for the second set. Often a pair of ramps AND a pair of jackstands are a good alternative.
Oh...one other safety issue....don't forget to chock wheels so the car can't possibly roll when jacking, while on ramps, etc. The brake should be set, but don't count on it without wheel chocking. Leave the car in gear if possible (first gear or reverse) too. Be sure that the car can't be tapped by another vehicle while raised. Before getting under the car, I like to lean a thigh into it and see if there is any shake. If so, DON'T go under it until it's stablized.
Bob
Thanks, Bob
For now I think I am gonna settle for a jack and a pair of stands...
Will this Jack work?
-
There are some threads that describe how to use hockey pucks to protect the 4 jacking points. I can't figure out why anyone is worried about the paint finish on the bottom of a jack point. Only a mechanic will ever see it. Therefore, any jack that fits firmly under the jack point will do, in my opinion. Personally, I use a Torin Aluminum Race Jack with Single Piston Pump — 1 1/2-Ton, Model# T8150121 which is a nice lightweight jack for under $100 that handles the car easily. For jack stands, personally I made mine out of wood blocks with a 6x6 base and 3.5x3.5 inch top about 10.5” high which just gets the tire off the ground for removal of wheels (there's photos and descripts somewhere in Boxster forums, but which I can't recall). I own 2 sets of heavy duty steel jack stands but the tops are sort of U shaped and will not fit firmly under the jack point. Besides, their min height is unnecessarily high.
As for "alternate jacking points", the area several inches behind the front jack point and several inches in front of the rear jack points is a great spot, but personally I would distribute the weight better than the concentration of a hockey puck (guess that I'm just not much of a hockey fan!). I made a roughly one foot long piece of 4x4 with a saw slot approx 3/8" deep and 1/4" wide along it's length. This supports the body along the entire foot of length and has clearance to the delicate rocker panel. Just slide your low racing jack under it and pump.
Ramps… There are plenty in stores, but I built mine from 3 progressive layers of 2x6s with angles at the ends to allow the car to climb on. I have 4 such ramps with the only difference that only the back ramps have wheel stops. The resulting 4.5 inches is usually enough, but in some cases I want it a bit higher, so I have a few longer precut 2x6s to boost it to 6” of lift…just tack them on with a screw when needed. I’m changing the oil as we speak with this and it’s a great height. I advise making ramps longer than you think you need them. You want the car to be fully up each 1.5” before rising up the next 1.5”.
OK, all of this stuff is wood. I can afford the ’01 Boxster but not every service device on the market, so DIY items like these are saving me money and are much more stable than factory build items, sacrificing versatility and light weight. I don’t mind!!!
Good luck,
Bob
Thank you guys for all the help...
I am leaning towards a not so expensive jack adapted with the hockey puck...
My big concern now is how to keep the car stable and safe during the repair, should I go for jack stands ? If so, what kind works?
I wish I were good at wood working, but that is another skill I am still to acquire.
My other question is: dont ramps replace the need for jack and stands? I found these online:ramp What do you guys think?
Best,
Gus
-
Hi Guys,
I am planing to start doing my own oil changes and would like to know whats is the safest way to lift my Boxster for service. I have heard some horror stories (none particular to Porsches) about people getting smashed by their cars.
There is a PepBoys across from my house...Is there anything I could get there or in any alike store that would do the job?
Any tips on how to lift the car, such as how far to put the ramps and how to distribute the jack(s)?
Thank you very much,
Gus
:renntech:
-
Kid:
If your dealer has ben servicing you for about 2 years, why would he not "go over the entire car and replace whatever needs replacing under warranty" without obligating you to spring for a $1,200 tune up?
It sounds to me as though the dealer is trying to "sell" this job.
Regards, Maurice.
Hi Maurice,
I know it is a little off topic :huh: but I also live close to NYC...What mechanic do you take your car to?
I have been looking for a while.
Thanks,
Gus
-
Please do a search here - it's been covered many times.
I am going through the same problem with my 01 US Boxster - need throttle body cleaning....did a search, but could not find a doc on how to do it for the 986...
Thanks,
Gustavo
It is easy to do. In fact the job I did also was the first time I had opened up the engine compartment at all. The biggest issue for me was the stiffness of the intake plastic tubes. You really have to yank on them pretty hard and loosen up the end opposite of the throttle body intake (to get a little play in there) --- I found a few online DIY places for instructions on getting access to the engine, then I just figured out the rest.
If you have any questions, let us know.
Best of luck.
Thank you for the prompt input...
How long did it take you to do the whole thing...BTW it is also going to be my first time opening the engine compartment
Thanks,
Gus
-
Please do a search here - it's been covered many times.
I am going through the same problem with my 01 US Boxster - need throttle body cleaning....did a search, but could not find a doc on how to do it for the 986...
Thanks,
Gustavo
-
Specify the parking sensors first. You will use them every day and regret every day that you did not fit them.........
I am from the opinion that knowing the size of your car is an essential step to get familiar with it, and the easiest and safest way to develop that is through parallel parking. The parking sensors are, in my opinion, something you get used to and, although convenient (and annoying - my perception), make you less in-touch with your car...
But again...it is a matter of personal opinion...
Thanks,
Gus
-
I vote for Lloyd's. They list several grades of quality, the worst of which is very good. My OEMs will go back in when I sell it.
I like black mats in my sea of Savanna interior,
Why not use the porsche mats
http://e-partssales.com/Merchant2/merchant...96gt3interiorup
That is a great, great question!!!
-
My car is comig up to a Oil Change interval ($250!!) - the question I have is whether I should take it to a dealer I bought it from so they can nose around and see if there is anything that could be replaced under warranty - or take it to a different dealer
Guess my question is do dealers who claim on warranty's that they have issued get penalised and therefore less willing to look for/fix anything that is covered under warranty? - or do other dealers have the reverse motivation?
Cheers
Anthony
What dealership did you go to...so that I can avoid it...I live in the same region...
Try Prestige Porsche Nanuet, NY...I have heard they are pretty good and fair
Best,
Gustavo
-
I would email the folks at Brey-Krause (http://www.bkauto.com/). They have likely made brackets for most seats.
Hi Loren,
I am running out of time to close the deal and opinions...
Do you or anyone else have any suggestion?
FYI - Brey-Krause has not responded to me yet.
Thanks,
Gustavo
-
Hi,
You might want to buy some slider hardwear. The sliders on my 997 are 16" apart if I remember right.
Paul
Hi Paul,
Thanks for the tip. The seats will actually come with brackets and sliders, which are in fact 16'' as you suggested.
My main concern is whether I have enough space on the Boxster to accomodate the width of the seat (shoulders and waist)
Thanks,
Gus
-
I would email the folks at Brey-Krause (http://www.bkauto.com/). They have likely made brackets for most seats.
Thanks Loren,
I just emailed them...
I have not seen any brackets for Kirkeys in their website, but hopefuly they will be able to tell me wheter the seat fits, based on the dimensions I attached.
New Rear Window Installed
in 986 Series (Boxster, Boxster S)
Posted
Do you have instructions (a posting here) on how to do it?
Thanks,
Gus