Welcome to RennTech.org Community, Guest
There are many great features available to you once you register at RennTech.org
You are free to view posts here, but you must log in to reply to existing posts, or to start your own new topic. Like most online communities, there are costs involved to maintain a site like this - so we encourage our members to donate. All donations go to the costs operating and maintaining this site. We prefer that guests take part in our community and we offer a lot in return to those willing to join our corner of the Porsche world. This site is 99 percent member supported (less than 1 percent comes from advertising) - so please consider an annual donation to keep this site running.
Here are some of the features available - once you register at RennTech.org
- View Classified Ads
- DIY Tutorials
- Porsche TSB Listings (limited)
- VIN Decoder
- Special Offers
-
OBD II P-Codes - Paint Codes
- Registry
- Videos System
- View Reviews
- and get rid of this welcome message
It takes just a few minutes to register, and it's FREE
Contributing Members also get these additional benefits:
(you become a Contributing Member by donating money to the operation of this site)
- No ads - advertisements are removed
- Access the Contributors Only Forum
- Contributing Members Only Downloads
- Send attachments with PMs
- All image/file storage limits are substantially increased for all Contributing Members
- Option Codes Lookup
- VIN Option Lookups (limited)


gandrade1
-
Posts
398 -
Joined
-
Last visited
Content Type
Profiles
Events
Forums
External Paint Colors
Downloads
Tutorials
Links Directory
Collections
Store
Posts posted by gandrade1
-
-
Thanks guys for the detailed and honest assessments...
This is great,
Best...
Gus
-
Hi guys,
Just a early Thanksgiving afternoon thought.... :rolleyes:
I currently have a 986 and am thinking about eventually upgrading to a 987S...I was checking the Porsche website and the price for the added optionals make me wonder - are they really worth it or can I do better with aftermarket parts? A basic model goes for $55,700.00 while the Sport (Porsche configured) goes for $66,185.00 (thats the price of a nicelly equipped '04 911 4S !!!)
Just food for thought...
-
sorry I should have been more specific. All season and I wondering if 265/55/18 or 275/60/18 would work. Thanks for the reply
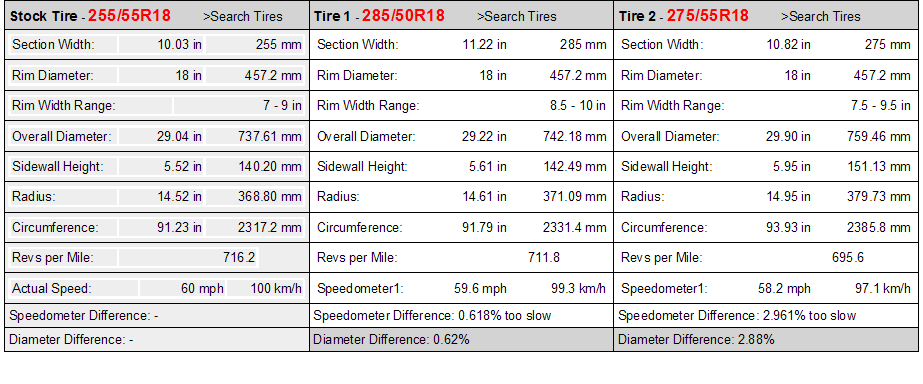
Hi, I did some research and apparently with the 18''s, 275/55-18 and 285/50-18 (cooler look) will fit, none of your original choices however seem to work. Please, note that the original size for these rims are 255/55/18. The table below will show u the comparisons I put together.
This is one of my sources for research: http://www.discounttiredirect.com/direct/a...&vid=008400
Hope this helps...
Found another important piece of info for you...Please, note the wheels size limits.
Cheers,
Gustavo

-
sorry I should have been more specific. All season and I wondering if 265/55/18 or 275/60/18 would work. Thanks for the reply
Hi, I did some research and apparently with the 18''s, 275/55-18 and 285/50-18 (cooler look) will fit, none of your original choices however seem to work. Please, note that the original size for these rims are 255/55/18. The table below will show u the comparisons I put together.
This is one of my sources for research: http://www.discounttiredirect.com/direct/a...&vid=008400
Hope this helps...
-
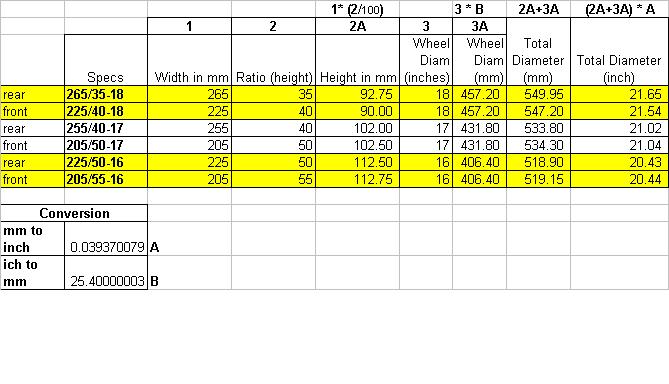
What you have to maintain is the same diameter front to back. Also it is not the diameter that helps in snow, but the width...the narrower the better. I personally would not run 18 in front and 17 in back.
Agreed - The narrower and the higher the TIRE the better...Total diameters calculations however do not solely justify why you should keep the same wheel diameter for your front and rear wheels...even within the same wheel diameter (see calcs below), you will notice that the total diameter (with tires) changes slightly...Adittionally you might have different wheel diameters but very close total diameters - it is all a matter of the height ratio of the tire you choose. Best advice however, is to keep the same wheel diameter in the front and in the rear because the recommended tire widths (hence the contact surface) are very different across different wheel diameters, which obviously changes the handling of the car. In general, the higher the height ratio of the tires, the higher the 'sidewalls' and the lower the changes of you getting stuck in snow...
Additionally, winter tires and summer tires are made of different materials and tread designs, which have a direct impact on how the car handles.
Just my 2 cents...
Gus
-
These are the before pics....
-
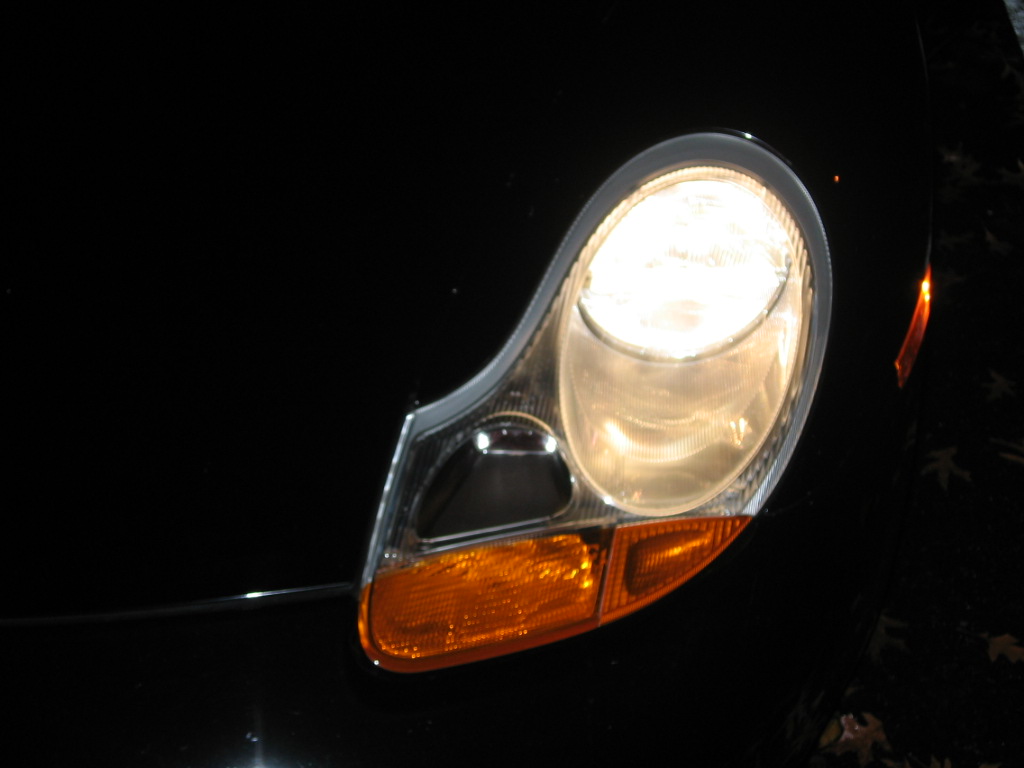
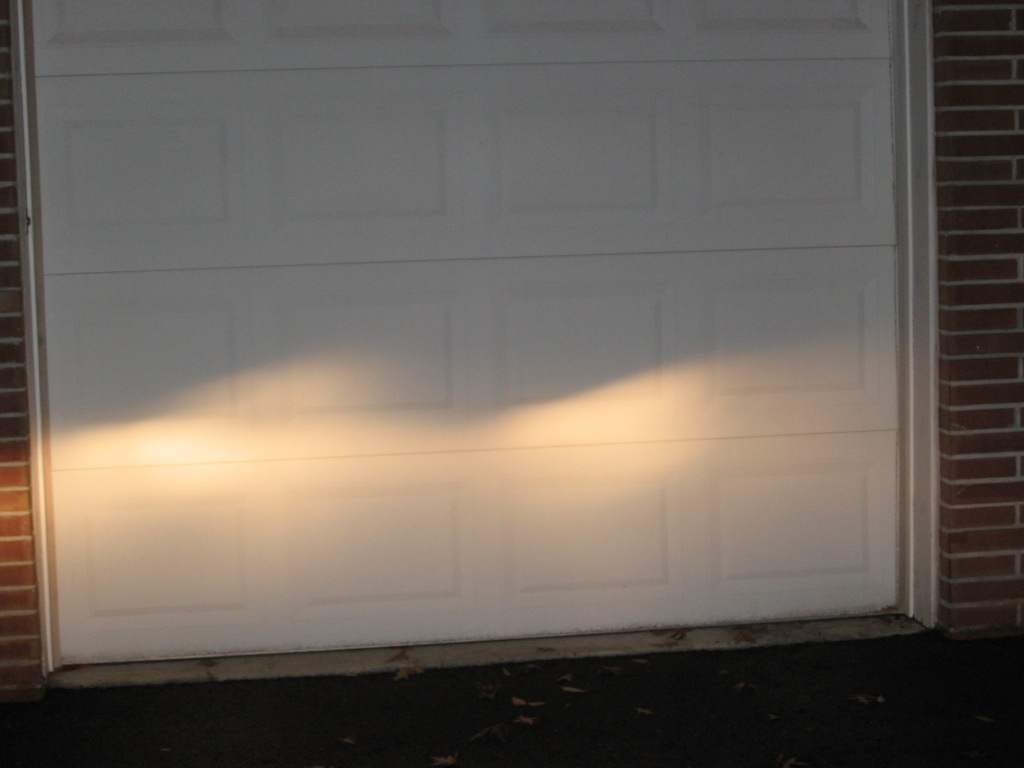
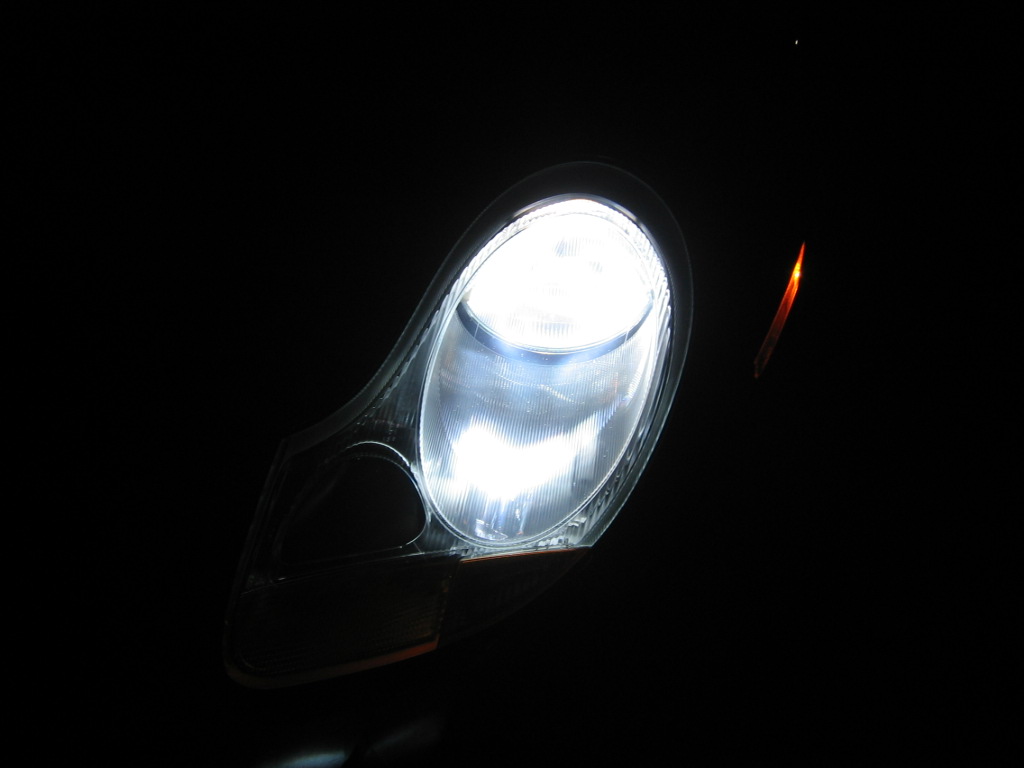
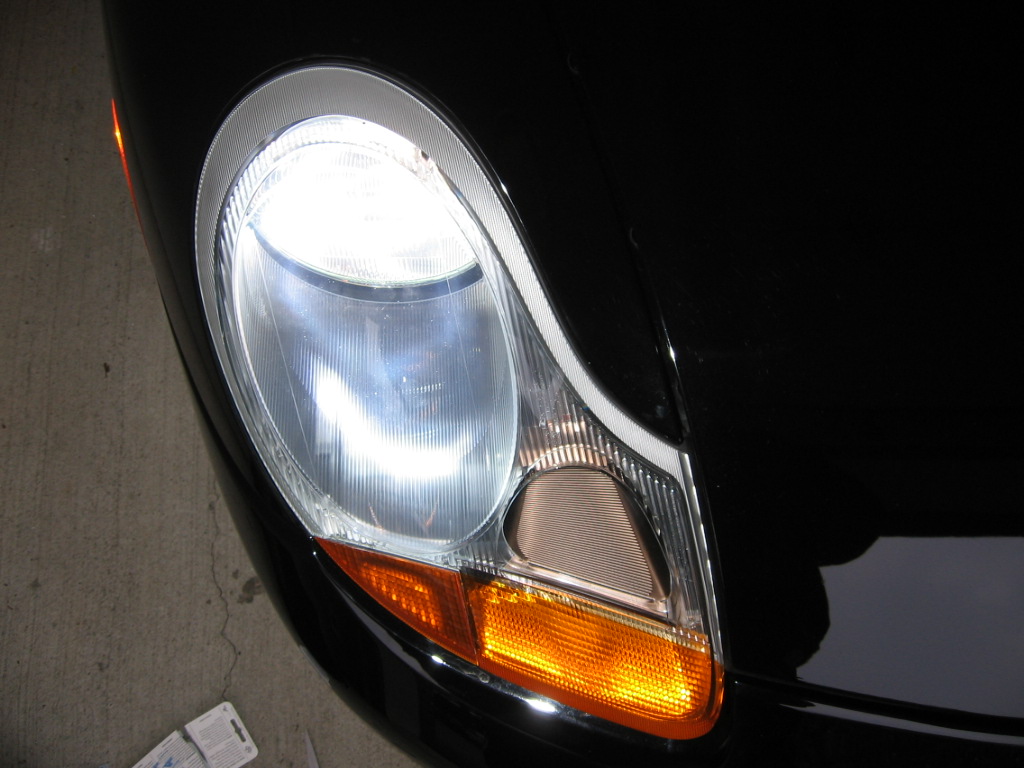
Thank you so much John for the detailled description...I did do the MOD and am impressed by how much brighter it looks.
I am adding some pics to show the final results (my camera is not that great though, despite my great photographic skills...hahahaha)
I just believe the headlights are not very well aligned...but I will check during the next weekend...
Thanks,
Gus
-
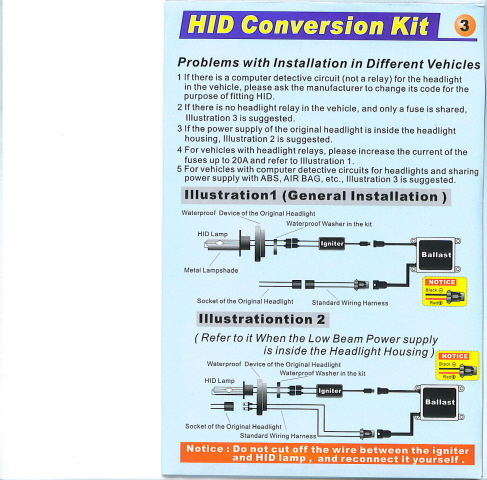
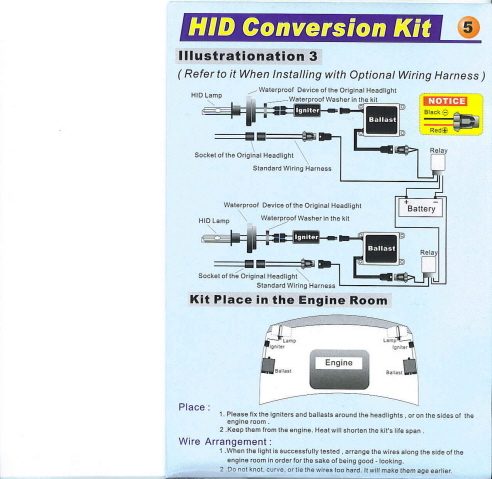
Hi guys,
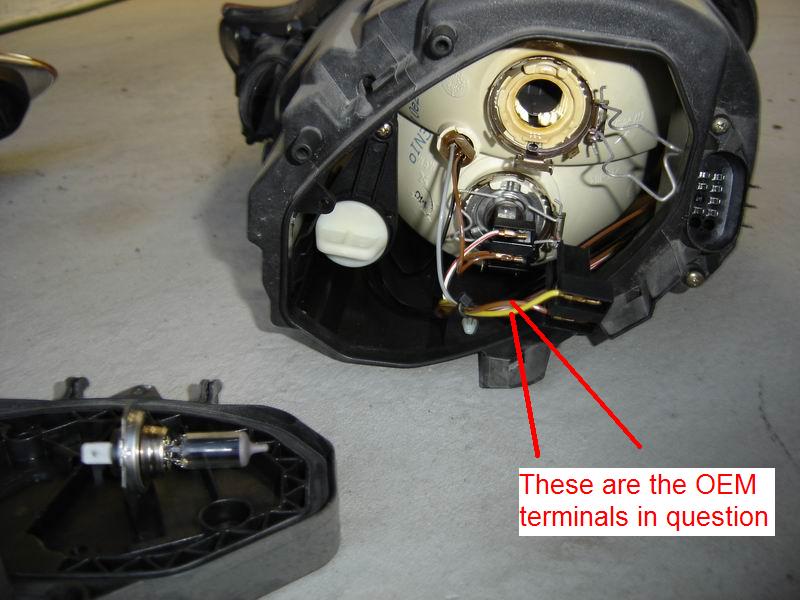
I am doing the HID installation in my stock headlights and the kit comes with two spade connectors a RED (+) and a BLACK (-) the stock sockets (picture below are Brown and Yellow and I am not sure which one to connect to which stock terminal....
Thanks,
Gustavo
-
If you don't have Boxster shop manual, I suggest you to get Bentley's "Porsche Boxster Service Manual" to look at electrical schematic. Once you have the schematic, I think it will make the HID kit installation easier and safer. Amazon has a great price at:
http://www.amazon.com/Porsche-Boxster-Serv...7551&sr=8-1
Peter
Thanks Peter....
How is this manual different than the one that comes with the car?
Gus
-
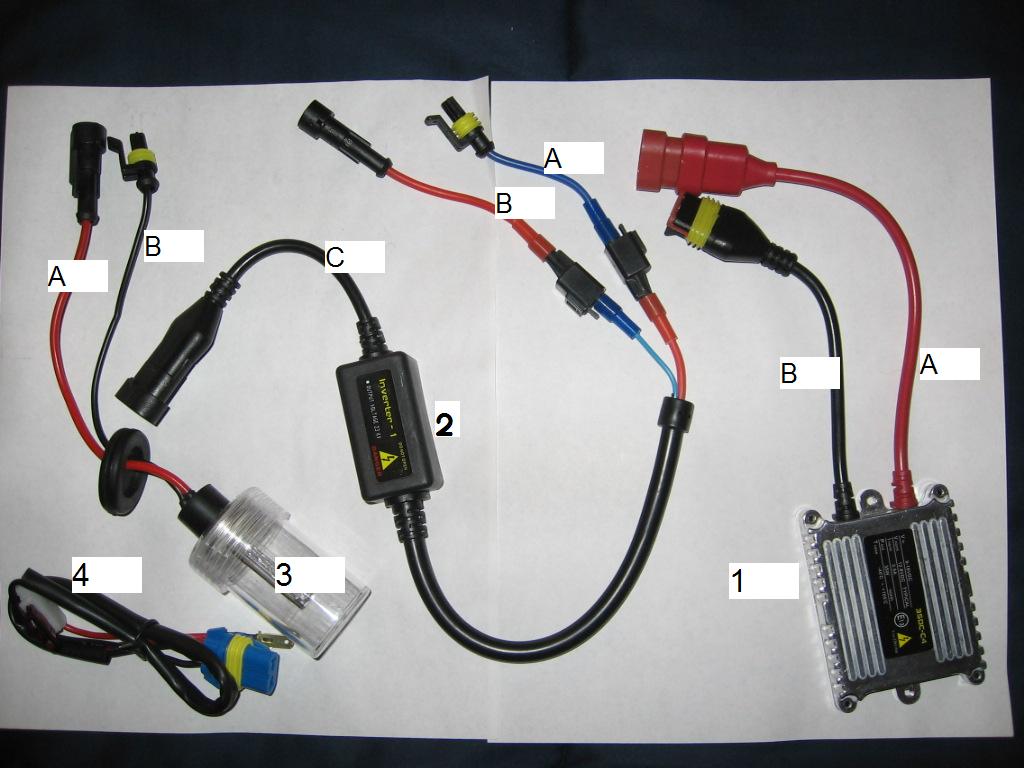
I also took the picture below from half of the pair of parts I received with the kit...
Thanks you very much,
Gustavo
Can anyone provide input please...I want to do the install this weekend.
Thank you so much,
Gustavo
-
I need help on doing my install.
I actually posted some very very basic quastions I have as well as some pics on the following posting - Simple Questions and Pics
Thank you in advance for your help....
-
I also took the picture below from half of the pair of parts I received with the kit...
Thanks you very much,
Gustavo
-
Hi,
I got the 5000K HID kit from CQ lights today. I want to install it in my '01 Boxster with regular, amber headlights. I read the DIY article but I am not really clear on basic points, such as which of the installations below should I choose. Once chosen, where do I find the 'socket of my original headlight', what cables do I connect to the car and where?
Sorry for the obvious nature of the questions, but I am really new to the DIY world and got really inspired by the original DIY article for this conversion, but have had very little response to my questions - maybe because they are too obvious...
-
First, for GANDRADE1, it's logical. You need a 1" hole for the big rubber grommet. And I'd advise a little silicone sealant for where the cable passes through. The ballast, with the other electronic dohicky electrical taped to it's back, can be screwed to the back of the removable cover. A few cable ties and you're in. Toughest part is getting the lamp units back in!! Don't plan on finishing too quick unless you have a fair amounts of tools such as files, dremel, assortment of screws and drills.
Hi Bob,
Thanks for the feedback...I finally ordered the kit from CQ and am planning to install it next weekend.
I do have a dremel and a decent amount of drills, etc. The 'bottleneck' for me resides on the skills side... :rolleyes:
That said, do you have any detailled pictures of the install, covering specifically where the wires should be connected etc. I am thinking about securing the ballast with an industrial strength velcro to the back of the plastic cover rather than drilling. Additionally, do you recommend any particular sillicone sealant? Can I get it at a hardware store?
Sorry for the many questions, but any help is greatly appreciated....
Gus
:renntech:
-
Wipers for LH and RH traffic are differend !
Thanks guys,
I have the LHD US version....
Gus
-
Hi,
I am planning on getting new winshield wipers for my '01 986. I tried to get the regular RainX ones at my car wash...but once again...I was told i gotta get the Porsche ones...so my question stands..
What should I get? Does it have to be Porsche specific?
Thanks,
Gus
-
Here is another vote for Zaino products. Great company and Sal Zaino is very helpful and a class guy! The Z2 and Z5 I use the most.
www.zainobros.com
I also use RejeX wax on leading edges (mirrors and front bumper) and on the wheels and wheel barrels.
Thanks guys,
Sent these guys an email. They don't deliver in NJ...
I am thinking about these 2 products to start (my car is black):
Z-AIO All-in-one 1 $26.95 $26.95
Z-3 Show Car Polish for Regular Paint 1 $14.95 $14.95
Let me know what you think.
Thanks,
Gus
Gus, why won't they deliver to NJ? Strange.
You don't want Z3. You have a clear coat.
Thanks for the tip Withe987s,
I will get the Z2pro...
Regarding the delivery...I found it strange as well...This is the message on the website:
"Other Shipping
For those customers not in 47 contiguous states, our online store is not presently able to service you. We're sorry for the inconvenience at this time. We've established the following independent distributors for more efficient service. If you're not in the 47 states, please choose the following option most convenient for you.
New Jersey customers:
Please email: newjersey@zainobros.com"
-
Here is another vote for Zaino products. Great company and Sal Zaino is very helpful and a class guy! The Z2 and Z5 I use the most.
www.zainobros.com
I also use RejeX wax on leading edges (mirrors and front bumper) and on the wheels and wheel barrels.
Thanks guys,
Sent these guys an email. They don't deliver in NJ...
I am thinking about these 2 products to start (my car is black):
Z-AIO All-in-one 1 $26.95 $26.95
Z-3 Show Car Polish for Regular Paint 1 $14.95 $14.95
Let me know what you think.
Thanks,
Gus
-
Hy guys,
A lot have been said about wax, but nothing has been mentioned about their winter capabilities...
Since I am driving my 986 this winter for the first time (I already changed the tires!), I would like to know which wax would offer the better balance between ease of application/weather protection...
Thanks,
Gustavo.
-
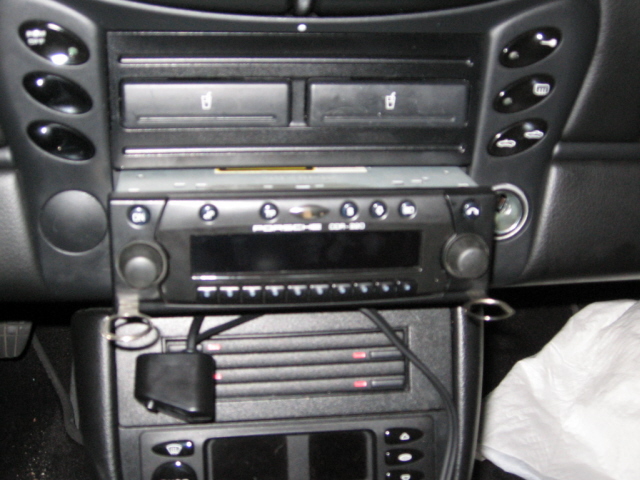
Thanks guys....It is finally in!!! :cheers:
The frame which hols the HU inside the dash (with the 2 brackets) was slightly bent, hence the HU was getting stuck and bending it even further... I straightened the frame and bingo - the CDR220 slided in (not without some force, but relatively smoothly).
BTW, not only dont I need to hold the CDR on my lap, but I found some use for my cupholder - the IPOD (5 Generation) fits right in!
Thanks,
Gustavo
-
OK, so looked at real litronic lights and couldn't swallow the $1300. I have had HID retrofits in a lot of my cars before but have had mixed results with them. I generally buy a projector housing for the car then put hid in that and even then they are not that great.
I bought this kit from CQ Light:
H7, 5000k http://www.cqlight.ca/index.php?cPath=32_45
They are plug and play lights ment for a H7 halogen headlight. The install was really easy. As a matter of fact the easiest I have done in any car. The headlights pop out with the tool in your bag in the spare tire in about 30 seconds then plug in the HID light, zip tie the ballast in the headlight hole to something so it doesn't flop around then re-install the headlamps. You will need to drill a hole in the plastic cover on the back of the headlamps for the hid wiring to go through. Two wires for the bulb it's self and power and ground that plugs into the stock wiring harness. No cutting or soldering involved. The kit comes with power leads with spade connectors on it already that just slip into the stock bulb socket no probs.
The stock halogen lights have the european code light cut off like this. ____/ if you have ever driven close to a wall you will notice it. I took before and after pics. The cut off was exactly the same with no glare or light wandering away. The cut off on the stock lights is really good and cuts the hid off just like the stock bulb so you only get light were the factory light intends it to be unlike most cars. Generally hid retrofits in stock housings have light all over the place which was the case for me a few times. This is NOT the case with Porsche lights, lucky us.
Just incase you wondered about HID retrofits, you can now see they are just as good as stock. You get the light of HID without 1300 bux. Remember real litronic are better, self leveling etc. so they are worth the money. For $200 you get more light output than stock, the nice HID color, and no downside typical with HID retrofits.
I think that Porsche did a really good job on the stock headlights as they have good cut off from the factory. With a lot more light output from HID lights, they still control the light very well and get it right on the road with no glare.
Bottom line, really good for the cost, and really look nice too.
Hi Jim,
Sorry for the ignorance, but do you have any pics of where you drilled the hole to run the wires through...I am planning on doing the mod this weekend, but I am not really a skilled DIYer.
Thanks,
Gustavo
Anyone?
-
The radio is a tight fit in the slot and you need to wiggle it a bit to get it in at the best of times. Suggest you check the following:
a) that the cables out of the rear of the radios are routed clear of the sides of the radio (ie towards the rear) and not obstructing the insertion of the radio
B) you appear to have your auxilliary cable routed underneath the radio and I think you'll find there's not enough room. Try routing the aux cable out the rear and back through some other part of the dash
Actually in the picture it looks like the aux cable is routed underneath the radio (sorry), but its actually routed through the back and resting in the space between the dash and the central console...
Rick's comments seem to be right on the money. It looks like some metal bracket or wing is impeding the HU from going in and I am actually trying to place it back by pushing the HU straight.
Regarding the keys I tried with them and without them, but I will make sure that I keep them off for the next tries.
Thanks guys,
I will let you know how it goes.
-
Any time! I'm just glad u got her back inThanks,
Juniic,
I added some pics
Actually it is still stuck...
I will keep on trying.
Gustavo
-
Thanks,
Juniic,
I added some pics


Boxster RS 60 Spyder
in 987-1 Series (Boxster, Boxster S)
Posted
Nick this is an impressive car to say the least!!!
Any idea of when it is going to be released in the US or a ballpark of the MSRP
Man...This is the car I want!