Welcome to RennTech.org Community, Guest
There are many great features available to you once you register at RennTech.org
You are free to view posts here, but you must log in to reply to existing posts, or to start your own new topic. Like most online communities, there are costs involved to maintain a site like this - so we encourage our members to donate. All donations go to the costs operating and maintaining this site. We prefer that guests take part in our community and we offer a lot in return to those willing to join our corner of the Porsche world. This site is 99 percent member supported (less than 1 percent comes from advertising) - so please consider an annual donation to keep this site running.
Here are some of the features available - once you register at RennTech.org
- View Classified Ads
- DIY Tutorials
- Porsche TSB Listings (limited)
- VIN Decoder
- Special Offers
-
OBD II P-Codes - Paint Codes
- Registry
- Videos System
- View Reviews
- and get rid of this welcome message
It takes just a few minutes to register, and it's FREE
Contributing Members also get these additional benefits:
(you become a Contributing Member by donating money to the operation of this site)
- No ads - advertisements are removed
- Access the Contributors Only Forum
- Contributing Members Only Downloads
- Send attachments with PMs
- All image/file storage limits are substantially increased for all Contributing Members
- Option Codes Lookup
- VIN Option Lookups (limited)


p0rsch3
-
Posts
112 -
Joined
-
Last visited
Content Type
Profiles
Events
Forums
External Paint Colors
Downloads
Tutorials
Links Directory
Collections
Store
Posts posted by p0rsch3
-
-
I may have to do this on my '04 C2. Looks killer and thanks for the pics and instructions! One thing I may do differently is instead of screws, using a nut and bolt with the big washers on bith sides, or a small toggle bolt. I installed a very similiar chin spoiler on my '03 Mustang GT from a Mach 1 Mustang. Basicly exactly the same, but had it fastened from both sides. I feel safer with the nut on the other side, knowing the screws cannot pull out at high speeds! How did you merge the chin spoiler with the 2 black edges at either side near the tires?
Thanks!!
bigrob- You'll have a very difficult time using nuts / bolts since it is very tough to reach up under the lower apron underside (where you are attaching the screws to). Remember, the lip has 3M tape and it sticks very well. The large scews would take an immense amount of force to pull out. If you want to feel more secure, put some epoxy on the screw threads before screwing in and then coat the top of screw / washer with epoxy.
On the fender edges of the lip, just cut them to fit as in my pic above. It sort of tucks in nicely on it's own. Have fun!
-
You know, it just might. The underside of the 996 front is similar both pre and post facelift. Look under your pcar bumper and compare it to my pics in this thread.
I'd say worst case you'd have to trim off a bit more from each end if it overhangs into the front wheel wells. Very worst case it will not work at all and you have to mail it back, so for "trying" it would cost you the shipping. - That is the risk I took when I first guessed it might work on my pcar.
-
I would not think a flywheel would be replaced with such low mileage as yours. Unless it was damaged of course. I'm sure others here that have done their own clutch jobs can provide more information on that.
My old 996 had the original clutch and flywheel at 72k miles.
Also remember that dealers will tell you that everthing needs to be replaced..... :angry:
Thanks and I agree 100%. Hopefully some of the other members here will chime in-
-
Ok here is another question- When you have the clutch replaced by the dealer (assuming normal wear), do they commonly replace the flywheel at the same time? Or is it just the clutch, pressure plate, release bearing?
-
Doesn't sound right to me. I would continue to push the issue. I'm sure there are others here that have had to deal with similar situations with Porsche that may be able to guide you.
There is no way you should need a new clutch and flywheel after only 16,000 miles. (unless you track the car.)
Phillip- I agree and this is why I am a bit burned up by the issue. I know some folks don't know how to drive clutch and it is possible to burn it in short order, but this car has been babied and driven right since day 1. Since it's a cab it will never see track time. I suppose I am looking for some cases of precedence, I can't be the only one who has come across this particular issue. I was also specifically told that the clutch itself is perfectly fine, and the issue relates strictly to the flywheel.
-
Hopefully you have receipts for the earlier repairs/attempted repairs.
You will want to get copies of those to PCNA. Be civil with them and fully explain the history. Ask them to help - that is what they are there for.
Hi Loren- I don't have any record of previous repairs on this issue, basically I had brought it in a few times before to have them take a look at the noise- But it was not doing it at the time so they never did any paperwork. Only last week when I brought it in were they able to reproduce the noise, keep the car for a few days and give me a diagnosis.
So I *just* got more info after speaking to PNA a few minutes ago. An area porsche tech came out to look at my car while it was at the dealership. He stated that he had seen this issue before and the pilot bearing in the flywheel is bad. His recommendation to the dealership was to replace the entire flywheel / clutch assembly. PNA told me that all bearings on the car are considered a "wear item" and are not covered, and also that a pilot pearing is part of the clutch and not covered. -Even if my clutch shows no signs of undue wear and the bearing itself is defective, I have to pay for it. Does this sound right??
Oh and definitely I have been very civil, followed all sugested protocols and fully explained the history. Still no love, PNA is basically saying I am s.o.l..
-
Question for Loren or anyone else with intimate knowledge of Porsche's warranty process.
I have a 2006 C2 with 19k miles on it. I have been reporting a squeak/honking sound from the rear of car since the car had 16k miles on it. It is sort of a low pitched honk sound, rather than a high pitched squeak and only occurrs when fully engaging clutch in 1st when taking off from a stop. And, it only makes the sound after the car is hot from driving around for a bit. Anyway, all other times I brought it in it to dealer was not doing it regularly enough to make a diagnosis. Now it is. I was instructed by my dealer that the flywheel bearing might be bad and they need to replace the flywheel. They also told me that my clutch is not worn / still feels like new. Now the kicker is, I was told the flywheel is not covered under warranty and I would have to pay $3800 for a new clutch and flywheel.
My fight here is, (a) they told me the clutch is not worn and ( B) this seems like a defective item issue. For example, if I have a defective brake rotor it is covered under warranty even though it is part of the "wear item" brake assembly. This (to me) would appear to be the case with the flywheel.
I did not want to say yes to the expensive out of pocket repair without first investigating, as this does not seem like an issue caused by "normal wear". The dealer told me to pick up my car and then call PNA to open a case (which I have done). Any insight on how to proceed is appreciated.
-
ok I just got it done- what a total pain changing the faces! The clock and trip counter knobs pull straight off. they are press-fit. The plastic cover on the gauges is a hassle to free up due to inner locking tabs on the top of the silver cover. You'll need to pry around with a small screwdriver to get the center top portion of the cover off.
The needles are press-fit so you just have to make sure they are at "0" when you take them off and put them back on. You'll need to use two small screwdrivers under the head of the needle to "pop" them up and then pull straight off with fingers. It is not a task for the faint of heart, becuase if you pry crooked you'll break the needle shaft...
Then, after needles are off you have to pry out the little black locking circles that go around the needle hole. These black snap-in circles hold down the OEM gauge faces. You'll need a sharp dental pick to get under the rim and twist them out. When they pop out, they fly 5 feet. Again, not for the faint of heart.
This was like brain surgery- you have to be very precise and very careful. I don't think I would do it again.
-
Does anyone know how to remove the clock and trip odometer button tips on the gauge pod? that is holding me up from pulling apart the gauge pod. I can't see how to take off the knob tips.
-
Anyone come across specific info on removing the needles yet?
pull them off. nothing specific. here is cayenne info that comes with gemballa faces.
Thanks buddy- I couldn't confirm whether 997 is same as CTT, tried calling / emailing Gemballa and no one responds.. If I feel brave today I might give it a shot.
the instructions seem kind of retarded- looking at #5, it says "turn needles to left until stop then pull up" - but the arrow shows turning to right! Also, not all of the needles can go left because of their arrangement, for example the oil pressure gauge on right side (997). Did you find the instructions odd and do something different?
-
Anyone come across specific info on removing the needles yet?
-
Thanks for the info. Since I already have to be careful with the spoiler as is I think I'll leave it alone. Again, nice job on your car.
Phillipj
Well, your pcar looks just awesome as-is so I would't sweat it
Hey PORSCH3 .... your DIY thread is a gift that's keeps on giving fifteen months later. I'm ordering the same lip from Suncoast Fla. and will be using your gift to complete the install. Thanks! Sam
Awesome- post up some pics when you are done!
-
Mike - thanks for the pics. Any info by chance on how to remove the gauge needles?
I have heard that you must turn the needles counter-clockwise and pull to remove, and re-installing is the reverse, but this is unconfirmed information.
-
Nice ride...I am looking for a '05 or '06 997 S Cab now - can I ask what you paid?
I just bought this 2006 CAB S Dark Olive metallic 22K miles with CPO for $75,000 from dealer. Full Leather Cocoa and Cocoa Top NAV BOSE
Just out of curiosity, is there any reason you guys that are sharing photos etc. aren't doing it on 6speedonline or Rennlist forums where these types of posts get much more visibility? I view RennTech as a more technical discussion forum.
Just my 2 cents.
I think sharing everywhere is good.
However, I do tend to post more of the car photos on 6speed.
-
Very nicely done- thanks for sharing the pic!
-
The difference in airbag is that the multi function wheel comes with a leather faced , rather than vinyl faced item , the leather on the wheel rim of the multi function item is also slightly more padded , though not to the extent of and XPA specified wheel. As you state in your post the original airbag can be re used in a multi function wheel. The control module for the multi function wheel and loom is also the same as that used on the tiptronic wheel I believe. I can also confirm the multi function equipment can be transferred into a Techart steering wheel if so desired. This is the current status of my vehicle.
The loom is different for the MF wheel, there are a couple more connectors on it. The PET shows three parts for wire looms with layout of each one, tip is similar but missing the extra MF plugs. Thanks for the clarification on the airbag cover and tip on xfer to a TA wheel- cool. Post a pic?
-
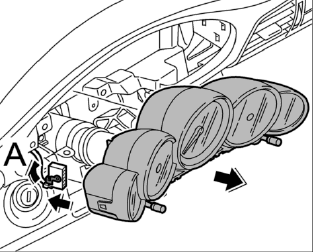
997 Cluster Removal
1. If a new instrument cluster should be installed, read out the values if possible from the instrument cluster.
2. Loosen the steering wheel adjustment, put the steering wheel in the front-most and lowest position and lock the steering wheel adjustment.
3. Unscrew the two fastening screws 1.

4. The instrument cluster is also secured in the dashboard with two retaining clips. Therefore, pull the instrument cluster abruptly forward and if necessary push instrument cluster away from dashboard from underneath.
5. Release electrical connector on instrument cluster A and unplug it.
6. Pull out instrument cluster at the sides and to the left.
Installation is the reverse.
Wow- Simpler than expected. Thanks very much Loren. I still cannot find info on needle removal, some suggest turning them counter-clockwise, others suuggest carefully prying straight off. Why do I always go for the oddball DIY's? LOL
-
How to remove / replace 997 steering wheel and / or upgrade to Multifunction steering wheel- the facts
Put the new multifunction CF wheel on the other day, it looks sweet! For now, I wanted to capture the knowledge here for those who may want to do this.
Park car with wheels straight and steering wheel straight.
Remove key from ignition
Disconnect battery neg. terminal, let sit for 10 mins.
Remove airbag: take a long 1/4" alan wrench or other similar sized thin object with a flat tip, and insert into the hole on the bottom rear of the steering wheel. Use something almost the same size as the hole. You will push up firmly to remove the airbag. What you are doing is pushing up on an internal wire retainer clip, once you push on it hard enough put your fingernails under the top edge of the airbag and pull forward, it should start to pop out. Now pull forward on bottom edge. It should all pull straight out.
Once the airbag is out, reach in and unplug the orange connector, it pulls straight forward. Now lay the airbag somewhere safe.
Remove steering wheel center bolt *special tool needed*. You will need a 12mm multi-point tool. It looks like a large Torx bit with about 12 or 13 smaller ridges (A torx has 5 larger ridges). This tool is used for a few different things on Audi / VW cars as well. I do not know the exact name of this tool, I borrowed it from my friend. Slap the bit onto a 1/2" long ratchet wrench and turn bolt counter clockwise to loosen / remove. If you lock the wheel in the process do not worry, it is ok.
Now that the bolt is off, use a thin marking pen to mark a few points on the steering wheel next to the shaft that you unscrewed the bolt from. This is just in case you need to put the old wheel back on or need a point of reference when putting on the new wheel.
Gently slide the old wheel forward and off. do not twist or rock, you do not want to disturb the clock spring that sits behind the wheel.
Sport wheel replacement is easy, just put new sport wheel on with same alignment- tighten bolt to 37ft-lbs - plug in airbag and push in to lock it in place.
Now, reconnect battery. you will get a PSM failure light. No biggie, it goes away after driving off.
Note for multifunction wheel:
There has been HUGE speculation on whether the multifunction wheel is "plug n play" on 997 cars. Answer is, it depends!!
If your car did not originally come with a multifunction wheel, then your car does NOT have the required control module or wiring harness. Period.
Now, if you buy a used multifunction wheel from a forum member, more than likely the wheel has the control module and wiring harness installed with it (it sits inside the steering wheel under the airbag). In this cars, YES it is "plug n play". Just attach your standard wheel airbag to the harness on the multifunction wheel and put it back on as in step 9 above, and go to the dealer for programming (BH Porsche charges about $80).
If you bought the wheel new from Porsche, it DOES NOT have the control module or wire harness included, you must buy these separately!! You need part number 997-612-673-00 (wire loom) and part number 997-613-445-00 (control unit). Both of thse parts can be ordered in a week from a dealer. Sunset Porsche charges $62 for the loom and $118 for the control unit. both of these pieces mount inside the steering wheel, just ask them to email you the schematic from PET (illustration 403-05). Put this all on (it's very easy) and take to dealer for programming.
NOTE: PET calls for a different airbag part nuber for the multifunction wheel than the standard wheel. This is BS! My standard wheel airbag fit just fine. If there is a diff I cannot find it!
You can find a few pics here of the required tool and parts list: http://www.6speedonline.com/forums/997/140...el-removal.html
-
does anyone know how to remove the 997 gauge cluster from the dash?
-
Beautiful car. And a number of nice mods. I'm interested in the wheel spacers. Does anyone know whether those (15/7) are the appropriate sizes for the 997S as well?
By the way, I just did an Alcantera upgrade on mine - wheel from a GT3 RS, shift boot and knob, and p-brake handle - as well as the Porsche brand short shift kit. Subject to taste, it looks and feels fantastic. Irrespective of taste, the short shift vastly improves the speed, feel and crispness of the gearbox.
Enjoy the new ride.
IIRC 17/7 are the correct sizes. I am going to swap the 15mm spacers for 18mm, there's still plenty of room. Fronts could go to 10mm but no one makes a 10mm spacer.
I have an EVOMS SSK going in soon, 35% reduction- If I don't like it I'll change to the Porsche unit. Did you upgrade the shift link connector to an aftermarket aluminum one or leave the stock plastic one? I hear those tend to break with use of a SSK.
-
Thanks guys- Yeah the blue is beautiful but is as hard to take care of as black (my previous 996 color). I have the required bag of microfiber cloths, wash mitt, etc.. the extra care is well worth it :)
Plus, I typically get a chip touch-up and buff/polish done anually. Taking car in next week for it's 1st polish including color sand to get rid of the factory "orange peel", then wrapping front with 3M clearbra.
-
Nice ride...I am looking for a '05 or '06 997 S Cab now - can I ask what you paid?
Hi Bob- I paid $57k cash. Of course, this was a very extraordinary situation and I was at the right place at the right time. Keep in mind an '05 S cab should be in the mid to upper 60's range depending on mileage.
Just picked up the "Exclusive Package" CF interior pieces from a fellow forum member- CF multi-function wheel, CF shifter and CF e-brake. Will post pics after I get everything installed. Sweet! BTW you have to buy the 997 SmartTOP module, it is just fantastic! www.mods4cars.com best price is at www.pcars.us forum, sign up and send a message to Rick (BlackKnight).
-
opening the cluster isnt to difficult a few screws and clips.
however swapping the gauge faces asks for removing the needles this is quite tricky.
i've just swapped the internals of two clusters because i didn't want to remove the needles
hope this helps
Thanks for the info- do you have any specific instructions for removing the needles? I'm not afraid of doing it, just need to know how (not something to experiment on...heh).
-
n/m - found the answer:
with the top closed, open the top a bit so that the rear piece (wing/cover) goes up, then there are two cables attached to the roof that you can access. At the bottom of the cables they will pop off the mount, thus releasing the top so that you can fold it forward. Then pry out the 4 plastic carpet retainer push-pins and work the bottom cloth cover back/up/out and there are the bolts. SUPER EZ!!

Install 02 GT3 chin spoiler on 02+ 996 standard bumper
in DIY Articles - Carrera (996) - Mods
Posted
yeah I'm not familiar with that, post up a pic!