Welcome to RennTech.org Community, Guest
There are many great features available to you once you register at RennTech.org
You are free to view posts here, but you must log in to reply to existing posts, or to start your own new topic. Like most online communities, there are costs involved to maintain a site like this - so we encourage our members to donate. All donations go to the costs operating and maintaining this site. We prefer that guests take part in our community and we offer a lot in return to those willing to join our corner of the Porsche world. This site is 99 percent member supported (less than 1 percent comes from advertising) - so please consider an annual donation to keep this site running.
Here are some of the features available - once you register at RennTech.org
- View Classified Ads
- DIY Tutorials
- Porsche TSB Listings (limited)
- VIN Decoder
- Special Offers
-
OBD II P-Codes - Paint Codes
- Registry
- Videos System
- View Reviews
- and get rid of this welcome message
It takes just a few minutes to register, and it's FREE
Contributing Members also get these additional benefits:
(you become a Contributing Member by donating money to the operation of this site)
- No ads - advertisements are removed
- Access the Contributors Only Forum
- Contributing Members Only Downloads
- Send attachments with PMs
- All image/file storage limits are substantially increased for all Contributing Members
- Option Codes Lookup
- VIN Option Lookups (limited)


steve_wilwerding
-
Posts
245 -
Joined
-
Last visited
Content Type
Profiles
Events
Forums
External Paint Colors
Downloads
Tutorials
Links Directory
Collections
Store
Posts posted by steve_wilwerding
-
-
I'm finally getting pretty decent on the track during DEs (on street tires, anyway). I came back from this weekend's track event and pulled off the wheels to change the brake pads back to stock from the Pagid Oranges, and noticed that my tires were worn pretty well on the outside, but hardly at all on the inside. This was true for both the front and back tires, but seemed to be more pronounced on the rears.
I'm assuming I need to be running more camber. My 98 Boxster has never been aligned since it came from the factory, so (barring a little difference after ten years), the camber should be stock.
I'm trying to figure out the best way to add more negative camber. I could go with camber plates, which are probably the cheapest option, but they raise the ride height of the front of the car. I could get GT3 lower control arms, but they are rather expensive. I could go with the ROW 030 kit (I currently have the US 030 kit on the car) or get PSS9s, both of which allow about 1.5 degrees of camber on the front. The other option is to dremel out the stock mounts, which I've heard a lot of people talk about but never do.
Which is the best, most cost effective solution?
-
Here are your pics - I just installed these tonight.
First pic - original 1998 Boxster brake duct on top, 997 "street" GT3 duct on bottom:

Steve,
When I was looking at my old ones on Sunday trying to figure out how to get them off, I noticed the semi-circular cut out (which you can see in the picture on top). Do the GT3 ducts need to have any cut out to to clear the arm?
Also, on the right side of the GT3 duct in your picture, there are two holes. Are these for a cable tie as an extra to keep the ducts on?
I didn't notice a place where the semi-circular cutouts made a difference - they are actually on the top of the ducts.
I don't think you need to zip tie anything - when you get them in correctly, with all the tabs inside the lip of the control arm, the one is on just as tight as the old one.
-
Here are your pics - I just installed these tonight.
First pic - original 1998 Boxster brake duct on top, 997 "street" GT3 duct on bottom:
Here's what it looks like on the car - definitely lower and more of a scoop than the originals, but not any lower than the front mud flap:
A few things - you'll notice in the first picture that they have roughly the same profile on the right side, which is the side nearest the rotor, so you don't have to trim any plastic off like you do with the GT3 RS ducts. Also, as for installation, just look at the new ones and you'll see the clips - one half goes over the top of the control arm, one half over the bottom, and they clip at the back. Took me about 10 minutes, including jacking and removing the wheels, to take the old ones off and get the new ones on.
It will be interesting to see if they make a difference on the track.
-
996.100.996.02 Engine -- (are you sitting down) MSRP $25940.43
An exchange engine is less than half that price - so if you could find an exchange it would help you out a lot.
I notice that a lot of the dismantlers charge a core charge also. What the heck are they doing with the engine cores? Reusing them?
-
 1
1
-
-
Exchange or non-exchange?
6 Speed or Tip?
Non-exchange. Does it make a difference for just the engine whether you get a 6-speed or Tip? If so, then 6-speed.
-
What is the part number for a 3.4 liter 996 crate engine i.e. the part number I would ask the dealer to look up?
-
Which ones? There are 3 different part numbers for 996 GT3 brake ducts including the GT3 RS ducts.Do you happen to know the part # for the 996 GT3 brake ducts?i think he was asking about the part number for the "street" 996 GT3.
I'm interested in this topic as well - I would like to get better brake cooling during DE events, but I don't want to drop $300, either.
-
I have stock 17"s and I run 31F/34R - takes a little of the understeer out and suites my driving style. I've found also that on street tires, 31F/34R cold works pretty well on the track (not sure what hot temps are).
-
I was down at the track a few days ago, and noticed that after track sessions, everyone else opens their hoods (or trunks for 911s) after a track run to cool down their engines. Obviously, this is not practical to do for the Boxster.
If you ever watch F1, when they pull the car into the garages, they will put little battery-powered blowers over all the air inlets to cool them. I was thinking about building a similar thing for the Boxster. I assume you would rig it up to blow into the passenger-side inlet, as that goes directly into the engine compartment. I even tried it yesterday after a "spirited run", just using a leaf blower to blow into the passenger-side inlet, and it seemed to lower the temperature pretty well.
Has anyone ever tried anything like this? I'm going to try to find a small electric blower that will work.
-
Never mind - did a search.
-
Does this tool actually evacuate the system? Does it pull all the coolant out through the reservoir?
-
I would like to change the coolant in my 1998 Boxster, and I would like to do it the correct way, using a vaccuum to draw out the old coolant and draw in the new.
I thought I recalled seeing on this Board that someone had bought an aftermarket evacuator/refiller, but using the Search function, I can't find it.
Can someone fill me in? Has anyone actually bought one of these devices? How do they work?
-
I really like using the wheel alignment tool in the car's toolkit, but I hate digging into the the toolkit to get it every time. Does anyone know the part number for the wheel alignment tool so I can order another one? It's the tool that screws into the wheel hubs and acts a wheel stud when you're putting the wheels on.
-
That's a helpful link, but the problem I have is not the height of the brake pedal (which is the same as it always has been), but the amount of travel in the pedal before the brakes engage.
Is there some other linkage, like between the MC and the booster, that needs to be checked? Or can the pedal travel be affected by link you gave me?
-
I had my master cylinder replaced, and when I got the car back, I noticed that the brake pedal has quite a bit more travel before it engages. I talked with someone about this, and he thought that the shop probably didn't measure the tolerances between all of the pushrods when they installed the new MC.
Does anyone know what these tolerances should be? How about a procedure for checking/changing these tolerances?
-
Well it's possible we're talking about two different things (or things that are different per model year; mine's a '98), but when we did my suspension changes we had to remove the front underbody tray to r&r the sway bar, and I distinctly recall those six or so clips being metal and we re-used them. I recall them being roughly the size and shape of a stick of chewing gum with about 1/4" to 1/2" of each end bent at a 90 degree angle.
It turns out the new ones are metal, but the ones on my car (which I assume are original to my 98) are plastic. I assume you ruin the plastic ones getting them off, and replace them with the metal ones, which I have already bought six of.
I guess people got sick of ruining the pieces every time they took the front tray off!
-
If you mean the big flat center front underbody panel, held in place by metal clips (about 1" x 2" if I recall), those clips do not break when you pull them off. Just pry at one end of the clip with a small screwdriver until it unhooks, then do the other side if needed.
I didn't realize they were metal - they seem to be made of plastic!
And, yes, I'm talking about the front plastic undertray directly behind the bumper.
-
I need to remove the front-most plastic undertray to replace my front hard brake line. Unlike the other plastic pieces, which are held on with plastic nuts, there seem to be six clips that hold the front tray on. I can't see any way, other than destroying these clips, to remove them.
Is that the answer - do I just destroy the clips and buy six new ones? Or is there some trick to getting them off?
-
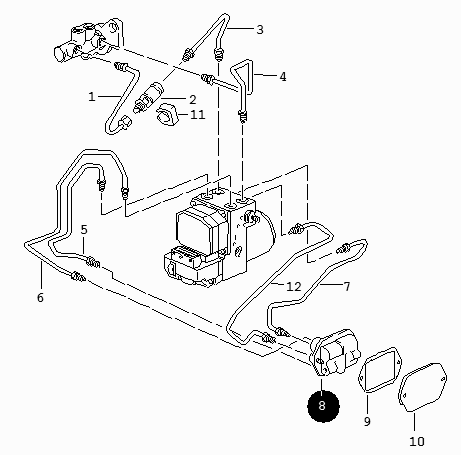
Item 8 - intermediate piece
Where is that piece? On the left or right side of the front trunk? Inside the trunk?
-
I'm looking for where part number 996.355.650.27 is physically located on a 98 Boxster.
-
Invest in a set of tubing wrenches, or borrow one, if you intend to replace it. You may not be able to buy a new preformed line and will have to form one yourself. Not difficult if you have any experience with tubing benders. I have done some on my truck.
I did order the preformed tubing from the dealer. I also was using a tubing wrench when I was working on it. It's just that the wrench slipped (the fitting wasn't coming loose) and the the nut got rounded off.
-
Does anyone at least know where the front right brake line runs? Does it run inside the front trunk, behind the bumper, etc.?
-
Can you tell us how you got a soft pedal to begin with? Was it the result of any caliper work, or pad replacement?
I believe the master cylinder was going out.
-
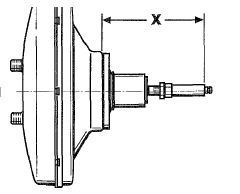
There are two or three variants of boosters used on these cars are they are all a little different. Did they replace the booster? and/or did they reset the pushrod dimension?
"Note: Basic setting of the push rod-dimension X is 138 mm (set in new brake boosters)! If necessary, correct during the relevant work!"
They did not change the booster. I don't know if they did any pushrod adjustments.


Wiring diagram for seat belt receptacle
in 986 Series (Boxster, Boxster S)
Posted
I'm looking to install race seats, and due to the clearance on the sides of the seats, I'd like to unplug the seat belt receptacle. I've heard that this will throw the airbag light, and it will take a reset with a OBC computer to turn it off.
I'm wondering if I couldn't fabricate a plug that would mimic the seat belt. I assume there's at least three wires going to the receptacle - power, continuity that the receptacle is plugged in, and continuity when the seat belt is plugged into the receptacle. I'd like to not only avoid the airbag light, but also turn off the seatbelt light when the race seats are in.