Welcome to RennTech.org Community, Guest
There are many great features available to you once you register at RennTech.org
You are free to view posts here, but you must log in to reply to existing posts, or to start your own new topic. Like most online communities, there are costs involved to maintain a site like this - so we encourage our members to donate. All donations go to the costs operating and maintaining this site. We prefer that guests take part in our community and we offer a lot in return to those willing to join our corner of the Porsche world. This site is 99 percent member supported (less than 1 percent comes from advertising) - so please consider an annual donation to keep this site running.
Here are some of the features available - once you register at RennTech.org
- View Classified Ads
- DIY Tutorials
- Porsche TSB Listings (limited)
- VIN Decoder
- Special Offers
-
OBD II P-Codes - Paint Codes
- Registry
- Videos System
- View Reviews
- and get rid of this welcome message
It takes just a few minutes to register, and it's FREE
Contributing Members also get these additional benefits:
(you become a Contributing Member by donating money to the operation of this site)
- No ads - advertisements are removed
- Access the Contributors Only Forum
- Contributing Members Only Downloads
- Send attachments with PMs
- All image/file storage limits are substantially increased for all Contributing Members
- Option Codes Lookup
- VIN Option Lookups (limited)


edgemontvillage
-
Posts
19 -
Joined
-
Last visited
Content Type
Profiles
Events
Forums
External Paint Colors
Downloads
Tutorials
Links Directory
Collections
Store
Posts posted by edgemontvillage
-
-
Adam, I'm interested in the comments about your RS smoking at startup. I have an 07 GT3 RS that has no history of RMS leaks (so far!) however as it is not my daily driver it tends to sit, sometimes weeks at a time. From my experience it will smoke on startup, often more if it has been sitting a while. You compared this to the smoking you experienced with your M series BMW. I previously owned an '02 E46 M3 which was prone to producing a small puff of blue smoke on cold starts.
-
I know its an RS ... an all track machine ... sound deadening is limited ... so am curious about other RS owners ... how badly does your car rattle?
I get a resonance at low revs on the door panels somewhere or maybe its the pillar ...
It seems the roll-cage or in that area also tends to make sound as if a piece of wire is hitting against it ...
But of course this is really on uneven and bad roads, once on the highway no issues at all ...
sure this is all normal ...
I've owned an '07 GT3 RS for 14 months and have driven 4,000KM's during that time including a couple of track excursions. I have a North American version without the Clubsport ROW equipment (rollbar, lexan rear window etc). Although the cabin noise is much more present than non GT3 versions of the 997 (I previously owned an '06 997 C4S Cab) I have noticed only minor rattles however nothing unusual. I haven't experienced any resonance or trim rattles at specific rpm levels either. I have read the CS roll bar can be noisy (groans and clicks) as it flexes under load and the lexan rear window is prone to vibration noise especially when the side window is open. Nothing else.
-
It was news to me that US spec RS does not have plastic rear window and rear roll bars. In Europe you couldn´t order one without them. Just few days ago I installed the Porsche original front roll bars. Very nice and very heavy engineering so it really adds safety, but adds weight of course.
About the rear window, I have never ever noticed any vibration or anything with it. I might just be too slow.
Interesting experience and helpful feedback regarding the Lexan rear window - thank you. The US / North America spec GT3 RS comes equipped with a thin glass rear window only. The cost to replace the glass with the ROW spec Lexan plastic window is ~US$1,400 + installation for a 3KG weight savings. Most would consider the price too high to justify the weight savings. I have heard comments from some GT3 RS owners who have done the conversion that they experience rear window vibration noise at higher speeds when a side window is open. In North America only early production 2007 and no 2008 GT3 RS' came equipped with the stud plates welded to the floor of the tub used to install the front and rear roll bars. My RS (#2710) did not come with them.
-
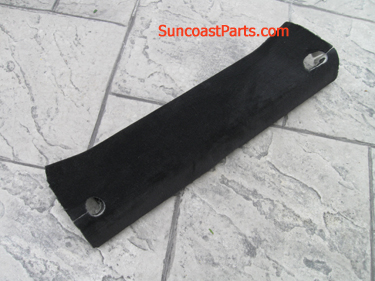
Nick, turns out you had the right part number, many thanks! Here's a photo of the carpet shelf (with pre-cut holes for the Clubsport roll bar - 997.551.033.90.A10) I ordered from Suncoast Porsche. If anyone is planning a GT3 RS Clubsport roll bar installation I highly recommend you buy this part. I will save a lot of time and frustration.

-
I have a copy of the PET which is the same electronic parts catalog that the dealers use.
Thanks again Nick, I ordered the part and the dealer should have it before the end of the week.
Awesome!! So next the Plastic Rear Window ???
Nick, I'm told the plastic / lexan rear window tends to vibrate at speed which makes me wonder if the 6lb weight savings is worth the $1,300 price + installation and vibration as a byproduct. I've installed Rennline pedals, Cargraphic rad grills, a Sharkwerks bypass and the 997 euro/ROW GT3 RS seats (which rock). The roll bar may be the finishing touch....can't say for sure!!!
-
I have a copy of the PET which is the same electronic parts catalog that the dealers use.
Thanks again Nick, I ordered the part and the dealer should have it before the end of the week.
-
The replacement carpet for the I003 option (Racing Safety Devices) is 997.551.033.90.A10 (It only comes in black) - $291.50
Nick, thanks for the lead :) , I've placed a call to the dealer with this information and I'll see what happens. How did you come across this part #?
-
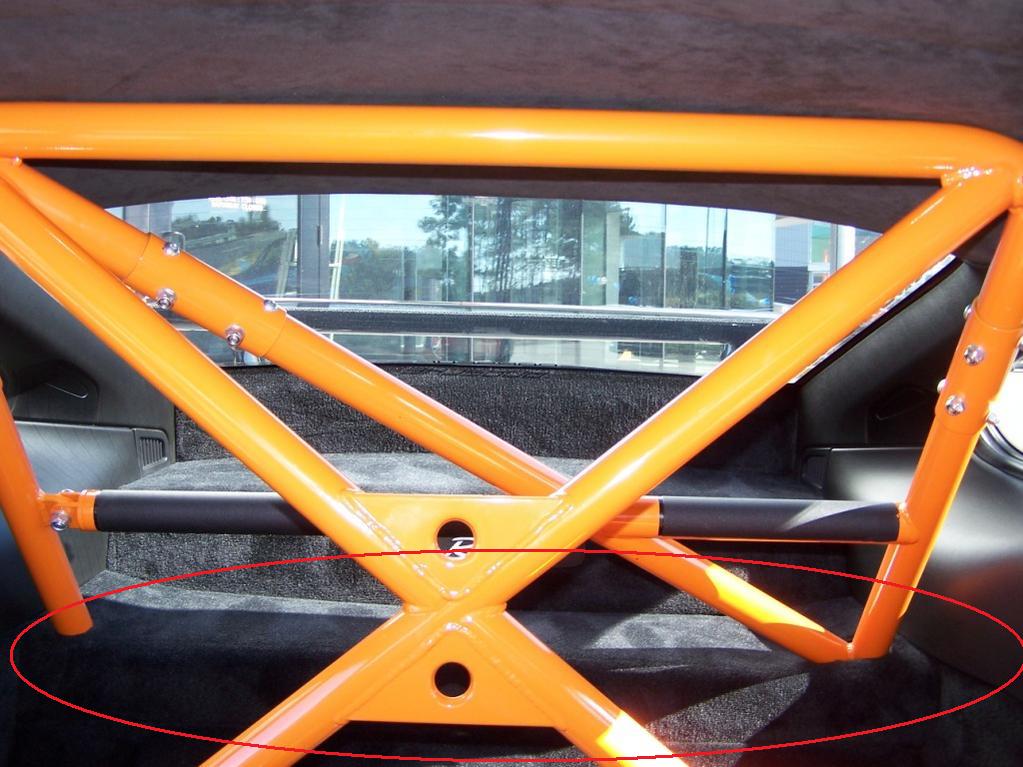
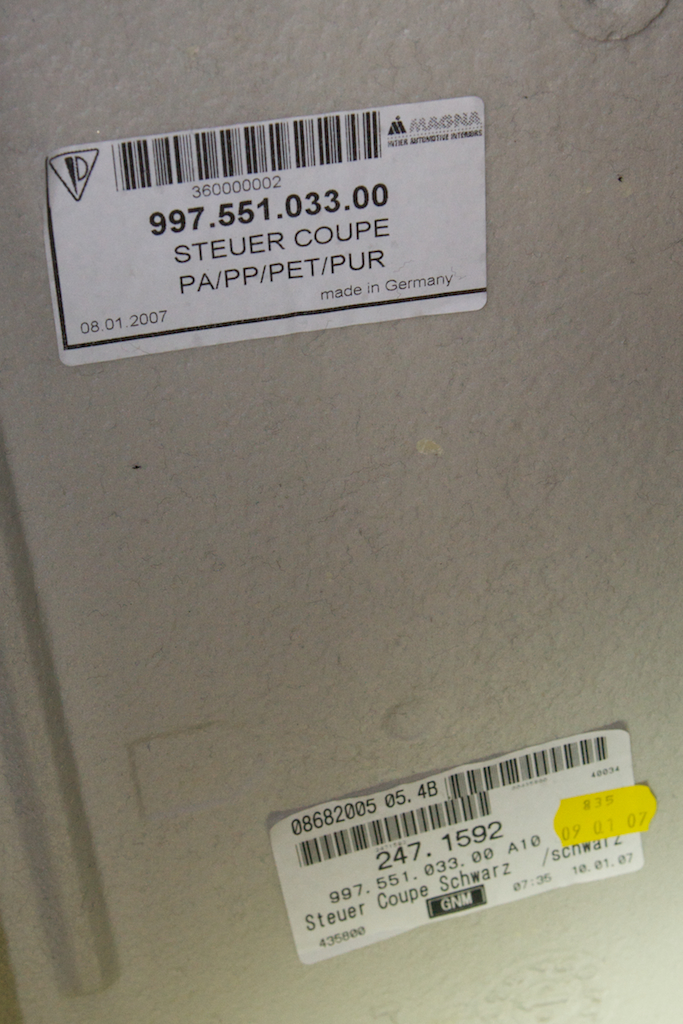
I was helping a friend on the weekend install a Porsche GT3 RS Euro/ROW clubsport roll bar in his US spec 2007 GT3 RS (#2373). As it is an early production RS it has roll bar stud plates factory welded to the floor behind the seats where the front base of the roll bar attaches, bosses welded to the floor under the seats to screw in eye hooks for the sub belt attachment and even stud plates welded to the floor in each of the foot wells to bolt a front roll bar extension. Installation of the Euro/ROW clubsport roll bar was straight forward however we spent considerable time measuring and cutting the rear shelf carpeting and undercushioning for the bar pass through where it bolts to the rear shock towers (see attached picture). The carpet undercushioning is difficult to cut with any precision as it consists of thick, spongy foam (up to 3" thick) and some rigid styrofoam. It occured to me that a better solution would be to order a replacement carpeted shelf piece for a ROW spec 997 GT3 RS that came with the factory Clubsport option as it should have the proper bar pass through holes already pre-cut in the carpet and foam backing? Attached is a picture of the reverse side of the carpeted panel from #2373 which shows a 997.551.033.00 part number. Do any of our RennTech forum subscribers have a ROW spec RS that came factory equipped with the clubsport option? I would appreciate the part number of the carpeted shelf panel (and pictures of the carpet cutout section)? Many thanks :)
-
It is here listed under Literature and Other TSBs.I'm trying to locate a Technical Service Bulletin dated 03/07/2006 "PURCHASING VIN PLATES, CERTIFICATION LABELS, EMISSION LABELS AND 987/997 TIRE PRESSURE LABELS - REVISED" I have browsed the TSB's listed on the site and have performed a general search with no success. Does anyone have this TSB?Loren - can you help?
Purchasing VIN Plates, Certification Labels, and Emissions Labels, 987/997 Tire Pressure Labels
Link only works for Contributing Members.
Many thanks Loren, that is exactly what I was looking for (I am a contributing member)
-
I'm trying to locate a Technical Service Bulletin dated 03/07/2006 "PURCHASING VIN PLATES, CERTIFICATION LABELS, EMISSION LABELS AND 987/997 TIRE PRESSURE LABELS - REVISED" I have browsed the TSB's listed on the site and have performed a general search with no success. Does anyone have this TSB?
Loren - can you help?
-
I just did this. here are some pictures. hope they help:
1. Lower the steering wheels and pull it all the way aft. No need to take the steering wheels off.
2. Pull the plastic former right under the cluster towards you or stright aft. This will reveal the two torx screws that holds the cluster locked.
3. Remove two torx srews. I used an extra tool(magnet) so not to drop the screws themsleves.
4. Now you can pull the clusster straight back. It is still held by two clips in the back, so ti will need a strong tug towards you. I found the best way is to insert your fingers under then behind the cluster and pull it towards you.
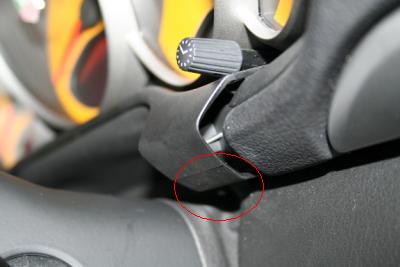
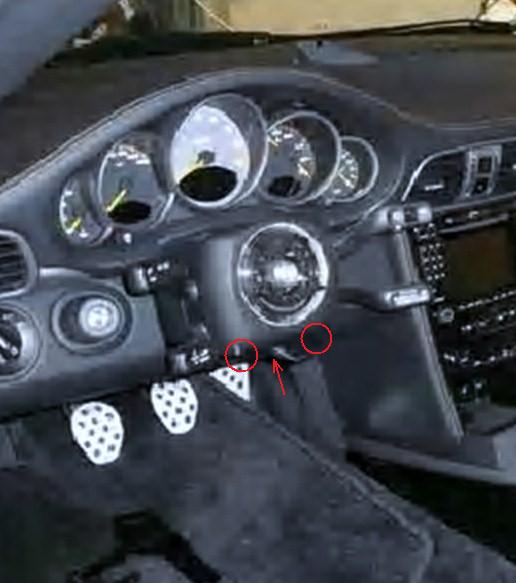
Mike, here is the area I was having trouble (circled in red), I couldn't get the bottom of the plastic trim piece to release from the dash seam - how did you succeed, careful pursuasion, prying or?
-
a. The harness is held by the black harness lock tab. Swing the black tab down and the harness will push itself off the cluster.
Mike, outstanding pictures and step-by-step description! Many thanks :clapping: . On a small point, in step #2 you state " Pull the plastic former right under the cluster towards you or stright aft. This will reveal the two torx screws that holds the cluster locked." I was able to dislodge the upper portion of the plastic piece where it wraps around the area below the guages however wasn't able to dislodge it where it's sandwiched / friction fit in between the seam of the dash (low side). Did you simply pull on the bottom of the piece to get it to release or? I stopped there as I feared I might break the plastic which seemed fragile and wasn't sure if there was a fastener?
-
Last night I tried again to access the guage cluster to remove it, this time I tried to access the mounting screws shown in Loren's schematic from behind the flap below the cluster (see picture, area circled in pink). I was able to detach the leather flap from the drivers side of the steering column (clips in) however had no success trying to detach the other side where it is wrapped around the trim below the cluster. I was able to dislodge the plastic somewhat however I was concerned about possibly breaking the piece as it seems there may be a couple of fasteners holding it below the cluster where the 2 horizontal sections of the dash meet (above the ignition) - so close and yet so far...any help would be appreciated!
-
Can anyone tell me what this is?
many thanks
Did you ever get a response to your question? I am looking for the same paint code information.
-
It is not necessary to remove the steering wheel and dismantle the column. Lower and pull backward the column with the handle at the max. and lock. Pull out the lower/middle trim on the cluster and let hanging on the leather flap, there are 2 screws behind, remove the screws. Wiggle and pull the cluster out, there is room enough, remove the connector.
Thank you, this is helpful especially if I can avoid stripping down the steering column. Can you tell me how to remove "the lower/middle trim" which I take to mean the leather/plastic piece directly below the instrument cluster that covers the column (the flap) and allows it to tilt. Where does this pull out from and how is it attached?
-
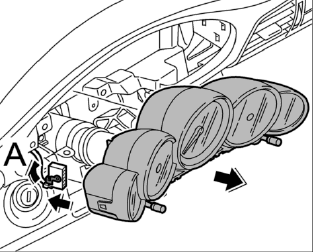
997 Cluster Removal
1. If a new instrument cluster should be installed, read out the values if possible from the instrument cluster.
2. Loosen the steering wheel adjustment, put the steering wheel in the front-most and lowest position and lock the steering wheel adjustment.
3. Unscrew the two fastening screws 1.
4. The instrument cluster is also secured in the dashboard with two retaining clips. Therefore, pull the instrument cluster abruptly forward and if necessary push instrument cluster away from dashboard from underneath.
5. Release electrical connector on instrument cluster A and unplug it.
6. Pull out instrument cluster at the sides and to the left.
Installation is the reverse.
I got as far as removing the steering wheel however the "two fastening screws" referenced in Step 3 above are not visible. It appears to me and as the diagrams seems to indicate, the plastic casing around the steering column needs to be removed together with the piece behind it (just below the cluster)? In the attached picture (sorry for the poor quality) there are holes (circled in red) in the front of the casing which I can insert a driver vertically however I could not locate a fastner head inside? There is a single T-30 Torx machine screw in the middle of the underside of the casing (see arrow) which I removed however I don't see any other screws or attaching points to remove the housing? Does the casing need to be removed to access the screws in Step 3? If so how is the column stripped to get access to them? If the casing doesn't need to be removed how are the fastening screws accessed? Your help would be appreciated.
-
:welcome:
The Sport steering wheel gets the same torque as the standard steering wheel - 37 ftlb.
Loren, thanks for the quick reply and the kind welcome, this is a terrific site and I'm glad to be on board.
:renntech:
-
I am trying to find the torque spec for a 2007 997 sport steering wheel main / center bolt I've searched the site however wasn't successful in locating a posting on this - does anyone have this spec? (Loren?)


MKII RS roll bar
in 997-2 GT3, GT3 RS
Posted
Rich, Suncoast Porsche is still selling the Clubsport (rear) rollbar and they are usually best priced, here's the link: http://www.e-partssales.com/miva/merchant....Code=997gt3seat