Welcome to RennTech.org Community, Guest
There are many great features available to you once you register at RennTech.org
You are free to view posts here, but you must log in to reply to existing posts, or to start your own new topic. Like most online communities, there are costs involved to maintain a site like this - so we encourage our members to donate. All donations go to the costs operating and maintaining this site. We prefer that guests take part in our community and we offer a lot in return to those willing to join our corner of the Porsche world. This site is 99 percent member supported (less than 1 percent comes from advertising) - so please consider an annual donation to keep this site running.
Here are some of the features available - once you register at RennTech.org
- View Classified Ads
- DIY Tutorials
- Porsche TSB Listings (limited)
- VIN Decoder
- Special Offers
-
OBD II P-Codes - Paint Codes
- Registry
- Videos System
- View Reviews
- and get rid of this welcome message
It takes just a few minutes to register, and it's FREE
Contributing Members also get these additional benefits:
(you become a Contributing Member by donating money to the operation of this site)
- No ads - advertisements are removed
- Access the Contributors Only Forum
- Contributing Members Only Downloads
- Send attachments with PMs
- All image/file storage limits are substantially increased for all Contributing Members
- Option Codes Lookup
- VIN Option Lookups (limited)


ChilPhil
-
Posts
18 -
Joined
-
Last visited
Content Type
Profiles
Events
Forums
External Paint Colors
Downloads
Tutorials
Links Directory
Collections
Store
Posts posted by ChilPhil
-
-
99 C2 Coupe - 189,000 miles and running.....replaced tranny at 125K. Runs like a Champ..just had it serviced and the technician said that I have many miles to go..
-
1999 Carrera 178,000 and still running. no major problems....however, I did swap the tranny at about 125,000. Lovin it!!
-
I'm trying to replace the alternator on my 99' Carrera and I need some assistance. Can someone please send me a link or instructions on how to perform this DIY. thanks in advance!
-
I have a 99' C2 with 155K on it and still running strong. I did had to drop a remanufactured tranny in her at ($5K) at 125K and a new clutch, but other than she's still purring!
-
Rear Spoiler
Does anyone have instructions on how to relocate the manual rear spoiler switch on a 996/Carrera. I would like to have it relocated to within arms reach. Please Advise....Thanks!
-
I would still start by cleaning the throttle body and idle control valve.
That remove them as a variable.
A new DME is about $1500.
After speaking to the shop manager, I'm beginning to feel that I'm being taken for a $pricey$ ride. It's apparent that when I mention to clean the ICV and throttle body he said that it'll idle by itself some of the time then it just dies out. I really don't believe that he's being honest with me.
-
Then start by cleaning the throttle body and idle control valve.C2 or C4?Was the transmission a 6 speed or Tiptronic?
The tranny is a 6 speed C/2
I just spoke with the shop manager and he says the vehicle isn't presenting any fault codes. Therefore, he would like to swap out my ECU to verify if it's working properly. Please advise!
-
ICV valve?
I'll try cleaning/or replcing it. Thanks!
-
ICV valve?
Thanks for the input..i'll try it.
-
C2 or C4?
Was the transmission a 6 speed or Tiptronic?
The tranny is a 6 speed C/2
-
I own a 1999 996 Coupe that has been in a local shop for approximately 4 months with this problem. The initial problem was I had the transmission replaced and since then the vehicle will not idle proper. The vehicle will start and run but, not without continually pressing the accelarator. I had the oil separator replaced and the MAF sensor. Can someone please offer some helpful advice. Thanks in advance!
Concerned Porsche Owner
-
Where can I order one of the "rubber Bellows"? Also, Can I get the Porsche part Number for the item. thanks!
-
These rubber "accordians" can crack over time. Fortunately the rubber piece is only around $60, and can be replaced easily. You'll need to set aside about an hour and a half if you haven't done this before.
Tools needed:
Flat-bladed screwdriver
4mm allen wrench
Ratchet with short extension and 10mm socket
Parts needed:
The bellows
Two plastic expanding fasteners (might come with the bellows)
First, deploy your spoiler manually, and shut off the ingnition. No need to disconnect the battery.
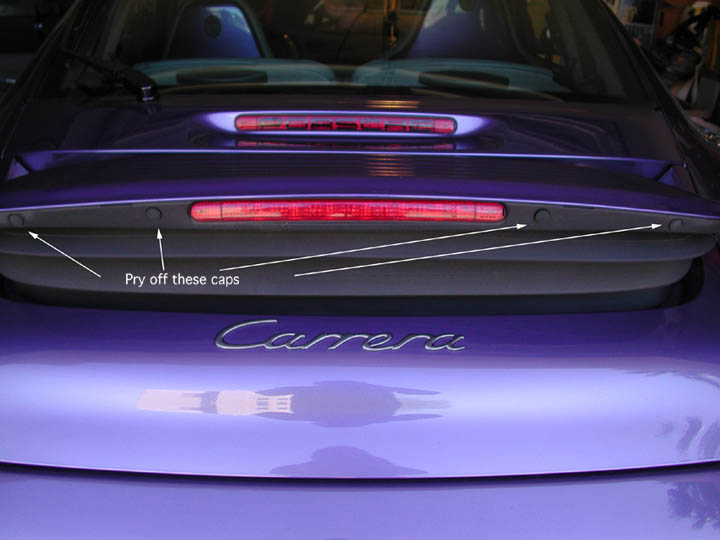
You will see, along the rear edge, four caps, as seen below. These pry out easily with your fingers or with a flat bladed screwdriver. No paint to worry about, just try not to mar the plastic.

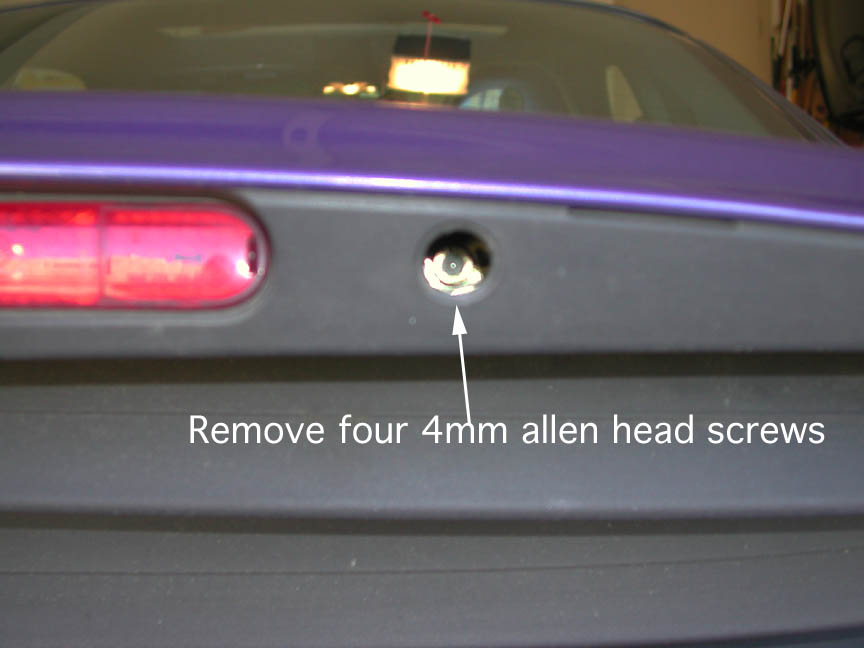
With the caps off you can access the 4mm allen head bolts:
I found these to be a bit tight due to exposure to the elements, but I was able to get them off with an allen key. A long allen socket would work better.
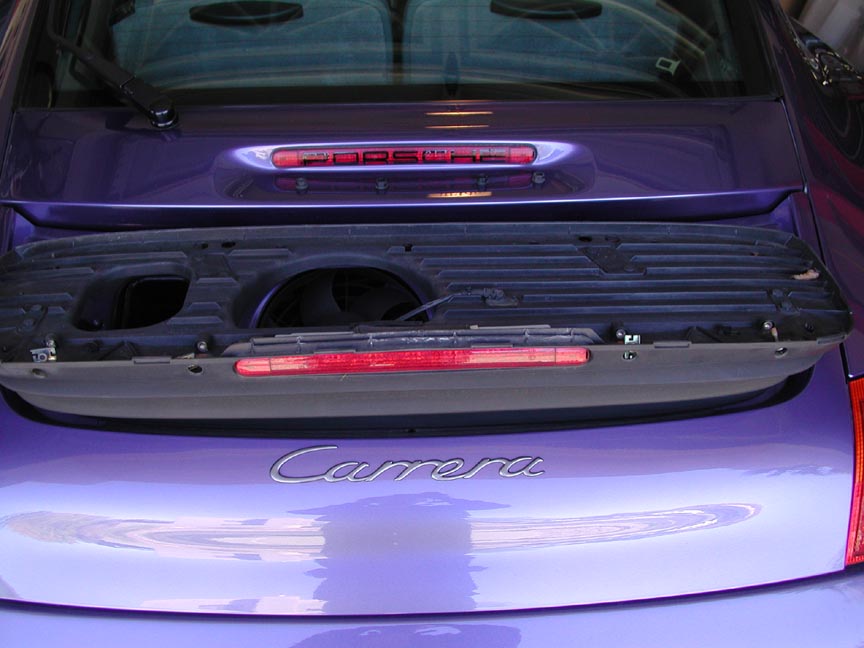
Once the bolts are out, the top tray (painted part) of the spoiler can be slid toward the rear and off. Put it somewhere where it won't be scratched.
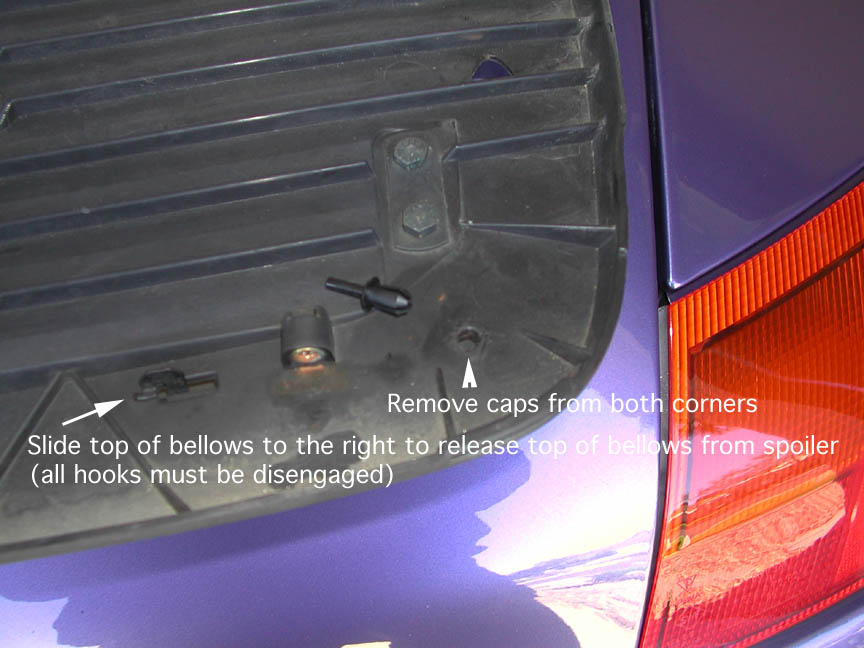
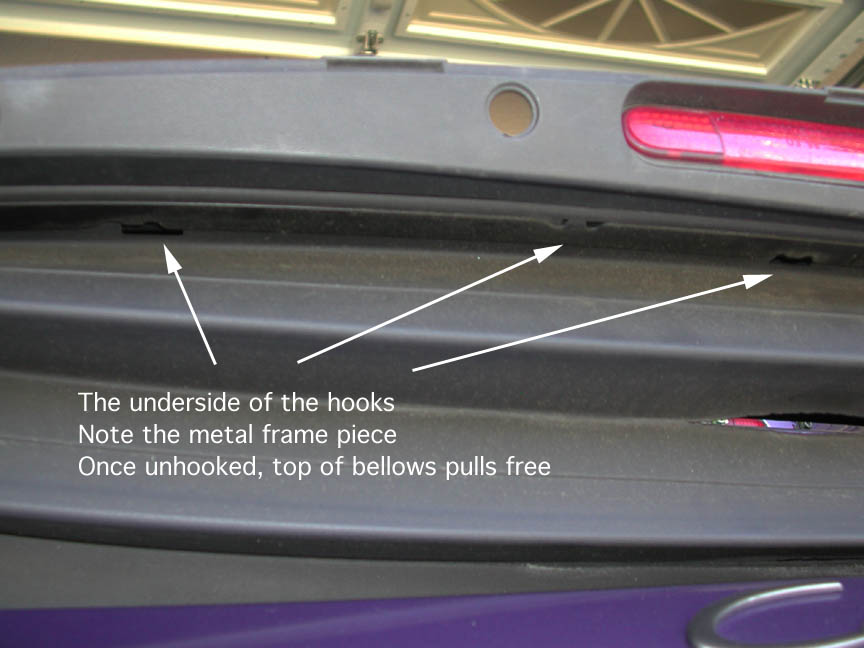
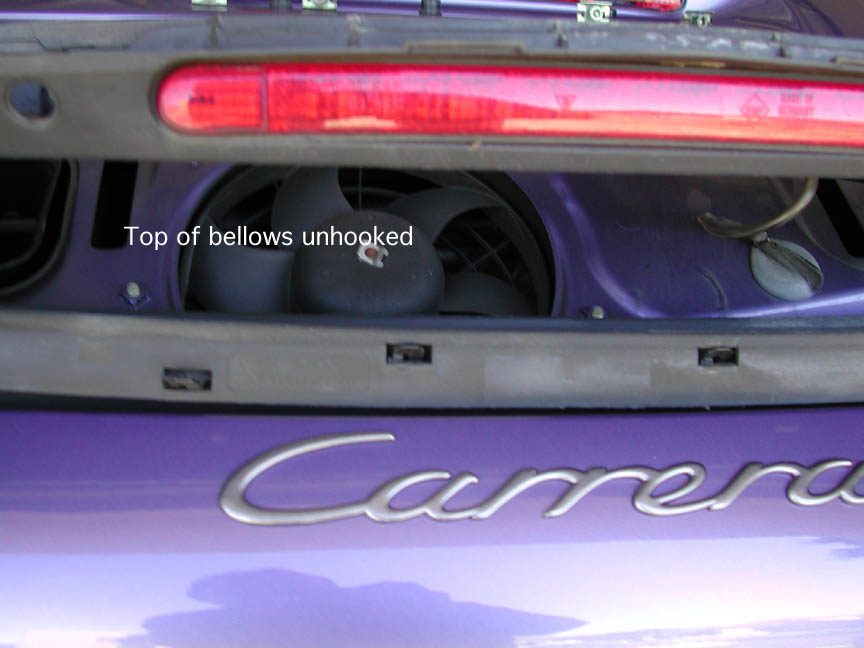
Now you can see the fasteners holding the top of the bellows to the spoiler. There are two explanding plastic fasteners, one on each corner, and several sliding hooks. I destroyed my plastic fasteners since my new bellows came with new ones. Just nipped them off with wire cutters.
With the two plastic fasteners off you can disengage the hooks and detach the top of the bellows by sliding it to the right, and down. The top edge of the bellows is actually sandwiched between a long metal strip and the spoiler. The metal strip has the hooks that go through pre-cut holes in the bellows.
View from below:
With top of bellows detached:
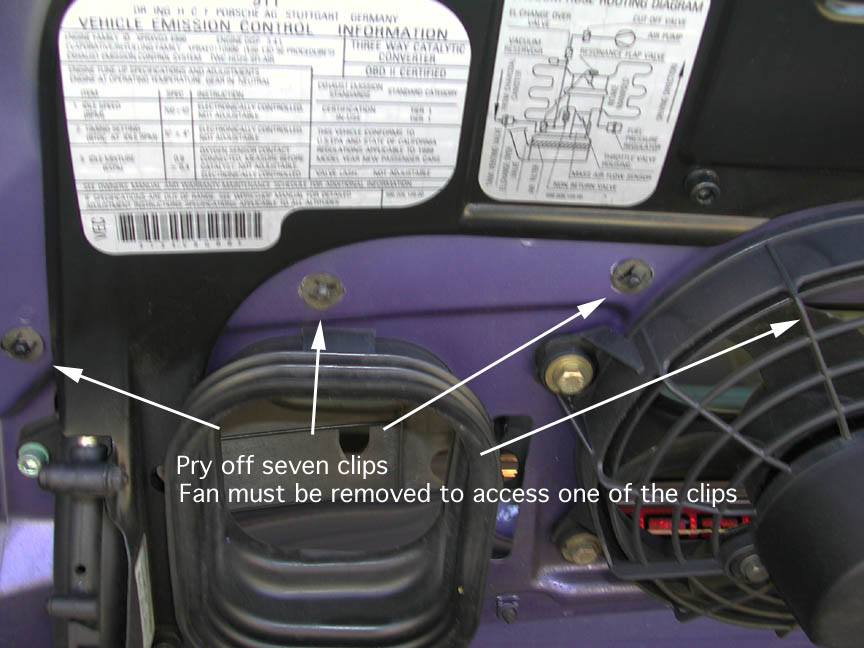
With the top of the bellows detached, open the engine lid. You will see several circular clips holding the bottom of the bellows to the engine lid:
There is one under the fan, so you will have to detach the fan. Just three 10mm bolts. Just let it hang by the cable, out of your way. Be careful not to scratch your paint while removing the clips. In my case, the clips themselves had scratched the paint a bit. Fortunately this is one of the body areas that receives only a "rough" paint job from the factory anyway. Save those clips. It is not necessary to replace them.
With the clips removed, you can pull the bellows out.
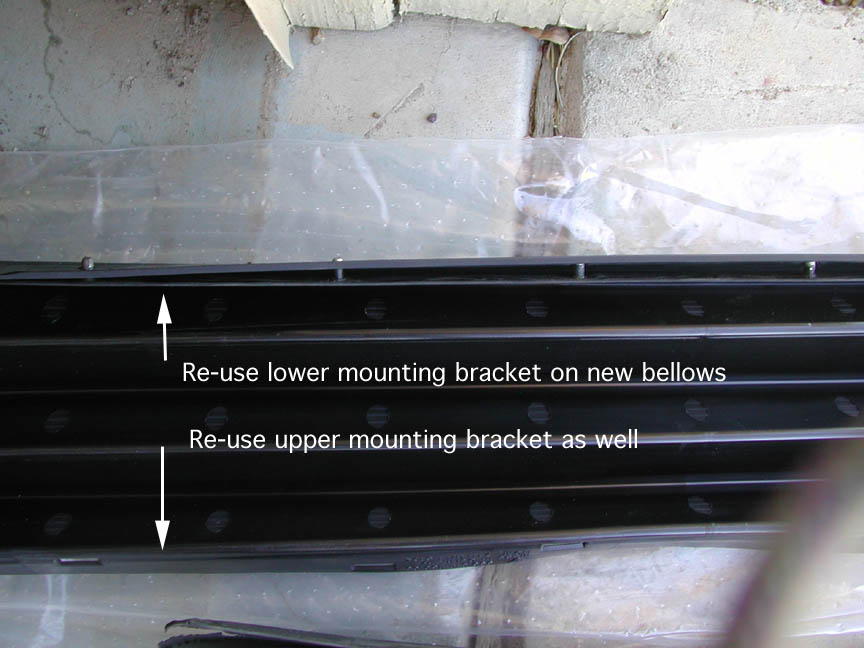
As with the top, there is another frame piece running the length of the bottom of the bellows. This sandwiches the bottom of the bellows to the engine lid. The bellows has pre-cut holes for the nubs on the metal strip:
Lay your old bellows alongside you new one, so that you can see how the top and bottom frame strips fit.
Reassembly:
Transfer your frame pieces to your new bellows.
Then attach bottom of bellows to engine lid with the circular clips. Push those numbs through and get those clips up as tight as possible. The idea is to clamp onto the lower bellows edge.
Re-attach the fan.
Close engine lid
Make sure the top frame piece hooks are threaded through the top of the bellows, push up through the corresponding holes in the spoiler, and slide to the left to secure. Make sure all of the hooks are engaged and snug. Then insert and secure the two plastic expanding fasteners in the corners. This step will confirm that you have the bellows and the spoiler snug and aligned properly.
Now grab your painted spoiler top, and look under it to make sure the locking tabs are lined up. Push down, and slide toward the front of the car to lock the tabs. The top and bottom of the spoiler should mate very well. If you feel gaps around any edges, check and adjust.
Finally, secure the top of the spoiler with the four allen screws. Put the plastic caps on, and manually raise and lower the spoiler to make sure you haven't left any tools in there...
-
Can anyone tell me where I can purchase a Code/Fault reader for a 99 Carrera?
High mile role call
in 996 Series (Carrera, Carrera 4, Carrera 4S, Targa)
Posted
I currently have 205K on my 99/996. Just got rear ended a few weeks back.....picking the car up tomorrow 9/30/2011 at the dealer hopefully, all is well and she's still purring like she did before the accident. Only problem, needed new bumpers, and a new AC Compressor and a few minor parts replacements. Can't wait to test drive .....Updates to follow.