Welcome to RennTech.org Community, Guest
There are many great features available to you once you register at RennTech.org
You are free to view posts here, but you must log in to reply to existing posts, or to start your own new topic. Like most online communities, there are costs involved to maintain a site like this - so we encourage our members to donate. All donations go to the costs operating and maintaining this site. We prefer that guests take part in our community and we offer a lot in return to those willing to join our corner of the Porsche world. This site is 99 percent member supported (less than 1 percent comes from advertising) - so please consider an annual donation to keep this site running.
Here are some of the features available - once you register at RennTech.org
- View Classified Ads
- DIY Tutorials
- Porsche TSB Listings (limited)
- VIN Decoder
- Special Offers
-
OBD II P-Codes - Paint Codes
- Registry
- Videos System
- View Reviews
- and get rid of this welcome message
It takes just a few minutes to register, and it's FREE
Contributing Members also get these additional benefits:
(you become a Contributing Member by donating money to the operation of this site)
- No ads - advertisements are removed
- Access the Contributors Only Forum
- Contributing Members Only Downloads
- Send attachments with PMs
- All image/file storage limits are substantially increased for all Contributing Members
- Option Codes Lookup
- VIN Option Lookups (limited)


Sky_King
-
Posts
43 -
Joined
-
Last visited
Content Type
Profiles
Events
Forums
External Paint Colors
Downloads
Tutorials
Links Directory
Collections
Store
Posts posted by Sky_King
-
-
I have the instructions for the E bay blue LED's now. P.M me if you want them.
Phillipj
Phillipj,
Could you PM those to me as well??? or email jhale@neo.rr.com
joe
-
I have an idea, but let's see the pictures.
toolpants,
Thanks for the prompt reply.
Here's a good example, the problem is pretty evident. I could live with it as is for now but would like to resolve if not too envolved. :renntech:
Joe
-
My digital odometer window on my MY01 996 C2 has been experiencing a weird look to it. I really can't say how long it's been going on but to the left of the total mileage there are some weird 'marks' in the same orange color that the numerals are 'made of'. Any ideas? I will try to get some photos uploaded tomorrow and it will explain it better than I can describe in words. The aforementioned markings are non-descript. Just looks like some sort of garbage that the computer may be passing on to the odometer. :o :o :o
Joe[/img]
-
Just curious what others have paid recently for paint and install of a factory aerokit. I got a quote of $2,900, but honestly don't have any idea if that is good or bad. Thanks in advance.
Will
I just paid $2161 for a very outstanding job at painting and fitting the complete factory Aerokit on my 2001 996. It included the two rocker panels, the front bumper, the rear deck lid and putting in it the complete hardware (fans, wiring, etc.) from the older lid on this one and, lastly but not least, the GT fins at the bottom of the rear bumper. Not only that, this company also painted my black rubber bumperettes and, in the interior of the car, also painted the instrument surround, rear center console (the big one that holds the shifter and parking brake) and the "horseshoe" area, which is the part where the radio, A/C vents etc. are located. All of these parts were painted Speed Yellow, which is a standard color and may be cheaper than the color you might want.
Therefore, if you are using a standard color, I think $2900 for just the Aerokit is a bit high. Otherwise, find out how much more is the metallic paint, if this is what you'll be using, and compare this to the price I told you to make a decision.
I hope this helped a little bit. Good luck and let us know how it turns out. :)
Pictures....... we would like to see some pictures.....
Where in the country are you located? I have a '01 996 in speed yellow as well. :D :D :D
Joe
-
:renntech:
Stunning fastboydave...Thank you!
Tried this out this morning and it absolutely works! Here's what I did...
- Yesterday, I got caught in light rain on my way back and immediately noticed that the creaking was much reduced, substatiating the that the rubber trim was creaking against the dry bodywork.
- This morning with my car dry in a covered garage, I pressed along the edges of the rubber windshield trim and sure enough, there was significant creaking along various areas!
I then proceeded to clean under the rubber trim with meths and soapy water using a thin soft cotton cloth wrapped tightly around an old plastic credit card;
- at the bottom of the windshield I got it in between the trim and glass
- at the sides along the A-pillar and roof in between the bodywork and trim
The creaking came from the rubber trim moving and rubbing between these surfaces.
Using the same setup of the thin soft cotton cloth around plastic card, this time soaking it with some silicone lubricant, I ran along the inside of the same surfaces at least twice to get enough silicone lubricant in them. Waited for a few minutes and cleaned off excess with meths and soapy water and voila!
I enjoyed my drive this afternoon so much more without the distraction of the creaking upfront :). Like fastboydave, this was getting worse and so becoming so unbearable to me that I considered replacing the windshield (see my earlier post on this thread). Thanks to fastboydave for sharing his experience for this rather simple fix!
What is/are meths????
- Yesterday, I got caught in light rain on my way back and immediately noticed that the creaking was much reduced, substatiating the that the rubber trim was creaking against the dry bodywork.
-
I found a PIWIS for sale on the internet. Would this work here in the US or what would I need to make it workable? Do I need to connect a laptop to this? The following is from the company offering it for sale:
Original Tester for Porsche,support Diagnosis/Programming/Coding/Key ProgrammingThe PIWIS Tester is a modular, portable diagnostic, information, and measuring system.
The unit contains a computer, hard disk with installed software,LCD display,and a
Lithium-ion battery.
A virtual keyboard and a USB mouse is available for operation in addition to the
tracer pin for the LCD touch screen.
Data and measured values can be printed using the USB-interface with an external
printer.
The LCD display is used as the display. An external monitor can also be connected.
The PIWIS Tester and the accessories are housed in a protective case.
Package include:
1-PIWIS Tester
2-Case
3-OBD Porsche Diagnostics cable
4-Tracer pin
5-Y-connection piece to connect the PIWIS Tester and the DVD drive to the power pack.
6-Ground cable with terminal
7-Cables for the multimeter (for future expansion)
8-Power pack with German power cord
Joe
-
I just had the same problem on my brother's 2000 C4. See the attached. The button is on the underside.
Hey guys,
I have the button on the bottom side of the MAF sensor as shown in the picture. Is there some sort of trick to get it off? Just press the botton and remove? Press upward (toward trunk lid) or Press downward (toward air cleaner)?
I haven't been able to get it to budge. Perhaps some sort of small explosive? :huh:
Joe
-
Only the 124 MAF is approved for use with a 996TT.
Loren,
Saw the 124 in an eBay ad and it was listed for the 996TT, is it the correct MAF for a MY01 996 C2 as well?
Joe
-
I purchased a 2001 996 coupe off eBay a couple of years ago. I live in Akron, OH and flew into NYC and met Peter Kern to examine the car and sign the papers. It had 34K miles on it and I drove it home that day. He's one of the owners of Highline Imports who are from NJ. The experience was a good one except for picking it up in midtown Manhattan and trying to get the hell out of the city on a Friday afternoon..... nearly 2 1/2 hours to traverse 8 miles with a stick wasn't any fun thanks mainly to the crazy cabbies who don't care what kind of car they nose in front of. I sure didn't want fender bender there to start out my new ownership. The car was in very good shape, well maintained, and the paperwork went smooth. I purchased an extended warranty from AutoSource from him as well. You might give him a call and ask if he has any leads on a tiptronic 996. For you that should be a no--brainer already living in NJ.
From their website profile a cut and paste:
Highline Imports is a referral-based business specializing in the acquisition and resale of late model high-line cars at substantial savings. Although our focus is primarily on 2001 and newer German and Asian vehicles, we serve our customer base with any desired make and model. We even have ready access to like new 2005 and 2006 models.
We only deal with high quality inventory. Our cars are not salvage titles, flood damaged, recovered theft, or manufacturer buy-backs unless they are disclosed as such in the description. We do our best to photo document or include in text shortfalls that we notice, and have never had a buyer surprised by undisclosed issues upon delivery. Highline will save you thousands of dollars due to extremely low operating costs, and
our willingness to pass these savings on to you.
In addition to our top quality on-hand inventory, Highline offers buyers a personalized Buying Service. This unique service allows the retail buyer direct access to literally tens of thousands of cars offered only to licensed automobile dealers each week.
You will find that Peter and his staff are car enthusiasts committed to serving car enthusiasts, and are in this business for the sheer enjoyment of it. Highline was conceived by life-long automobile enthusiasts involved in various aspects of motor sports activities ranging from club road racing and driver education events, road rallies, auto shows, to the modification and resale of fine automobiles.
Highline's warehouse is conveniently located at Perryville Centre, 78 Route 173, Hampton, New Jersey 08827, (one minute from Exit 12 off Interstate 78). Out-of town clients can fly into Newark Airport, Allentown, Pennsylvania, or one of several other major airports. Our hours are by appointment only, so please give us a call at 908-391-3471 to set a time for a no obligation look at some of the area's finest pre-owned inventory
I would do it again, the price was right and so was the car. :D
Joe Hale
Akron, OH

-
Hey guys, just started getting a CEL warning. What's the best code scanner for the buck? Hate to take it to the dealer if I don't have to, their hourly charges for something so simple are ludicrous. If it is something relatively simple I'd rather do it myself. Thanks in advance. Either PM me here or email me at jhale5@neo.rr.com :notworthy:
-
Did you figure this one out? My wife's '03 Boxster S does the same thing. It has gone off maybe 3 or 4 times in the last six months. I'm always worried going out of town for a weekend or whatever and having it go off and really pizz off my entire neighborhood. I am sure not comfortable with leaving the keys at home with my 16 year old son "just in case".
Any thoughts on why it would do this?
The move Risky Business comes to mind..... better to have the neighbors pissed off than the car practicing its' water treading skills...... LOL
:drive:
-
Has anyone tried painting a coating of plasti-dip or some similar insulator on the area normally occupied by the plastic pad? Seems like that might work.... just a thought.
Joe
-
996.606.123.00
What does the 996.606.124.00 work on?
-
What is the part # for the MAF sensor for my '01 996 C2?
joe :notworthy:
-
Thanks Loren, quick response as always.
Joe Hale
Akron, OH
-
What year 996's will an instrument cluster for man.transmission with part # 996 641 223 03 70 c fit?
Joe :drive:
-
Kim,
Thanks, that is exactly what I was looking for.
:clapping: Joe
Does anyone have photos of their installation of the Flash2Pass garage door opener on a 996 that was spliced OUTSIDE of the headlight enclosure. I know some have accessed the wiring before it went into the headlight enclosure. That makes sense to me. More room to 'maneuver' available for the connection. Anyone provide a guide to getting the wire out to behind the bumper guard for increased distance to activating the opener?
I know some have had problems installing as per manufacturer's instructions so I am trying to ask those who have had their travails to help me through this install with minimal loss of stomach lining.
Joe ... the DIY I followed was not from a manufacturer. I just used the flash to pass wire lead to provide power for my own 12v opener, taking the place of the battery. The lead sounds like it should be the same you are asking about, however. Its in a bundle just to the passenger side of the battery. When you think you've found it, use a test light to make sure. Take a look at these.
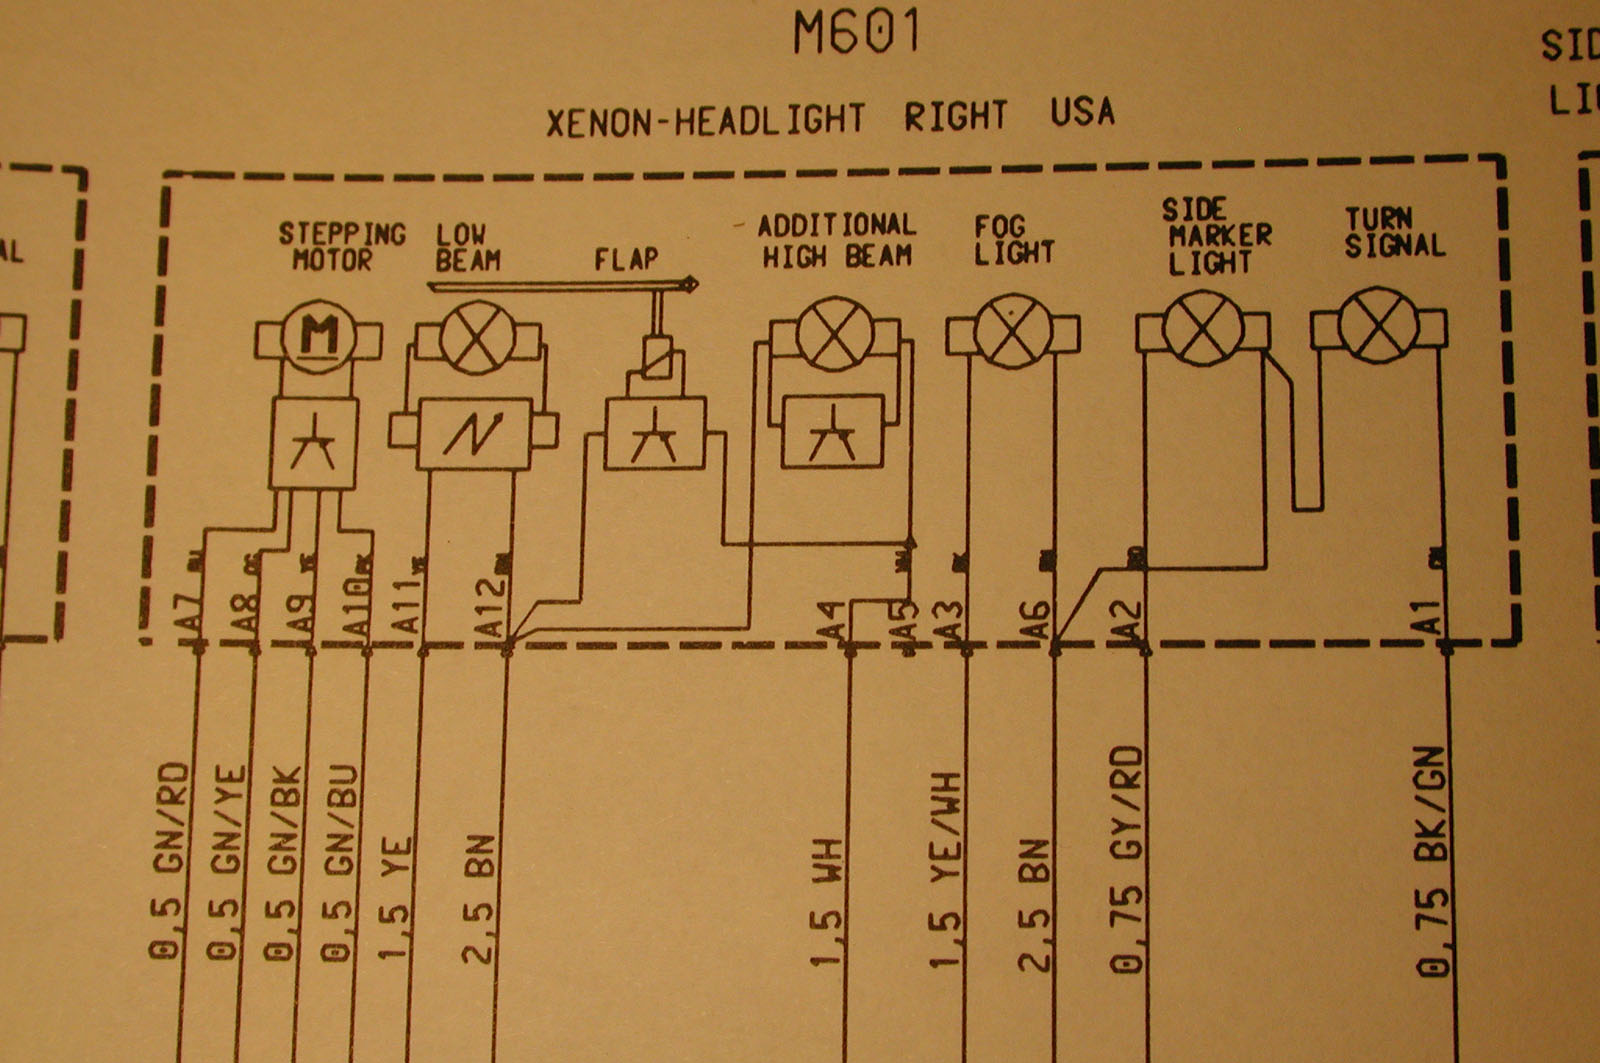
Wiring diagram of the headlight. Will use the white wire that powers the flash to pass headlight.
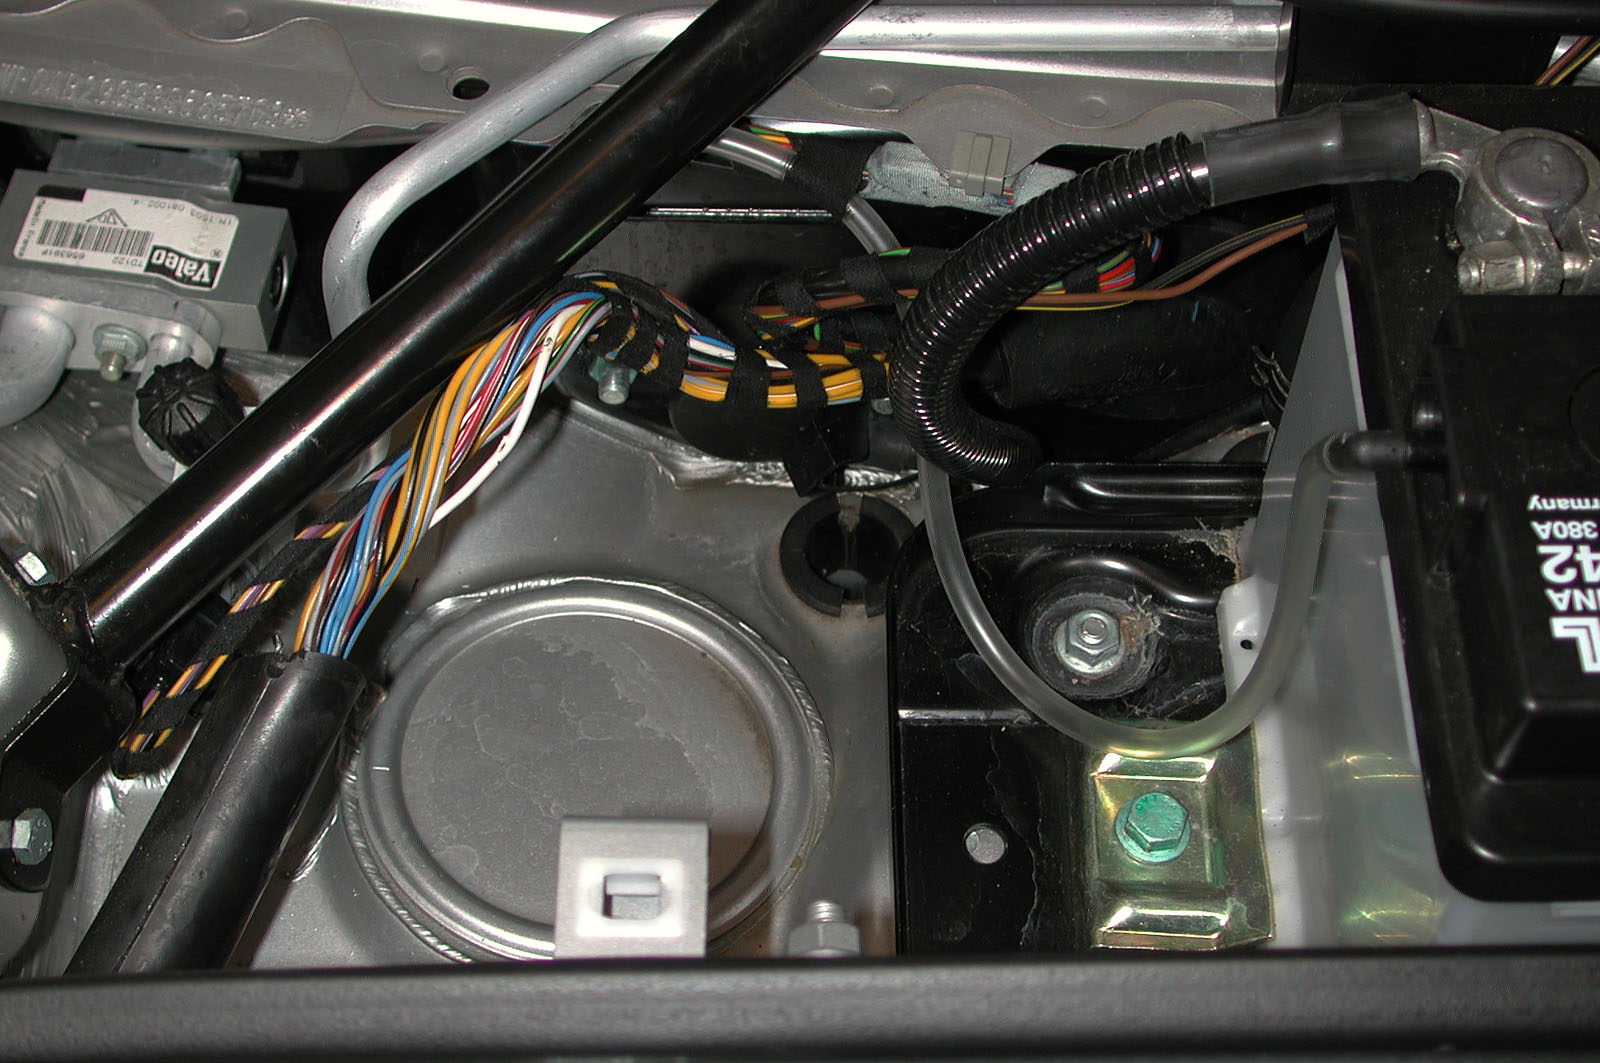
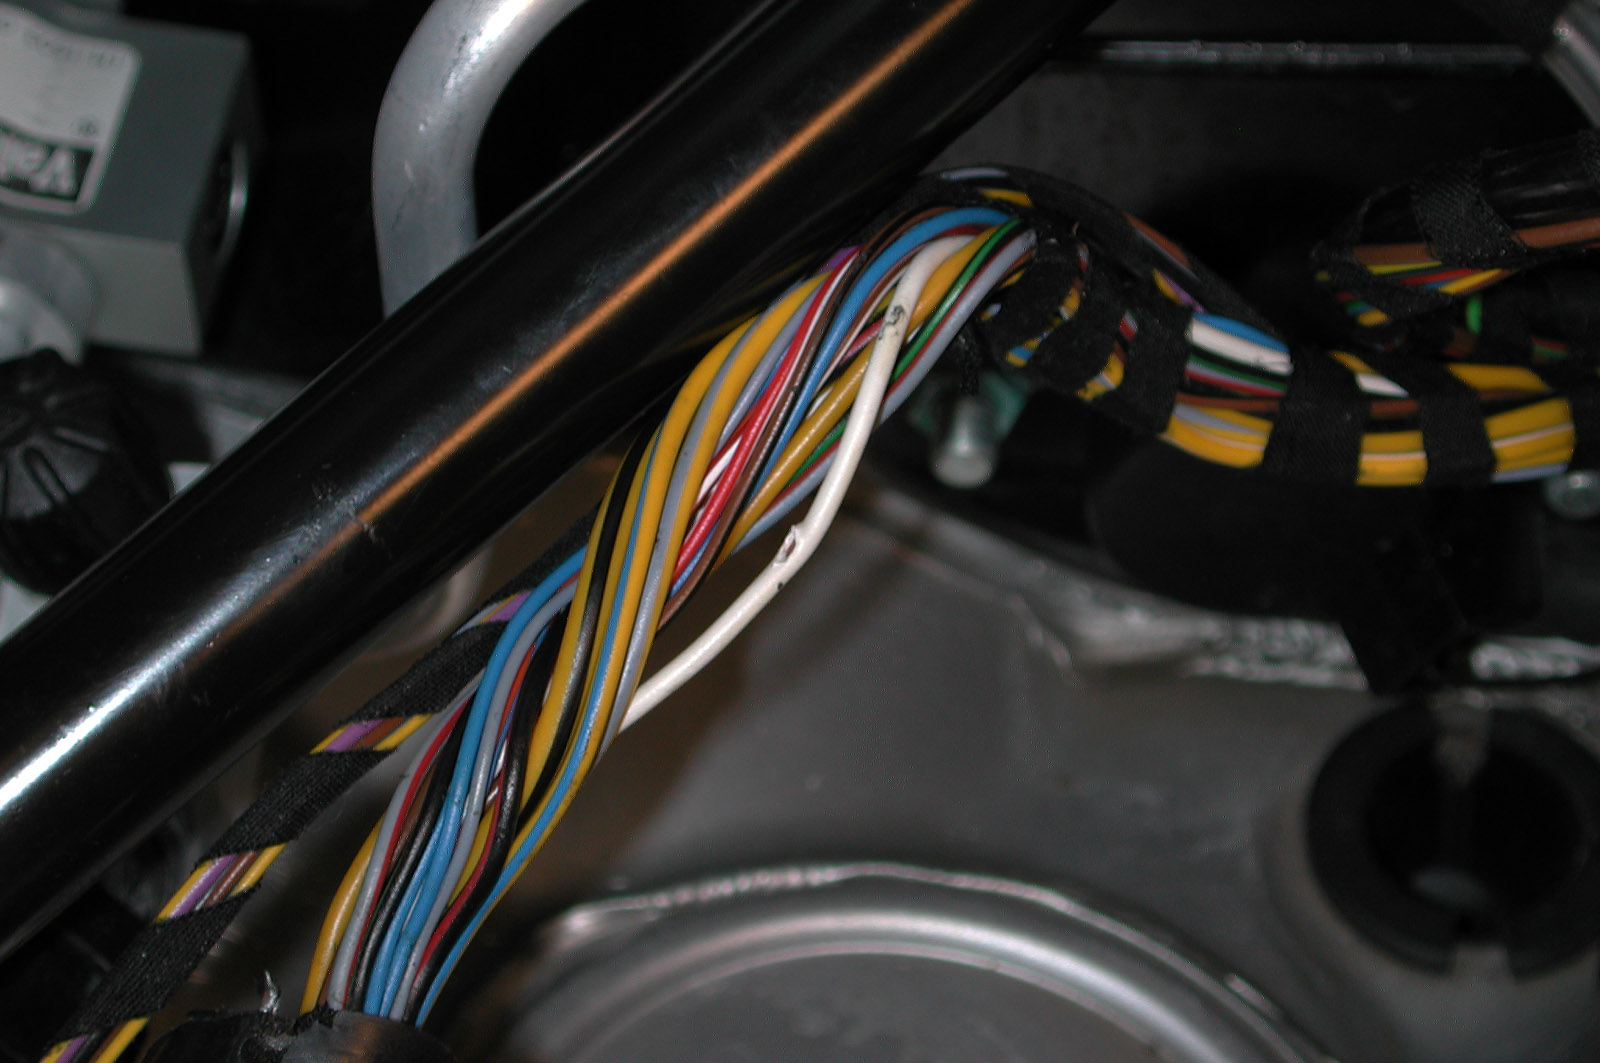
Next 2 photos show an easy place to access this wire. Just to the passenger side of the battery in a bundle of wires.
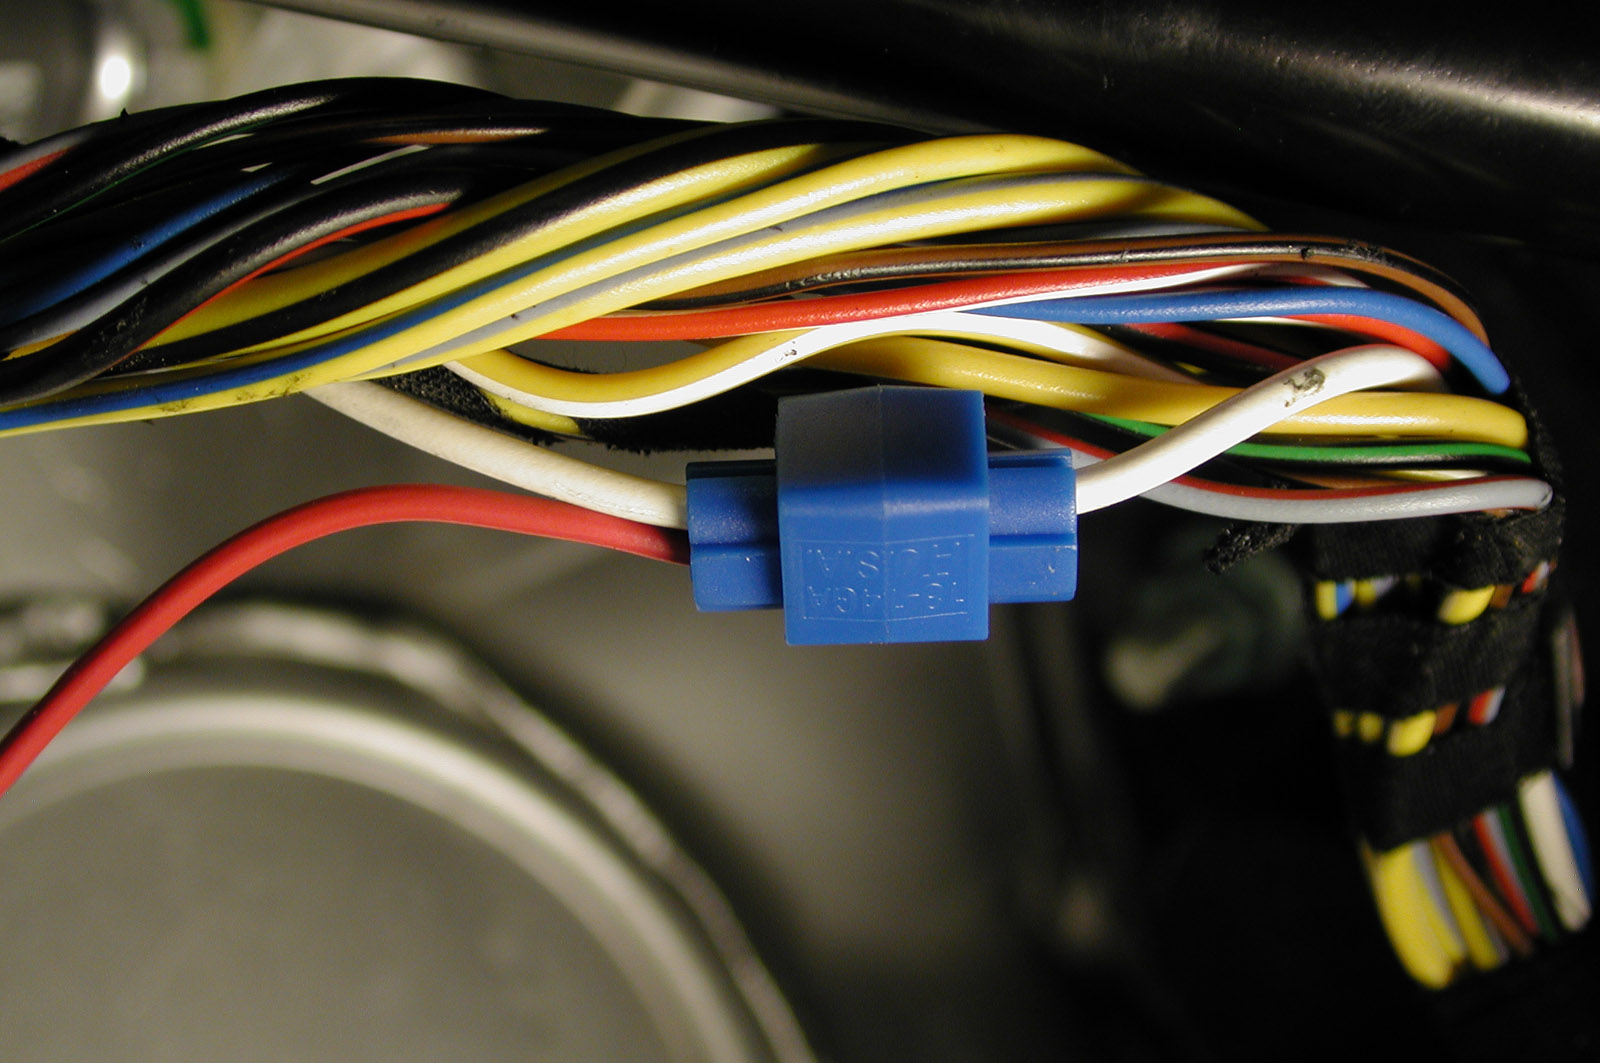
Use a wire tap to connect the positive lead to the white wire.
-
Does anyone have photos of their installation of the Flash2Pass garage door opener on a 996 that was spliced OUTSIDE of the headlight enclosure. I know some have accessed the wiring before it went into the headlight enclosure. That makes sense to me. More room to 'maneuver' available for the connection. Anyone provide a guide to getting the wire out to behind the bumper guard for increased distance to activating the opener?
I know some have had problems installing as per manufacturer's instructions so I am trying to ask those who have had their travails to help me through this install with minimal loss of stomach lining.
Joe
:help:
-
Loren,
When I did the console delete in my '01 996 I wrongly ordered graphite gray for my plastic color. Is there a part number for the little plastic piece that fills the gap at the front of the console in the lighter gray? This darker gray is not correct. An alternative woule be to paint the piece in the correct color..... any suggestion as to which way to go? The carpet color is correct but leaves a bit to be desired for that piece of plastic. Is there a spray paint readily available to paint this?
Joe
In MY99 there were two grey interiors offered and airbags for that year were offered in Leatherette (plastic) or Leather.C50 Graphite Grey (leatherette or leather) -- kind of a dark grey (like your air vents)
B50 Space Grey (leatherette or leather) -- kind of a light grey
The color code does not change but the part number does depending on leatherette or leather.
-
They should snap in unless you broke the clips removing them (fairly common). I think they snap in easier when warm - so park in the sun then snap them in.
Thanks Loren, will give it a try. :notworthy:
-
What is the best way to reattach the defroster covers in my 996? I loosened them to facilitate placement of the GPS antenna for the TrafficPro installation. There's very little space between the windshield and the dash area. Should I put some padding on the cover and smack it down with a soft hammer or what?
Joe
:P
-
This can't be used for the United States though, right?
One of the best solutions to get a navi radio CD is to install the new Becker Indianapolis Pro. It's provided with a bluetooth telephone hand free system, and besides can reproduce MP3. It has an ipod connection too. The design is the same as Porsche radios (made by Becker) -
Thanks guys,
I just put a jumper between the two pins and voila...... sweet music!!
Put the TrafficPro back in the dash and the A/C control unit and trim piece.
Now enjoying a beer with a little grin on my face.
The fit of the two top screws on the side guides for the A/C controls (which were moved from the lower console with a console delete installed) seemed a little sloppy. I believe I read somewhere that this was a problem for someone else. If anyone can direct me to that post I would appreciate it.
Thanks again for all the help.
Joe
Did the same about 2 years ago. You dont need to cut and solder. A jumper works fine. -
I hooked up the TrafficPro model 4773 to the two connectors that came off the prior CDR 220. Only thing that doesn't work are the speakers. Seems this has been discovered and I guess a wire has to be 'moved from Connector A pin 5 to Connector C1 pin 6.
What is the best way to do this? Can I just solder a wire between the two wires or must I cut the wire going to the connector A and then solder to C1 pin 6
What I'm trying to find out is it OK to leave the original wires intact and just connect the two with a 'jumper'?
:help:
Joe


Open/Close garage door with hight beam stalk
in 986 Series (Boxster, Boxster S)
Posted
cease,
I did the Flash 2 Pass installation as well. With the install of the garage opener button and under the hood install of the transmitter it probably took me a total of 45 minutes. Time very well spent, and my kudos to those who developed the unit. Just two crimp connectors onto existing wires, no soldering, just wire tied it to a support behind the battery and voila, no more finding the garage door opener on the floor or beside the seat. I get about 100 feet of transmitting for door to open but YMMV.
Joe