Welcome to RennTech.org Community, Guest
There are many great features available to you once you register at RennTech.org
You are free to view posts here, but you must log in to reply to existing posts, or to start your own new topic. Like most online communities, there are costs involved to maintain a site like this - so we encourage our members to donate. All donations go to the costs operating and maintaining this site. We prefer that guests take part in our community and we offer a lot in return to those willing to join our corner of the Porsche world. This site is 99 percent member supported (less than 1 percent comes from advertising) - so please consider an annual donation to keep this site running.
Here are some of the features available - once you register at RennTech.org
- View Classified Ads
- DIY Tutorials
- Porsche TSB Listings (limited)
- VIN Decoder
- Special Offers
-
OBD II P-Codes - Paint Codes
- Registry
- Videos System
- View Reviews
- and get rid of this welcome message
It takes just a few minutes to register, and it's FREE
Contributing Members also get these additional benefits:
(you become a Contributing Member by donating money to the operation of this site)
- No ads - advertisements are removed
- Access the Contributors Only Forum
- Contributing Members Only Downloads
- Send attachments with PMs
- All image/file storage limits are substantially increased for all Contributing Members
- Option Codes Lookup
- VIN Option Lookups (limited)


kbrandsma
-
Posts
1,103 -
Joined
-
Last visited
-
Days Won
8
Content Type
Profiles
Events
Forums
External Paint Colors
Downloads
Tutorials
Links Directory
Collections
Store
Posts posted by kbrandsma
-
-
If you have some Plasti Dip, you can do what Pedro recommends. Press Here
The tip is at the very bottom of the page.
-
+1 for Red Clip, works well. Once installed and the alarm is set, any intrusion into the driver/passenger compartment the alarm will go off after a 1-2 second delay.
Just remember to remove it when you try to put your top back up. When I first got my car, I couldn't figure why the switch wouldn't bring the top back up. First emergency brake and now the red clip. Go figure????
-
The OBC hack with a 4th stalk only needs 4 wires. The wires you have look much larger than #009 VW wires typically used. The fact that you have more than four wires may indicate the addition of cruise control as well. Do you have cruise? In any case, I know of no way to determine which wire plugs in to where, without looking at the harness where it plugs into the stalk. The wires also need to terminate into a pin that gets inserted into your white harness plug that attaches to the back of the instrument cluster. Here is a link with more info: Press Here
Good luck and update your post when finished.
-
Perfect, thanks Loren!
-
I recently purchased a primed GT3 Bumper Part Number: 996.505.980.03 G2X for my 98 Boxster.
When dry fitting the bumper prior to sending out for painting I noticed a few missing screws and attachment parts. I'm looking for the PET diagram to confirm missing parts and any needed additional parts for the 3rd radiator.
I am also am looking for any recommendations on where to purchase the third radiator.
Thanks in advance!
-
I have a MY98 Boxster (986) with stock bumper and I am upgrading to a GT3 996 Bumper and a third radiator.
I have the bumper but need to know of any additional hardware and grills needed. I haven't purchased the third radiator and I am interested in the best place to purchase.
Thanks!
-
does anyone have an on board computer stalk cap in gloss black that they like to sell? i've been told porsche doesn't make the gloss black stalk cap any longer. thanks to loren and a few other members i just did the obc 4th stalk upgrade and it works! thanks.
I've heard of people simply spraying a coat of clear over the matte cap to get the gloss effect, since the glossy bits are no longer made. I'd try a dismantler like LAPD or Parts Heaven if you want the OEM piece.
Mark
Call Sunset at "Porsche Parts at Dealer Costs- Sunset Imports". See link at the top of this page. I did the fourth stalk a year and a half ago and they told me that the caps don't come in gloss (A02) only the matt finish (A05.) So, I orderd the matt finish and sprayed a clear gloss arcylic (several light coats) and as of today you can't tell the difference. I also used the Targa switch for the garage door hack and did the same thing. See bottom switch on the left as an example.
Recommend the clear coat highly.

-
Check the fuse, check the light bulb or switch the light unit with the one in the front trunk. If it works in the front trunk then you have a faulty switch.
-
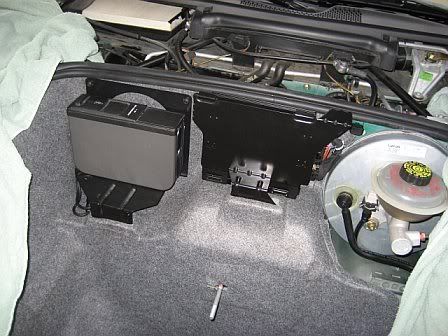
An easy way to check to see if your car it is pre-wired for speakers in the doors is to check your AMP harness for existing wires. Find the AMP in the front trunk.
Remove the cover over the harness
Remove the harness and check which wires are installed.
Once removed see if you have any of the following wires in the harness like the photo above:
Pin #10 - yellow - (left dash +)
Pin # 20 - yellow brown - (left dash -)
Pin # 9 - red - (right dash +)
Pin #19 - red brown - (right dash -)
Pin #18 - Green - (left door +)
Pin #8 - Green Brown -( left door -)
Pin #17 - Purple - (right door +)
Pin #7 - Purple Brown - (right door -)
Pin # 2 - RED BLUE - Power
Pin #1 - BROWN - Earth or Ground
If pins 7, 17, 8,18 are occupied you already have wires to the doors. If not you will need to wire.
For an excellent write -up on modifying the Boxster Sound System read Andy Morris''s article Click Here
Let us know what you found.
-
sanjeev explained it very well. The Boxster is excellent in cold weather even on icey roads but only with winter tires.
Get 2 sets of rims with Winter tires on one set and Summer performance tires on the other. I bought a used set of rims with new winter tires from another party for $600 plus shipping. Check the Mass. Craigslist sites out. They have good stuff for winter driving at great prices.
-
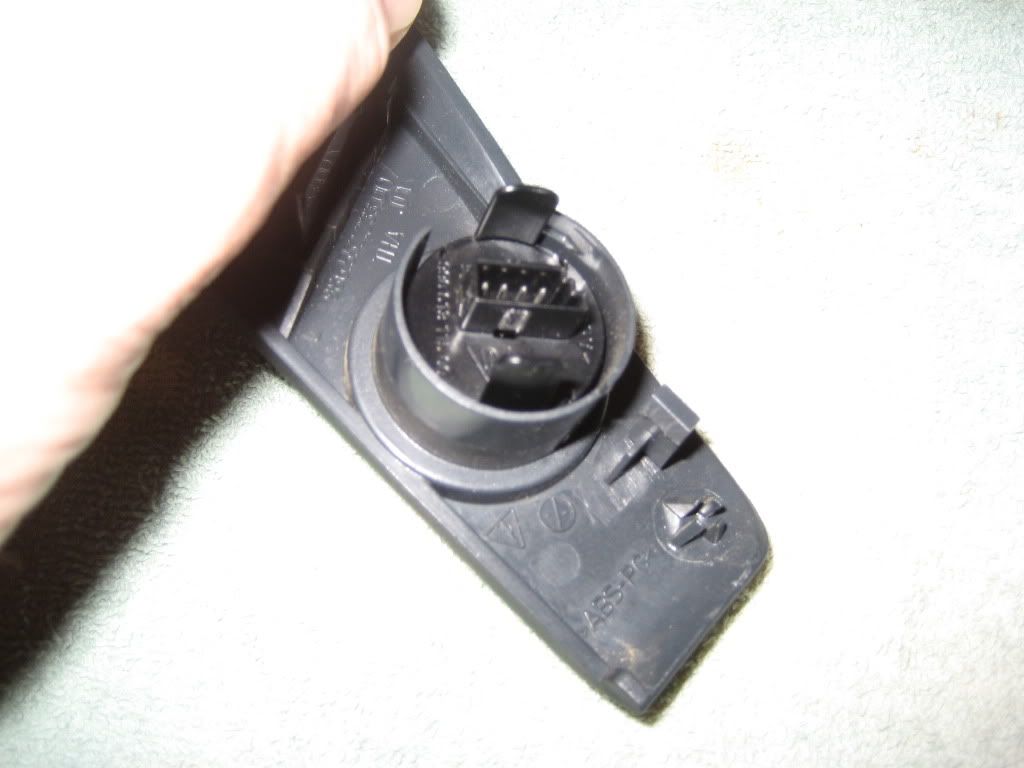
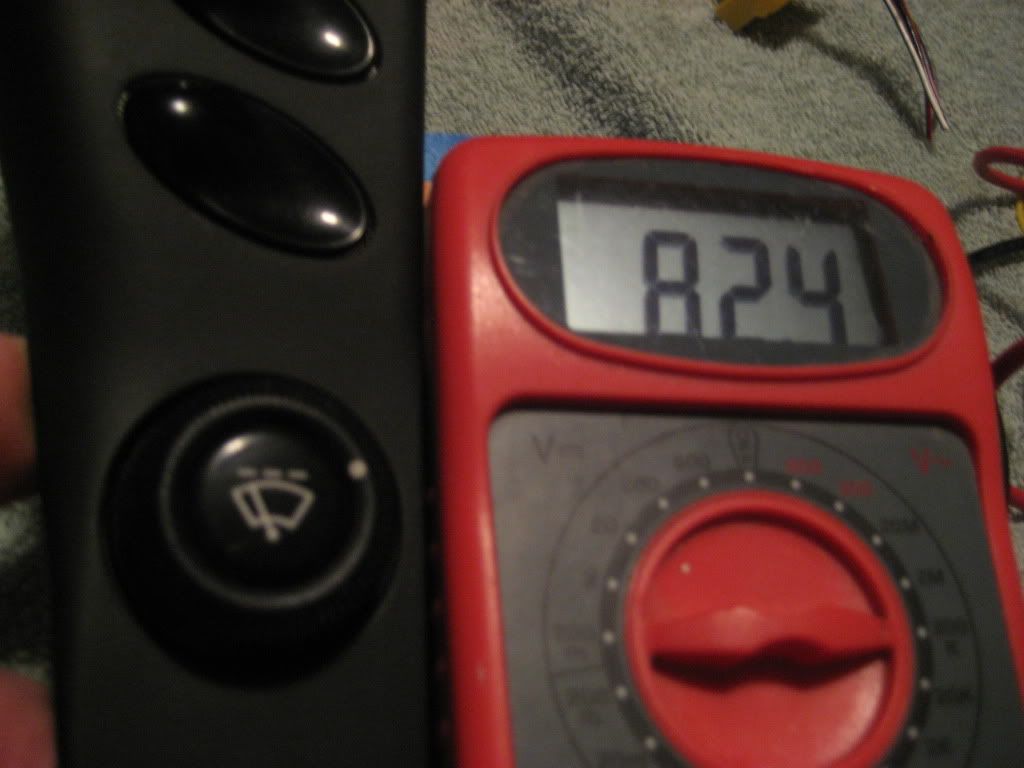
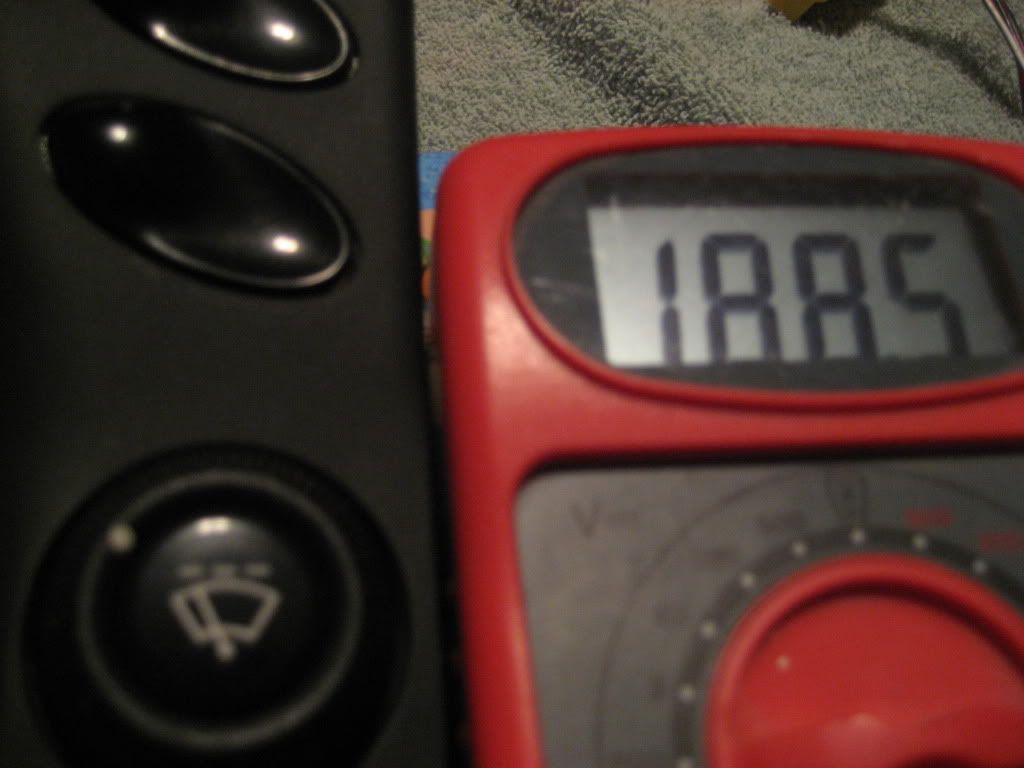
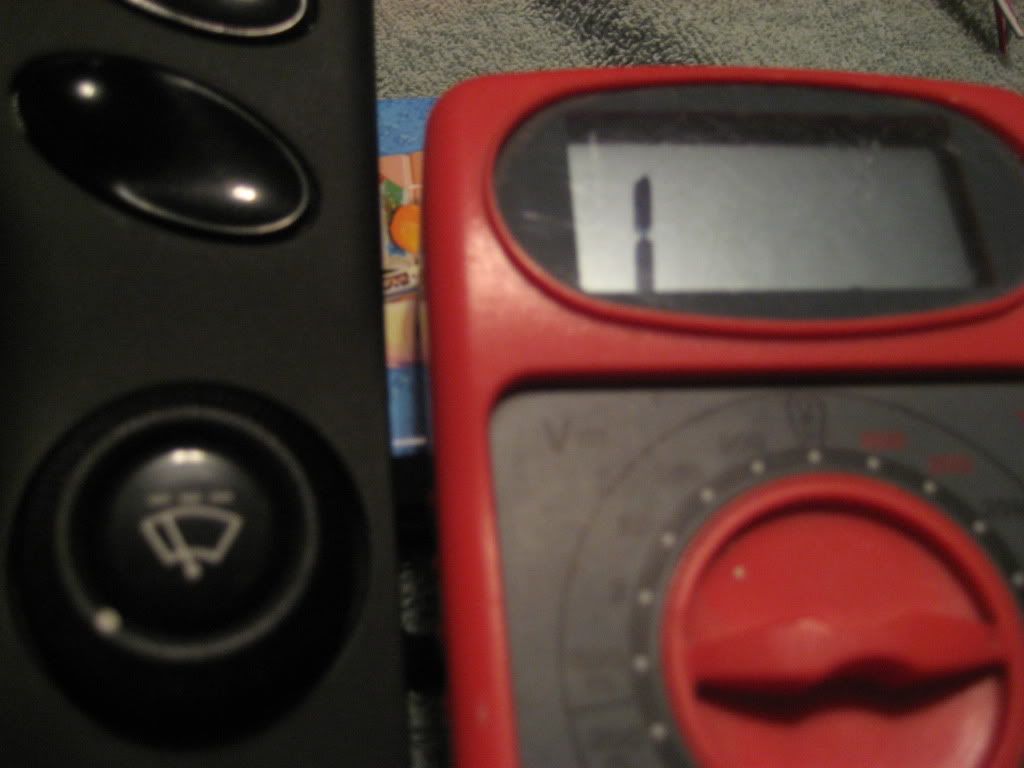
With your info - I was able to make sure the relay was seated. Retested and still have issue. I was able to pull the rheostat as you stated. It has 4 pins on the back side. I used a multimeter and took random samples with no changes. Are there specific pins I should check/compare? Also the part number on the piece was 996.613.115.00. You stated a slightly different (996.613.127.00.A02). Are they equivalent parts?
Thanks so much for your help.
You are correct and I was wrong the part number is 996.613.115.00 A02 (gloss or A05 for matt)
If you orient the harness this way the two pins are on the far right. The other pins on the left are for backlighting with the pin on the far left being for the brown wire which is ground or earth.
With the dial turning clockwise the number gets smaller
Turning the dial counterclockwise the number gets larger and eventually 1. or off and no resistance. If your reading is always 1. or open you have a faulty switch. Check your multi-meter out on a bare wire to ensure it is working properly.
-
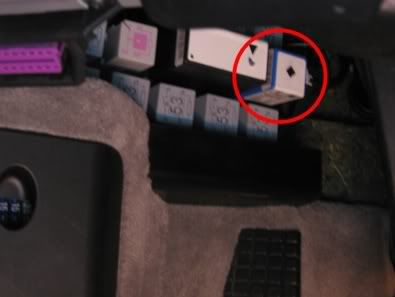
The intermittent wiper relay is in the bank of relays to the right of the black fuse box by the driver's left foot. Second row of relays from the bottom, furthest on the right. (see photo below)
If you remove the rotating dial, you can check it with a multi-tester. The dial/switch is just a potentiometer so it should change resistance when rotated. If you don't get a change of resistence when rotating the dial or it is is completely open it will need to be replaced. Part number 996.613.127.00.A02 (Gloss or A05 - Matt)
Cost of the potentiometer is about $50.00 from Sunset.
You can also check the fuse. It is fuse C6 (25A) and is located on the third row from the top and 6th fuse from the left.
Relay Location
I'll send photos later of potentiometer.
-
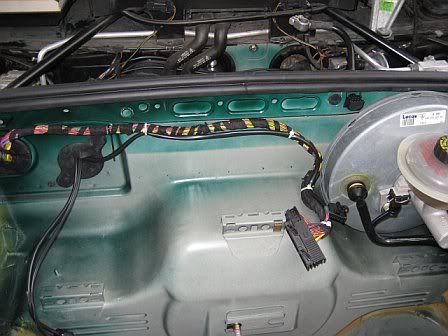
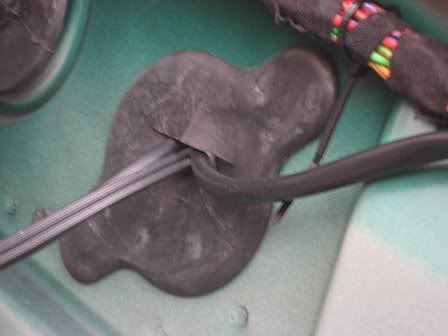
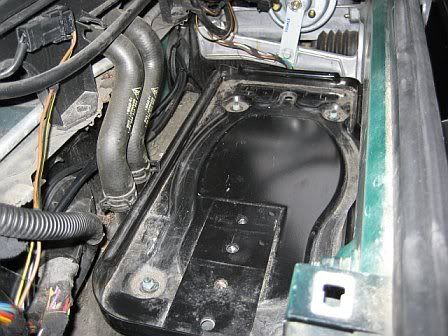
I removed all the carpet liners. Very straight forward and little or no effort and time.
I penetrated a grommet next to the existing one. Cut an X with a razor knife and then seal with chaulk before you put carpet back. Fasten with zip ties to existing wires to make it look nice.
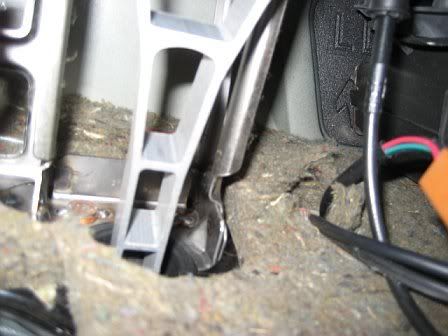
Then remove the battery and tray it is attached to and run the cable in the moat and enter the cabin via the rubber grommet behind the battery on the driver's side.
The grommet opens into the cabin right above the gas pedal. Careful pushing things thru as you can also push the grommet thru. I think it is better to have a partner help you with this.
Put carpet back.
-
Ya, but $100 for it is a bit steep... that's why I was hoping to get a scan of stock 1998 which would match up pretty close to mine. Anyone willing to make a scan of their window sticker? If you want to block out the VIN and dealer info, that's fine. thanks.
Here you go.
-
2000 C4 - my intermittent wipers will not vary with the dial/rheostat. It wipes about every 6 seconds. Does this mean the rheostat dial is bad? If so - is there a way to remove/replace that rheostat without removing the dashboard?
Take a padded butter knife or some other plastic flat tool and pry the trim piece off that contains the dial and the three switches or switch plugs above the dial. It should pull off with little effort. Mine comes off with my fingers once you get behind it a little bit.
Your Carrera may have a horse shoe that wraps around the AC and radio. My boxster doesn't. In any case you only need access to the back of the dial to remove.
Once away from the dash grab the electric harness by the plug (not wires) and pull straight out. That leaves two verticle black plastic pieces on the outer edge. Place your fingers inside these verticle pieces and gently push both outward on both at the same time. The dial will release toward the front.
If you need photos let me know.
-
To use the existing cable routing will caused you to break open a very well developed closed water tight system. It will be easier to route thru another grommet opening above the gas pedal. PM me for additional pictures and slides.
-
I have mine for a MY98 Green with Savannah Beige Interior, M490, 5 speed, TC and Sports Package
-
I recently purchase an Escort 9500ix and I am very satisfied with it.
-
Hi Gus,
Sometimes when you reinsert the headligt assembly, the headlights (female) receptacle does not fully engage with the stationary light receptacle (male). Before slideing in the ligts, check and see how firm and stationary the male receptacle is. They break off fairly easy and /or a wire gets lodged between them. Some people remove the inner wheel well cover and manually check after you snap the lights in.
Just my 2 cents worth.
-
That does look like a crack at the bolt so 6 plugs and 6 coils and whatever o-rings and tubes needed? what is that special grease is it just silicone grease I will probably order the parts to do it over the winter now.
Just did my 60K maintenance. I got my parts from Sunset, clearly the best prices. Did not need coils however as mine were in excellent shape.
Tool Pants suggested in another post to only replace one side at a time and then start and check for misfires. It is easier to narrow the problem to three at a time if you do have a misfire rather than do all six.
-
Found another post that gives more detail on the OEM brand from Autozone.
-
Hey Guys, I've searched already, but I have a question that I'm trying to figure out for a friend who doesn't get on the computer enough to become a forum member. Not on my car, but on his 02 Boxster.
He occasionally gets the white puff of smoke on startup, usually parks on an incline, and it doesn't always happen.
On a recent trip in southern california, driving on the 73N, and later on the 73S toll road through Orange County, we noticed some strange power loss. It seemed to not want to make much power and go above 80mph. Perhaps an elevation issue? I'm not sure, but after that freeway, it seemed to perform normally. I've driven that freeway in my car before and it seemed fine, but in this trip in his car, it was acting a bit weird.
I don't know if that is related to the issue or just was a fluke. Suspecting the AOS due to the occasional puffs of white smoke on startup, I recall reading threads saying to try removing the oil filler cap while the engine is on and testing the resistance.
We tried that on his car, and the cap came off easily. There was a definite vacuum, and I wanted to ask, is the vacuum normal, or is that vacuum indicative of the AOS failure? Also, when removing the cap, the car's idle would change. I assumed this was normal...
Any ideas guys? He is worried, and I tried to help with what I knew, but I am no expert on this issue.
Thanks in Advance...
You can also check the "J" tube that goes from the AOS to the throttle body and check for standing oil. The Boxster is a flat 6 cyclinder engine so an ocassional white smoke at start-up is to be expected. If no oil in "J" tube, no regular regular smoke even after initial start-up, and no oil consumption, I would not worry about it.
-
Autozone sells a three bit set 10mm, 12mm and 14mm by OEM.
-
Had a similar probelem recently with a CDR-220 unit. Took it to a local shop and for about $80.00 they were able to repair. In the CDR 220 there was a piece that came detached and the repair was simple.


What size socket do I need for the lug nuts on OEM wheels?
in 987-1 Series (Boxster, Boxster S)
Posted
It's a coating like you would find on pliers, etc. Found a container of it at Home Depot. Lowes didn't stock it.