Welcome to RennTech.org Community, Guest
There are many great features available to you once you register at RennTech.org
You are free to view posts here, but you must log in to reply to existing posts, or to start your own new topic. Like most online communities, there are costs involved to maintain a site like this - so we encourage our members to donate. All donations go to the costs operating and maintaining this site. We prefer that guests take part in our community and we offer a lot in return to those willing to join our corner of the Porsche world. This site is 99 percent member supported (less than 1 percent comes from advertising) - so please consider an annual donation to keep this site running.
Here are some of the features available - once you register at RennTech.org
- View Classified Ads
- DIY Tutorials
- Porsche TSB Listings (limited)
- VIN Decoder
- Special Offers
-
OBD II P-Codes - Paint Codes
- Registry
- Videos System
- View Reviews
- and get rid of this welcome message
It takes just a few minutes to register, and it's FREE
Contributing Members also get these additional benefits:
(you become a Contributing Member by donating money to the operation of this site)
- No ads - advertisements are removed
- Access the Contributors Only Forum
- Contributing Members Only Downloads
- Send attachments with PMs
- All image/file storage limits are substantially increased for all Contributing Members
- Option Codes Lookup
- VIN Option Lookups (limited)


kbrandsma
-
Posts
1,103 -
Joined
-
Last visited
-
Days Won
8
Content Type
Profiles
Events
Forums
External Paint Colors
Downloads
Tutorials
Links Directory
Collections
Store
Posts posted by kbrandsma
-
-

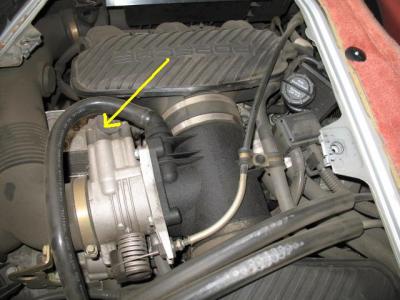
The black rubber boot...center of pic.....check valve on one side.....does a vacuum line hook to the other hole on the driver's side....PLEASE INGORE THE YELLOW ARROW AND DON'T POST ASKING IF I'M TAKING ABOUT THE PART THAT THE YELLOW ARROW IS POINTING TO...I AM NOT TALKING ABOUT THAT PART, THAT WILL BE THE THROTTLE BODY...I can't believe how hard it is to get an answer here to a simple question
The driver's side sleeve has a vacuum line that runs from it (intake distributor) to the pressure regulator. The pressure regulator is located on the fuel ring pipe that provides fuel to each of your 6 injector valves. The pressure regulator is near the air box where you change your air filter. It is right before the fuel return line.
The pressure regulator can be found in section 24-10 of the Bentley Manual. The manual is less than $100 and a good investment. Rembember you get more bees with honey that you do with vinegar.
-
Since I can't get a straight answer on the prior post, I will go this route...I'm putting in new vacuum lines in my 1998 Boxster, Looking at the car from the back end, I know that the black side of the valve goes in the right side of the rubber sleeve or plumens as you might call it and the white side goes to the Y connector. Is there a line the goes into the left side and if it does, where does the other end hook to. Thanks
Does this help?
-
If you look behind the the right front tire wheel shield you will be able to find the pull cable. Here is a DIY for the 1997-04 (986) Boxster that is also applicable to the 996. Easier to find when the trunk latch is operable and you can remove the headlight and move the pull ring to the tow plug in the bumper.
-
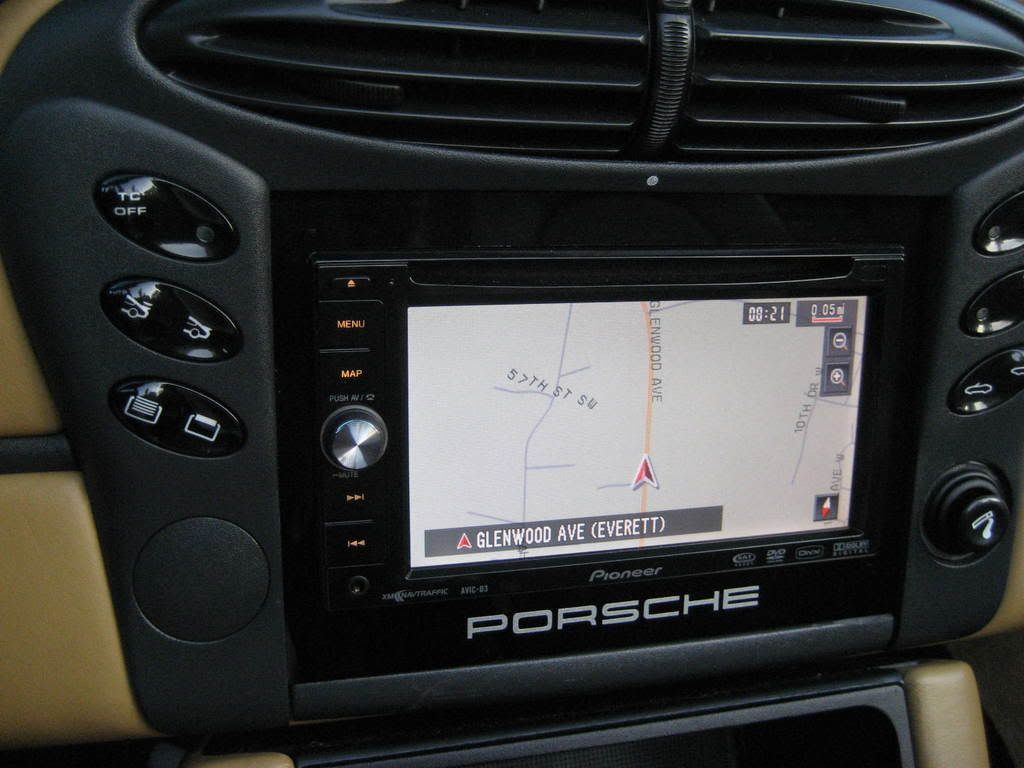
I decided to replace my becker with an aftermarket unit form JVC. I installed the unit no problem but I cant find a switched lead for the deck. The harness that Crutchfield sent works as it should except the yellow wire that normally provides the switched lead is not working. The guy at crutchfield is telling me its because of the most bus. So here I sit with my stereo laying in my seat and no power. Anyone know of a solution to this problem.
Thanks
Will
Member Rahlstrom installed a AVIC D-3 in his MY03 Boxster S with MOST Bus. Let us know how you progress. Good luck.
-
Is there anyone available in the Redondo Beach, CA area that would be willing to pick up some Porsche audio parts from a local residence. I would be more than willing to cover any of your expenses. (mileage and trouble). PM me if you are interested and/or willing.
Thanks in advance!
-
4. I couldn't find a glossy black Targa switch. According to the sources I checked, it is only available in matte black. I have heard of some people coating the flat black switches with a glossy clear coat. I have not done that because I am concerned that it would wear off. I may coat mine later.
I sprayed mine with a clear glossy coat and can't tell the difference. It has been going on 3 years now.
-
I have dropped the bumper two months ago and gave both radiators a thorough cleaning.
-
I had the same thing happen to me this summer in my 986. After a careful anaylsis I found a piece of my plastic undercarriage cover had cracked and would dangle and vibrate at 80+ mph.
-
This morning I noticed antifreeze under the passenger side's radiator. I plan on taking a closer look this evening.
I was wondering if anyone has dealt with this before. Did you find a bad radiator that needed replacement? A faulty hose or connection? Is this a DYI job? Did you have to remove the front bumper? Or can you get to it via the wheel wheel. Anyhelp with what to expect is appreciated!
Thanks in advance!
To get complete access to the radiator, you will have to remove the front bumper, but you can start to investigate by removing the front fasteners for the wheel well liner and pulling the liner back.
If you have to remove the front bumper, use Skyler's excellent DIY for cleaning out the radiators and it will be a snap, here: http://www.realtime.net/~rentner/Porsche/R...r/Radiator.html
With any luck, it will only be a loose or cracked clamp!
Regards, Maurice.
Thanks Maurice,
I take a closer look this evening.
-
This morning I noticed antifreeze under the passenger side's radiator. I plan on taking a closer look this evening.
I was wondering if anyone has dealt with this before. Did you find a bad radiator that needed replacement? A faulty hose or connection? Is this a DYI job? Did you have to remove the front bumper? Or can you get to it via the wheel wheel. Anyhelp with what to expect is appreciated!
Thanks in advance!
-
Does anyone know if a CDR23 radio will work in a 1977 911S? How about a CDR-210 or 220?
What is the stock unit in a 1977 911S?
Thanks in advance.
-
I recently purchased a CDR-220 Radio/CD player that came shipped with a CD already in the unit. On using the injection button it tries to eject it but stops part way.
Does anyone have any suggestions for removing it?
Thanks in advance!
-
I just bought an amplifier from Los Angeles Dismantler. Was stunned to find out how many parts and dimantled Porsches they have. Certain they have your headlamps if you need to replace them. (888) POR-SCHE. I talked to a guy named Leo but I'm sure anyone can help you. Good luck!
Your lights are repairable and easy to fix but will take about an hour of labor. You can either take them to a reputable detailing shop that performs headlight restoration or you can go to Wal-Mart and buy a kit for about $20.00. I have used them repeatedly with great success. DO NOT use the machine pads for the very reasons you wrote this. It takes a skilled hand to prevent heat from building up on the disks causing the swirl marks you have. The kit from Wal-Mart will be done entirely by hand and will take you about 30 minutes a light if you follow the directions carefully.
Heres the link Headlight Restoration
Good luck, GW
B)
While you're at WalMart and before you invest $20 and an hour of your time, you should check their Auto Service center in the back. The WalMart in Westminster, CA I know they will do the headlight restoration for you for $38.00.
I went DIY, spent longer than an hour working on it and the job still didn't come out perfect. For $18 extra, if I could do it again, I'd just have them do it.
What I'd like to know is if anyone has tried baking their headlights to open them up. I know people have to do this to do aftermarket H.I.D. installations.
My lenses (next to the bulb) are burned inside and I'd like to try to clean them up.
Not sure there is anything you can do with the burned lense. Perhaps take an older amber pair and split them too and put the clear 996 lights over the top of them.
Has anyone been able to remove the burned look?
-
Awesome, they look great!
-
F me.... what a disaster.
any reco's on where to buy headlamp covers? i've done about 20 min of research and sounds like i have to buy the whole assembly.
Here is the link. I think you are going to be in good shape.
-
In addition to things already mentioned:
1. Over inflate your tires a few pounds and park on plywood. Move car a foot or so every 2 to 3 weeks.
2. Check and prevent investation of rodents by plugging exhaust and then place a note on your key chain to remove plug.
3. Get battery maintainer to keep battery charged.
4. When bringing out of hibernation, push car in reverse to get some oil circulation started prior to starting.
-
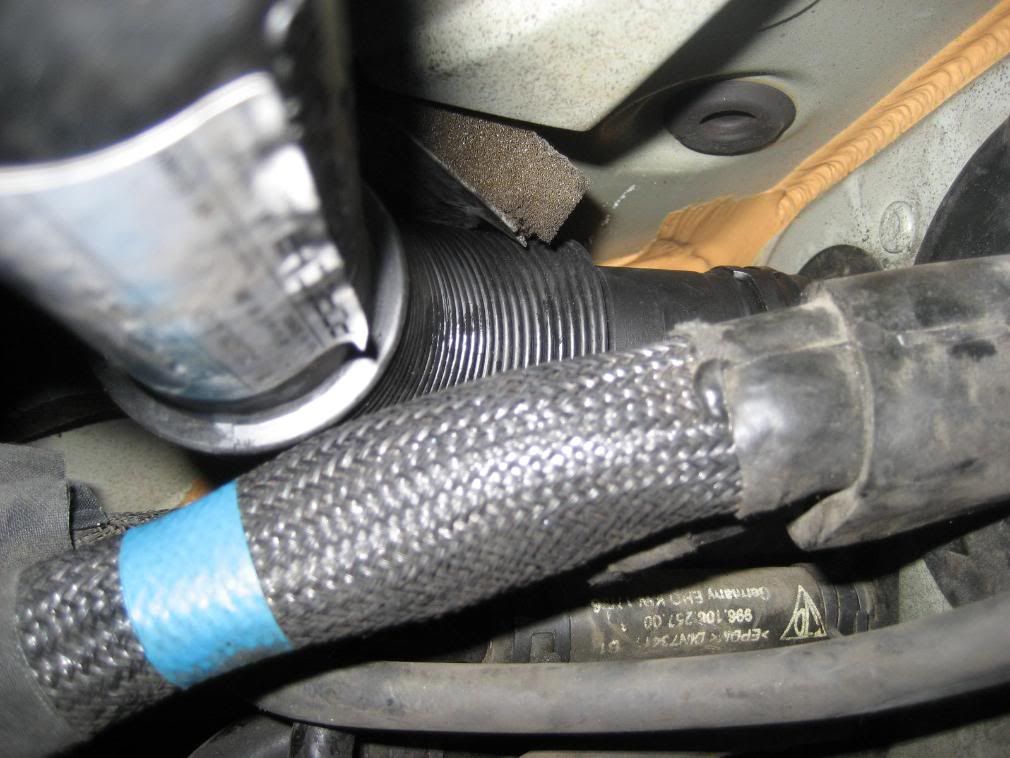
Check the bellows on the AOS just inside the right (passenger) rear tire.
It could also be the AOS, my AOS was in all sorts of bad shape, and oil leaked down on that side (and in precisely that area) and got all over the "Vario Cam F1" logo and everywhere in between (although it was never enough for me to notice until I looked inside to see it all over the place. -
Way to go! Congrats!
-
The tube is attached by a spring clamp. I had my transmission out when I replaced mine. I also removed the air tube from the intake box (where filter is) to the throttle body and the resonator too. This created room to get to the clamp from above.
-
CDR220
BE4462
Y5044475
Thanks in advance!
-
Bump for Squires!
-
Ended up taking it to a dealer and the number was 1082. I wasn't sure if you were tracking this sort of thing.
I have another one that I picked up from a salvaged boxster in a wrecking yard.Becker CDR 210
MN BE 2282
SN T5001034
Try 0082
or
0080
-
Check Rahlstrom DIY post below. He upgraded a double din aftermarket unit to his MOST system.
-
If oil is leaking in the the center of the car where the transmission bell housing connects to engine then you most likely have a RMS or an IMS issue. RMS usually leaks the drops the size of a quarter or so while an IMS can be quite heavy. You really can't know until you drop the tranny and remove flywheel.


Vacuum line question
in 986 Series (Boxster, Boxster S)
Posted
Glad to hear it!