Welcome to RennTech.org Community, Guest
There are many great features available to you once you register at RennTech.org
You are free to view posts here, but you must log in to reply to existing posts, or to start your own new topic. Like most online communities, there are costs involved to maintain a site like this - so we encourage our members to donate. All donations go to the costs operating and maintaining this site. We prefer that guests take part in our community and we offer a lot in return to those willing to join our corner of the Porsche world. This site is 99 percent member supported (less than 1 percent comes from advertising) - so please consider an annual donation to keep this site running.
Here are some of the features available - once you register at RennTech.org
- View Classified Ads
- DIY Tutorials
- Porsche TSB Listings (limited)
- VIN Decoder
- Special Offers
-
OBD II P-Codes - Paint Codes
- Registry
- Videos System
- View Reviews
- and get rid of this welcome message
It takes just a few minutes to register, and it's FREE
Contributing Members also get these additional benefits:
(you become a Contributing Member by donating money to the operation of this site)
- No ads - advertisements are removed
- Access the Contributors Only Forum
- Contributing Members Only Downloads
- Send attachments with PMs
- All image/file storage limits are substantially increased for all Contributing Members
- Option Codes Lookup
- VIN Option Lookups (limited)


kbrandsma
-
Posts
1,103 -
Joined
-
Last visited
-
Days Won
8
Content Type
Profiles
Events
Forums
External Paint Colors
Downloads
Tutorials
Links Directory
Collections
Store
Posts posted by kbrandsma
-
-
It is usually soldered to a garage door opener. Since the previous owner sold the care they may have kept their opener. The three switches snap into the surrounding vertical plastic plate. Take something (like a plastic upholstery tool) and snap the three switches out together and see if it is connected to a garage door opener. In any case you will need to solder yours to the switch. Provided of course that is what you want to do.
-
Yes from Sunset Porsche you can purchase the version .03 Cap
996-106-447-03 Coolant Reservoir Cap Was $18.87 Now $12.16
Select Porsche Parts at Dealer Cost at the center top of any screen in Renntech
-
I used "Crystal Clear Enamel" from Rust-oleum. Several light coats and looks like the other switches.
-
Check around the both trunks for the wheel locks. I found mine in the rear trunk near the radiator and oil fill caps.
-
Over 7 months now and no airbag light!
-
I had two blank switches on my 98 2.5L 5 speed. The AC controls in the middle are at the top, followed by a CDR 210 radio CD player and the two blank switches are to the left. The top switch on the left is for TC or traction control.

I put a Targa Switch in the middle position and wired it to my rear spoiler. I can now raise it up and down manually instead of waiting to accelerating to 75 mph. Probably not much advantage but impresses the heck out of friends in my garage. The bottom buttom is wired to my garage door opener. Push it once garage door goes down, press again and it goes the opposite. All are backlite off of the TC switch. I plan on inserting intermittent wipers in the center round plug.
Lots of write-ups on this board for both of these hacks and others. Do a search and have some fun.
-
If you have a matt switch all you have to do is put several thin coats of clear gloss spray. You really can't tell the difference.
Also, the gong will not work unless you have the fourth stalk and the control mode only cycles one way with the push button hack.
-
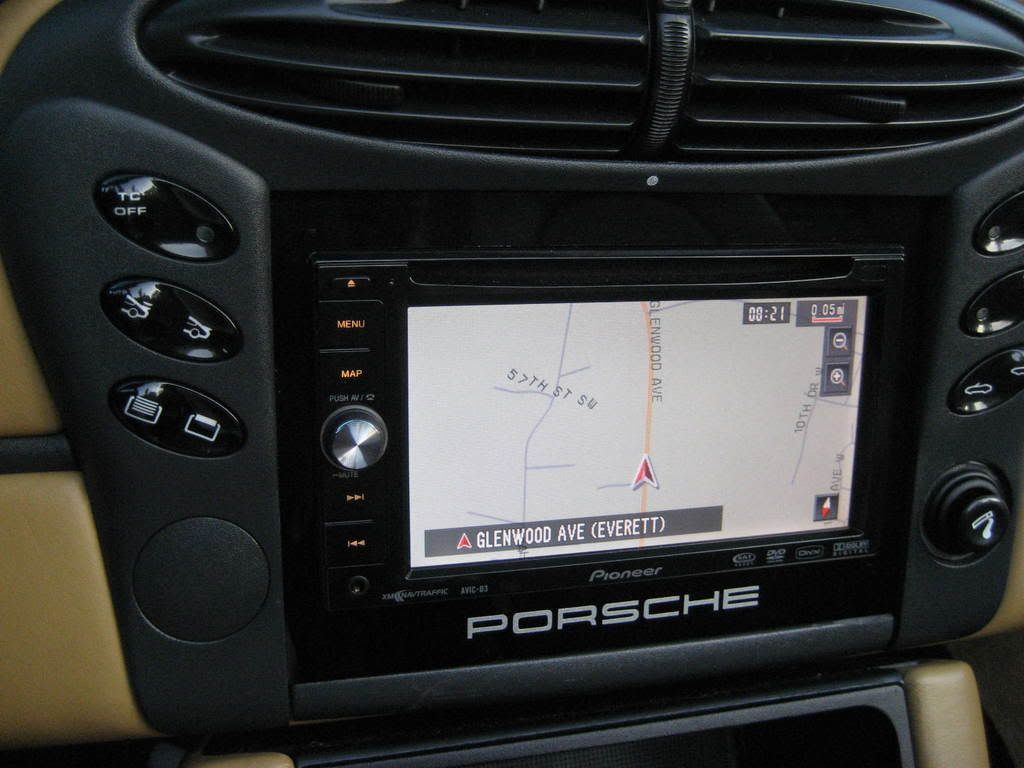
I've read and heard that as well. I recently upgraded to a Pioneer AVIC D-3 HU and power the rears thru the HU. I ended up adjusting the fade balance (back to front) 4 out of 10. It was just to much in the rears with out making the adjustment. Having the power and the cabilibity to adjust to an individual preference makes sense. Everyone is different.
I have a couple of 6x40 AMPs that will work for your application. PM me if interested.
-
Check your option codes that are located on the white label (sticker) in very front of the front trunk or on page 1 of your maintenance book. You can also check the label on your 4 channel AMP. If you have the 490 Option you need a HAES 6x40W AMP with the following:
996 COUPE M490
996.645.311.00
Other AMPs may work but I know this one does for sure. Perhaps others can chip in.
You do not need a DSP module with the AMP that I referenced above. I've installed both AMPS 4x40 and 6x40 while using the stock rear speaker kit. The stock kit contains 4 speakers 2 per side and the HU 220 (15 AMPS) powers the stock OEM rear speakers very well.
-
I also have a black hard rear compartment with a new OEM rear speaker kit installed.
-
Anybody heard about winter storage with gasoline that contains ethanol?
-
To get the blank plate out, just use both thumbs and fore fingers and squeeze the four posts at the corners and pull out. You don't have to squueze very hard and sometimes a little rocking motion helps. Also you can run the wires for the backlight on the new switch either under, over or behind the PCM.
-
Orient Express has come to the rescue. The specs and everything you need can be found in a Technical Bulletin (0913), entilted, "Assembly and Use of the Hardtop/Wheel Storage System.
Thanks Orient Expess!
-
-
AOS and/or Bellows. Run a search and see if that helps.
-
You also need the 986 rear hard compartment. I have a used black one in like new condition with a brand new OEM PNA-986 KIT rear speaker kit installed. PM me if interested in more info or photos.
-
I did Andy's upgrade and couldn't be happier. I went with 6 1/2 in the doors.
-
My '99 Boxster (US, 2.5L, 5-speed) has some serious alarm issues. I have searched this forum high and low and have tried all the tips and suggestions for trouble shooting alarm systems. Is there any way to just disable the alarm system completely while I sort things out? I was leaving it unlocked in my driveway to cut down on the annoyances but some kids got into it over the weekend and gave it a ransacking. Fortunately I don't leave anything of value in there. Any help would be appreciated.
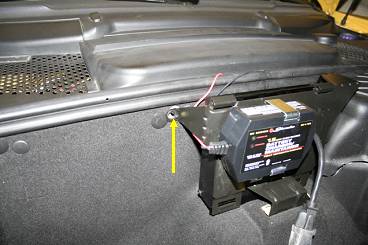
In the front trunk, remove the plastic battery cover. Remove the cover and disconnect the alarm horn. The horn is to the right of the battery. Then find an Indy and/or dealer with a PST2 Tool or Durametric software and check for alarm codes. I had a faulty infared sensor (fault code 33, I believe) that was located near the interior overhead light. It was very easy to replace. Good luck and keep us posted.
Regards,
-
Hi,
I need to get the "nutsert" that secures the amplifier bracket on my 2001 986. It is a rubber cycindar with a brass nut inside that compressed when tightened - like so many other fasteners on a Porsche. I have attached a photo to assist in identifying which part I need.
Thanks,
David
I pick one up at the local hardware store here in US in the speciality fastnr section at Lowes Hardware.
-
Guys;
I should receive my new Alpine amplifier in few days. I would like to route wiring between my Alpine radio and the front compartement where the amplifier will take place. No problem for (+) & (-), very easy with battery next to the amplifier, but I have to route a pair of RCA cable from back of my radio to the amplifier. I'm sure, lot's of people here did it, so I'm asking to you guys where did you cross the fire wall between inside car & front compartment? Did you drill a new hole? Where? Or did you cross the wall somewhere across an existing rubber grommet?
Thanks for sharing your experience.
Thierry
There is a rubber grommet just above the gas pedal that leads to the battery tray compartment (moat). Cut an "X" in the grommet towards the top and run RCA wire thru from the battery side. Have a partner assist as to not push the rubber grommet all the way thru. Depending on all long your RCA cables are you can run under battery and into the trunk area where CD changer normally sits or take a shorter route into the trunk area by the brake fluid reservoir. Use cinch ties to neatly secure cables and use sealant to seal the cut in the grommet.
-
You have a PM
-
Contact Sunset Porsche in Beaverton, Oregon. Replaced mine 6 months ago. Quite simple.
-
I started with the dash, then door and finally rear stock speakers. I would repeat if I had to. I also upgraded to a 6x40 AMP as Tool Pants and others suggest. However, the stock PNP-986-KIT are made to be powerd by radio. When I upgraded my 210CDR to a 220CDR Radio and now to a AVIC D-3, I switched back to the 4x40 AMP. Having had both the 4x40 and the 6x40AMP, an AMP switch is the last thing I would do. Any of the other three upgrades are worth it and in any order. They all should be done!
-
If your stock 4x40 AMP system is M490. I don't think the M680 will work in your case. You need the M490 6x40 AMP.

Broken Clamp and Oil Gunk in AOS Hose
in 986 Series (Boxster, Boxster S)
Posted
Oil in the J tube is a sure sign of a bad AOS. If you replaced your AOS, it is common to also replace the J tube that connects to the throttle body. You can order one from Sunset Porsche Part no. 996-107-145-06, price $25.43. Depending on your year you may need your VIN number to insure the correct tube.