Welcome to RennTech.org Community, Guest
There are many great features available to you once you register at RennTech.org
You are free to view posts here, but you must log in to reply to existing posts, or to start your own new topic. Like most online communities, there are costs involved to maintain a site like this - so we encourage our members to donate. All donations go to the costs operating and maintaining this site. We prefer that guests take part in our community and we offer a lot in return to those willing to join our corner of the Porsche world. This site is 99 percent member supported (less than 1 percent comes from advertising) - so please consider an annual donation to keep this site running.
Here are some of the features available - once you register at RennTech.org
- View Classified Ads
- DIY Tutorials
- Porsche TSB Listings (limited)
- VIN Decoder
- Special Offers
-
OBD II P-Codes - Paint Codes
- Registry
- Videos System
- View Reviews
- and get rid of this welcome message
It takes just a few minutes to register, and it's FREE
Contributing Members also get these additional benefits:
(you become a Contributing Member by donating money to the operation of this site)
- No ads - advertisements are removed
- Access the Contributors Only Forum
- Contributing Members Only Downloads
- Send attachments with PMs
- All image/file storage limits are substantially increased for all Contributing Members
- Option Codes Lookup
- VIN Option Lookups (limited)


svenjamin
-
Posts
5 -
Joined
-
Last visited
Content Type
Profiles
Events
Forums
External Paint Colors
Downloads
Tutorials
Links Directory
Collections
Store
Posts posted by svenjamin
-
-
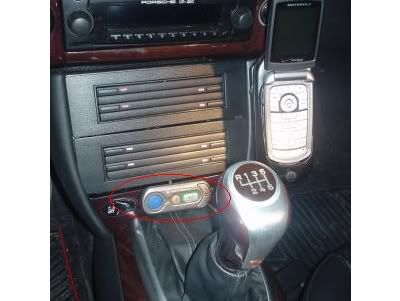
I am looking at installing a motorola bluetooth kit in my 2001 996 cab (looks like the same kit hspiva used here http://www.renntech.org/forums/index.php?s...luetooth+phone). I was thinking about taking apart the control unit (circled in red)

and hijacking some tip switches to perform the functions of this device. I have 3 blanks on my car (no PSM :o ) and this would take care of the 3 controls, but there is a volume control that I'm not sure what I should do with. I was wondering if anyone knows whether it is likely this would be a successful venture?
So, some of the questions I have are...
- Do you think tip switches would work?
- Are there any blank tip switches that i could paint/decal myself?
- I'm not sure what else I don't know to ask...
Thanks for your thoughts!
--Ben
- Do you think tip switches would work?
-
Install microphone
Use the microphone that came with your phone’s car kit.
Mounting the microphone in the Porsche location may take some modifications, but is the best choice.
The TSB does a good job of describing cable routing.
Use a stiff wire to run the cable towards the windshield through the instrument cluster.
I think that I have the same kit. Looks like you did a good job on this. Do you have any pictures of where you put the microphone?
--Ben
-
Ok, do this at your own risk...
Here is what we did on a MY 99 Cab:
(courtesy of Bob H in Las Vegas (1st guinea pig) ;)
"Thanks Loren, It worked I now can raise and lower my top while moving, just click the e-brake to the 1st click and it works!
Now, as for how it was done:
1. Park your car and set the e brake. With the convertible top down start raising the convertible top. First thing that happens is the convertible top compartment lid lifts and moves all the way rearward, keep raising the top until the convertible top compartment lid just starts to move forward. Then interrupt the closing operation.
2. Remove key from ignition THE CONVERTIBLE TOP MUST NO LONGER BE ELECTRICALLY OPERATED IN THIS POSITION.
3. There are right and a left tension cables that goes from the rear of the convertiblt top on the right and left sides to the right and left sides of the deck under the rear of the convertible top. These 2 cables are 4 inches long and they keep the rear of the convertible top from flipping up. They snap off where they connect to the deck, just push to the side and they will pop off the ball.
4. Lift the rear of the convertible top (the window part) all the way up until it is vertical and have someone hold it there. Now the deck is exposed. You will see 4 black plastic rivets that you just pull out (you can use a small screw driver) and then you can pull the panel rearward to expose the convertible top control module. its the large silver box on the left side of the car mounted on the vertical wall just behind the pop up roll bar, with the 3 seperate connectors going into the bottom of it.
5. The connector all the way to the left with all the small wires going in it is the one that you want.
6. Do not disconect the connector from the control unit, just find the GREY/ PINK wire and cut it 1 inch before it goes into the connector and put a small piece of black tape on each end and then put a piece of black tape around all the wires.
7. Put the panel back up and push the 4 plastic rivets in and lower the rear of the convertible top that someone was holding and attach the 2 cables to the deck.
8. Now put the key in the ignition and raise the top all the way.
9. All done, now take out for a test drive. While moving at 10mph raise the e brake 1 click so the e brake light comes on and lower the top. When done release e brake all the way.
Please note, This is something I did to my car because I wanted to. I can not be responsible for anything that happens if you do this to your car and don't ever put your top up or down while going over 20 MPH."
Note: If you want to do this and have a different model year you should post a message (and someone will check for you) as some wire colors have changed over time.
I just did this to my MY01 Cab (pink/grey wire) in about 10 minutes. This is an awesome mod! Thanks for posting the instructions.
--Ben
Hard Wire iPod Input
in 986 Series (Boxster, Boxster S)
Posted · Edited by svenjamin
I just purchased a similar iPod AUX adapter (for a 996) and I have a question about the power. Does the power have to be "on" for the iPod to play through this adapter? If it does not, I was thinking about adding an on/off switch so that I could control when the iPod gets charged so that I don't kill my battery. Any thoughts on this are appreciated!
Thanks!
--Ben