Welcome to RennTech.org Community, Guest
There are many great features available to you once you register at RennTech.org
You are free to view posts here, but you must log in to reply to existing posts, or to start your own new topic. Like most online communities, there are costs involved to maintain a site like this - so we encourage our members to donate. All donations go to the costs operating and maintaining this site. We prefer that guests take part in our community and we offer a lot in return to those willing to join our corner of the Porsche world. This site is 99 percent member supported (less than 1 percent comes from advertising) - so please consider an annual donation to keep this site running.
Here are some of the features available - once you register at RennTech.org
- View Classified Ads
- DIY Tutorials
- Porsche TSB Listings (limited)
- VIN Decoder
- Special Offers
-
OBD II P-Codes - Paint Codes
- Registry
- Videos System
- View Reviews
- and get rid of this welcome message
It takes just a few minutes to register, and it's FREE
Contributing Members also get these additional benefits:
(you become a Contributing Member by donating money to the operation of this site)
- No ads - advertisements are removed
- Access the Contributors Only Forum
- Contributing Members Only Downloads
- Send attachments with PMs
- All image/file storage limits are substantially increased for all Contributing Members
- Option Codes Lookup
- VIN Option Lookups (limited)


carDorque
-
Posts
37 -
Joined
-
Last visited
Content Type
Profiles
Events
Forums
External Paint Colors
Downloads
Tutorials
Links Directory
Collections
Store
Posts posted by carDorque
-
-
Figured it out. The attachment bolt was loose. Once you get a 15mm wrench back there to tighten it, the belt will loosen right up.
-
Hello everyone. I'm attempting to replace the voltage regulator on my alternator, and as one of the steps need to remove my serpentine belt. It order to loosen the belt you are supposed to turn the 24mm bolt on the tensioner pulley clockwise. I've tried this and it looks like there may be a problem. After turning it many times and seeing nothing loosen, I reached the the back and felt whatever was carrying the tensioner pulley was also spinning. This is not good, right? Was this installed wrongly?
I assume it's the number 4 in the pic below:

Am I "screwed"? Any ideas on how to loosen the tensioner pulley?
-
Yes, the key should still work.
43 means the PST2 could not communicate with the alarm unit (fairly common sometimes occurrence).
54 is likely if you have an after market radio and the previous owners did not proper disconnect the Porsche radio alarm wire.
60 Is locking fault that is very common and usually not a problem - it can occur if you hit the lock key before the door is closed (and it can't clock). Occasionally there will be a mechanical failure in the door lock mechanism - but if you can lock the car with a key then that is unlikely.
If you clear these they likely won't come back and would not be a reason for the remote function to not work.
Ok great, thanks Loren. I'll see if it can be reprogrammed and post the results.
-
Have you tried your second key?
Did you you try the hard reset by placing the battery in backwards for 2 seconds. Then replacing it normally?
If you tried all of these then you will likely need a re-program or a new key.
HI Loren,
Just tried the battery reversal thing (I didn't get it until I tried it. I just shorts the two contacts because of the shape of the battery. Very clever.) Unfortunately, no worky still.
Also, I don't have a second key, so can't try that.
Should a key remote still work even with these fault codes?
Thanks!
-
So my keyfob stopped unlocking the doors and trunk. There are a number of threads on this topic, but not much of any resolution.
Here's all the clues I have:
Key LED does flash when buttons are pressed. Battery is good. I only have one key (but I don't think the key is the issue). Have unlocked the door and tried to use the keyless entry immediately after, no change. I have also started the car and tried to use the keyless entry immediately after, no change.
I also reversed the battery in the keyfob for 2 seconds and then turned it back, no change.
Durametric tells me:
49 - K Lead status: not present
54 - Radio receiver defective
60 - Central locking limit position lock not reached
(There were a couple other codes, but I have since cleared them and the codes have not come back yet.)
Central locking unit under the driver's seat has been removed and replugged in. Fuse is good. No moisture. Solder joints look good.
I have not taken this to a dealer to get reprogrammed.
Any ideas on what this could be? Is my central locking system computer bad?
Thanks in advance!
-
How much interest would there be in a simple iPod connector for 996s with the CDR220 Becker radio? I am considering putting together some adapters that would allow people to use the line out and charge on iPods including iPhones and iPod Touch 2nd Gens.
Would people pay $60 for this?
-
My rear window seal has begun to come loose, so I am looking at replacing the top. Has anybody purchased the following convertible top?
Any opinions?
Thanks!
-
Sorry Loren, just wanted this at the top and to clarify the question. Plus, this project needs to be complete today, so it's going without text display for now. And Becker is non responsive.
Thanks
-
Oh, I did actually forget to say that this is pre MOST and for the Becker CDR-220. Text display from a CD changer to a CDR-220?
-
-
Thanks for the responses guys. This isn't the info I need yet however. I need to know if text info can be sent from a CD changer or other Unilink device. Anybody with a CD changer know?
-
I'm working on an iPod integration project and I need to know if the CDR-220 is capable of text display. Can the CD changer display track and CD names if it's encoded on the CD?
TIA
-
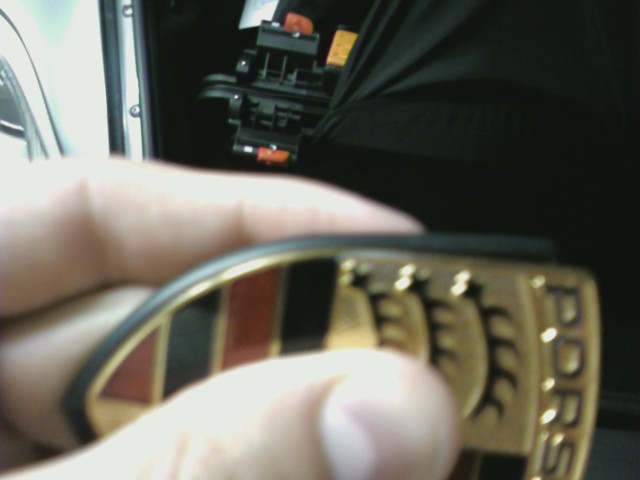
Ok I got it, and I think I found a better way to do it. I tried just holding it down with four hands, but I couldn't get it to work.
Here's the way I did it:
-Put the bottom point of the crest through the hole on the gasket so that the bottom of the rubber is under the emblem and the top of the rubber is on the top of the crest
-Match the lip around the bottom edge and hold it
-Put it on your hood with the edge matched around the bottom but the gasket still above the crest on the top of the crest
-Tighten the two nuts of the bottom, but do not tighten them all the way since you will need room for some of the gasket, and be careful not to scratch your hood since the metal of the top part of the crest is exposed to the hood
-Once tightened down enough, hold the bottom of the gasket down around the point of the crest and pull the rest of it over the top of the crest
-The gasket should now be completely around the lip of the crest
-Tighten the nuts down a little more, but don't over tighten
-return 0;
Be careful not to dent your hood!! I think they are made of aluminum, so they would be easy to damage compared to steel. (Someone correct me if I'm wrong.)
And someone tell me if this is impossible to understand and I'll fix it. I know that I know what tops and bottoms I'm talking about, but I know some of you may get lost.
-
I've moved this up here so you don't have to search through the posts. This is my proposed method for getting the gasket to fit on the hood crest:
-Put the bottom point of the crest through the hole on the gasket so that the bottom of the rubber is under the emblem and the top of the rubber is on the top of the crest
-Match the lip around the bottom edge and hold it
-Put it on your hood with the edge matched around the bottom but the gasket still above the crest on the top of the crest
-Tighten the two nuts of the bottom, but do not tighten them all the way since you will need room for some of the gasket, and be careful not to scratch your hood since the metal of the top part of the crest is exposed to the hood
-Once tightened down enough, hold the bottom of the gasket down around the point of the crest and pull the rest of it over the top of the crest
-The gasket should now be completely around the lip of the crest
-Tighten the nuts down a little more, but don't over tighten
-return 0;
Be careful not to dent your hood!! I think they are made of aluminum, so they would be easy to damage compared to steel. (Someone correct me if I'm wrong.)
And someone tell me if this is impossible to understand and I'll fix it. I know that I know what tops and bottoms I'm talking about, but I know some of you may get lost
Here is my original message asking for help:
I just received a replacement hood gasket from pelican parts,. I ordered a new one since mine looked shrunken. Well I got this and this one, while a little bigger than the old one, still doesn't fit around my hood crest. Do I have to do anything special? Is it not even supposed to fit into the little ledge?
Here's some cell phone pics:
-
Cruise control indicator.
Saweet, thanks
-
I cannot for the life of me figure out what that light on my speedometer is. It looks like a little arrow pointing to a tachometer with the needle in the middle and lights up green at certain times. I've searched and searched, but can't find an answer. Anyone know? Loren?
Thanks in advance.
-
I think that may drive the DME crazy - and will certainly cause a CEL.
Really? Even if there is still some exhaust flowing through the normal exhaust path? I would think that the O2 sensors would stay within normal range. Am I missing something? Are there other sensors that would cause problems?
-
Hmm, missing the diagram.
Loren or anyone else, do you think there would be a problem dumping the exhaust before the cat right before the first O2 sensor? I know this would be for off road use only since it would just be dumping excess fuel.
-
Hmm, what chambers are you talking about?
So nobody on this forum has done this?
-
Has anybody put some electric exhaust cut outs on their car? I'm surprised I haven't seen this yet with the PSE cutouts that are already on a lot of cars, the exhaust switch that is already available, and the gains people have seen when bypassing the mufflers and/or cats.
Is putting exhaust cutouts on a car considered tacky? Is this too "American Muscle" for a Porsche?
If I do this (which I probably never will :rolleyes:), I was thinking right at that curve in the exhaust right before the catalytic converters would be a good spot. I don't like that you would have to cut a hole and weld, but I can't think of another way to do it.
What do you guys think?
BTW, I'm not talking about the cutout on the Porsche Sport Exhaust. For those who don't know what I'm talking about here's a picture and a link.
-
Here's one writeup I found:
http://www.gti-vr6.net/library/engine/fixi...oiled_pack.html
-
This was a common occurrence on some Volkwagen engines of '99 on, particularly of the 12v VR6 engine that went into Jettas and GTIs. It was a common solution to use JB Weld to seal it back up, and this apparently worked very well for many people.
You can find info on this at www.vwvortex.com in the VR6 12v section if you search for coil pack.
I can't say that I know of anybody doing this on our coilpacks, but I am new here. And if it were me, I would definitely try this before buying a new coilpack.
If you haven't used JBWeld before, don't be intimidated. It's fun and easy.
-
-
Titled PORSCHE 986 BOXSTER 996 FRONT BUMPER SPOILER TRIMS NEW
http://cgi.ebay.com/ebaymotors/PORSCHE-986...tem320235032566


Interest In A Third-Party Keyless Entry System?
in 996 Series (Carrera, Carrera 4, Carrera 4S, Targa)
Posted
After my key stopped being able to unlock my doors and being frustrated with the high cost of diagnosing the problem let alone fixing it, I started considering designing and building a replacement system that would implement more features. If I go through the process of designing this, I'd like to know if people would be interested in purchasing such a system for themselves.
Some of the features that could be added:
-Longer range
-Decide what both buttons do on your remote (key button locks car, trunk button unlocks car, holding trunk button pops trunk)
-Open or crack the windows with your key
-Put the top up or down with your key
-Get feedback from your car to your key (alarm going off, cabin temp super hot so suggest to crack the windows, car battery low voltage)
-Connect to the system on your computer using a USB adapter
What do you guys think? Any other feature requests or ideas?
How much would you guys pay for something like this? $250 for the starter system (in-car module and one key) plus $50 for each additional key?
In your keys, the circuit board would be replaced with other electronics (although the transponder would stay):
http://i.imgur.com/uxlg5.jpg
On your car, the alarm module would stay, but electronics would be fit in between the wiring and the alarm module.
http://i.imgur.com/cbb6w.jpg